Winter is approaching, the days are getting shorter, it's getting dark earlier, and if your dog is half as crazy as mine, you've probably lost track of him more than once when he's slipped out from under your nose on a walk.
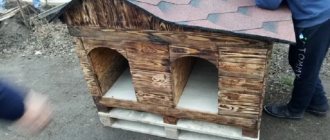
Armed with a coin cell battery, a couple of LEDs, a clear flexible tube, a strip of leather, a button, some thread and a buckle, I'll show you how to make a glowing leather dog collar that will prevent your pet from sneaking out of your sight just as easily as before on a walk.
We will need:
- knife
- beeswax
- awl
- skin needles
- round punches
- mallet
- button installation kit
- cardboard for pattern
- durable, thin and flexible leather, preferably goatskin
- glue
- button
- waxed thread
- 5mm clear plastic tube
- two LEDs
- battery CR2032
►►Tools for leatherworking◄◄
We take measurements.
Measure your pet's neck and make a pattern out of cardboard. My neck is 33cm, which means the collar should be the same length along with the buckle. On the back of the buckle you need to make several additional holes so that you can adjust the size of the collar in case the dog grows or gets fat.
I started with the holes for the buckle - I punched an oval one in the middle of the belt and two round ones on the edges of it. On the pattern I marked several holes for the buckle tongue - 33cm, 35cm and 31cm.
I took the buckle 20mm wide, which means the tongue of the collar should be the same width so that it can fit freely into the buckle. On the pattern I marked the place for the battery and handset. I stepped back 3 mm from them to give a gap for their thickness for the seam.
Mark and cut out.
Lightly wet the leather and transfer the collar pattern onto it using an awl. You can also apply markings on the inner side of a piece of leather; here you can use a pen, since the ink will not be visible on the finished product.
Make sure the pattern is transferred evenly and cut out. This is not a race, take your time. Do not try to cut through the leather in one pass, it is better to do several, especially for thick leather.
Luminous dog collar
So, this accessory is not a toy, as some people think.
This device helps pet owners and sometimes those around them. If you want to buy one for your pet, you need to figure out what models are sold in pet stores. According to technical indicators, the following stand out :
We will talk about them in more detail below. In addition, they are distinguished by colors - they can be orange, yellow, pink, blue, etc. They usually do not differ in size, since the length is easily adjustable - if necessary, you just need to cut off the excess. Thus, we see that the collar can be chosen to suit every taste. But what about the technical side? Let us highlight the “pros” and “cons” of different models of this accessory.
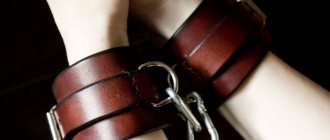
We fasten the buckle.
Now we will put our buckle and button in place. The button is needed to fix the battery and also to replace it. For the buckle we simply cut an oval hole. This can be done in several ways - punch two round ones and cut out the excess, or use an oval punch.
For the button, we punch two holes of suitable diameter and secure it with a set for installing buttons.
How to make a glowing leather collar
Winter is approaching, the days are getting shorter, it's getting dark earlier, and if your dog is half as crazy as mine, you've probably lost track of him more than once when he's slipped out from under your nose on a walk.
Armed with a coin cell battery, a couple of LEDs, a clear flexible tube, a strip of leather, a button, some thread and a buckle, I'll show you how to make a glowing leather dog collar that will prevent your pet from sneaking out of your sight just as easily as before on a walk.
Measure your pet's neck and make a pattern out of cardboard. My neck is 33cm, which means the collar should be the same length along with the buckle. On the back of the buckle you need to make several additional holes so that you can adjust the size of the collar in case the dog grows or gets fat.
I started with the holes for the buckle - I punched an oval one in the middle of the belt and two round ones on the edges of it. On the pattern I marked several holes for the buckle tongue - 33cm, 35cm and 31cm.
I took the buckle 20mm wide, which means the tongue of the collar should be the same width so that it can fit freely into the buckle. On the pattern I marked the place for the battery and handset. I stepped back 3 mm from them to give a gap for their thickness for the seam.
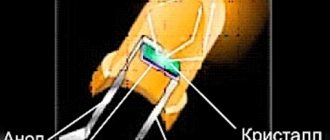
We assemble the electronic part.
I don’t have a soldering iron and the last time I worked on radio electronics was more than 10 years ago, so forgive me for such a barbaric assembly method. But what we will do is not difficult and anyone can do it.
I found two pink LEDs, just right for a bitch. All I have to do is buy a battery - a CR2032 - of the right size to hide it in the collar. I did not include a resistor in the circuit, which only makes it easier for beginners.
I simply stuck LEDs on both sides of the tube and tied wires to their legs - not the best solution, but the entire structure can be removed from the collar and replaced. Perhaps in the future I will make a zippered pocket for a 9 volt battery.
At first I wanted to use one LED, but then I decided to connect two in parallel, so they would shine with approximately the same brightness.
Reflective Dog Collar
The simplest type is reflective. They are made of special reflective fabric, which allows you to see your pet in the dark only when light hits the collar. “Advantages” of this type :
“Minus” is only one, but quite significant: you can detect a dog in the dark only with the help of illumination, a flashlight; this cannot be done in complete darkness. Thus, if you plan not to let your dog off the leash, then you can purchase this copy . Some similar models have built-in LEDs that eliminate this only drawback.
We glue.
Gluing is not necessary, but I find it easier to stitch if the two pieces don't move.
I applied leather glue around the perimeter of the collar, except where the battery will be placed and removed, on the buckle side. First I pressed one side of the collar, then I placed the tube with LEDs inside and pressed the other side.
LED Dog Collar
LED collars are a little more complicated than reflective collars, but they are also quite simple. These are LED bulbs that “let” light into special light-conducting conductors.
Such conductors can be in the form of a tube, or they can be flat and located in a nylon sheath (which may additionally have reflective elements). They come with replaceable batteries, no batteries (you can throw them away after about 100 hours), and USB chargers. Now let's look at each type in order.
“Pros” of LED collars in the form of a glowing tube:
"Minuses":
Now about the “advantages” of LED collars in a nylon case:
The main “disadvantage” of such accessories is that
the light is less bright than that of a simple tube .
But this can also be a “plus” if the dog is irritated by bright light. Now about the technical side. The most practical are, of course, luminous collars with USB charging, since you won’t need to buy batteries for them. In addition, even if you lose the charging cable, it will be easy to buy a new one; most models have a standard connector - miniUSB.
On the other hand, after 1 hour of charging it works for 3-4 hours in constant glow mode, and this can sometimes not be enough. In situations where there is no electricity at hand (at cottages, nature, while traveling), it is better to use models with replaceable batteries .
Thus, the choice of one option or another depends on your goals, since the range of these devices is extensive.
Sew it together.
To sew, I take a thread about 3 collar lengths long and sew it with a saddle stitch.
Be sure to leave room to insert the battery inside the collar. To make sewing more convenient, I remove the battery and handset.
Once sewn, that’s it, the collar is ready, you can put the tube back and connect the battery.
I decided not to coat the collar with protective compounds or paint it. Over time, it will acquire a natural “tanned” color in the sun.
You can go for a walk!
Author of the master class emdiesse
Translation: LeatherThoughts
How to make a glow-in-the-dark dog collar or harness
There comes a time when it starts to get dark outside at 4 o’clock in the afternoon, so a luminous collar will be very useful for dog owners for morning and evening walks with their pets. Especially if your dog is a real fidget, which is very difficult to keep track of even during the day.
1. For the collar, measure your pet’s neck. For the harness - the neck, the girth of the body behind the front legs, as well as the girth of the paws on top, to the latter we add at least 4-5 cm so that the dog can then run comfortably and at the same time nothing will rub anywhere. From thin cardboard we make a template for a two-layer collar or harness according to the obtained dimensions, together with the design (decorative holes on the top through which the luminous insert in the collar/harness will be visible). The template should consist of two connected parts, each of which is a mirror image of the other: 1 part is the top of the collar with holes, the second is the bottom of the collar without holes (bottom and top are 2 layers of one collar), and between them there will be a tube or garland.
Example : if the girth of the dog’s neck is 33 cm, the collar must be made at least this length plus a clasp (so as not to squeeze the dog’s throat), but we will also make plus a small tongue with additional holes so that the length of the collar can be adjusted, like with conventional commercial products , so add at least another 4 centimeters to the length. Total here: 37 cm - the length of the collar or 74 cm - the length of the leather blank for the collar, consisting, as written above, of two layers of goat skin.
We take the main width of the collar to be about 2 cm (for a given diameter of the tube and the diameter of the flat battery) plus 0.6 cm for the seams on the right and left - on the sides along almost the entire length of the collar. The total width here is 3.2 cm. The width of the tongue with holes and the tongue for inserting the fastener, respectively, is left exactly 2 cm.
You can see an approximate diagram of the blank for the collar and the collar itself in the figure below.
Peculiarities
Many dog owners are faced with the problem of walking in the dark, especially in the autumn-winter period, when daylight hours are significantly reduced. The situation becomes especially complicated when the dog is young or very frisky, which is why it may not obey and quickly move away from the owner. Thus, you lose sight of your pet, and the walk turns into a nervous ordeal.
At the same time, walking a dog only on a leash is also not very useful for its well-being, since the animal simply needs physical activity, especially if it is kept in an apartment. Therefore, many dog breeders purchase a luminous collar, which allows them to visually control the movements and movement of the animal. This will also help you find him if he gets lost in the dark thickets of a park or square.
In addition to monitoring the dog’s movements in the dark, the luminous collar is designed to protect the animal’s safety. Thanks to this device, drivers moving in yards or along the road can notice the dog in time if it suddenly runs out onto the road. Good models have a vision range of about 250 meters .
Also, a luminous collar makes the dog visible to other people who have the opportunity to see the animal from afar and be prepared for its presence. This point should be taken into account, because even a harmless and non-aggressive dog can scare a stranger.
Tips for use
There are certain rules for how exactly ringovka should be used. The first thing the training begins with is putting the accessory on the neck. For this:
- the dog sits on the left near the owner’s leg;
- a loop is formed on the lace into which the animal’s head is threaded;
- the noose rises under the pharynx, its upper edge should be under the occipital protuberance.
When the ring is in the correct position, it does not tighten the neck, the dog breathes freely, turns its head easily, and the owner has full control over the pet’s actions. If the choke is above or below a given level, the dog will show signs of hypoxia and try to crouch to the ground or rise on its paws. All this will affect the quality of the gait when moving.
The correct “ring” position of the cord is vertically upward, forming a perpendicular to the skull. The handler holds his end in an outstretched but not tense hand. The dog should gradually get used to the position of the leash and not show signs of fear.
When preparing a dog for an exhibition, it is imperative to rehearse showing the animal in a static position and in motion. If the dog and the handler have extensive experience in participating in the show, you can demonstrate the stance and movement with a free position of the ring.
The loop remains without tension, and the leash rises slightly when walking. When stopping, it is placed on the dog’s back and between the shoulder blades, but is not released from the handler’s hands.