The purpose of the easel in painting
Using an easel allows the artist to properly organize his work space. The easel allows you to position the canvas at eye level. Therefore, the artist completely covers the image with his gaze, taking into account the lighting, which allows him to more accurately convey colors, shadows, depth, perspective of the image, and composition.
Types of easels by purpose and design
Today, the choice of easels is unusually wide; the variety of models can be appreciated in the pictures below. Models may differ in appearance, size, material, installation method, be stationary or mobile, folding or collapsible.
The choice of easel model is influenced by the type of creativity (portraits, landscapes, etc.), the place of work (studio, home workshop, nature), the size of the future painting, the required tilt in the work, the age of the artist (special requirements for children's easels).
"Lyra"
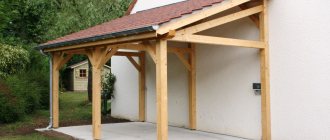
A simple "A" shaped design (three-post design), invented by Renaissance artists. This is a universal floor-mounted folding easel, most popular in painting. It can be stationary and mobile, used at home and in the studio.
A suitable easel for teaching painting as well as for art exhibitions thanks to its elegant design. However, such an easel is not suitable for watercolors and other water-based techniques, since it cannot be rotated horizontally to allow the work to dry.
Tabletop (for watercolor)
Small easels, which are placed on a table for work, are called watercolor easels, although they write/draw from them not only and not so much with watercolors. An easel for watercolors is a great gift for a child who is passionate about drawing. It is not difficult for an average home craftsman to make it (an easel; children, as you know, are made in a different way), and with a little modification or if the child’s child, as they say, burns out, it can serve in another useful capacity.
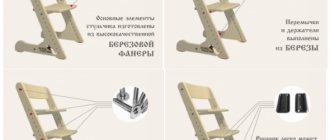
Easels for watercolors and drawings of a children's transforming easel
Easels for watercolors can be flatbed (top left in the figure) or framed (bottom in the same place). A frame tabletop easel is structurally more complex, but taking it as a basis, you can come up with a transformable children's easel, the drawings of which are given in the rest of Fig. Once the need for the original quality has passed (for example, if the child has already started writing from a tripod), the transforming easel is converted into a children's work table (inset at the bottom right of the figure).
Tripod
A tripod is a stand with three points of support, the main advantage of which is its compactness, small size, and lightness. Least stable and not as reliable as other easels. However, it is suitable for beginners, artists working on the street and for clients at home.
Note!
DIY ottoman: TOP-190 photos of the best diagrams and drawings. Do-it-yourself master class with a full description of the stages of work
How to Write a Screenplay: Tips and Best Practices for Writing a Screenplay. Step-by-step master classes for beginners with detailed descriptions of the stages
- DIY medical mask: TOP-140 photos of the best DIY options. Instructions for making a mask at home
Studio easel in the shape of the letter “H”
Professional art stands with expanded functionality compared to the “lyre”. This easel has clamps for the canvas, height and tilt adjustment for better lighting.
Suitable for large jobs due to its rigid design and massiveness. Can be used for works in watercolor and gouache techniques, if the design allows for rotation parallel to the floor to dry the canvas.
Sketchbook
The sketchbook is intended for plein air work - outdoor work. This is a portable easel that can be carried on your shoulder or back, like a backpack. The design of the easel is a box for storing and transporting paper, paint, and brushes.
Folding legs make it easy to transport the easel and quickly assemble it outdoors.
Another transformer
In everyday life, you often come across a device that also has great transformation potential - a photo/video tripod. In relation to the topic of this article, this means that on its basis you can make an easel that combines the useful qualities of a tripod and a lyre. Moreover, the tripod itself will not lose its suitability for its intended use. Which is very valuable, because... Creative photography and painting are related art forms.
Note: a video tripod differs from a modern photographic tripod only in the distance between the axes of the tripod screw and the spring-loaded pin that keeps the camera from rotating. But before, they managed just fine without this pin, so you can put a camera on a video tripod, and vice versa.
Modern tripods for use as easels require virtually no modification: their integrated swivel and tilt tripod head is an excellent upper grip for a painting. It is enough to attach the canvas support from a piece of metal corner (item 1 in the figure) to the legs with screw clamps of the tripod, and a light, convenient, reliable mobile easel is ready.
How to make an easel from a photo/video tripod
With a stationary easel made from a tripod, the matter is even simpler: the lower support, also known as a shelf, is cut out of plywood, as shown in pos. 2. Its bottom stops will be the knee connectors that make up the tripod legs, and the stability of the shelf will be given by the canvas itself, pressed from above by the tilted tripod head. How to turn a photo tripod into a traveling easel, lighter and easier to carry than a sketchbook, see also the video:
Video: DIY portable easel
The functionality of a tripod easel can be expanded to something unattainable on traditional easels using the method shown in pos. 3. The standard tripod screw with a 1/4” thread (machine, not pipe!) is unscrewed if you pull it towards you; it is a regular captive one, and then you can wrap it back up. Since the bolt head on the painting tablet is useless, a support platform is attached to the tripod platform, in which the bolt head is recessed, and the tablet is attached to it, pos. 4. Now it (the tablet) can be raised and lowered, tilted and rotated as desired. If you want to paint the sky from nature, lying on your back, please, from an easel-tripod, this is possible. And if you push the legs in completely, we get an excellent tabletop easel from a tripod, pos. 5.
An easel made from a photo/video tripod will also support a technical painting (stretcher with primed canvas) measuring up to approx. 1x1.5 m, but to install it you will have to make a device, the structure of which is shown in Fig:
Device for mounting on an easel from a tripod stretcher with canvas for painting
The support platform is made of 6-10 mm 2-tier plywood, as shown in the section at pos. 1. Its dimensions are approx. 20x25 cm; extension of the mounting edge approx. 2-2.5 cm. According to the platform, a 3-tiered clip is made, tightly placed on the platform from above. The clip is attached to the back side of the canvas, as shown in pos. 3, put it on the platform - and you can paint the sky from life.
A good tripod is still not cheap, although it costs much less than an easel. On occasion, you can buy an old Soviet tripod quite inexpensively, but when converting it into an easel, certain difficulties will arise, because... some critical parts of the “sovtripods” were molded from fragile thin silumin. First of all, you need to unscrew the head tilt handle, drill out the counter thread in its socket, file the former threaded part along the length as far as possible (shown by the red arrow in item 1 of the next figure) and fix the tilt of the head with a wing nut screwed onto the now protruding shank tilt handle (green arrow). Without this, many Soviet tripods would not hold the Zenit-E with the Helios-40 portrait camera: either the camera would nod off, or the threads on the silumin would lick off, or it would burst. An unmodified old tripod is unlikely to hold a 40x60 cm plywood tablet in the desired position, and the canvas will definitely turn down all the way.
Features of converting an old Soviet photo tripod into an easel
Further, the tripod platform of old tripods is not removable. Therefore, we remove the standard adapter screw from 3/8" (old tripod thread) to 1/4" (green arrow on item 2. The 3/8" screw is also captive and seems to be held only by a PCB cover (item 3) or thin steel with a radial cut, but it is impossible to remove the screw: its head rests on a non-separable silumin support, which, by the way, also often burst and had to be repaired in all sorts of different ways, as can be seen in item 4. But the screw is 3/8 "still could not be removed, unless the support needed to be broken completely. No, it is not necessary. You need to use side cutters No. 4 (or No. 2 - No. 3, who have hook hands) to carefully bite the shaped getinax head of the 3/8" screw (red arrow on pos. 4), and then its brass core “with skipping” was pulled out. Into the design! Purely Soviet in the worst sense. Well, after that you can put the support platform under the tablet or canvas on a tripod as described above.
Note: it is still better to fit a modern photo/video tripod under the easel. It is much stronger and lighter than old ones, and its load-bearing capacity allows you to put not only a tablet or canvas, but also the entire sketchbook on a tripod; incl. homemade inexpensive convenient, see for example. video:
Video: DIY sketchbook
what else to read:
Chair covers: choosing a sewing pattern and fabric, cutting, examples of patterns Chair cover: how to make your own patterns, cut and sew different types Box: materials, making simple and more serious ones yourself, decor, secrets Display all materials with the tag:
- design and decor
- needlework
Go to section:
- General repair questions
Discussion:
Easel-mast
Mast easel is a lightweight easel designed for exhibitions.
Note!
- How to make a piggy bank with your own hands - the best ways to make a piggy bank with your own hands. Detailed master class for beginners with photos and videos
- Cold porcelain: features and methods of making it at home. Reviews of the best recipes + 120 photos
- Cake decorating: TOP-170 photos of the best ideas for decorating a cake at home + instructions for beginners with simple patterns
Advantages of a homemade easel
Savings and the ability to manufacture an easel according to individual requests are the main advantages of making it yourself.
With all the wealth of choice, an artist, especially a beginner, often has the question of what to spend the money set aside for a hobby: on high-quality paints, brushes, paper, canvas, or buy an easel?
You shouldn’t skimp on paints and brushes, as their choice will affect the quality of the work, but making an easel with your own hands at home is quite a feasible task.
Easel for drawing
It would be nice for every art lover to make an easel for painting with their own hands. This is a fun and rewarding activity. This can save you a certain amount of money. Borrow a step-by-step guide to this process from the same drawing enthusiasts who made the easel. Or you can download it from the Internet.
The websites present ideas for an easel made from slats. This entire structure will cost only a few hundred rubles, while easels in stores cost about five thousand rubles.
Reiki material is light and comfortable and even women can handle it. Taking three long and two shorter slats, connect them with self-tapping screws. The folding support point is fixed with the simplest door hinge.
For strength, it is better to glue permanent parts of a rigid structure with PVA glue, and then fasten them with self-tapping screws.
Note!
- DIY photo album - step-by-step instructions for creating a photo album
- DIY lampshade - a detailed description of how to make different types of lampshades
- The most interesting DIY home crafts: a selection of the best interior crafts
Materials and tools for a homemade easel
At home, you can use any available materials:
- wood slab (countertop, cabinet door are also suitable),
- frame,
- plywood sheet,
- board,
- wooden blocks,
- metallic profile,
- polypropylene pipe.
Note!
- How to make a house out of cardboard: 140 best photos of children's crafts with your own hands + step-by-step manufacturing instructions with simple diagrams
- DIY rose lamp - step-by-step instructions for creating a lamp with your own hands + original design ideas with photo reviews
- Furniture decoupage: TOP-140 photos of non-standard decoupage options. Step-by-step instructions for decorating furniture with your own hands
But the most practical and affordable material is a wooden beam, mainly made of pine. Beech is an ideal material for an easel; it is used in elite, durable models.
When working with wood, it is worth preparing such consumables for fastening parts as:
- screws,
- finishing nails,
- bolts and nuts,
- piano hinges (awnings),
- furniture folding brackets,
- locks,
- latches,
- hooks
You will also need PVA glue “Stolyar” (you can also use universal thick PVA), acrylic varnish or any other to protect the surface of the wood.
The main set of tools includes:
- saw,
- jigsaw,
- wood hacksaw,
- screwdriver or screwdriver,
- drill with a set of drill bits of different sizes,
- hammer,
- sanding machine or hand sanding tools (sandpaper).
The master classes presented below offer steps for making easels that are most suitable for beginning artists and do not require much effort.
Making a mini easel
You can also make a mini easel with your own hands, which is ideal for beginning artists, those who like to paint small paintings, and owners of small spaces.
It will take a minimum of time to make, and the finished design will be a decoration for any workshop.
What you need to prepare
To create a homemade mini easel you need the following tools and materials:
- glazing bead with a section of 6 by 8 mm;
- hacksaw;
- awl;
- drill;
- furniture thumbscrew;
- wood glue;
- small carnations;
- sandpaper;
- hammer;
- stapler;
- a simple pencil;
- ruler.
Easel Lyre
Modern versions of this classic folding easel can be tabletop or floor-mounted. The front part of the easel is made of three vertical bars and two transverse ones, connected to each other in the shape of the letter A.
Step-by-step manufacturing instructions:
Prepare a central rail approximately 1500 mm long, two side rails approximately 1700 mm long and a rear support rail approximately 1600 mm long. Prepare two transverse slats 400 mm and 55 mm long, fix them on the central river perpendicular to it: a 55 mm long river at the bottom, a 40 mm long rail at a distance of 55 mm from the top edge.
Attach the side slats to the structure so that the central strip protrudes upward above the side slats, as in the figure. Install a shelf to support the painting perpendicularly. Connect the support leg to the central rail using a piano loop.
During operation, the leg is fixed using a cord, chain, etc. The easel is quickly installed, suitable for sketches, educational work in studios, where at the end of the work the easels are put away in a cabinet.
Floor easel
Such models are good both for the creative process itself and for demonstrating the next masterpiece of an artist or art lover.
The most common model is the Lyra design. It has an A-shape and is based on three posts. It is quickly produced, 2-3 hours are enough to complete work on it.
Parents themselves make easels for their children who are interested in painting: one- and two-sided, taking into account the number of children in the family. Children get tired of drawing while standing for a long time.
When making an easel, you need to take into account the possibility of a child working both standing and sitting. Then he will be happy to spend hours doing what he loves.
Enthusiastic lovers of painting and nature drawing. They have a lot of patience. Therefore, making sketchbooks, stretchers, and easels for them will not be difficult. Having a convenient easel, you will always paint your paintings with pleasure and comfort.
Firecracker
For a clapper easel, you will need to make two identical stands in the form of a frame with a height of 1200-1700 mm, which can be easily stacked with each other. The size of the easel depends on the age of the customer and the conditions of use (for painting while standing or sitting on a chair).
The frames are made from dried rectangular timber (50 by 20 mm).
Step-by-step manufacturing instructions:
Cut a sheet measuring 600 by 700 mm from a sheet of plywood 6-8 mm thick. Prepare 4 bars 1200-1700 mm long, 6 bars 500 mm long, 1 bar 600 mm long.
Assemble frames from two long and three short bars using self-tapping screws. Use one short bar to connect the long bars in the upper part, the second at a height of 650 mm from the top, the third to strengthen the structure at the bottom, screwing it at a distance of 100 mm from the bottom. Repeat the same steps with the second frame. Screw a 600 mm long block vertically inside the top of the frame to strengthen the structure.
Attach a sheet of plywood to the second frame. If desired, cut out and attach a shelf from the remains of plywood 150 mm wide. Connect the finished frames at the top using piano canopies.
7.Make fasteners about 50 cm long from slats with a cross-section of 20 by 12 mm, secure them to the legs using bolts, wings, washers and nuts. Such fasteners will allow you to quickly assemble and disassemble the easel for movement and storage.
Drilling holes
To make the easel easy to carry, it will have a rope handle. Lengths of string will also hold up your DIY easel while your child draws on it.
The first step is to drill holes in the panels through which the rope will pass.
Place two large boards together. Remember that the width of the finished easel will be slightly greater than its height. Therefore, the handle will be on one of the long sides. The holes for the ropes holding the easel will be on the short side of the workpiece.
On the short side of the board, mark the location for the hole. It should be approximately in the center, step back about 3 cm from the edge.
There should be one central hole on each short side of the boards.
Mark the center on the wide side of the board. At a distance of 3-4 cm from it and 3 cm from the edge of the board, drill two holes for the handle. Repeat for the second board.
Each hole must be drilled with a special nozzle so that their diameter matches and is slightly larger than the diameter of the rope. Sand the holes with sandpaper.
Tripod
The simplest tripod easel can be made at home in a very short time. It can be any size and can be used for displays and for painting. To make a medium-sized tripod, you will need a square beam with a cross-section of 40 mm and a bolt 140 mm long, with a diameter of 10-12 mm.
Step-by-step manufacturing instructions.
Prepare three identical bars 1400 mm long for the legs and one block 1000 mm long for the support. Drill holes for the bolt in the upper part of the bars, connect the parts together using a bolt and a wing nut, as in the figure. The bolt holes on the two front legs are made slightly larger than the diameter of the bolt.
The middle leg is the rear support of the easel; the hole for the bolt is drilled exactly in diameter so that the leg moves back freely, but the stability of the structure is maintained. Attach a 1000 mm long block to the front legs. The front view of the structure resembles the letter A.
Additionally, you can connect the front legs to the back using a cord or chain.
Floor-standing
A stretcher with primed canvas weighs several kg; large - up to several tens of kg. But it should be easily and simply installed on the easel, as well as removed from it, but securely held on the easel while working. The canvas (paper, cardboard, board) must be sufficiently, evenly and directly illuminated, for which the source of working lighting is located low behind the artist, but the canvas should not be shaded by it when working both sitting and standing.
The main types of floor easels for easel painting were developed at the beginning of the Renaissance and described by Vasari in his Lives. Folding tripod easel (item 1 in the figure below) is mobile. It is the easiest to make, it does not take up much storage space and is useful if the size of the painting does not exceed approx. 100x80 cm, and each working session does not last long. The canvas on the tripod is not fixed in any way; it simply lies on the easel. If its supports (or support, see below) are placed high, a sufficiently large canvas becomes unstable. If you place the canvas low, then when working while standing, it is difficult to illuminate it evenly and your eyes get tired, and when working while sitting on a large canvas, your hanging hand will soon get tired; The painter cannot lose the fidelity of his eye and the firmness of his hand.
Main types of easels for easel painting
Note: there is a legend about one or the other master of the Renaissance. A certain rich connoisseur and philanthropist (usually called Lorenzo de' Medici the Magnificent) decided to invite him to work with him and sent one of his associates for this. He, knowing nothing about painting, but wanting to curry favor, demanded a trial work from the artist. A version of the legend is that the messenger wanted to receive his portrait by the great master for free. He shrugged his shoulders and drew a circle by hand as evenly and accurately as with a compass; The envoy had no choice but to present such a sample to the ruler. He, immediately realizing what had happened, burst out laughing, went to the master himself (optionally, sent a personal message with an invitation), and demoted the overly zealous servant.
The easel-lyre (item 2) is so named for its distant resemblance to an ancient Greek musical instrument; well, without developed associative thinking there is nothing to do in art and literature. The lyre easel can be considered the most universal of the floor ones: you can place a canvas up to 1.2x1.8 m in size on it, and at the same time it can be either stationary or mobile. Easel-machine, pos. 3, (from where - easel painting) is used to create paintings of large sizes up to extraordinary ones.
Note: M.V. Lomonosov had to build a unique machine for the “Battle of Poltava” mosaic, which withstood a load of 300 pounds (4.8 tons) during testing.
About the tilt of the canvas
The problem of lighting the canvas can be easily solved by tilting the canvas by 10-20 degrees. Tripod and lyre easels produce it naturally. On an easel-machine for the same purpose, when creating paintings of regular size, the stretcher is placed on supports, pos. 4 in Fig. higher; When working with very large canvases, the problem of canvas lighting usually does not arise, because the light source is already above the artist’s head.
Why another machine?
Painting with strong, broad strokes
Artists who work with strong, broad strokes, such as those in the picture on the right, do not really favor lyre easels. If you paint energetically executed paintings from them, then, being carried away by your work, you can press the brush so hard on the corner of the canvas that... no, the easel will not tip over and the canvas will not fall out of it. But it will give way under the brush, the stroke will “go away”, and the master will have to state that the work is ruined. An amateur will most likely not care what is smeared there, but painting has long moved away from the literal representation of nature. Therefore, if you intend to master technically expressive ways of working, you will need a durable and stable stationary easel or, for canvases of approx. up to 1.5x1.5 m, so-called. stop (emphasis on the second “o”), see below.
Tripod
For the reasons stated above, the tripod easel is not suitable for outdoor travel, although it is not heavy and compact when folded: in the open air, the canvas from it can simply be blown away by a gust of wind or inadvertently pushed over by a random onlooker. However, in addition to beginners/students, a tripod easel or several of them are almost always kept in stock by artists who work a lot at the customer’s home: it is not difficult to bring the tripod to the place and take it back, even on foot. There are (at least, there definitely were) portrait painters who managed to do up to 5-6 works in parallel in this way: they took easels to customers, set them up, and ran from one to another all day long. By the time he gets to the next one, his hand and eye have time to rest.
It is difficult to reproduce a ready-made tripod easel with your own hands: you need the so-called. treukh - a tee with three pairs of legs at angles of 120 degrees horizontally, in which the legs rotate on the axes. The folding limits are the bevels of the ends of the legs. Similar systems are used in photo and video tripods, which can also be used as an easel, see below. In the tripod, which is an easel, there are holes drilled in the front ones (see figure above) into which pins are inserted; the canvas rests on them. Drilling and preparing support pins also require a lot of work, but all this can be simplified to literally half an hour to an hour of simple carpentry work if you make a tripod easel according to your height, manner of work and preferred sizes of canvases. The easel will turn out to be stationary (not folding), but you don’t have to run around visiting customers all day long.
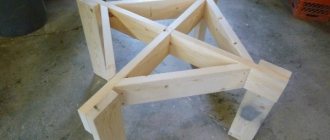
The design diagram of a homemade simplified tripod easel is shown in the figure:
Diagram of a homemade tripod easel
For this you will need 3 pieces of hardwood timber with a cross section of 40x40 mm and a length of 120-150 cm for working while sitting or 170-190 cm for working while standing and/or on canvases of maximum size. In this case, the length of the bars can be increased as much as the ceiling height in the room allows, and their cross-section can be taken larger, 50x50 or 60x60 mm. You will also need a piece of any lumber 0.7-1.5 m long for the stand (support) of the canvas. It is better to take it (the segment) thicker, with a cross-section, say, 60x60 mm (the canvas will easily slide off from a 40x40 mm support) or, better, from 50x75 to 75x150 mm; in this case, it is attached to the front legs with a narrow edge so that the canvas rests on the wide (side), as shown in pos. And the picture, but first the tripod needs to be assembled.
The secret of simplification is in the holes for the key holding the tripod together - a piece of threaded rod from M6 to M10. The hole for the key in the rear leg is drilled according to the diameter of the rod, and in the side legs it is 1.5 times wider. Then the front legs will diverge to the side at an angle of approx. 20 degrees (pos. B in the figure), and the tilt of the blade will be approx. 10 degrees, which is what you need. The back leg of the easel is foldable for easy storage. It is fixed with a cord: its middle is attached to the back leg, and on the sides, inside the front legs, self-tapping screws are not screwed in completely, onto which loops are thrown at the ends of the cord. Too lazy to sew loops - you can just tie them on. The final assembly and adjustment of a homemade tripod easel is done as follows:
- The canvas stand is placed after the tripod is assembled.
- The base of the easel is laid out so that the front legs move apart as much as possible, and the back legs set the angle of inclination of the canvas that is convenient for you.
- Measure how much cord is needed to secure the hind leg and cut it off (with a reserve for loops or a garter); sew loops if necessary.
- The tripod is folded, the cord is attached in the middle to the back leg; Screws are screwed into the front ones under the cord.
- Lay out the tripod again, secure the legs with a cord, check the stability and convenience of the accessory.
- Mark on the front legs the position of the board that is comfortable for you - the support of the canvas, and on the support - the position of the legs under its narrow edge.
- They drill holes in the legs and the board for self-tapping screws, attach the support - that’s it, you can work according to art.
Note: in the form of a tripod it makes a very good children's tabletop easel for drawing, see the video below:
Video: tabletop children's easel-tripod
Lyra
If after the first experiments with a tripod things have gone well for you, you will soon need a more serious easel - a lyre. The machine is a bit complicated to make on your own and too bulky for apartment conditions. If you have enough money to set up an art workshop or you expect to earn enough from painting for this, then a good easel machine will be affordable for you.
The lyre easel is known in a number of modifications. Some of them, the so-called. Stations (emphasis on the “and”) make it possible to work on canvases that literally still fit in an ordinary living room. Unless you intend to engage in monumental painting (which is of little relevance nowadays thanks to the availability of film printing and façade plotters), this will be more than enough for you.
Draw monumentally? How is that?
Samples of monumental painting
What is monumental painting (Master Mural)? Remember, who was older, how, for Soviet holidays or just like that, the walls of houses were hung with huge portraits of leaders, ideologically consistent paintings (both of which made the Soviet people sick), advertisements for films, and other things of the same size? This is what it is, and there is more left, but in a different key and smaller. And once upon a time in large regional cities (the capital and union significance, of course) there were monumental painting workshops with easels for canvases up to 10x15 m or more. Of course, teams of artists worked on them. Their colleagues working in smaller forms did not like the monumentalists, but secretly envied them and dreamed of being included in this privileged caste.
But let's get back to the topic. The structure and dimensions of the conventional (item 1) and reinforced (semi-mounted, item 2) are shown in the figure:
Design and dimensions of a regular and reinforced lyre easel
The canvas is placed on a height-adjustable support (shown by a blue arrow), which also serves as a shelf for small painting accessories, and is pressed from above with a shoe with a grip and clamp sliding along the central bar. The hind leg is suspended simply: on ordinary card loops, pos. 1a. In factory-made lyre easels, the position of the rear leg(s) is limited to pairs of earrings, but in a homemade one, you can place a door hook at a suitable height, pos. 1b.
The only thing that is difficult to do at home is the central bar and the shoe sliding along it. However, it is quite possible to do without both if you paint on canvases not of arbitrary size, but of a fixed height with a certain step, for example. 5 or 10 cm. Such a limitation is unlikely to burden an amateur painter; Drawings of an easel-lyre for amateur painting are given on the following. rice. Actually, it no longer resembles a lyre, because... there was no need for a central bar. So what, just less carpentry work is needed.
Drawings of a lyre easel for painting
Note: the device diagram and dimensions of a reinforced home easel for working on large canvases are shown in Fig. on right. For more information about the lyre easel, see also the video below:
Video: DIY tripod easel
Table easel
Having decided on the model and prepared the materials and tools, it is advisable to prepare a sketch or drawing of the product. To do this, you can use the proposed pictures of the drawings.
The size of the easel is selected in accordance with the format of drawing paper A4 or A3. To work, you need to prepare a dry beam, a sheet of plywood, a piano hinge and screws.
Step-by-step manufacturing instructions:
Cut a rectangle from a sheet of plywood to the size of a sheet of paper, optimally A3 format.
Make a rectangular base from bars with a cross-section of 40-50 mm with grooves for stops, with the help of which the slope of the plywood sheet changes. The size of the finished frame when folding the easel will approximately correspond to a sheet of plywood or be slightly smaller. The width of the grooves corresponds to the width of the bars from which the stop is made.
The stop is a frame made of bars with a cross-section slightly smaller than the width of the cuts on the base of the easel. It is better to make the upper part of the stop from a rounded block or metal pin to ensure the mobility of the structure.
On the back of the plywood, attach a piece of timber with an internal groove made in it for the upper part of the stop. Insert a block or pin into the groove and connect it with the remaining 3 bars.
Connect the sheet of plywood with the finished stop and the base with the cuts using a piano loop. This mount will allow you to change the angle of inclination and fold the easel for storage. If desired, screw a shelf for paints and brushes at the bottom of the plywood sheet.
Pieces of leather or felt can be glued to the bottom of the base to protect the table from scratches.
In a similar way, you can make a similar easel, in which instead of a sheet of plywood (if it is not available), a frame made of bars is used.
Paper pencil
You will need: toilet paper rolls, colored corrugated paper, scissors, glue, a ruler and a simple pencil.
Master Class
- Measure the length and circumference of the sleeve.
- Prepare strips of colored paper to fit the sleeve.
- Cover the bushings with colored paper.
- Cut a cloud from a sheet of paper so that all the sleeves fit on it.
- Glue the bushings onto the stand (cloud).
- Cut out the flowers and glue them onto the pencil holder.
The paper pencil is ready! I recommend watching this video!
DIY. Budget DIY office stationery organizer. Desktop organization.
Children's easel
An easel for children can be made in several variations, but they all have common requirements, taking into account safety and convenience for children. The easel is made of lightweight, durable timber, well polished.
The height of the easel is calculated based on the height of the child; it is not advisable that at its upper limit it should be no higher than the head. The design of the easel resembles a “cracker”. The difference is that instead of timber, thinner, lightweight slats 40 mm wide are used.
Step-by-step manufacturing instructions:
Cut 2 bars 1000-1200 mm long, round the corners, drill holes in the upper part for bolts with a diameter slightly smaller than the diameter of the bolts. Make cuts 40 mm wide to attach the cross bars in accordance with the drawing. On four bars at a distance of 440 mm from above, on two rear ones at a distance of 60 mm from above and 130 mm from below.
Cut 3 bars for the crossbars, 400 mm long, and install them in the place where the cuts were made. Secure both halves of the easel with bolts at the top.
Make a shelf for paints from a sheet of 4-6 mm plywood measuring 400 by 400 mm. Place and secure with self-tapping screws on the cross beams. Cut the front panel to size from the same sheet of plywood and secure it with self-tapping screws.
Children's drawing
When making a children's easel for drawing, you must not forget about the shelf for paints and brushes so that the child does not have to constantly be distracted looking for them. The tools and requirements for wood are the same. You can make an easel with your own hands (drawings with dimensions for children are shown in the figure) without having experience working with wood.
Children's easel for drawing: step-by-step production
Manufacturing steps:
- Take four 1 m bars. Cut down the corners. Sand with sandpaper.
- Put them together and drill a hole at a distance of 15 cm from the end of the beam on either side. Secure with a long bolt temporarily.
- Measure 44 cm on 4 bars from the beginning to the center. Make cuts on all four beams.
- Turn them over and measure the distance for the rear jumper on two pieces of wood. Make a cut on the other two bars in the center.
- Measure the distance on the supporting leg to the top mark of the upper jumper 6 cm, and from the bottom of the supporting leg to the lower jumper 13 cm. Make a gash.
- Assemble the rear and front supports together and secure with bolts of M6 diameter. Make the holes on the bars slightly smaller in diameter. If the user obtains other easel sizes, then when assembling it is necessary to adapt to the size of the back support.
- Now all that remains is to make a shelf for paints and brushes and attach a base - a sheet of plywood on which the canvas will rest. Take a sheet of 40x40 cm and place it on the beams with screws. Make a small border from the glazing bead so that the tassels do not roll onto the floor.
- Take another sheet of plywood and attach it to the front support with screws. Cut off all excess and sand with sandpaper.
Additional Tips for Making Children's Easels
The children's easel can be made double-sided to make it more interesting for children to be creative together. To do this, it is better to take the design of the firecracker as a basis and secure the sheets of plywood on both sides.
Instead of side clamps, like a firecracker, you can attach cross bars between two posts. In the center of the slats, drill a hole with the diameter of a round block on which a roll of drawing paper will be placed.
To fix the paper on the plywood, you can use additional cross slats, as in the pictures (pictured).
An additional shelf for drawing supplies can be placed at the bottom of the easel, between the two halves. Along the edge of the shelves it is necessary to lay a border made of glazing bead or thin timber so that felt-tip pens and brushes do not roll off.
To make the structure collapsible, the transverse strips are secured on one side, and on the other side a wing bolt or hook and loop is used.
Any easel can be modernized with your own efforts to suit your needs, you can make it collapsible, foldable or more stable, you can change the size, add devices for convenient placement of paints, paper, brushes.
Thanks to the instructions given above, you can make an easel that is suitable for each individual case: for work in the studio among beginning painters, for organizing creative leisure for children, for work on the road, for serious creative work that requires significant time.
Rules for choosing an easel design
A child should not receive a negative attitude towards this type of art from childhood because of an incorrectly chosen easel.
Therefore, it is recommended to pay attention to the following parameters:
- height;
- sustainability;
- reliable fixation;
- flat board.
When choosing an easel for a child, be sure to take into account the characteristics of the product (height, stability, etc.)
You should not buy a stand that is too small or, conversely, high. Otherwise, it will be inconvenient for the child to do his favorite thing with such a subject. The main thing is that the little artist can work both sitting and standing.
The canvas stand should be well fixed. It should be made from environmentally friendly material, such as birch wood. Plastic easels break too often and quickly become unusable.
If there are more than two children in the family, then it is better to make or purchase a double-sided easel. You can make surfaces that differ from each other in color and design. For example, make one board for drawing with chalk and a dark color, and the board on the other side for playing with magnets or drawing with felt-tip pens.
For adult beginner artists, a tripod is suitable. It's lightweight and easy to carry around in case you need to draw at a friend's house.
Professionals choose easels based on their needs and preferences for the tools they use while working. Also, the choice of a professional depends on financial capabilities, love for one of the types of creativity, be it still life, landscape or portrait.
There is another category of people who use easels. These are draftsmen. They buy special studio stands for canvases, with clamps, special compartments for tools, and an angle of inclination. These are large easels for A3 sheets, on which the design engineer draws the necessary drawing.