Manufacturing materials: advantages and disadvantages
Collar for a dog
The purposes of equipment are different: education, training, behavior correction. Often the item is used simply as a decorative element - we are talking about small “couch” breeds that accompany glamorous representatives of the fair sex.
Depending on the goals, owners choose different types of collars and materials for their manufacture. Most popular materials:
- Leather. The product uses natural and artificial materials. Leather collars are the most in demand. They are light, flexible and odorless. The ammunition turns out to be durable and wear-resistant; the animal’s neck does not experience heavy loads. The outer side of the product is coated with water-repellent substances, so the collar does not get wet or warp after walking in the rain.
- Velvet and velor. Collars made from such fabrics serve more to decorate the pet than to be used for practical purposes. Such things are usually decorated with rhinestones, braid, and beads. But these materials are also used to line the inside of leatherette products to soften the effect of the strap on the dog’s neck. Also, fleece and felt are used for the backing on the reverse side.
- Tarpaulin. A simple, inexpensive material that lasts a long time. But after numerous cleanings, the tarpaulin becomes shaggy and worn out - a strong dog can easily tear the collar with one tug.
- Nylon. It is widely used because it is not inferior to natural leather in strength and softness. In addition, nylon does not shrink after getting wet, does not fade, and does not lose colors. Nylon collars are more expensive than canvas collars, but the cost is worth it.
- Metal. It produces stylish and elegant pieces of dog equipment. The steel rings have an interesting weave; the item adorns the dog. With the help of a metal collar, dog owners have excellent control over their charges. But it is worth paying attention to the disadvantages of the attribute: the product is heavy (can be worn for a short time), the accessory heats up in the sun and gets very cold in frosty weather. If worn for a long time, animal hair may come out or become tangled.
Important! For everyday wear, veterinarians and experienced dog handlers advise purchasing leather collars.
Walking a pet with a collar
What points need to be taken into account when making a collar?
Collars are recommended for wearing by all breeds of dogs, except those with a neck thicker than their head. What conditions should you remember when making an accessory:
- The product should be durable, but not rigid, so as not to injure the dog.
- A homemade collar must fit tightly around the animal’s neck so that an attempt to throw off the object ends in failure.
- You should not put too much pressure on your pet’s neck, otherwise a sharp tug on the leash may suffocate him.
- Ropes should not shed.
- Decorative patches and other elements should not cause discomfort to the pet.
Important! Metal collar rings with traces of corrosion are replaced with new elements, and to prevent this phenomenon the chain is coated with an anti-corrosion compound.
How to make a collar for a dog with your own hands - step-by-step instructions, photos, videos
Pet stores sell a variety of equipment for four-legged pets.
But you can make a dog collar with your own hands. A homemade accessory will turn out to be original and will cost several times less than a purchased one. When making your own collar, you need to take into account three parameters: length, width and strength.
The length is measured using a measuring tape along the pet's neck or using an old collar. Additionally, a few centimeters are added for seams and fastenings.
The width depends on the thickness of the neck and accessories: rings, latches, rivets.
The standard size for large dogs is 2.5 cm. For a puppy and small breeds (Chihuahua, Toy Terrier) - half as much. The width of the fastenings should be the same.
The material is selected based on the owner’s taste and needs. The most durable and wear-resistant accessory is made of nylon, leather and textile sling. It is universal; any leash can be attached to it, including a show leash.
A noose collar is best made from a braided cord, and a collar across the body (harness) is made from textiles.
To make an original dog collar, use beautiful accessories: beads, beads, metal rivets, ribbons.
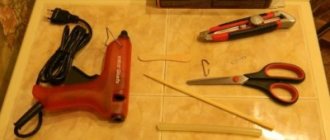
Required Tools
When the issue of manufacturing material has been decided, pet owners select tools. If you have a sewing machine at home, then the process is greatly simplified - in this case, you only need to choose the right needle and thread corresponding to its thickness.
But you can easily do it without a machine by sewing belts and connecting the parts manually. An awl often comes to the rescue here if it is difficult to pierce a canvas or leather tape with a needle. Without fasteners and double-slot buckles, a finished finished product will not work - accessories (plastic or metal) must be purchased in advance.
How to measure a dog for a collar
Simple collar made from belts
This type of collar will be simplified. The volume of the neck will not be adjusted in it (collars with adjustment are made a little more difficult and take longer). For it you will need:
- belt;
- latch;
- yarn;
- scissors.
The basis for the collar will be a woven fabric strap. Its width is two centimeters. Instead of clasps, it has two loops at the end, into which you just need to thread the belt, and it will hold. Such loops will later be useful for attaching a leash carabiner.
In addition, you will need a skein of yarn for sewing and decorating the collar. An ordinary plastic latch will be used as a lock , which can be bought at a sewing accessories store. It is important that the width matches the waistband.
To begin with, you need to cut out the iron loops and the second iron edge (if there is one) from the belt. If the belt is too thin, it can be folded in half and stitched. One of the parts is inserted into the lock, and at this stage you immediately need to decide on the length of the future collar. To do this, measure the girth of the dog's neck. The next step is to sew both ribbons together. In addition, you need to secure the lock with a seam so that it does not “walk” on the strap.
After both belts are sewn, the second part of the lock and the loop are attached to which the leash will cling. The loop should be located near the second part of the lock. Such collars can be made not only from a belt, but also from any other suitable braid, sling or nylon.
How to take measurements from a dog
Taking measurements is a responsible, but not difficult task. The animal should not lie down or sit - it is important that it stands calmly on all four legs.
Take a tailor's measuring tape and measure the neck circumference at the widest point. Do not tighten the tape too much - it should turn slightly to the right and left, the owner’s finger should fit under it.
Important! If the readings are on the border between sizes, then choose a larger parameter. They also make a note of the thickness of the hair - if the hair is too thick, the tape is slightly tightened.
The result obtained during measurement is multiplied by 1.7, and, based on this indicator, a sling, tape or belt is purchased.
How to make a dog collar with your own hands at home
The dog collar and leash are the oldest inventions of mankind. Without them, it is not possible to walk dogs, use them as guides, guards, or household helpers. When purchasing a pet, dog lovers first of all buy these accessories. Although any owner can make a dog collar with his own hands from scrap materials.
- Manufacturing materials: advantages and disadvantages
- What points need to be taken into account when making a collar?
- Required Tools
- How to take measurements from a dog
- Making a collar: instructions
- Nylon collar
- Leather collar
- Braided collar
Making a collar: instructions
The step-by-step algorithm for making collars from different materials is not fundamentally different, but there are some nuances.
Nylon collar
Nylon collars
Dog owners purchase ready-made nylon and textile tape, a buckle with two slots, a D-ring, and a plastic carabiner.
The material is easy to sew on a machine. How to make a nylon dog collar:
- First, the coverage of the client’s withers is correctly measured and the result is multiplied by 1.7.
- Cut a piece of the required length from both tapes.
- Sew the strips together using a machine using two lines, each of which should go as close as possible to the edge of the product.
- Next, attach the carabiner - thread one edge of the resulting strap (4 cm) through the carabiner, secure it with a stitch near the plastic jumper.
- Now insert the ring in the shape of the letter “D” and finally secure the piece of the strap.
- The free end of the tape is threaded through the second half of the carabiner.
At the last stage, the belt is pushed through the slots of the mobile buckle and secured with several lines. This element will regulate the volume of the collar.
Leather collar
Leather collar
The most convenient and practical version of dog equipment is constructed using a leather belt, special glue, and rivets. A pin buckle and a D-ring are also required.
Step-by-step master class on making a leather collar for a dog with your own hands:
- Measure the volume of the pet’s neck and add 24 cm to the resulting parameter.
- Cut out the belt tape by cutting off the required piece from it.
- Round the edges, treat the edges with glue so that the dog does not rub the skin.
- Next, mark the places where the rivets and the hole for the buckle rod will be located.
- Use an awl to make holes in the marked places (to make work easier, the tool is heated over a fire).
Finally, a buckle is installed - the end of the belt is threaded through it and secured with rivets.
Braided collar
Braided collars
This stylish and colorful item can be woven from cord. The most suitable material for a dog collar is paracord, which is what parachute lines are made from. In addition to paracord rope, purchase a D-shaped ring and a plastic carabiner. You will need a lighter and a twig to push the ropes into the fastener slot.
The accessory design technology is as follows:
- Owners measure the pet's neck, multiply by 3 - this is the length the cord should be purchased.
- Cut the rope into three equal pieces. The ends of all parts are scorched with a lighter so that they do not unravel.
- Unfasten the clasp (carabiner), attach the ribbons to it so that the outer fragments are longer than the middle one.
- Next the strap is woven. The most common weaving technique is macrame.
- When they reach the end, they weave in a D-ring.
- At the end of the work, secure the laces to the second part of the carabiner. The protruding ends of the ropes are soldered to the wrong side of the product with a lighter.
Additional Information. Self-made dog collars can glow in the dark if LED strips are placed on them or the equipment is coated with reflective paint. A pet with this attribute will never get lost. If this happens, dog owners hang tags on their collars with their contact information so that the person who finds the dog can contact the owner.
It is not difficult to make a dog collar yourself. It is necessary to select the material of manufacture and accessories. Working tools will require a sewing machine, a needle, an awl, thread and a lighter.
Lesson #2: Braided Collar
You will need:
- nylon cord;
- plastic carabiner;
- lighter;
- scissors;
- small key ring;
- centimeter;
- masking tape.
Fold the cord in half and thread it through the carabiner. Make a loop, pull the two loose ends of the cord through it and tighten. Take the collar you have and measure its circumference (or measure the length using a centimeter).
Measure the length of the cord equal to the circumference of the collar, and thread the two free ends through the second part of the carabiner, securing it with masking tape at the required distance (it is best to glue the carabiner to the table - this will make it easier for you to weave).
Begin weaving the collar following the instructions shown in the pictures.
Take the left lace and pass it under the two laces stretched between the two parts of the carabiner. Take the right lace, pull it under the left, over the two laces, and then through the loop created by the left lace. Tighten the knot. Then pass the right lace under the two taut laces. Then take the left lace, pull it under the right, over the two laces, and then through the loop created by the right lace. Tighten the knot again.
After you have woven the collar to the end, cut off the excess ends of the lace and burn them so that they do not unravel. Don't forget to thread the key ring to which you will later attach the leash, a tag with the dog's name and your phone number.
Step-by-step sewing of a harness
In order to sew a high-quality wool or textile collar, you must adhere to the following pattern:
- To make the accessory attractive, the nylon sling needs to be sheathed with colored material. This can be done using a sewing machine;
- The stitching must be done both diagonally and along all free edges;
- the free end of the object is threaded through the ring and secured with a strong double seam;
- the second end must be attached to the buckle and also securely stitched.
Useful video
Video about DIY dog collars:
Now on the shelves of pet stores there are a lot of different accessories for pets, including collars. They can be of completely different sizes, made of different materials, all kinds of shapes to suit every taste. But often you want the collar to be non-standard and moderately original. Why not, when there are all the possibilities for this. Making a dog collar with your own hands is not difficult, but it is advisable to know the basic principles of this process.
You can create a stylish collar for your pet from paracord or beads. It's quite easy, not particularly expensive and fast.
How to sew an accessory yourself
Let's turn to how to make a dog harness with your own hands. After all, anyone can sew a harness. Professionals can go further and pamper their pet with an unusual accessory that they knitted with their own hands.
- Taking measurements of your pet.
Regardless of the chosen method of making your own harness, you have to start by taking measurements. Only correctly taken measurements will help you sew an accessory that is ideal for your pet.
The chest circumference is taken behind the dog's front legs at the widest point. To the resulting value you need to add 2 centimeters for a loose fit.
The girth of the neck is determined in the place where the animal usually wears a collar.
The length of the pet's back is measured from the withers to the base of the tail.
- Choice of material for the product.
The next step is choosing the material. Strength, wear resistance, softness and ease of cleaning - these are the requirements for harness fabric.
Cotton and linen are considered the most suitable - they breathe well, nylon is easy to clean and does not get wet, felt retains heat.
Don’t forget about rings, clasps, carabiners and Velcro, which will help the owner to easily remove and put on the harness on the pet.
- Constructing a pattern and sewing a product.
Having completed all the preparatory work, we proceed to constructing a pattern for the product. Don't forget about 2cm seam allowances on all sides. The resulting pattern will form the basis for cutting the product onto the fabric.
For the convenience of wearing the harness, we cut out 2 pieces of soft lining (1 piece is acceptable) separately from the base.
Of course, you can sew parts together with a needle and thread, but a product stitched on a sewing machine will look more neat.
Fold the lining in half and sew it along the entire perimeter. We sew the lining to the harness.
Our creation is almost ready. All that remains is to stitch the rings in the back area for ease of fastening the leash. It is recommended to sew parts using a zigzag stitch. It is this that allows you to firmly sew rings and fasteners, which take on the main load.
The straps can also be equipped with fasteners or Velcro to adjust their length if the pet is prone to obesity or is still growing. It’s good when the harness fits exactly to the dog’s body
But you should pay attention to ensure that it does not cause discomfort to the dog, does not tighten his chest, or digs into his body.
It can also be bad and uncomfortable for the animal when the belts of the product sag. This can also injure your pet or provoke a situation where he breaks free and is in danger, or when the straps dangle under his paws.
To make sure that the sewn product meets the safety requirements for wearing, you can use the following verification method: you just need to stick your palm between the harness and the dog’s body. If it passes freely, the product was successful. Don't despair when something doesn't go as planned. After all, everything can start over. No wonder popular wisdom says: “The first pancake is lumpy.” If the creative passion has left the needleworker, then the workshop will help make his dream come true.
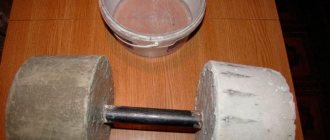
A separate recommendation for those who chose leather as the material. As you know, this material has excellent stretchability. Then, if an error was made in the calculations and the product is too tight for your pet, then you can save the fruit of your labors and try to stretch the product. This can be done in several steps:
- place the product in water for 20-30 minutes;
- then remove from the water and, without getting wet, tightly wrap it around some cylindrical surface (but not the battery), for these purposes you can use a bucket or canister; if the surface is narrow, like a pipe, then the product will eventually be “curly” and will create inconvenience for the pet;
- When the leather is dry, it will need to be thoroughly lubricated with shoe polish or other thick industrial fat.
The only disadvantage of this method of saving the product is the likelihood that the belt will turn out to be too thin and may end up cutting too much into the skin of your furry friend.
Mr. Tail recommends: step-by-step instructions for making different harnesses
When it comes to purchasing a harness, the most important aspect is choosing the size. Some owners prefer to make the accessory themselves, taking into account the characteristics of the pet, its preferences, and purpose.
Measurements
First you need to take measurements, especially important: chest circumference at the widest point behind the front paws; base of the neck. They play a crucial role in planting ammunition. When taking measurements, there is no need to tighten the measuring tape; it is better to leave a margin of 2-3 cm for freedom of fit.
Before sewing, the harness model is determined based on the size and activity of the dog, the material and accessories (rings, carabiners) are selected.
Material selection
For small breeds (dachshunds, spitz, chihuahuas) - a harness-vest made of fabric is suitable. Velcro is acceptable as accessories; it is better not to use metal parts. Loops and connections are made from nylon inserts.
For large dogs (Alabai, Malamute, Husky) a riding harness is optimal; it is reliable, convenient for training with loads; for such dogs it is best to buy nylon or leather. Fasteners and connecting blocks are made of metal, the best fasteners are carabiners.
It is imperative to have a light walking harness at home, which will be most in demand and should be lightweight and durable; this type is most often made from synthetics. Materials corresponding to the size of the dog are used as fastenings.
Pattern
A large selection of harness cuts can be found on the Internet. The variety of types and sizes allows the owner to choose the option that is most convenient for the pet. Before starting work, it is recommended to adjust the pattern to the size of the animal; if this is not possible, choose a deliberately large model, then adjust the product by putting it on the animal.
Lining
Lining is used for riding harnesses, harnesses with weights and winter accessories. This can be any soft material that duplicates the product from the inside. Some people use old jeans or other simple, inexpensive fabrics. In order to reduce pressure and soften the harness, a thin foam insert is inserted between the main layers. On the back and chest, the belts are made wider to properly distribute the load.
Assembly instructions
Step by step:
- Print out the pattern and adjust to the size of the dog.
- Purchase the necessary materials and accessories based on the plan.
- Cut out the main parts and duplicate lining parts, if necessary. Be sure to leave allowances of 1-2 cm.
- Sew the parts on a machine using a zigzag stitch, which provides an additional margin of strength by stretching when jerking.
- Try the harness on the animal, adjust the necessary parts to fit the size.
- Form loops for inserting carabiners, rings or alternative types of fastenings. Sew them on a machine, drawing the shape of an envelope with a stitch. This fastening is strong and secures the fabric in the center and on the sides.
- Insert accessories.
- Carry out the final fitting by hooking the leash carabiner.
Regardless of the type and shape of the harness, the assembly instructions remain identical. Slight variations are possible when sewing products with lining and foam softeners.
Existing types of dog leashes
It would seem that what could be special about a leash and collar? However, this dog accessory is capable of solving a wide variety of problems - from simple holding while walking to solving quite specific problems, for example, training.
A leash and collar are the main accessories in the life of a pet.
Roulette
A tape measure is the most common type of restraint device. It is usually used in urban environments, since automatic adjustment of the length of the leash with the possibility of fixing allows you to determine the allowable space for dog needs. This type of leash can be tape or cable.
Note! The tape measure is only suitable for toy and small breed dogs. Such a leash will not be suitable for large and hyperactive dogs, as it will not be able to withstand strong tension and will simply break.
Harness
A type of leash often purchased for small dogs. Its design feature is that the device is attached not to the dog’s collar, but behind the front paws. Thus, the dog is held not by the neck, but by the entire body. In some cases, harnesses are used for walking large dogs. For sled dogs, a harness is an indispensable device.
One of the minor disadvantages of the harness is the reluctance of some pets to put it on themselves.
Note! It is very important to choose the right holding device. Otherwise, it can significantly harm the pet.
A harness is one of the most popular types of dog restraints.
Leash for walking and training
A classic holding device with a carabiner on one end and a loop on the other. The length of such a leash can vary from 1.75 to 5 m. There are longer leashes on sale, but they are usually purchased for specific purposes. The material used can be very varied: canvas fabric, nylon tape, leather.
One of the disadvantages is that if you do not manually adjust the length of the leash, it will drag on the ground and get tangled between the dog’s legs.
Leash-noose (ringovka)
A leash that is not intended for walking, but for practicing certain skills. It is not attached to the collar, but is tightened around the pet's neck using a loop. If the dog begins to behave excessively, the noose instantly tightens around the neck. That is why it is most often used by handlers at exhibitions and demonstrations. Usually made of nylon cord and a specially designed carabiner.
Chain leash
This leash is the least secure of all dog walking devices available. It is rather decorative in nature. The fact is that the links that make up the chain open up over time. There is a danger that it will break at the most unexpected moment, when the dog suddenly twitches.
Spark leash
This type of leash is used to connect several dogs participating in a group walk. Due to the fact that such a leash is not very long, the dogs do not get confused and the coupling is orderly.
Note! Walking dogs for a long time in a double-hitch is not recommended. Still, for a full walk, the dog requires a fairly large individual space.
A spark leash is needed when several dogs are going for a walk at once.
We assemble the electronic part.
I don’t have a soldering iron and the last time I worked on radio electronics was more than 10 years ago, so forgive me for such a barbaric assembly method. But what we will do is not difficult and anyone can do it.
I found two pink LEDs, just right for a bitch. All I have to do is buy a battery - a CR2032 - of the right size to hide it in the collar. I did not include a resistor in the circuit, which only makes it easier for beginners.
I simply stuck LEDs on both sides of the tube and tied wires to their legs - not the best solution, but the entire structure can be removed from the collar and replaced. Perhaps in the future I will make a zippered pocket for a 9 volt battery.
At first I wanted to use one LED, but then I decided to connect two in parallel, so they would shine with approximately the same brightness.
Master class No. 3: Leather collar
- a piece of leather;
- knives for leather processing;
- buckle and half ring;
- awl;
- decorative rivets.
We recommend using latigo leather for the collar - it is very durable and does not deteriorate under the influence of dirt and water, maintaining not only its qualities, but also its appearance.
1: Using a special knife, cut a piece of leather to the required width. To determine the required length, measure the circumference of your dog's neck and add another 25 cm. If necessary, you can always cut off the extra piece. On both ends of the leather strap, cut off the corners to create a finished look.
2: Use a bevel knife to trim the corners along the entire length of the collar. Repeat on both sides. Thanks to this, the leather collar will not chafe. Use a color-matched water-based leather glue to seal the edges.
Tip: lubricate the collar with a special leather cream, gently rubbing it in with your hands. Then apply a layer of beeswax and remove any excess with a soft towel.
3: Using the template, use an awl to mark the locations where the holes will be located for attaching metal decorations. Use a paring knife to remove some of the leather from the underside. This will make the collar lighter and softer.
4: Using awls of various diameters, make holes in the marked places - for decorations and for attaching the buckle tongue. At the same time, do not forget to add another piece of leather so as not to spoil the surface of the table. Use a scalpel to make a hole for attaching the buckle.
5: Thread the end of the collar through the buckle, bend it over and secure it. Then put on the half ring and fasten the free end of the leather strap. Decorate the collar with decorative rivets.
How to make a spinner on a dog collar?
A spinner is a special device that is attached to an object for the pet’s neck so that a chain or leash can be attached to it.
If you do not have certain skills in working with metal products, then this item is best purchased in a specialized store.
However, if you want to do it yourself, then you will need the following items;
- bolt;
- nut without thread;
- wire.
I recommend: What you and your children can get from your pet dog
If you want to use other items for this purpose, then this is completely acceptable. However, it is worth proceeding from the fact that the turntable should be durable and wear-resistant.
A collar made of paracord is characterized by low weight, high density and excellent strength . This accessory does not fade, does not deform and looks very attractive.
For a larger pet
To make your pet stand out from the rest, you can choose a variety of materials for the base. The step-by-step instructions will show in more detail an example of a collar that you can make with your own hands. For it you will need:
- 2 paracords;
- vice;
- lock buckle;
- D-ring;
- scissors;
- tweezers;
- measuring tape;
- lighter or matches;
- beads.
Paracord is a smooth, lightweight, elastic, durable material, making it great for creating a collar. In order to get started, you need to know the size of the dog’s neck in the place where the collar will be in the future; you can use a measuring tape. To this figure you should add 4 cm. Then multiply by 4. The resulting figure is the size of one skein of paracord. You can start weaving.
2 cords need to be folded in the middle and pulled each through the end of the buckle (lock) with one slot, now we thread 2 cords into the D-ring, while moving them tightly to the buckle. We thread the ends of the paracord into our loops and tighten.
Now, on a well-stable surface, you should clamp the buckle in a vice, take the left pair of cords, wrap it around the right pair of cords and then thread it between the two so that it looks like tying a knot. The same must be done with the right pair of cords, thereby continuing to weave the collar. You need to finish weaving five centimeters from the end.
Related article: Do-it-yourself hut on chicken legs made from natural material
Now we take the right and left cords, wrap them around the free area and thread them through the loop from above. It is better to hide the ends, cut off the excess and burn it. Here you have a wonderful paracord collar, made with love.
We fasten the buckle.
Show hidden content
Now we will put our buckle and button in place. The button is needed to fix the battery and also to replace it. For the buckle we simply cut an oval hole. This can be done in several ways - punch two round ones and cut out the excess, or use an oval punch.
For the button, we punch two holes of suitable diameter and secure it with a set for installing buttons.
We glue.
Gluing is not necessary, but I find it easier to stitch if the two pieces don't move.
I applied leather glue around the perimeter of the collar, except where the battery will be placed and removed, on the buckle side. First I pressed one side of the collar, then I placed the tube with LEDs inside and pressed the other side.
Roulette leash
Thanks to the internal mechanism, it twists and unwinds without sagging or dragging on the ground. may be convenient as a walking option for owners of small and medium breeds. Not recommended for strong animals, as the roulette mechanism cannot withstand sudden jerks. Such a leash can be tape or cable, but it is worth remembering that anyone teaches the animal to pull. Unfortunately, this is the only model, the manufacture of which at home is almost impossible without specialized materials.