The desire to decorate their home or apartment is familiar to all happy owners of real estate, as well as to those who have to live in rented premises. Modern manufacturers of various decorative devices are racing to meet the growing demand, offering new product after new product and creating the most unimaginable combinations of styles and technologies.
Some of them perform a purely aesthetic function, others combine attractive appearance with functionality. These useful decorations include luminous trees made of polymer materials and equipped with a large number of small LED bulbs. This decor can perfectly illuminate part of the room.
Naturally, the brightness of such a lamp cannot compete with full lighting; rather, it is intended to replace lit candles or a night light.
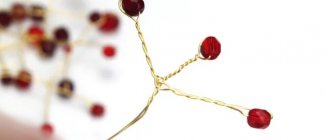
LED tree for home or apartment
Most often, when making LED trees on your own, intended for installation indoors, two main methods are used.
Tree with LED garland
The manufacturing process begins with a frame, for which aluminum wire is best suited. It easily bends at any angle, giving the future structure any configuration. A more realistic color is achieved by wrapping the white insulation of the wire with black electrical tape.
Then, the finished frame is evenly wrapped with a garland, secured to the wire with black electrical tape. If desired, you can create additional decorations for LEDs in the form of decorative nozzles made of transparent plastic. Upon completion of the work, the manufactured tree just needs to be connected to the electrical network and checked for its functionality. Thus, the question of how to make an LED tree with your own hands can be considered resolved.
The main advantage of this method is considered to be ease of manufacture. The main disadvantage is the impossibility of producing large-sized wood. This is due to the standard length of the garland, which is not enough to fit on the entire tree. Therefore, this method is most suitable for the manufacture of miniature products, which are also very popular.
LED tree
Making a tree from individual LEDs is considered a more labor-intensive process. However, this method does not have the disadvantages inherent in ready-made garlands, which makes it possible to produce structures of any shape and size. The main material is 5 mm LEDs. To equalize the voltage you will need resistors.
Direct manufacturing begins with soldering. The LED contacts have different lengths, so the resistor legs are pre-shortened on one side. You need to solder the contacts of both elements very quickly so as not to damage the LED.
Heat shrink tubing is then cut into the wires to cover the solder joints and resistors. It is necessary to leave space for soldering the power wire. The tube is inserted onto the resistor leg and heated a little with a lighter to give the insulation the required shape. This operation is performed with each LED.
After this, you can begin making the tree itself. Most often, the trunk is made from thin plumbing pipes, and the branches are made from wire, approximately 50 cm long. The main part of the branch takes 45 cm, and 5 cm is left for attaching it to the trunk. Small branches are cut into sizes up to 10 cm. The number of LEDs on one branch must be calculated in advance.
At the next stage, small branches are tied with electrical tape to large branches. It is recommended to make the number of LEDs on each small branch equal to the number of LEDs on the large branch. Each LED is secured using electrical tape.
The wires need to be stretched along the entire length of the main branches, after which they are cut taking into account the bends of the small branches. The ends are wound to the trunk, after which all the pros and cons on each branch are connected. Their number should match the total number of branches. The wire connections are insulated. All that remains is to hang the decorative ornaments evenly and connect the finished tree to the electrical network.
All these lamps are presented in several types:
- ground lights of various sizes and shapes;
- rack-mount lanterns with shades of various shapes, installed mainly along paths and to mark the boundaries of various areas;
- hanging lanterns that can be attached to various supports, walls, or hung on large trees;
- outdoor sconces - you can’t particularly illuminate plants with them, because they need to be mounted on the wall;
- floodlights – can be installed directly on the ground or suspended from supports;
- LED garlands with bulbs of various sizes.
The choice of lamp and its location depend on what effect you want to achieve:
- If your goal is to demonstrate the beauty of a plant trunk, its texture and strength, then you should use a spotlight installed on the ground almost near the trunk itself. It needs to be directed from bottom to top. It is better to use white light.
- If you want to emphasize the beauty of a dense deciduous crown or coniferous tree, then it is better to install the spotlight on the ground, but at some distance from the tree. One lamp will not be enough, it is better to use three, then the tree will “show itself” in all its glory.
- In order to emphasize the beautiful silhouette of a shrub or large tree, the light source must be placed behind the plant.
- Internal lighting located in the center of the bush will allow you to show the most interesting branches or other fragments of the tree, leaving most of the crown in the dark.
- You can also use lighting from above using a lantern on a specially installed support.
- In order to create the effect of the airiness of a tree, it is necessary to fix the lamps on the branches, while directing them into the crown.
- To illuminate small plant forms, flower beds and alpine slides from below, you can use ground lamps with adjustable light flow. LED or halogen devices are very good for this purpose.
- To illuminate small plants, “spike” lamps are available for sale, equipped with a sharp wedge that is simply stuck into the ground. True, they are not used constantly, but only at the right moment (for example, during a party).
Garlands made from are very diverse and are widely used in lighting design. They are divided into two types: “fruits” - garlands with fairly large, but sparsely spaced lights, and “leaves” - garlands with very small, but often spaced lights.
LED sources are perfect for illuminating trees because they are quite durable, weather-resistant, have beautiful light, and can be of various shapes and colors.
LED trees for outdoors
Artificial trees with LEDs can be installed in any place to decorate the landscape and surrounding areas. The attractive power of beauty actively attracts visitors to restaurants and cafes, shopping centers and boutiques, offices and other public places. Each luminous tree, with its configuration, largely resembles real plants, and sometimes completely imitates them. Artificial bark is used to cover metal branches. Maximum resemblance can be achieved thanks to silicone or plastic leaves and flowers made in life-size.
The entire structure of the artificial tree is decorated with multi-colored LEDs. Most often they operate from the electrical network, but in some cases autonomous power supply can be used, which leads to a slight increase in the cost of the design. Sometimes LED garlands are used, but they do not give the same effect as LEDs used separately.
Advantages of artificial trees with LEDs:
- Long service life of at least 5 years.
- Artificial structures do not require the maintenance required by real trees.
- Low power consumption. Even the largest trees consume electricity in quantities not exceeding 700 W.
- The simplicity of the design allows you to install it yourself, without involving specialists.
- Resistance of the structure to low temperatures, dust, high humidity and other negative influences.
- If one or more LEDs burn out, the rest of the chain will continue to work, and faulty elements can be easily replaced with others.
- The correct choice of artificial trees and bushes allows you to advantageously emphasize and complement the elements.
Sakura is especially popular among LED plants. These trees are especially beautiful thanks to the highly durable coating of the branches with plastic or aluminum alloy. Their appearance is as close to the real thing as possible. Despite its relatively small size, this tree provides as much light as taller structures. Sakura has a soft and delicate light spectrum, mainly white, pink and golden tones.
What is LED lighting
The dynamically developing production of LED lighting devices is confidently displacing traditional incandescent lamps, conquering the market with numerous advantages:
- Exceptional durability.
- High quality lighting (brightness).
- Safety.
- Economical energy consumption.
- Environmentally friendly.
- Resistance to humidity and temperature changes.
The essence of the operation of LED (Light Emitting Diode) lamps is the release of light by a semiconductor material under the influence of the movement of electrons. These devices do not require phosphorus, mercury or other hazardous substances. And during operation, burns and electric shocks are excluded, since the lamps do not heat up and consume a negligible amount of electricity (5-9 Watts).
Making your own wood for the street
When making wood with LEDs for outdoor use, you must take into account the aggressive influence of the environment. Therefore, before you start making an LED tree for the street with your own hands, you need to determine the entire procedure in advance.
The general scheme of work will be approximately the same as for conventional structures intended for indoors. In the outdoor version, it is recommended to pay attention to a more thorough coating of the trunk and branches with high-quality materials.
It is also necessary to take care of good insulation of the LEDs after soldering them with resistors. The heat shrink tubing should completely cover each pair. If necessary, all unreliable areas can be additionally insulated with black electrical tape. The same goes for wire connections in the plus and minus areas. Decorative items should be secured more efficiently so that they are not torn off by strong gusts of wind.
Most often, the following types of lamps are used for illumination:
- conventional incandescent lamps are an undesirable option, especially for constant use - they often burn out, do not like dampness and consume a lot of energy;
- LED lamps – perfect for outdoor use, consume little electricity, have a long service life, are environmentally friendly, and easy to install;
- Solar-powered lamps are quite expensive, but are an ideal option for parents of small children, since they do not require wiring to be installed (however, they do not shine for long - about 3 - 4 hours).
The best way to style branches
Trees decorated with purple and orange garlands for Halloween.
Most trees should be decorated with garlands along the trunk and 1-1.2 m along the branches. It is not necessary to decorate every branch; it is better to choose those on which the bulbs can be placed most evenly and neatly. It is best to decorate trees together, rolling the garland into a neat ball. The following steps will help you decorate your tree as easily as possible:
- Start winding the first strand of the garland at the base of the tree. Make sure the plug is level with the ground so that it can be connected to the power cord.
- Starting from the connector, systematically wrap the tree with a string of light bulbs, connecting the plug of one garland to the connector of the next.
- Wrap the garland tightly to prevent it from sliding down the trunk. If necessary, you can secure hanging wires or areas you are unsure of with plastic cable ties.
- Increase the vertical distance between the threads on the branches in places where the garland will be wound in the normal and reverse directions.
- Try to wind the garland threads closer to the tree to prevent them from being damaged by wind and bad weather.
The birth of an original lamp
The work of creating a tree is not difficult, but painstaking. In general, it will take up to 15 hours, taking into account drying. You don't have to do everything in one day.
To work you will need:
- 5 m LED cord;
- batteries with cradle;
- art knife;
- foil;
- glue gun;
- 2 sheets of A4 cardboard;
- empty plastic bottle;
- scotch;
- old newspapers;
- chopsticks and toothpicks.
We cut out blanks from cardboard for the base stand. We take into account that the width of the transverse stripes should not be less than the batteries.
Glue the base and wrap it in foil.
We pass the cord through the base and connect it to the power supply housing.
We form a trunk and crown from sticks and toothpicks.
We distribute the cord with light bulbs throughout the tree.
We wrap the branches and trunk of the tree with narrow strips of newspaper coated with glue. The LEDs remain outside.
We shred the newspaper, fill it with water, let it become limp, then squeeze it out and mix it with glue.
Cover the entire tree with the resulting mixture without touching the LEDs.
We cut out flowers from plastic bottles and leaves from foil.
DIY: Decorating tree trunks and branches
The tutorial shown in the following images uses one LED garland of 70 bulbs, which is wrapped around a trunk 1.2 meters high and 30 cm in circumference, as well as two branches. We recommend wrapping the decorations more tightly and decorating more branches.
Step 1
. Roll the garland into a ball to make it easier to wind and connect the plug to the power source at the base of the tree.
Step 2
. Wind the thread up the barrel, leaving room to wind it in the opposite direction (if you want).
Step 3
. Wrap the garlands in the usual and reverse directions along the length of the main branches
Step 4
. Wind the garlands in the opposite direction along the trunk, securing the plug at the end
Decorating trees with LEDs
Glowing trees for the street look great as a single decoration or as an element of a bright composition (a decorated alley, garden, home).
One of the main advantages of LED garlands and lamps is their resistance to mechanical damage and aggressive weather factors. That is why they are so often used to decorate garden plots or areas near offices and shops.
Dressing up evergreen trees
Evergreen trees maintain their crown intact throughout the winter and include spruce, pine, fir and other species. Using the recommended number of garlands will help you determine how many strands of decorations you need, as well as what size the lights should be. Check the bulbs before installation, especially if you are going to decorate large trees, as it will be almost impossible to fix the damage once you have installed all the garlands. You may also need tees and extensions to connect ornaments on a taller tree.
- Calculate how much power your garlands need and make sure the limits are not exceeded
- To decorate large evergreen trees and pines, C7 and C9 bulbs are most often used
- Wrap the garlands randomly to make the bulbs light up in different places, remaining unnoticed and without disturbing the appearance of the tree
- By decorating the crowns of large trees, you will create bright lighting without the need to wind the garland to the very top of the tree
- Use extension cords to reach high parts of the tree
Garlands for bushes and fences
To quickly and neatly decorate bushes and fences, use mesh garlands. If you prefer to decorate bushes and fences with ordinary garlands for trees, follow the basic rules:
- Hang them randomly
- When designing long fences, place the power source in the center of the fence, and stretch the strings of light bulbs to the left and right
- Attach strands of garland to the outside of the bushes, covering the top and ¾ of the length of the bush from top to bottom.
- Leave about 30 cm of distance to the ground so that the decorations do not end up in water or snow
How to decorate a Christmas tree with garlands
When decorating a Christmas tree that will stand in the house, the main effect that needs to be achieved is for the wires to remain as invisible as possible. By wrapping the garland around the branches instead of just hanging it outside, you get beautiful, evenly diffused lighting.
- If you decorate Christmas trees with a garland with mini-bulbs with a distance of 20 cm, the wires can be wound more tightly onto the branches
- Start at the base, leaving the end long enough for the plug to reach the outlet
- Wind the cord in both directions along the length of the branch, moving along the branches as close to the trunk as possible, and without extending the cord to the outside of the branches
- When the garland reaches the top of the tree, start winding it in the opposite direction, leaving a socket at the top for installing a decorative tip.
Now you know how to decorate both street trees and your home Christmas tree with Christmas garlands. You can complement the decoration with light figures made of duralight.
Bushes and trees glowing in the dark are a new fashionable trend in lighting technology. Such lamps not only fulfill their main function - illuminating the streets at night, but also decorate the city, emphasizing the features of the general atmosphere and placing the necessary accents.
Glowing trees for the street - LED street decoration
LED trees can be installed almost anywhere, but most often such unusual lamps are displayed at the entrance to a cafe, shopping center, restaurant, cinema, boutique, etc. Thus, they become the very attractive highlight that lures visitors to these cultural places.
Glowing bushes and trees are very similar to real ones; they completely imitate the shape of their prototype plant. The metal branches of the LED miracle are covered with artificial bark, and life-size plastic or silicone leaves and flowers are attached to them. Small single-color or colored LEDs crown this entire structure.
Such ornamental trees can be powered by the network, but more often they are equipped with an autonomous power supply, which makes the structure somewhat more expensive.
You can, of course, simply decorate an ordinary tree with an LED garland (for example, you can use ), but the effect will not be good enough. What are the advantages of using LED trees?
The photo shows glowing trees against the backdrop of a winter landscape:
Advantages:
- Durability, these lighting fixtures last for at least five years;
- Artificial trees do not require the maintenance that real trees require;
- A small amount of electricity consumed, even to illuminate the largest giants requires a maximum of 700 W of energy;
- Easy to install, you can easily do without the help of specialists;
- The design is resistant to low temperatures, high humidity and dust;
- If one or more LEDs burn out, the rest of the lamp continues to light, but the LEDs are easily replaced with new ones;
- Properly selected bushes and trees can favorably emphasize the landscape design and become part of the overall decor. Of course, you can just use regular street lights for your garden.
You will find all the information about outdoor wall-mounted waterproof LED lamps in.
Types and costs
We said that such trees need to be selected wisely, therefore, the conclusion suggests itself that there are a huge number of their species. LED trees can be of different colors and shapes, their size ranges from 0.8 m to 5 m. They are often installed as New Year's decorations. Read about the features of street lamps for the home.
Palm trees
These exotic trees are usually made to be at least 2 meters tall and can be painted in any color. Simpler models are made in such a way that the trunk smoothly transitions into spreading branches and its structure and color are identical to the crown. In more expensive palm trees, the texture and color of the pillar are close to natural wood, and the leaves completely repeat the shape of real ones.
Similar lamps may also differ from each other in the number of branches, the thickness of the trunk, the presence or absence of artificial nuts or fruits.
Palm trees are most popular in sanatoriums, boarding houses, hotels and other recreational areas, because they successfully create an atmosphere of sultry fun and the freshness of the sea breeze. The average price of luminous palm trees is 50-160 thousand rubles. Find out what street ground lamps are in.
Willow
The weeping willow, glowing in the dark, gives lovers the opportunity to enjoy a date under a spreading tree at any time of the day, without taking their enchanted gaze off each other.
Here, flexible long branches are attached to a massive trunk, dotted with small leaf-shades, glowing white or any other color of the rainbow. Prices for willows range from 16 to 50 thousand rubles.
Fruit trees
For spring to bloom 24 hours a day and 365 days a year, it is enough to install outdoor LED fruit trees in your garden, country house, or just somewhere on the street. Peaches, apple trees, cherries, apricots, and pears will delight others with their lush blooms in shades of lilac, white or pink.
On such trees, flowers and fruits are made in life size and look like the inflorescences and fruits of real plants, like twin brothers.
The cost of such lamps depends on the chosen tree, its size and the number of branches. This amounts to 12-80 thousand rubles.
Types of LED trees
When thinking about how to decorate your home or territory with a tree-shaped LED lamp, it is worth collecting information about devices of this kind in advance.
LED trees can be of various sizes and types:
- Small ones are designed to be placed on cabinets and tables.
- Medium and large ones are placed on the floor in spacious rooms (large living rooms, offices, sales areas).
- Street lamps are mounted on the site or attached to living growing trees.
Some of these lamps can be purchased completely ready-made, others require assembly and connection. For those who like to decorate their home with their own hands, there is an opportunity, in addition to purchasing a factory product, to make a similar device themselves.
How to make your own from a New Year's garland
- Draw a detailed diagram. On a sheet of paper, draw a sketch of the future tree to scale, marking with numbers its height, the length of the branches, the number of luminous elements on each of them and other necessary dimensions.
- We measure the trunk. Cut off part of the required height from a metal-plastic plumbing pipe or any other pipe - this will be a tree trunk.
- We make a frame. From the wire, cut the required number of medium branches and many smaller branches. Bend them into an "L" shape so they can be easily tied to the base. Using black or brown electrical tape, secure the small branches to the medium ones, then use the same adhesive material to tape the latter to the trunk.
- Let's move on to LEDs. Armed with a soldering iron, solder resistors to the LED. Keep in mind that the latter have two legs - one longer, the other shorter. Make sure that all LEDs are soldered either only to the extended or only to the shortened contacts of the resistor. To protect against moisture, a good solution would be.
- We isolate the LEDs. Take an insulating tube, the color of which matches the shade of the electrical tape, and the diameter is sufficient for the LED to easily fit inside it. Cut the tube, taking into account that the soldering point and the resistor itself should be hidden from the observer, but at the same time it is necessary to leave a place for connection to the power wire. Place the tubes on the LED bulbs and lightly heat them with a lighter so that the insulation completely envelops the parts.
- We attach the LEDs. Wrap each of the LEDs on small branches to the wires according to the polarity and wrap them with insulating tape. Now connect the wiring from small branches to the wires of medium ones, one wire per branch. We connect the bundle of resulting wires again so that all the pluses are together, and the minuses, accordingly, are connected exclusively to each other. The resulting bundles can be immediately soldered to the main wire and run along the trunk, or you can first thread the wires from each branch into pre-drilled holes in the pipe, connect them to each other and solder them to the main wire so that it is subsequently located inside the pipe. Do not forget to observe polarity, and then insulate all exposed conductors. Helps ensure uninterrupted operation in any weather conditions
How to use backlighting correctly?
Depending on the result you want to get from lighting the trees, one or another lighting method is chosen. In order for luminous trees for the street to look beautiful, you must adhere to several basic rules:
It is best to place the spotlights on the ground at some distance from the tree at a slight slope;
you can simultaneously use several spotlights with different types of lighting: halogen and LED;
for not too tall trees and bushes, lamps that are screwed into the ground, which can also be moved from place to place, are perfect;
lamps can also be installed on a tree trunk, directing the light upward - this will allow the light to be scattered between the foliage;
when creating a luminous tree with your own hands, you need to take into account the density of foliage, the height and diameter of the plant, as well as its shape;
For overhead lighting, halogen or LED lamps installed on nearby buildings are usually used;
In order for the plantings to cast a shadow on a vertical surface, spotlights are installed behind them at a great distance.
Application of LED garlands
If you want to create an LED tree with your own hands from an existing plant, then you just need to attach LED garlands to it, which are connected to the electrical network. Such garlands are divided into fruits, which look like large lanterns, which are located far from each other, and leaves - small light bulbs, located very densely (see photo). The presented LED tree lighting has many advantages, which include efficiency, long service life, resistance to low and high temperatures, and precipitation. With its help, trees can be made either monochromatic or multi-colored.
Self-created
Now let’s look at how to make LED street trees from scratch. First of all, I would like to note that luminous plants can be very diverse. This includes an LED sakura tree, palm tree, maple tree, and a variety of spruce and pine trees. So, the stages of work to create a luminous tree are as follows:
Tree diagram
First of all, the future plant must be drawn on a piece of paper, where you also need to indicate its height, diameter, length and number of branches.
Creating a trunk
The tree trunk is created very simply - just take a metal-plastic pipe and cut it to the desired height (see photo).
Construction of the frame
From wire of different thicknesses it is necessary to cut the required number of thick, medium and thin branches, and there should be as many of the latter as possible. For ease of installation, all branches are bent in the shape of the letter “L” and attached to the trunk.
Working with LEDs
Resistors are soldered to the LEDs, after which they are isolated. To do this, take electrical tape and a tube of approximately the same shade. The diameter of the tube should be such that the LEDs fit into it without problems. An electrical wire is attached to each such element. Next, the LEDs are attached to the tree branches. In this case, the wires from smaller branches should be connected into a bundle and connected to the wires of thicker branches. As a result, all existing wires are soldered into the main wire and run inside the metal-plastic pipe. At the same time, do not forget to isolate them.
Decorating twigs
In order for the glowing LED trees to look as natural as possible, leaves and flowers are cut out of plastic and taped to the branches with electrical tape, and the tree trunk is completely wrapped with brown electrical tape, as, for example, in the photo.