Ideas for cats made from socks
If you decide to sew a toy for a child under 1 year old, then it is better to simply draw the eyes, mouth and antennae or embroider them with thick threads. For such children, the toy can be filled with cereal. This sock cat with cereal will be an excellent exercise machine for developing fine motor skills. for fine motor skills.
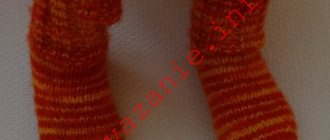
Lilac cat
To make this cat, you don’t need to take old worn out socks - the toy will turn out ugly. Maybe there is a bright mismatched sock that has been waiting for this moment.
What you need for work:
- Sock.
- Scissors.
- The material for stuffing the cat is padding polyester or batting.
- Needle with thread.
- Buttons and yarn for decoration.
- Felt scraps
- Buttons
- Socks
- Sintepon
First, let's determine what length you like. If you want to make a fat cat, leave the very bottom of the sock.
Then you need to stuff the cat’s body and head with padding polyester. Stuff the body more tightly so that the head is not too big. After stuffing, fold the edge of the cut inward and baste with pins. Try to make sure that the arrows do not go. Sew along the basting line and pull the corners to make ears.
Remember the product, giving it the desired shape. Adjust your ears so they are pointed. Draw the cat's face with a marker or pen. Then we embroider the muzzle with black threads using a “back needle” stitch. Make a scarf for your cat from braid or thread with a button. So we made a craft from socks with our own hands.
Sock Cat Tutorial. Handmade toys for kids
This cat is not easy to sew, but very simple. You don't need any special skills to work - just be able to hold a needle in your hand. A child can make a toy if you help him a little.
Materials that we will need for work:
Let's start our master class. First, cut off the elastic at the toe, then cut the sock from the top to the beginning of the heel. We will get a torso and two legs. From the second sock you need to cut off a strip that will be the tail, as well as two triangles that will become the ears. For the inner parts of the ears you will need pink felt. We cut the toe into two parts, they will become the cat’s paws.
We stuff the top with padding polyester, fold the cut bottom strips face to face, and sew the legs with any small stitches. We turn and stuff each paw and sew up the hole.
In order to mark the neck, you need to sew a seam with a “needle forward” stitch below the head, then pull the thread and secure it.
Now we take a sock of a different color and cut it this way: we cut off the part with the heel and toe, we simply don’t need them. The upper part of the sock with the elastic band will become the sweater, and the middle part will become the sleeves; it needs to be cut in the middle.
We turn the bottom of the sweater one centimeter to the wrong side and carefully hem it. Now you can put this sweater on the cat, then sew the paws to the sleeve blanks, then sew them on the side and turn them inside out. We stuff the paws with padding polyester, turn the top of the sleeves slightly inward and sew up the hole.
We sew it to the sweater, grabbing each leg of the body.
We fold the blank for the tail, stitch it from the wrong side and stitch it, now we turn it inside out, a pencil will help us with this. After this, we stuff the tail with padding polyester and carefully sew it to the cat’s body.
We take pink knitwear and make an overlay for the cat’s face from it. To do this, first mark a place and sew a piece of knitwear over the edge using a frequent stitch, put a little padding polyester inside and, turning all the edges inward, sew further.
For the bridge of the nose, select a light triangle made of felt, sew two such triangles together and sew them on first, then add padding polyester and sew up the hole. Now we make the ears; to do this, we fold the triangles in pairs and sew them together. We sew the ears into the right place for the cat.
They must first be gathered and small folds made, and then sewn on.
At the end, we select buttons that will serve as the eyes of the cat. To do this, you can choose green or blue buttons, but preferably with two holes; by sewing them on, we make the necessary pupils for the cat. So our soft sock toy is ready.
What you need to make a cat from socks
- If you are making a cat from socks for an older child or as a gift for mom, then it is better to use synthetic padding or cotton wool as a filler.
- To make a cat you will need 2 small socks. The brighter the socks, the more fun the kitten will be. You can take terry socks, then the cat will turn out fluffy. The size of the cat depends on the size of the socks. In the video, a cat is made from socks for a 14cm leg.
- You also need scissors, a needle, thread, eyes, antennae, a mouth, chalk or a felt-tip pen with which you will draw the pattern.
Why do you need shoes?
Owners put boots on their pets for the following reasons:
- Protection from chemical reagents on the roads of megacities.
- To prevent damage to dogs' paws from debris, broken glass, hot or too cold asphalt.
- To protect furniture and apartment walls from your pet's claws when they are not using a designated scratching area.
It is especially important for parents with small children to wear cat shoes. Since a baby can pull an animal’s tail or whiskers, and the pet may not like it, boots help protect the child from scratches from the animal.
It is better to buy slippers for your cat than to trim his claws or have them surgically removed; it is safer. Breeds such as Sphynxes and Devons, which do not have fur for warmth, need additional protection from the cold. These boots will help protect your animal from freezing in the winter or prevent burns when stepping on a hot surface.
Advantages and disadvantages
It will be easier for the animal to get used to such attributes if you put socks on it first.
The main advantage that boots provide for an animal is the protection of its paws from external influences. Thus, the owner does not have to worry about preserving the health of the pet. One of the disadvantages is the difficulty of putting on shoes, since it is not typical for an animal to like clothes and shoes. At first, you won’t be able to get dogs or cats to calmly put on slippers; they will try to take them off. To overcome this reaction, you must initially teach them to wear socks at home, and then go outside in them. Sometimes you won’t be able to do this, you have to come to terms with it and not torment your friend.
How to choose?
Main parameters for selection:
- seasonality;
- waterproof;
- naturalness of the material;
- hypoallergenic.
The animal's paws must be properly secured with boots.
The owner chooses the appearance of the shoes according to his taste, but for the animal it is important how functional they are. Veterinarians say that the sole of the boot should have treads so that when walking the kitten or dog does not slip or move apart. The most convenient fixation is laces or Velcro. They should fit snugly against the paw, but not pinch it. So that the animal does not lose it, but also cannot remove it. The material must be durable, otherwise it will be of no use.
How to sew a cat from socks with your own hands
- Place your toes with your heels facing up. Draw a pattern on them (we drew with a felt-tip pen)
Pattern - cat made from socks - Cut along the lines. So, from the first sock you should get two hats and a cat's face. And from the second - the body and tail.
- Now we sew the cat and stuff it with stuffing. DIY cat made from socks is ready
Take two socks
Cut the parts along the marked lines
We stuff the cat's head with stuffing and sew up the hole.
Stuff the body with stuffing, sew up the hole
All details are ready. Sew the head and tail to the body
Ready cat from a sock
Hats for cats
The sock kitten is ready
Assembly of parts
Further work is also not difficult:
- You need to leave a hole in each part to insert the filler. Leave a hole in the head and tail in those places that will be sewn to the body, in the body itself - between the lower legs. To make it more convenient, before sewing on a machine, you can baste the seam with thread. If you plan to sew by hand, you can secure the seam with safety pins.
- Now you can relax if a child is involved in creating the craft. He will do an excellent job with the next task. Now is the time to fill the sewn parts with filler. Show an example of how this can be done and admire the process. Children really like this activity.
- We sew up the ends and tighten the holes on the body, they are no longer needed. This can be done not by machine, but by hand - with a hidden seam. Insert the needle on the left side of the hole from the inside and take it out from the outside. Now insert the needle on the right side, also from the inside, and pull it out. Pull the thread until the edges meet. Insert the needle again on the left side from the inside, pull. And with such a hidden seam, sew the hole up to the end. It will remain inside and will be practically invisible from the outside, especially if the socks are fluffy.
- The head and tail are sewn up a little differently. Here we also need to tighten the hole, but there is no longer a need for a hidden seam. Insert a needle from the inside of the hole and draw the thread in straight stitches along the entire edge. Tighten the thread, make a knot and the head is ready.
- Now let's connect the parts. A sock cat gets its head and tail.
- The tail must be attached by first making a small hole. And then sew it on so that the fabric does not stick out.
- A child can draw a face for a cat. If it is important for you that the muzzle is neat, do it yourself. We draw with chalk, soap or a marker, as when cutting fabric.
Safety regulations
Natural materials must be washed and dried thoroughly before use, and toys with food must be stored in a dry place - pasta and cereals are afraid of moisture. The bags must be sewn or tied in such a way that the baby cannot, under any circumstances, reach their contents.
Also visit the articles
Here you will find 4 simple master classes, and 3 of them do not even require sewing! Very simple and funny toys made from socks that both babies and older children will appreciate.
Cute cats made of fabric. We made them scented - we added essential oils. Go to the article and get free patterns and master classes.