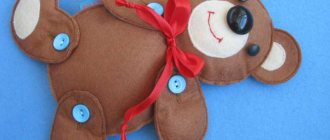
You can sew beautiful, bright and unusual toys with your own hands from leftover fabric using the patchwork technique (from the words patch - a piece of fabric, work - work). The art of sewing from scraps is popular all over the world. Sometimes entire works of art are created from small pieces of fabric. In every home you can see a bedspread, cape or rug, sewn from pieces of fabric with your own hands by your mother or grandmother.
Recently, sewing toys from scraps has become very popular. Children love to play with rag toys, especially if they are sewn with the kind hands of their mother. Funny dolls and animals made from colorful pieces of fabric fill your home with warmth and comfort, delighting your family and friends with their cute charm.
Any housewife in her house will always have a considerable number of multi-colored pieces of fabric left over from sewing some things. To make a rag toy, scraps of all types of fabrics of different sizes and colors are useful. The patchwork technique is not at all difficult to master if you have a sewing machine, a little free time and a great desire to create.
Tools and materials
The good thing about the patchwork technique is that it does not require special tools or large financial outlays. To make a toy from leftover fabric, you will need tools and materials that every needlewoman always has on hand:
- Scissors, sewing needle, sewing machine, safety pins, multi-colored threads, thimble.
- Cardboard, tailor's chalk, pencil, tailor's measuring tape, triangle ruler.
- A few remnants of fabric, buttons, padding polyester for stuffing, braid, beads and other decorative elements for decoration.
Operating procedure and useful tips
Sewing a toy from leftover fabric begins with a pattern. Schemes describing the work can be found in needlework magazines or on Internet sites. The algorithm for sewing patchwork toys with your own hands is almost always the same:
- Having chosen a toy model, we make its pattern out of paper.
- Using a chalk, we transfer the details of the paper pattern onto the pieces of fabric.
- We cut out the outlined parts from the fabric and sew them according to the pattern, leaving holes for stuffing.
- Then we stuff the toy with padding polyester, sew on the eyes, nose, mouth and decorations.
Using your imagination and skill, you can create real miracles with your own hands from a few pieces of fabric. But we want to tell you a few secrets that will help your creations become even more beautiful:
- It is best to make patterns on cardboard, then they will lie tightly on the fabric.
- It is advisable to draw on fabric only with tailor's chalk, pencil or a piece of soap.
- You need to cut out the parts of the toy along the grain thread to avoid warping the fabric.
- It is undesirable to use cotton wool as a filler for toys, because when wet it can mat and the toy will lose its appearance.
- Instead of padding polyester, you can use small beads for stuffing, which will be useful for developing the motor skills of a child’s hands.
- If you have an old, out-of-shape toy in your house, you can tear it apart and get a great toy pattern. By applying your imagination and slightly changing its details, you can sew your own unique masterpiece.
For a more detailed study of the patchwork technique, we bring to your attention several original lessons and ideas for making toys from scraps with your own hands.
Owl pillows
Decorate your child's room with decorative pillows. They can be sewn in the shape of cute owls - your baby will be happy to go to bed surrounded by such company.
Making such a pillow toy will not take much time - just draw the pattern correctly, sew the parts and stuff it with soft “filling”. Next, form a muzzle with large, curious eyes.
Photo: newarchit.ru
Photo: dshi10krd.ru
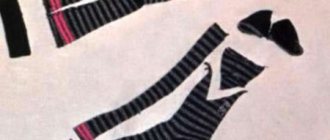
Rainbow fish made from patchwork using the patchwork technique - master class
We will need: several bright remnants of fabric, a piece of felt, padding polyester, safety pins, two buttons, a sewing machine.
Step one: print the pattern using a printer and cut out the details of the fish from paper. The pattern is given with seam allowances.
Step two: attaching the pattern pieces to the scraps, outline them with chalk and cut them out. Draw a heart on a piece of felt and cut it out as well. Having folded the fabric in half, we cut out and cut out 4 parts of the fins, as shown in the diagram. In the same way, we cut out 5 scales, sew them along the contour, turn them inside out and stuff a little padding polyester into them.
Step three: pin one pair of scales to half of the fish’s body. We pin the fish part on top of the scales as shown in the diagram, stitch it together with the scales and turn it away. Then we pin three more scales.
Step four: place the fish’s head on top of the scales, stitch it and turn it over. In the same sequence we sew on the fins stuffed with synthetic padding. We place the sewn half of the fish with the front side on the fabric. We sew all the parts along the contour, leaving the tail unstitched, and cut it out. In rounded areas, we make notches on the seam allowances so that the seams do not pull together.
Step five: turn the sewn fish inside out and stuff it with padding polyester. We sew up the tail sections by hand, as shown in the diagram. Sew a felt heart onto the tail. Then we sew on the eye buttons. The cheerful bright fish, made by yourself, is ready.
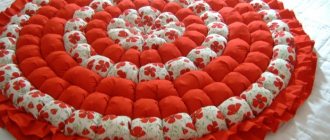
Fabric Christmas star
To decorate the Christmas tree, toys that are loved by everyone in the family and purchased in previous years are most often used. In order to diversify the decoration of the forest beauty this time, you can change the color scheme and choose jewelry in one color, but use several bright shades. Textile Christmas tree decorations will help you create such color accents. To create a multi-colored star, yellow, red and green fabrics are suitable. The special sewing technique outlined in the master class will help you create a voluminous, original Christmas decoration with your own hands. (Photo 1)
You need to prepare:
1. 8 rectangles 6cm x 8cm in five different colors. There should be 40 parts in total. (Photo 2) 2. Bias tape 5cm wide, fabric for the base, synthetic padding or foam rubber and fabric for the back side of the star. (Photo 3) 3. Sewing supplies.
Sewing sequence
To create a star, you need to select scraps of fabric of approximately the same density. In addition to colored ones, you need to prepare two plain materials.
The prepared rectangles are smoothed by approximately 1.5 cm. To make the work easier, you can use marked cardboard. (Photo 4, Photo 5)
After this, mark the middle along the front side and draw a line. (Photo 6)
Try several options for combining fabrics, choose the most successful option. (Photo 7)
For further work, you need to prepare a base of fabric that does not stretch and draw 8 lines. (Photo 
Then, starting from the center, lay out the rectangles so that all the lines match. Secure them with pins and sew them by hand or using a machine. (Photo 9)
All other rows are sewn in exactly the same way. To do this, secure the first row with pins (Photo 10) and sew the other five rectangles. (Photo 11)
It should look like this. (Photo 12)
Now the star creation stage begins.
The first rectangle of the first tier of each row must be folded in half and lowered down to the left. (Photo 13, Photo 14)
After this, wrap it up and to the right. (Photo 15)
The left part is wrapped in the same way. (Photo 16, Photo 17)
In all other tiers, the rectangles are folded in half once and tucked down. In this case, the left part is superimposed on the right. (Photo 18, Photo 19)
This is what the first ray will look like. (Photo 20)
Its edges and the edges of subsequent rays must be basted along the edge. (Photo 21)
Using any round object, cut the resulting part. (Photo 22)
According to its size, it is necessary to prepare the inner part from padding polyester and the reverse side from colored fabric. (Photo 23)
Baste all three layers, place bias tape on the front side of the star and sew it on. (Photo 24)
Turning the tape over to the reverse side, fasten it by hand while sewing bright braid for the eyelet under the edge. (Photo 25)
You can make several of these stars from materials of different colors and they will undoubtedly become a wonderful decoration for the holiday tree.
Even more interesting: Crafts for the New Year
In order not to forget the page address and share with friends, add to your social networks: Do you want to know news about competitions or master classes?
Tags: DIY Christmas tree decorations, New Year's crafts
Attention! It is better to write urgent questions in the comments on the website (form at the bottom of the page) or, better yet, directly by email. There are no notifications about comments from the VKontakte form! This form is more for feedback. 
Discussion: there is 1 comment
- Olga:
December 26, 2015 at 6:09 pmA very original and unusual ball - I’ve never seen anything like it before! Anyone can handle this.
Answer
Funny elephants using patchwork technique - master class
We will need: a few scraps of fabric, pattern paper, scissors, safety pins, and a sewing machine.
Operating procedure:
- We transfer the patterns to pieces of fabric and cut out the details.
- Then we make ears and sew them to the elephant’s body.
- Next we sew the remaining parts together, leaving a hole for stuffing, as shown in the diagram.
- Then we stuff the elephant with padding polyester, sew up the hole and sew on the eyes.
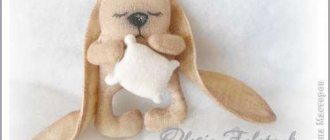
Making ears for a bunny.
7.Cut out circles with a diameter similar to the head blank.
8.Fold into pieces.
9.Fold again, one by one. It should turn out to be a triangle.
10. We use a needle stitch along the edge. Don't go wrong with the edge =)
11. We pulled the ear blank into an accordion and secured it. And we got this cute ear.
12.Sew the ears to the head blank.