Useful tips
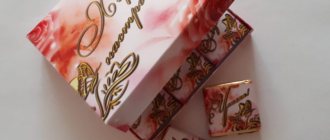
If there is a holiday, be it New Year, birthday, February 23rd or March 8th, it is most likely that on the table there will be a familiar thick green bottle with a sparkling drink inside.
Sometimes you want to decorate the table, and you can do this in an unusual way by decorating a bottle of champagne with your own hands.
You can try a method called decoupage of champagne bottles - a technique that involves transferring an image onto the surface to be decorated.
For example, a pattern that you cut out of paper napkins, thin fabric or other materials is attached with glue to the product that you want to decorate. Next, it is covered with several coats of varnish.
Finally you should have a pattern that looks nice on the piece without looking glued on.
Even if you don't have much of a gift for drawing, you may well be able to create beautiful decoupage of champagne bottles.
Decoupage wedding champagne bottles and glasses with napkins, ribbons, flowers
To decorate bottles and glasses for a wedding, you need to use the following scheme:
- The surface is first degreased . To do this, you need to wipe it with alcohol.
- Then apply a special primer for decoupage , which is sold in craft stores. However, acrylic paint will also work perfectly as a base. The paint is applied with the most common foam sponge, which is usually used to create makeup.
IMPORTANT: There is often a need for a second layer of acrylic varnish.
Bottles coated with acrylic varnish for decoupage
- Once the varnish is dry, you can treat the bottle with glass glue and then attach the napkins. It is recommended to use a special pistol. Do not worry about the fact that the glue is formed in the form of ampoules - they melt in the gun
- After 60 minutes, the bottle should be coated with several more layers of acrylic varnish
- After another hour you can start painting the bottle
- But now you can decorate it to your taste with sparkles, ribbons, flowers, lace, beads
Bottles and glasses decorated with ribbons and flowers using decoupage technique
Decorating glasses and bottles for a wedding with decoupage napkins
Decoupage bottle with flowers and angel figurine
These are such cute bottles and glasses, decorated with decoupage napkins, ribbons and flowers.
The glasses are decorated according to the same principle as the bottles. It is recommended to tie two glasses or two bottles with ribbons as a symbol of a strong relationship.
Bottles decorated with decoupage are connected to each other as a symbol of the strength of the marriage
If you want something unusual, you can design one bottle in a men’s theme, and the second in a women’s theme. Also, things that depict the hobbies of the newlyweds will look quite interesting.
Unusual bottles using the decoupage technique in the style of the bride and groom These are the original bottles and glasses using decoupage in the costumes of the bride and groom
What you need for decoupage, a list for beginners
As mentioned above, there are many techniques for performing decoupage, and they are actively developing - new materials, techniques and directions are appearing.
But still, there are main directions that we will present: Classic decoupage - gluing napkins, decoupage cards, rice paper on a flat hard surface;
Artistic decoupage - differs from the classic one in that artistic techniques, additional drawings, underdrawings, aging and more are added to the main image;
Reverse decoupage - gluing a picture onto the back surface of a transparent base;
Volumetric decoupage - when decorating, various volumetric pastes, putty and decorative elements are used.
In order to work in certain techniques, a set of materials is required - different in each specific case, but there is a necessary set that any beginning craftswoman should have:
Napkins, rice paper, decoupage card are necessary components for almost any technique, the basis of any composition. You can now buy these materials at any craft store, office supply store, or online. You can use ordinary table napkins if you find interesting ones with good image quality and a suitable subject.
Sandpaper - should always be in your arsenal for polishing surfaces; as a rule, there should be several types of grain - medium and fine, since there are several stages of polishing.
Alcohol or any alcohol-containing liquid to degrease the surface; you can also use nail polish remover.
The primer is a special acrylic material, applied as a base for decoupage for good adhesion to the surface.
Acrylic paints - in decoupage, mainly only acrylic materials are used, this is due to the fact that they dry quickly and are easy to apply. It is better to have a range of colors in your arsenal, as they are often used for painting.
Glue for decoupage - as a rule, it is acrylic, but ordinary PVA household glue is widely used.
Acrylic varnish - there are many varieties of acrylic varnish - matte, glossy and chameleon. Many needlewomen use ordinary high-quality construction acrylic varnish, but for beginning craftswomen it is recommended to use professional decoupage varnish.
Brushes – synthetic brushes, mostly flat, are most commonly used in decoupage. The sizes may be different, as they are used for different purposes.
Stationery file - in some cases used for gluing napkins. Scissors - used for cutting out images; many craftswomen use manicure scissors. Roller - a small construction roller is quite suitable; it is used to smooth out the pasted image.
A stack is an artistic tool that is very suitable for mixing paints.
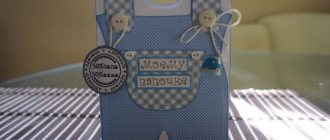
Decoupage bottles for a man's birthday
A good option for designing a birthday bottle for a man is a design with a portrait of the birthday boy:
- Be sure to degrease the surface with alcohol , having first removed all the stickers on it.
IMPORTANT: The remains of the old glue must also be removed, otherwise it will affect the quality of the decoupage.
- Print two photos for the forward and reverse technique
- Pour a small amount of water into a container. Dip the photo face down in water - this will help the sheet delaminate. After holding the image in the water for a couple of minutes, carefully roll up the excess layers with your fingers so that only one thin color remains.
For decoupage, you need to remove excess layers from a photograph, leaving one with the image
- Meanwhile, on the bottle, in accordance with the size of the photograph, a place for it is indicated. This place is lubricated with acrylic varnish. on top with the front side facing inward.
IMPORTANT: Smooth the paper thoroughly - there should be no bubbles or wrinkles.
Gluing a photo to a bottle during decoupage This is how the photo will look from the inside after decoupage
- After the photo has dried, you should stick a second one on it. Only this time the image will be facing the viewer. Smooth out the picture
Pasting a second photo during the decoupage process
- In a very ordinary syringe, add texture paste, which can be purchased at a craft store. Squeeze it onto the outline of the photo . You can also write
Place texture paste into a syringe for decoupage
This is the outline you can make from a photograph during the decoupage process
- draw some patterns with colored paste.
Decoupage patterns for bottles
The front side of a decoupage bottle
Don’t think that a design for a gift for a man cannot be bright. Here are some examples of gift bottle decoupage:
Decoupage of bottles and glasses in a marine style But decoupage using leather is stylish and discreet
Decoupage using leather and acrylic varnish Decoupage with napkins, buttons Decoupage with leather and coins as a wish for wealth for the birthday boy
Engraving
Engraving is one of the most sophisticated and impressive types of bottle decoration. Only an artist can do it independently if he has the necessary equipment. Therefore, engraving is ordered in special workshops. If time is limited, laser engraving is chosen. The desire to see a filigree ornament is ensured by handmade work that is more expensive and takes longer to complete.
Handwork is done using diamond or special alloys. Sometimes the design is applied to a thin layer of brass, which is subsequently glued to the bottle.
The engraver can order any inscription, including poems and warm wishes. Rings, hearts, cooing doves, floral motifs, even portraits and favorite aphorisms of the young - there are no barriers to this technique.
Of all the types of wedding bottle decorations, engraving is the most long-lasting. It will not darken over time, will not fall off, and will not become dusty. The engraved bottle can be washed under running water at any time. This is an excellent talisman of longevity and unfading love.
You can also decorate the newlyweds' festive glasses with engraving. If handled with care, they can drink the fizzy drink at both a calico and a diamond wedding, each time reminding them of the first marriage kiss.
Decoupage bottles for a woman's birthday
A rather interesting and unusual effect can be achieved if you do decoupage with fabric . You can take some unnecessary tights:
- Degrease the surface of the bottle
- Soak the cut part of the tights of water and PVA.
IMPORTANT: The proportion of glue and water should be 1 to 1.
- After soaking in the solution, the tights are laid out on the bottle in the form of waves, tails. At the same time, do not forget to leave space for gluing the napkin
- Wait for the material to dry completely
- Prime with acrylic paint or a special compound purchased at a craft store.
- All that remains is to tint it to your taste and decorate it
Here’s a sunny bottle with decoupage made of tights for a woman’s birthday. Another bottle with decoupage made of fabric - laconic and expressive
Decoupage from tights in golden tones.
A very good option for decoupaging a bottle as a gift for a woman is to glue lace. Small chains and beads are also suitable.
. Decoupage as a gift for fans of French charm Bottle with decoupage made of fabric, beads and flowers
Decoupage from napkins, ribbons and lace Lace will fit perfectly into the decoupage of bottles for a gift for a woman Decoupage of a bottle with lace is a rather elegant gift
Candies
If the gift for March 8 includes not only champagne, but also sweets, the usual set can be combined into an original composition.
The most common design options for a bottle of champagne on March 8:
- bouquet. This design method includes a standard set of components. But if the banal three tulips and a box of chocolates with a bottle of champagne in a gift bag are perceived as boring routine, then champagne decorated with sweets will be a fresh idea that will make the giver stand out. When designing a composition, both the bottle and the candies can occupy any position. Champagne can be hidden behind the decor of sweets, or, on the contrary, brought to the fore. For a more finished look, the bouquet can be supplemented with ribbons, bows, flowers and other decorations that match the color and style;
- cake. In this case, a bottle of champagne is placed in the chocolates, becoming the central element of the composition. It functions as a kind of candle rising above the candy cake. In the classic version, long and narrow varieties of candies are chosen for the “cake”. They are evenly placed around the champagne (in circles), fastened together with glue. To make the composition more stable, it is permissible to form it on a cake base, or fasten it with beautiful ribbons or lace. A bow or flowers from the same braid can decorate the neck of the champagne. Such a gift is suitable not only for personal presentation, but also as an element of congratulations to a large group of women;
- a pineapple. If “cake” and “bouquet” are classic decoration options, then “pineapple” refers to more daring and original types of design. This finishing method turns a bottle decorated with candies into a kind of “Kinder surprise”. Under the layer of sweets, the base is completely invisible, and the secret contents of the “pineapple” can only be found out by picking it up. For this type of decoration, choose round candies in golden or yellow packaging. If the color of the wrapper of your favorite sweets does not correspond to the canon, they can be additionally wrapped in wrapping paper of the desired shade. Smooth glass and glossy wrapper do not always stick together well. To ensure that the champagne in the candies is hidden securely, the alcohol must first be covered with a layer of corrugated paper. And then attach the sweets to the paper base. The neck of the bottle is hidden under green paper “leaves”. If the joint is not very neat, it can be covered with original braid, lace or ribbon.
Such decoration options are among the simplest. In this case, all that is needed to decorate bottles with your own hands for March 8 is:
- champagne;
- candies. For a “bouquet” – from 0.5 kg, “pineapple” – about 1 kg, “cake” – from 1 kg and above (depending on the selected diameter);
- glue. Superglue works best (PVA won't give the desired adhesion, and a glue gun can melt the candy). Due to the harmful substances contained in superglue, when working with it, you need to ensure that the glue only touches the candy wrappers and does not get inside the wrapper. If the packaging is not foil, it is advisable to cover the candy with an additional layer of paper before use;
- additional decorations (optional).
When making a bottle with candy decor with your own hands, you should not get hung up on standard options and finishing schemes. Fresh design ideas have always been valued higher than repeated ones.
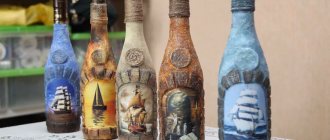
Decoupage eggshells on bottles
This decoupage will add volume to the patterns on the item, making the bottle truly unique. You will need:
- Shells cleaned of dirt and films
- Wide flat brush
- PVA
- Special napkin for decoupage
- Acrylic paint
- Toothpick
- The varnish that will be used for the finishing coat
Let's get started:
- Before applying to the bottle, crush the shell into small pieces with your fingers. However, adjust the sizes depending on your idea.
IMPORTANT: Some craftsmen glue large pieces of shell to the surface, and then crumble them with a blunt object, placing them with a toothpick. However, it is better for beginners not to resort to this method.
Crumble the shells for decoupage on the table
- Apply glue to the surface of the bottle. It is recommended to start from the neck. Pieces of shell are applied to the glue and smoothed using a toothpick. Remember to lightly press down the material.
Press down the shell with a toothpick during decoupage.
- Cover the entire bottle in this way, but do not touch the bottom. Top coat the entire piece with white acrylic varnish.
Decoupage the bottle from the neck
- Since you need to highlight the cracks, you should cover the surface of the bottle with a brown varnish with a sponge . It is better to mix several shades in advance to get the desired one.
Coating with brown varnish to decoupage the surface of the bottle
- Without waiting for the varnish to dry, wipe the bottle with a damp cloth. This way the varnish will remain only in the cracks, which is what is required.
- Cut out the desired images from napkins. Separate the top layer from them
Decide what images are needed for this bottle decoupage
- Now attach the selected drawings to the bottle and apply glue on top
IMPORTANT: Apply the glue from the center to the edges using a wide brush.
Bottle after decoupage with pictures
- The final stage is applying acrylic varnish
This is what the bottle will look like after decoupage with shells. Egg shells in decoupage can serve as an imitation of reptile skin
Shell decoupage goes well with flower designs
Bottles with shell decoupage look quite stylish and unusual
Universal decor
The combination of white and gold colors is considered wedding and is suitable for a celebration decorated in any style. This range gives positive emotions and emphasizes a joyful atmosphere. Decorating champagne bottles with gold and white ribbons is relatively easy. For this you will need the following materials:
- foam sponge;
- glue;
- gold paint;
- acrylic paint;
- primer mixture (can be replaced with white acrylic);
- rhinestones;
- white ribbons;
- gold leaf;
- twigs and leaves cut from gold paper;
- 5−7 polymer colors for each bottle.
Before the creative process begins, the artist coats both bottles with white acrylic or a primer mixture. Leave them until they dry, after which they begin to decorate. Instructions for decoupaging wedding champagne bottles with your own hands:
- The neck and stopper are decorated with gold foil.
- Golden branches with leaves are glued diagonally to the bottle.
- The elements are placed taking into account the fact that later there will be polymer flowers in these places.
- Glue the flowers so that the leaves are visible from under them.
- The surface, free of decor, is painted with a thin layer of gold acrylic paint, scooping it up with a foam sponge.
- The lower edge of the foil covering the neck is coated with glue, then wrapped with tape.
- The edges of the ribbon are tied with a bow, and to hide the knot, a large semi-precious stone or several beads are attached.
- A pattern of rhinestones is made on the neck.
- The entire bottle is treated with a fixative.
It must be taken into account that the vessels with champagne will stand next to each other, so the drawings should be a mirror image of each other. An interesting technique is the image of a heart made of two halves. To achieve this effect, flowers are placed on each bottle in the shape of a half-heart.
You can also come up with other options for placing decor.
Decoupage bottles for the New Year
For this decoupage we will need:
- Bottle
- Acrylic white primer
- Decoupage napkin
- Acrylic paints
- Crystal paste
- Finishing varnish for fixing the coating
- Golden red glitter
- Synthetic brushes
- Fine-grit sandpaper
- Foam sponge
- A palette knife used by artists to remove excess paint or apply primer
- Hairdryer
Let's get started:
- The first step is to clean the bottle from labels and traces of glue. To do this, it should be placed in a container with water at room temperature - this is how the labels come off. But it’s easy to get rid of glue residues using baby cosmetic oil.
IMPORTANT: Don't forget to rinse the bottle with dishwashing detergent if you used cosmetic oil.
- Then degrease the glass surface
The bottle should be degreased before decoupage.
- Apply primer with a sponge. It is recommended to make the first layer thin and then dry it with a hairdryer - this way the primer will lie on the glass in the best way. The second layer should also be thoroughly dried.
A primer is applied to the bottle during decoupage
- Tear off the images you want to glue from the napkin. Remove the bottom two layers, leaving only the colorful one.
IMPORTANT: It is better to tear off images rather than cut them out, because torn edges are easier to disguise with the background so that they blend into it.
- The top layer should be placed face down on the file. You need to pour a little water directly onto the napkin. Smooth out any uneven surfaces on a napkin. You can help yourself with a brush. After some time, remove excess water from the paper
- Now attach the file to the bottle so that the wrong side of the napkin is adjacent to the bottle. Gently smooth out creases
- Pull one corner of the file to remove it. The napkin will remain on the bottle
- Smooth out the folds again and cover the bottle with glue or acrylic varnish. Let the bottle dry thoroughly
IMPORTANT: Make movements from the center to the edges.
Smooth out any uneven surfaces on the decoupage napkin
- Small folds that probably still remain should be dealt with separately. They are easy to remove thanks to fine-grit sandpaper. Rub the sandpaper along the unevenness
- It's time for the finishing varnish
Coat the bottle with varnish at the end of decoupage
- Now we need to work on the main background. Apply white and blue acrylic varnish with a sponge, not forgetting to remove excess from the sponge
Drawing a white background during decoupage
- Mix the shades that should be used to work on the edges of the picture - you can’t do without it if you want to achieve a natural look
Work on the edges of the design during the decoupage process
- The plug should also be tinted
The cork also needs to be tinted during the decoupage process.
- Take an unwanted toothbrush and use it to splatter white paint.
Applying splashes during decoupage
- finishing varnish again
- an inscription using a syringe
An inscription made during the process of decoupaging a bottle
- The image should be three-dimensional. To do this, a transparent paste with glass pieces is carefully applied to the bottle - it will imitate ice. Silver acrylic paint will also help.
IMPORTANT: This is where the palette knife comes in handy. It is most convenient for them to apply such a coating.
A special gel for decoupage will help create an ice effect. This is the bottle you will get as a result of decoupage for the New Year.
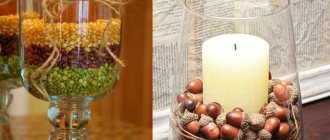
Another great way to decorate a bottle for the New Year is to sprinkle it with large salt crystals. The technique is simple - salt is attached to glue.
Decoupage bottles with salt
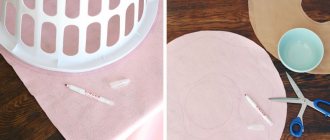
DIY decor master class
If you decide to create a unique design yourself, then first you need to prepare the surface of the bottle.
The easiest way to remove the label is to place the bottle in a basin or large pan filled with warm water, add dishwashing detergent and leave for half an hour. After soaking, removing the paper and glue will not be difficult.
Advice! Be careful with the water temperature, too low will not bring much effect, and too high can spoil the taste of the drink. The best option is a little warmer than room temperature.
Next, be sure to degrease the surface. Any alcohol-containing solution or even regular acetone will be suitable for this. Both alcohol and acetone can only be applied to a completely dry bottle.
Now all that remains is to choose the design for your champagne. There are many options - delicate lace, beads, polymer clay figures, fresh flowers. Below are two of the easiest master classes that allow you to create small masterpieces with your own hands.
Satin ribbons
A shiny, flowing material, beautiful both on canvas and as details , is perfect for decorating wedding bottles. Such decor does not have to be pure white. You can easily add soft pink, blue or lilac, and if the wedding theme allows, then a rich, bright palette.
You will need:
- satin ribbon (or several if you want a combination);
- glue gun (if you don’t have it, a regular Moment will do);
- scissors;
- various decor - beads, rhinestones, lace, brocade ribbon.
Decoration steps:
- Measure and cut the required length of tape. Apply a small amount of glue. You need to start gluing the bottle from the neck, slowly going down. The right end of the tape will cover the left;
- Cut off the next piece - it will be a little larger as the bottle expands. Lubricate with glue and secure, also leaving the right end on top;
- Apply two to five more layers , depending on the width of your tape. When the bottle becomes smooth, the top is ready, and you can move on to decorating the bottom part;
- Cover the bottom with even stripes , leaving a seam on the back of the champagne;
- Mask the joint with another tape glued vertically;
- The champagne is ready , now all that remains is to add details for beauty and disguise the inevitable irregularities. Bows look good both from the same satin ribbon and from a contrasting fabric of a different texture - brocade or lace.
To make the design more solemn, add several strips of brocade ribbon. Usually in the center - the fifth and sixth layers of the top decoration, and at the very bottom.
Velvet suits
The velvet design looks luxurious and aristocratic. The material has excellent stretch, which makes it easy to sew the necessary champagne clothes of almost any style from it. The colors can be any, but the classic combination is a white bottle for the bride and a black bottle for the groom.
You will need:
- stretch velvet in the required colors;
- threads matching the shade;
- paper, graph paper is best;
- well-sharpened scissors - cutting velvet is not so easy;
- pencil or narrow piece of soap;
- if desired, additional decor, for example, lace, rhinestones, beads.
Idea! If you have chosen a themed, non-classical wedding, then it is wise to reflect this in the champagne decor. However, in any case, the bottles of the bride and groom should be at least slightly different from each other so that you do not confuse them.
Decoration steps:
- First you need to find a pattern that suits you and transfer it to paper;
- We transfer the pattern to the velvet from the wrong side. You can draw either with a pencil, it will still not be visible, or with a piece of soap - its traces will disappear even faster;
- Cut out the resulting blank. Remember that velvet is an extremely capricious material, so it is necessary to cut it in a slightly stretched state and very carefully;
- We sew the details and get “suits” for champagne . We put them on bottles;
- Now you can start decorating. The groom's champagne is usually decorated with a miniature tie or bow tie; an equally charming option is rhinestones in the form of buttons on a suit. You can also use regular buttons. Another interesting idea is a miniature hat or top hat. For the drink, brides often make a tiny veil from a piece of lace or organza; they also add flowers, ribbons, and any other feminine elements.
Decoupage bottles with napkins
Decoupage with napkins looks especially chic if craquelure varnish - it helps to create the effect of antiquity. So, for this case you will need :
- Bottle
- Acrylic paints
- Craquelure varnish
- Napkins
- Alcohol for glass degreasing
- Flat synthetic fiber brush
Craquelure varnish for decoupage helps create the effect of an old thing.
Let's get started:
- So, first of all, degrease the surface and remove old labels.
- Now coat the bottle with acrylic varnish . Try to make sure the layer is even. Best applied with a sponge
IMPORTANT: Regarding the color scheme, keep in mind that the base should be the color that is planned for the cracks. Therefore, if the bottle itself is white, then it is advisable to make the base black or dark brown.
- Wait for the varnish to dry. You can use a hair dryer
- Now apply craquelure varnish . There is no need to dry this layer
- acrylic varnish is applied with neat strokes close to each other It is important to dry this layer properly
- At this stage, we begin to draw a design from a napkin. Peel off the top layer. Trim off all excess, while trying to avoid smooth edges, which are then difficult to make natural
- Dilute PVA in water. Apply the solution to the surface of the design attached to the bottle. Move from the center to the edges
- Apply varnish to the surface . Work out the details if desired.
This is what things look like after decoupage with napkins
Using a postcard
Classic decoupage of wedding bottles involves image transfer. This is a simple method that, in addition to materials, requires only imagination in choosing cards, accuracy in placing the design, and a little practice, so it is best to try your hand at a glass surface several times before you start creating decorations for the holiday. The materials are all from the first method, only postcards are used instead of napkins.
The bottle is cleaned and degreased, after which it is primed and allowed to dry, and any uneven surfaces are sanded.
The postcard is varnished without touching the edges. The dried image is separated from the substrate and glued to the bottle using PVA.
Selected paints that will harmonize and highlight the image are carefully applied to the remaining surface with a sponge.
Decoupage bottles with toilet paper
So, for decoupage bottles with the most ordinary toilet paper you will need:
- Bottle
- Toilet paper
- Napkins
- Acrylic paints of various shades
- Salty dough
- Various items for decoration - for example, beads
Let's get started:
- Of course, degreasing the bottle is an essential stage of work.
- Now tear the toilet paper into pieces and cover the bottle with these pieces
IMPORTANT: Apply pasting as if you were creating a background.
- Now you should make strips out of paper . It is advisable to select the width within 1.5 centimeters. But the volume should be different - for this, some stripes are created in two layers
- Pour some water onto the surface. Lightly wet each strip in some places and then twist it - this way the liquid will be distributed evenly and the strip will not get completely wet
Rolling toilet paper during decoupage process
- Make toilet paper balls in the same way . However, the idea will only benefit from the use of salt dough. It is recommended to outline the pattern in pencil in advance.
Patterns created using decoupage with toilet paper and salt dough
- Let the work dry. After this, you can coat the bottle with paint.
Coating a bottle with paint during decoupage
- Add additional elements to the decor as desired
This product can be made using decoupage with toilet paper
Wedding decoupage: features
Few people know about decoupage itself. It is a technique commonly used to decorate bottles of low-alcohol drinks. Lately it has become fashionable to do things with your own hands. Many people make it a hobby.
One of the leading techniques is decoupage. It can be used to decorate glass, wood, plastic and metal products. As a rule, dishes are most often decorated in an original way, since they are placed in a prominent place in the house.
The technique appeared in France. In French it means to cut. Accordingly, this is precisely what reflects the main essence of the methodology. It is necessary to transfer the image to another surface, carefully cutting out what you want to display.
Decoupage of bottles for a wedding.
In the last century, girls enjoyed decorating their precious boxes using decoupage. By transferring the design onto a wooden surface, they created a completely new and unique design. Each young lady had her own approach.
Subsequently, it was customary to show each other their boxes, bragging about what happened in the end.
This is interesting: Creating an original page design for a book of wedding wishes
Currently, many designers are resorting to decoupage techniques . It is not only simple, but also beautiful, modern, and fashionable. The vintage style has gained particular popularity. However, antique products look sloppy and untidy.
But after undergoing decoration treatment, the products seem to take on a second life. Even if you have a boring or old chest of drawers at home, you don’t have to throw it away. You may well give it another chance by decorating it with a color image.
Decoupage bottles with ribbons
There is a rather interesting way to decorate a bottle with ribbons rolled into rollers. need a bottle, ribbons and glue.
IMPORTANT: Regarding the number of tapes, you will have to stock up on 36 meters.
The principle of creating decoupage is simple:
- Cut the ribbon into small pieces. Roll each piece into a roll
- Glue the rolls onto the bottle . It is recommended to start work from the bottom
- After the ribbons are glued, use something like a knitting needle to straighten them a little. Try to ensure that the bottle is still visible through the decorative elements
- The neck also needs to be decorated. You can choose the simplest way by wrapping it with ribbon and attaching a flower
This is how decoupage of a bottle with ribbons turns out.
But there are also many other ways to wrap ribbons around bottles beautifully and with imagination:
Decoupage with ribbons in the form of a woman's outfit
Another option for decoupage with ribbons in the form of a lady’s wardrobe. But decoupage with ribbons for a man’s outfit. You can simply tie a ribbon during the decoupage process in the form of a beautiful bow
New Year's decoration of champagne made of organza
From organza, a thin and at the same time rigid transparent fabric made from silk, polyester or viscose, you can make with your own hands the most delicate-looking decor for a bottle of champagne, which will resemble a real New Year’s “dress”. Decorating in this way is not at all difficult, but, on the contrary, it is even very interesting. Moreover, such beauty, which is depicted in our photo, will certainly charm you and you will want to decorate your festive table with it for the New Year 2022.
To work you will need:
- a bottle of champagne;
- organza of any color;
- a sheet of white thick paper A4;
- satin ribbon;
- decorative elements: rhinestones, beaded ribbon and much more, to your taste;
- scissors;
- scotch;
- hot glue.
Progress:
- At the beginning of the work itself, it is necessary to make “petals” from organza, from which we will subsequently assemble our elegant “dress”. And to do this, take a small square of organza, measuring 7.5 X 7.5 centimeters and fold it in half, but slightly beveled, to form four sharp corners. Then we fold our product again so that the right side, bent to the middle of the flap, is covered with its left part. We fix the base of the resulting volumetric “petal” with a drop of hot glue. We proceed in this spirit with the rest of the scraps, having made the required quantity.
- We take a bottle of champagne and, without removing the label, wrap it in a sheet of thick white paper, A4 format. To prevent it from unfolding, we secure it with two strips of tape.
- In order for the paper to fit tightly to the neck, it is necessary to cut its upper edge in a circle into strips 2 centimeters thick, to the point where the expansion of the sparkling drink container begins. After this, we should collect our strips on the neck, folding one on top of the other, and securing them with tape along the entire circumference. Having removed our paper frame, we trim it with scissors, cutting it to the very expansion of the container and once again carefully treat it with tape. The side of the frame will be a satin ribbon placed around the circumference with hot glue.
- We put the finished paper cover on our glass container. We take a satin ribbon and, having measured the required length, glue it tightly to the neck in a V-shaped manner, also capturing the base of the side of the frame. In this way we need to decorate the entire product, right to the very bottom.
- Let's start creating our New Year's “dress”. We fix the previously prepared organza “petals” on top of each other with hot glue, starting from the bottom of the product and reaching the very top - the neck, the border of which we also make from a satin ribbon, preferably golden in color.
- We decorate the finished “dress” with our own hands using beads, iridescent stones, rhinestones and, if desired, beautiful sweets.
In order to create several options for such elegant products, you should use your rich imagination, which we will help you expand with the help of our interesting photo ideas.
For the New Year 2022, you should definitely make such a craft, because with it your home will be significantly transformed and sparkle with bright, cheerful colors. And to complete such creative work without problems, you should watch our training video, which will provide you with detailed step-by-step instructions.
Master class on decorating a bottle of champagne with organza
https://www.youtube.com/watch?v=pW4oyrcMRs8
Decoupage bottles with flowers
You can decorate the bottle not just with ribbons, but with ribbons in the shape of flowers. And you will need the following things for this:
- Bottle
- Ribbons
- Beads
- Acrylic primer
- Acrylic paint
- Silver outline
- Glue gun
The working process is as follows:
- First, the bottle is degreased with nail polish or alcohol.
- Now apply the primer using a sponge
- The bottle is covered with acrylic paint
IMPORTANT: You can apply paint with either a sponge or a brush. However, the most interesting effect is obtained if you use a sponge - the surface becomes rough.
- While the bottle is drying, you can start making flowers . The easiest way is to simply thread pieces of ribbon onto a needle and thread. The thread will tighten and the outline of a flower will form. Another way is to simply fold the corners and burn the edges. The last action will ensure soldering
- Once the bottle is dry, you can stick on the flowers . You can decorate them with beads and thin ribbons
- Patterns appear along the perimeter of the ribbons
This is how you get decoupage of a bottle with flowers from ribbons. Decoupage with flowers can be done in different shades.
A bottle presented for some holiday is, of course, a good gift in itself. However, you will agree that it will be much more pleasant to receive a unique thing, carefully made by someone else’s hands. In this case, decoupage can help out even those who have not previously had anything to do with needlework.
Decoration with kanzashi flowers
Kanzashi is a technique that uses pieces of fabric folded in a special way. Most often, holiday flowers are made this way. Creating such decor is relatively simple if you use ready-made flowers. It is better if they are silver or pastel shades with a pearlescent tint. To decoupage wedding champagne you need to prepare the following:
- 7−9 flowers of different sizes;
- silver satin ribbon 2.5 cm wide;
- 1 cm thick ribbon to match the kanzashi elements;
- glue;
- multi-colored beads or rhinestones.
Cut a piece from a wide satin ribbon and glue it to the very top of the bottle, where the cork is located. The ends of the tape should extend slightly onto the sides of the cork. The following actions:
- Wrap the neck with tape to a height of 5 cm, starting from the edges of the first segment.
- Starting from the end of the upper winding and extending slightly onto it, wrap the neck with another tape (1 cm wide) until it widens.
- The process should result in a pattern resembling a “Christmas tree”.
- The corners of the herringbone should be directed downwards.
- The places where the tape intersects are coated with a thin layer of glue; there should be just enough of it to fix the satin.
- Take a thick silver ribbon and make one herringbone circle, starting from the edge of the previous winding.
- The entire bend is wrapped using the same technique using thin tape.
- The straight part of the bottle is also wrapped with colored satin ribbon, but without the “Christmas tree”.
- Kanzashi flowers are glued onto the wrapped surface, placing them diagonally.
- The upper flower is placed opposite the second thick winding, and the lower one should not reach the bottom by several centimeters.
- Rhinestones and multi-colored beads are attached to the second thick winding.
The second bottle is decorated in the same way. If the region has a tradition of placing “bulls” on the table, they should also be decorated in this way. By the way, this decoration option is suitable not only for a wedding.
Decoupage a bottle of champagne with your own hands allows you to prepare a gift for another holiday, for example, a birthday, anniversary, and so on. Decorated bottles with expensive drinks are best given to women or married couples.