Nowadays, many residents of country houses strive to decorate a clearing or flowerbed with an unusual composition that will attract the attention of passers-by and delight the owners and guests. Today you will be inspired to make crafts from various waste materials.
Plastic bottles are empty containers no one needs. Many people simply mercilessly throw them into the trash can or bin. But, experienced needlewomen carefully collect plastic bottles of different shapes and sizes. For what? For making incredibly beautiful and original crafts for the garden and dacha. You can make different birds and animals that will become a real decoration for your garden plot.
This article is dedicated specifically to DIY crafts for the garden and dacha. You will learn about the secrets of making deer, sheep, cats, horses, etc. These funny and graceful animals, made with your own hands, also look great in the garden.
Crafts from plastic bottles for the garden and cottage
Deer made from plastic bottles
To make a brown deer, you need to take a five-liter plastic bottle and cut off the neck of it. A one and a half liter bottle is attached to the cutting site using self-tapping screws, bottom down. A liter bottle is attached to the neck of this container.
You just need to cut a circle in the center and insert the plug of the previous workpiece into it. The result is a head on a long neck and the body of a deer.
Then 4 holes are made in the five-liter bottle (bottom) and long wooden slats are inserted into them. These will be the legs of the animal.
The tail and ears are cut out of plastic containers and placed in the appropriate places on the craft. All that remains is to paint the deer with brown and white paint, draw its eyes and attach antlers from ordinary intricately shaped twigs. The brown deer is ready!
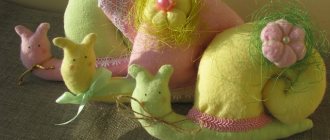
Yellow fawn - DIY garden craft
The yellow fawn is made using the same principle, but there are a couple of nuances. The five-liter bottle is attached entirely, and the neck is the tail. The neck is made of a short wooden strip.
DIY yellow fawn
Cat made of plastic bottles
This animal is made in a completely different way. First you need to collect a lot of plastic bottles with a volume of 2 or 1.5 liters, approximately 100 pieces.
How to make a garden craft in the shape of a cat step by step:
- From each container you need to cut off the bottom; this is the part of the bottle that is needed for work.
- Then you need to make two balls from a metal mesh: a large one for the body, a small one for the head. They are easily and securely connected with wire.
- Then you need to attach the bottoms of the bottles to the mesh. This can be done using thin wire or liquid nails.
- The hat, tie, tongue and eyes are made from pieces of old linoleum.
- All that remains is to paint the cat white (you can use any other color).
- Draw his eyes, nose and mustache with black paint. But decorate the tongue, headdress and tie in bright shades of red.
- To ensure that the structure stands firmly, it can be secured to a metal rod dug into the ground.
Cat made of plastic bottles
DIY sheep
The big sheep was made using the same technology as the cat. You prepare the bottoms of the bottles and fix them on a ball formed from a metal mesh. The legs are made of wooden slats. The ears and face of the animal are carved from a five-liter bottle. But the small lamb is formed from polyurethane foam.
Sheep made from plastic bottles for the garden and cottage
DIY horse for the garden
It requires a large plastic bottle. In our example, we replaced it with a plastic flower pot. This will be the basis for the body of the animal. Wooden slats are attached to four sides of the pot with self-tapping screws. The neck and tail are also sections of a wooden stick.
The horse's head is made from a paint can, and its hooves are made from plastic flower pot trays. The animal's mane and tail are an old blue wig. Instead of artificial hair, you can attach hay or threads.
The finished figure is covered with brown paint, and a favorite plant is planted in a pot. It turns out to be both a flowerbed and an interesting character!
Pigs are the most common crafts for the garden and dacha
Large water bottles can be used as original flower beds in the shape of a pig. To do this, the side of the bottle is cut off - flowers will grow there. Then the ears are cut out from the remaining sidewall.
Take four one and a half liter bottles and cut out the necks, they will be the legs of the pig. The resulting legs are attached to the body using wire. The piglet turns white or pink.
Then you need to fill the internal space with soil, after making several holes in the belly. Now you can plant the seedlings. Such a pig will look great in combination with any other flower bed.
Advantages of a rocking horse
Having bought a horse for your child, you can be sure that he will not lose his interest and will not throw it into the far corner, as often happens with many new toys. Having so much fun that children quickly lose interest, the wooden horse is one of the rare exceptions. The peak of popularity of the rocking chair occurs at 2-3 years. Children at this age become so attached to their horse that they can put it to bed, feed it sweets, spend hours combing and braiding its long mane.
A rocking horse is a good simulator for a baby; it maintains the normal vestibular apparatus, developing it, and also improves useful skills such as dexterity and fine motor skills - you still need to be able to stay on a wooden horse. Doctors recommend this toy for children with diseases associated with the musculoskeletal system. There is another variety of toy horses - a rolling horse. Instead of two arches, she has wheels attached to her legs, so the baby must push off with his legs to move. It's essentially a scooter with a seat.
DIY craft - peacock for a dacha garden
Peacocks are incredibly beautiful birds. You can admire their tail for ages. It's a pity that not every yard can see such beauty. Although, the situation can be fixed! You can make a magnificent peacock with a long tail from ordinary plastic containers.
The following materials are suitable for work:
- Styrofoam;
- stationery knife;
- metal rod;
- stand (log);
- old canister;
- metal grid;
- wire (thick and thin);
- awl;
- plastic bottles of all sizes;
- scissors;
- enamel paint of different shades.
First, take a stand (it can be a board or a wooden log) and fix pieces of a metal rod on it, making two legs for the future bird. Then you need to make a body from an old canister. To do this, the container should be given the correct shape by cutting off excess parts. You can secure the canister to your feet using wire.
Do-it-yourself peacock for a summer cottage garden
The neck and head are cut out of foam plastic and secured with wire to the canister (torso). And all that remains is to form the tail. To do this, you need to take a metal mesh, cut it to size and lower it along the length to the floor. In order for it to hold, it must be attached to the canister with screws or wire. That's it, the base of the future bird is ready!
Now the most painstaking stage of the work is making feathers from plastic bottles. Wings require long feathers. To do this, the bottle is cut into strips, and oval oblong blanks are cut out of them. You will also need short oval parts to decorate the body and neck of the bird.
You can attach the feathers to the canister and foam using self-tapping screws or pieces of thin wire. In this case, you need to move exclusively from the bottom up, so that each subsequent layer hides the fastening of the previous parts.
For tail feathers, it is better to use 2-liter green plastic bottles. One bottle will yield 4 feathers. You need about 70-80 pieces. The tail feather has an oblong oval shape with fringe along the edges. It is better to immediately draw a pattern on each workpiece. When attaching feathers to the tail, you can use wire or nylon thread. You should move from bottom to top, closing the previous row.
The crest, beak and fingers are also cut out from plastic containers. The final stage of work is painting the feathers with enamel paint. Colors should be bright and saturated.
Our peacock made from plastic bottles is ready!
Popular types
As a child, many dreamed of such a toy. Previously, such horses were made from wood and compressed shavings. The horse, made entirely of wood, was strong and durable, but it was not very comfortable to sit on. Horses made from compressed shavings looked more realistic and looked less like a rough cross between a stool and a sled. Modern rocking chairs are made not only from natural wood, but also from plastic, rubber and plush. There are even wicker models made from willow wicker or more expensive rattan. In the assortment of today's stores you can choose a horse to suit every taste and budget. This toy is suitable for children from 1 to 7 years old.
Important: when buying a horse for very young children (no older than 1 year), choose models with a back, soft seat and fastening belts.
Unusual crafts for the garden with your own hands
To decorate a flower bed, you can use a wide variety of ideas, you just have to use your imagination. For example, you can give a second life to an old non-working TV.
To do this, open the back panel, throw everything out, leaving only the body. The panel needs to be put back. We fill the soil inside and outside the TV so that it looks like the earth is pouring out of the screen. Now we plant small flowers. The illusion is that a stream of color flows directly from the screen.
You can build an unusual flower bed using the most original items. This could be a wheel from an old cart, a rubber tire, old suitcases, dishes, umbrellas, basins and even old shoes.
Read about flower beds made from tires here.
Crafts for the garden using improvised materials
Foam plastic This durable material is useful for making unusual compositions. It cuts well with a regular or stationery knife, so it can be given absolutely any shape. For example, make a goldfish. From a rectangular piece of polystyrene foam, cut out a piece in the shape of a fish. Cover it with shells and paint it with gold spray paint. Place the craft near a pond and let the fish fulfill your every wish.
You can cut out any cartoon characters from foam sheets. The base paints well; you can glue both dried flowers and pieces of fabric or other material onto it.
Natural material
Spikelets of wheat or panicles of field grass, physalis fruits, dried flowers, berries, fruits and moss can easily be used to make a huge composition. If you gather guests at your dacha, then make an unusual stand from various natural ingredients.
At some distance, vertically drive metal rods into the ground and stretch a mesh (metal or nylon thread) over them. Make a background from ears and stems of dry grass, place a bright sun and two charming butterflies made of flowers and herbs on it. Below, place two floor compositions made of vegetables, fruits and green moss.
Place a table with treats near this composition, or lay down a large blanket for relaxation. Your guests will be amazed by this creative outdoor reception.
Artificial flowers
For some reason, some people associate artificial flowers and plants with going to a cemetery. This is far from true; many bouquets look simply life-like and can be used in creativity. For example, make such a composition in the form of two swans. It would be appropriate to celebrate a wedding anniversary as a symbol of love and mutual understanding.
Make a frame from metal rods - two wings and two long necks. Decorate the wings with white translucent fabric. But cover the necks of the swans with white artificial daisies. Make the beaks from red wire. The result is a gentle and romantic composition.
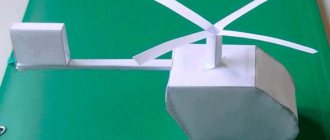
Crafts for the garden made from polyurethane foam
It can be used not only in construction, but also in creativity. For example, for making a bright garden snail. The body and head are formed from two wooden blocks connected with self-tapping screws. Polyurethane foam is applied to them from a spray can. The snail shell is also made of foam, which is blown in a spiral. All details of the craft are painted with bright paints from spray cans.
You can decorate the snail with green self-adhesive film, pine cones, tree leaves and other materials.
Cardboard tubes
If you've ever received linoleum wrapped around a cardboard tube, then you know what we're talking about. It needs to be cut into segments using a fine-toothed saw. Any composition can be formed from these parts. For example, a beautiful bird with a bushy tail.
The spaces between the large rings need to be filled with sections of thin tubes (the kind you wrap paper towels around). And in the middle of the rings it is better to place openwork weaving using the quilling technique. The last stage of work is painting. The result is an openwork composition that attracts the eye.
These are the original ideas that will help you transform a flowerbed or clearing in your summer cottage. You can make such simple but original crafts with your own hands and your garden or summer cottage will take on a simply fabulous look!
Interesting country crafts
Simple ideas for a summer house and garden
Painting a wooden horse
If your horse, in such an unprocessed form, completely integrates into the design of the garden, then you can leave it like that, just open it with paint so that the boards do not rot. Or you can give the horse a certain color and for this you will need: varnish, paint and stain, or replace all this with colored wood varnish. Decorate the animal's face, mane, you can paint the horse the color of a zebra or with multi-colored stripes. This toy can be placed near the playground and in a recreation area. The horse's body is a box, so you can pour black soil into it and plant flowers, then the horse will turn into a flowerbed for simple decoration.
Glue and rope were mentioned in the required materials; thin and thick parts need to be fastened with glue, and rope is an additional fastener; it also serves as decoration.
DIY garden crafts photo gallery
We recommend reading about flowers for flower beds.
- Preparing greens for the winter
- Do-it-yourself swing for a summer house
- DIY cups for seedlings
- DIY country veranda
- Colored stones - how to paint a cobblestone correctly
- DIY crafts from plastic bottles for the garden and cottage
- How to store food in the country without a refrigerator?
- Fixing covering material on the bed
- DIY stuffed animal
- How to make garden paths with your own hands
- Alpine slide
- Lobelia - planting and care
How to prepare straw for use?
Here are the basic steps to prepare the material for further use:
- drying;
- cutting;
- soaking;
- production of tapes;
- weaving;
- stuffing;
- painting;
- gluing;
- sorting.
Drying
Freshly cut stems of cereal plants are not suitable for making crafts, because they contain too much moisture, so there is a high probability of them turning black due to various destructive processes.
Therefore, before use, it is advisable to dry the material , for which the straw is collected in small bunches and hung in a dry, well-ventilated room, protected from direct sunlight. Drying time 1–3 weeks.
Cutting
The length of any stem varies from a few centimeters to half a meter or more, so the material has to be cut into pieces of the required length .
Single stems, as well as not too thick ropes or tufts, can be cut with a sharp knife or scissors, but a sharp ax or chainsaw is better for cutting bales and rolls.
If you do not need to cut into pieces of a certain length, but simply chop a large volume of material, then use any straw cutters.
Follow safety rules:
- position your feet so that an ax or chainsaw, even if it jumps out of its place, will not cause injury to you;
- do not place your hand in the path of the knife;
- When working with dry thick material, wear gloves to avoid splinters.
For some crafts, thick straws have to be cut lengthwise into two halves; this is most conveniently done with a sharp knife. A shoemaker's knife or wood carving knife will do.
When performing this work, follow safety rules:
- position your hands so that the knife, even if it jumps out of its place, does not cause injury to you;
- do not move your hand along the cut, otherwise you may catch a splinter;
- do not use a dull knife, it slips off much more often than a sharp one, so the chance of cutting yourself with it is much higher;
- Before starting work, adjust the knife on a leather belt or whetstone.
Soaking
This material is soaked in cases where it needs to be made more flexible. In Tsarist Russia, peasants, after soaking, twisted straw into ropes, which they used to create thatched roofs, which we talked about here.
For soaking you will need:
- container of suitable size;
- clean (tap) water;
- gas or electric stove;
- pot.
To soak the material, boil water and pour boiling water over the straw. If the material is too long and does not fit entirely into the container, then first immerse the butt part there , after an hour, when it softens, carefully roll it into a ring so that the remains fit in.
When the bundle of straw is too long, this rolling has to be done several times. To speed up soaking, drain the cooled water and add boiling water every 20 minutes.
Soaking time depends on:
- humidity of the stems (the lower it is, the longer it will have to be kept in water);
- required flexibility (the more flexible they need to be, the longer they will have to be soaked);
- average water temperature;
- thickness of the stems (the thicker, the longer they need to be kept in water).
Even when soaked in cold water, within a day the material will be suitable for weaving ropes or any other products that require maximum flexibility from straw. You should not keep the stems in water for more than a day, so as not to intensify the process of decay, because it will no longer be possible to stop it once it has begun.
Manufacturing of tapes
You can make ribbons from straws cut lengthwise, for this :
- a well-soaked stem is cut lengthwise, but not through, but only on one side;
- the cut stem is placed on a long wooden block and opened in the middle with your fingers;
- a knife is applied to the open area, tilted at an angle of 30 degrees (relative to the far edge of the stem);
- the knife is passed along the entire stem, not pressing too hard, because it is necessary not to cut or tear off, but to straighten the material;
- then the wooden block is moved in one direction, and the knife in the other, and the knife should not cut, but iron the material;
- alternately smooth out the upper and the butt parts of the stem;
- To completely align the tape, 5–10 passes with a knife are required;
- a sign that the ribbon is ready is when it curls into a ring.
Weaving
Soaked straw can be woven like regular thread or rope, so all the techniques of macrame and other weaving techniques are applicable to it .
Often, all kinds of braids become just one of the elements of a more complex product, so the choice of weaving method and the finished pattern must be approached very responsibly.
After all, after drying, the straw will fix the shape and it will be almost impossible to unravel it. The most effective weaving methods are those that require minimal bending of the individual straws.
Padding
Highly shredded straw is a good material for stuffing various shapes. It can be :
- pillows;
- toys;
- dolls;
- animal figurines.
If you decide to stuff a pillow with this material, then add a few dried sprigs of thyme or other medicinal herbs to it, so that such a pillow will have a beneficial effect on the body during sleep . By increasing or decreasing the volume of crushed material inside the mold, the density of the finished product can be adjusted.
In the Middle Ages, straw was used to make sleeping mats, so by placing the carefully dried material in a woven cover, you can get a good mattress that will last for several weeks. If you add dried medicinal herbs to it, it will also bring benefits, helping to relax and strengthen the body.
Painting
To change the color of the source material, you can use any water-soluble paints, but natural dyes give the best effect. For example, if you boil the stems in a decoction of beets, they will acquire a red-violet color , but if you use a decoction of onion peels, the finished material will acquire a color between gold and brown.
Different dyes can be mixed, as well as their concentration can be changed, all this will affect the color of the finished product. How to prepare the paint and the method of painting depends on how durable the effect is to be achieved.
You can wipe the surface of a straw product with cotton wool or a rag heavily soaked in dye, for example, beet juice, then the result will not last long.
If you boil the stems or a product made from them in an aqueous dye solution, the color will remain for many years, or even decades.
You cannot paint this material with any oil- or synthetic-based paints , because they do not allow air and water vapor to pass through well, which will lead to pathogenic processes inside the stems. Moreover, pathogenic microorganisms move from the affected fragments to healthy ones, which leads to the spread of the problem.
Gluing
Despite the fact that the stem looks smooth from the outside, it has excellent adhesion to any adhesives, so the choice of adhesive material depends on the bending strength of the straw.
If you need to glue even fragments to a flat surface, then the best choice is PVA , which is applied to the base, and plant material is laid on top.
After 10–20 minutes on paper or a day on a wooden surface, the glue will harden and fix the straw fragments to the base, so you can continue to work with the base without fear that the straw will fall off.
If it is necessary to glue dried stems to a convex base, then it is advisable to use faster adhesives , for example, based on acetone or solvent. Their advantage is that you can apply glue to the base and straw, then dry it, and then heat the straw with a hairdryer before gluing.
This procedure ensures quick and reliable fixation, but on the side of the adhesive layer, the plant material loses its ability to transmit air and water vapor, so it is better to apply it to dry straw, otherwise there is a high probability of developing pathogenic processes.
You can also use starch-based adhesives, which are popularly called paste. This glue is not very strong after hardening, and is also afraid of water, but does not interfere with the movement of water vapor , which ensures an optimal level of humidity inside each straw.
You can glue not only individual stems, but also finished products from them.
Sorting
The stem of most plants that produce straw is structured approximately the same and consists of individual segments separated by nodes .
The knots are unsuitable for crafts, because they are many times stiffer than the material of the rest of the trunk, which means they must be removed.
Don’t worry that the cut fragments are short; even if they are short, they can be woven into ropes, braids or other shapes of any length.
In addition, clear the stem of any remaining leaves and spikelets, because in order to use them in crafts, a completely different preparation is required. They simply need to be dried to remove excess moisture , after which they are suitable for gluing or painting. If you plan to bend or twist the leaves, you need to soak them in boiling water.
If you plan to make a craft from them not immediately, but after some time, then be sure to dry them, otherwise they will rot before you start making the craft.
Divide the cut pieces by length and thickness, this will make it easier to select pieces suitable for a particular application.