A little history
People have long sought to protect their savings from thieves. For this purpose, wooden chests were used, lined with iron for strength. They were more like modern safes. The poor layers of the population put their savings in stockings or clay vessels, egg capsules, which could be sealed and buried for greater safety.
Historians do not have reliable data in which country piggy banks first appeared. Germany, China and Malaysia are mentioned as her homeland. Previously, piggy banks were made mainly in the form of pig figurines. This, in particular, is associated with the fact that in Chinese culture the pig symbolizes prosperity and prosperity.
Space for creativity
You can easily buy a piggy bank, but they are not cheap. Instead of buying, you can make your own piggy bank at home.
Its cost will be very small, because for production you can use materials that are in every home. At the same time, you do not need to have any special skills and you can use your imagination and creativity without restrictions.
You can use plastic bottles, shoe boxes, glass jars, cardboard packaging from various products, soap dishes, etc. as a basis for a homemade money storage. And for decoration, anything is suitable.
There are no rules or standards - there is only imagination and the desire to create. This hobby can even become a source of additional income. Indeed, lately, handmade, handmade goods have become increasingly popular.
The instructions on how to make a piggy bank with your own hands are quite simple. Regardless of what material will be used as the base, there are several steps involved:
- Select material, base;
- Make a hole for coins or paper bills;
- Decorate.
Original ideas for a homemade piggy bank
The easiest way is to make a homemade piggy bank from a jar or box: all you need is to make a slot and decorate the product beautifully. To create an original piggy bank, you should use your imagination. Modern craftswomen offer a selection of the following ideas for independent creativity:
- From Lego. Take a construction kit and make a box or product of the required shape from it. Leave a hole for coins. To extract money, you just need to disassemble the constructor. Even banknotes can fit here.
- Made of wood. This material lends itself well to processing, so the creative process will bring pleasure. You can actually make the most unusual shapes of piggy banks from wood.
- From salt dough. The material is considered one of the easiest to work with - it can be sculpted into any shape and then painted with acrylic pigment.
- From wine corks. Using hot glue, all the plugs are glued into one structure, forming a box. You can make a hole on top for paper money and for coins separately.
Ordinary and polymer clay have shown themselves to be good for modeling: it is convenient to make a wide variety of products from this raw material. Don’t forget to bake the finished piggy bank in the oven and then decorate it.
Glass jar
There are glass jars in every home. Even if you don’t make any preparations for the winter yourself, grandparents definitely love to please their children and grandchildren with homemade pickles and jams. Or buy pickled cucumbers or tomatoes in stores.
So a homemade piggy bank from a jar is one of the most common and simplest options. For this you need the following materials:
Note!
- DIY ottoman: TOP-190 photos of the best diagrams and drawings. Do-it-yourself master class with a full description of the stages of work
- Do-it-yourself easel - varieties, drawings with dimensions for creating with your own hands. Step-by-step instructions for beginners
How to Write a Screenplay: Tips and Best Practices for Writing a Screenplay. Step-by-step master classes for beginners with detailed descriptions of the stages
- The bank itself.
- Lid. You can use nylon, but tin is better. If your goal is not to spend your savings ahead of time, then you can take a lid for home canning.
- Acrylic paints for glass, if you plan to make a drawing.
The manufacturing process itself looks like this: a hole is made in the lid for coins or bills, then the jar is closed with a lid. That's it - the simplest piggy bank is ready. The advantage is that you can see how much money has accumulated. And a large number of coins is very pleasing to the eye.
Even if the actual amount is not very large. It depends on the volume. After all, you can, for example, take a three-liter jar. When it is completely filled, the amount will be quite impressive.
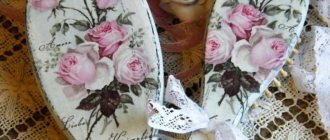
For beauty, it is fashionable to cover the jar with ornaments or various applications. For appliques you will need colored paper and a glue gun. It can also be covered with fabric or wrapped in colored paper.
DIY useful things from plastic bottles
Plastic bottles as an element of home decor and decoration
At first, which is logical, housewives themselves fell in love with them as vases and containers for storing flowers.
A little later, the craftswomen noticed that plastic behaves very interestingly when heated. Details become voluminous, edges are not scratched
This prompted the idea that, with the proper skill and dexterity, this is an excellent material for creating unique bouquets.
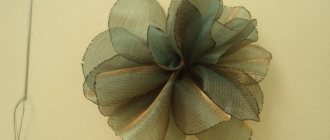
Flowers from plastic bottles
Art flowers made of plasticFlowers made of plastic
See for yourself - plastic in the hands of such a “florist” turns into a real work of art.
Plastic ribbon flowers
All you need to do is light the candle and lightly scorch the petals over the fire.
The process of creating a flower from plastic
When exposed to high temperatures, plastic takes on unique shapes. Plastic glue is used to connect the “petals”. And then it’s a work of fantasy.
Lamps and chandeliers made from plastic bottles
On the Internet you can find a lot of options on how to make unusual floor lamps from plastic bottles. The main task here is to ensure that the designer “thing” does not melt under the influence of high temperatures. Many people advise using “cold lamps” or LEDs. To make the light seem brighter, you can use garlands.
So, let’s imagine two lamp options - for the bedroom and the office.
Bedroom lamp
Office lamp
In the first case, we will need very sharp nail scissors, an awl, a candle or soldering iron, fishing line and a lot of free time. In the second - thin scissors and plain plastic.
For the first option, it is better to take plastic bottles in green, beige, orange and brown tones in order to bring the foliage as close to natural as possible. First, we make a wire frame on which an LED strip or garland is already attached. All we need is to cut out as many blank leaves as possible. After this, treat them with fire to give them a slightly convex shape, as shown in the figure. We pierce the finished leaves with a heated awl or a thick needle and connect them with fishing line, securing them to the frame. Diligence and patience - and our lamp is ready.
The second option is simpler. The lampshade itself is already ready, all that remains is to choose the desired color, make a hole for the wire, carefully cut the ribbons, and you can turn it on.
Vases and coasters
The first thing that comes to mind when we say “craft from a plastic bottle” is, of course, storage containers. There can be thousands of options here.
Containers can be of different sizes and shapes; packaging for shampoos, cleaning products and even coolant are suitable.
The plastic base can be used as the main element.
Container for storing tapes
Stationery cup
And as a basis for fabric products.
Fabric bag for small items
There may be several options. Both with additional elements, for example, lightning, and without them.
Curtains made from plastic bottles
Air curtains. This is the description one of the craftswomen gives to her creation. She complained to her subscribers that her room was not heated enough in the summer. And she got the idea to make not just spectacular curtains, but also a summer heater. During the day, the plastic absorbs all the heat and gradually transfers it into the room. In addition, such a curtain perfectly protects from prying eyes.
Air curtains
The most important thing is to collect the required number of “bottoms”. You can use different colors and sizes. And add leaves as additional volume. It all depends on the desire of the needlewoman. Best of all, these curtains do not need to be washed. They simply need to be washed in warm water. The flowers are perfectly round in shape and resemble lace in the fabric. They are connected using ordinary rings or paper clips.
Piglet
To depict a pig, you need to cover the bottle with pink paper and glue on ears made of the same paper. It is fashionable to draw eyes or use small buttons.
The spot will be a traffic jam. You can make legs from the same corks. A woolen thread or a piece of rope painted pink is suitable as a ponytail.
Note!
- DIY medical mask: TOP-140 photos of the best DIY options. Instructions for making a mask at home
- Cold porcelain: features and methods of making it at home. Reviews of the best recipes + 120 photos
- Cake decorating: TOP-170 photos of the best ideas for decorating a cake at home + instructions for beginners with simple patterns
Turtle
You can make a turtle like this - cut off the bottom part of the bottle. Make a slot in the bottom for money. From thick cardboard, you can use corrugated cardboard, cut out a turtle figurine with a head, legs and tail. Draw eyes, mouth, and paws on this basis.
Then glue the cut-off bottom part of a plastic bottle to this figure using a glue gun. If the bottle is green, then this may be enough - Tortilla, the keeper of money, is ready.
If the color of the base is white, then you can glue squares or diamonds made of colored paper onto it.
Rocket
To make a rocket, you need to make a cone out of red paper and glue it to the top of the bottle, after closing the lid. The “body” of the rocket can be wrapped in white paper.
Cut out six or eight triangles from red paper and glue them in pairs, with the colored part facing out, using paper glue. This is how you get stabilizers. Now, using a glue gun, you need to attach them to the base of the rocket.
Note!
- How to make a house out of cardboard: 140 best photos of children's crafts with your own hands + step-by-step manufacturing instructions with simple diagrams
DIY rose lamp - step-by-step instructions for creating a lamp with your own hands + original design ideas with photo reviews
- Furniture decoupage: TOP-140 photos of non-standard decoupage options. Step-by-step instructions for decorating furniture with your own hands
Creative piggy banks
You will need: blue and white paper, white PVC bottles, a glass, a black permanent marker, scissors, glue, a pencil, a stationery knife.
Master Class:
- To make a piggy bank rocket, you need to trace a glass on blue paper, then you need to cut out a circle.
- Now you need to cut the circle in half and make a cone.
- Then you should glue the cone to the lid.
- Then you need to cut out three circles of the same size and glue them in a vertical position to the bottle. These will be the windows.
- Now you should cut out the wings and glue them to the bottom of the bottle.
- Using a felt-tip pen, you need to outline the rocket as shown in the photo.
- Using a stationery knife, cut a hole for coins in the top of the bottle. Highlight it with a marker.
- To make a piggy bank princess, take a marker and a white bottle.
- Now you can draw the princess as shown in the photo.
- Then you need to prepare a strip of white paper and draw the links of the crown.
- Then you should cut the teeth, form a crown and glue it to the lid.
- Using a stationery knife, you need to cut a hole for coins.
All. The original piggy banks made from PVC bottles are ready!
Dog
To make an owl piggy bank you will need: glue gun, PVC plastic bottle, masking tape, four empty spools of thread, newspaper, paints, water, craft paper, newspapers, PVA glue, scissors, brush, sanded block or sandpaper, black marker, varnish for decoupage.
Master Class:
- Using a felt-tip pen, mark the pug's face on the bottom of the bottle.
- Four coils must be glued as legs, using a glue gun for these purposes, then secure them with tape.
- Now you need to cut out the ears from craft paper and glue them with hot glue.
- The cover should be removed.
- Twist a tail from a newspaper and attach it to the neck of the bottle, as shown in the photo below.
- You should take a newspaper and tear it into pieces. Now you need to dilute PVA glue with water in the following proportion: 1:1 and cover the workpiece using the papier-mâché technique.
- After the workpiece is completely dry, you should sand the workpiece.
- Now you need to cut a hole for the coins.
- If you wish, you can make another hole for taking out coins. It can be done in the pug's belly area. And then cover it with a coil.
- You should cut out parts of the muzzle from paper and then glue them to the bottom of the bottle.
- You can color your pug to your liking.
All that remains is to coat the craft with decoupage varnish and wait until it dries completely. All. Your pug piggy bank is ready!
Cardboard box
If you want to save a lot of change, or save paper money, then a shoebox piggy bank is best suited for this. You just need to make a cutout for the money and decorate it.
If you set a goal not to open the bottle until a certain time, then the lid can be glued. If you simply tie a ribbon around the box or make a lock, it can be used more than once.
Tree
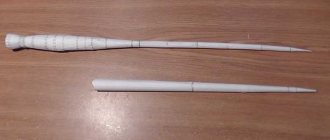
Making a piggy bank from wood is not so easy. This requires a special tool and the ability to handle it. For such a craft, you can take a piece of a thick branch with one or several small branches.
A disk about 1 centimeter thick is sawn off from the thick part. In the remaining part, the middle is drilled with a special tool, but not all the way through.
A hole is made at the opposite end for coins. A plug is screwed to the cut disk using a screw so that it fits tightly into the hole in the main part.
You can glue colored paper leaves onto the branches. Then coat all parts with acrylic varnish. The “Money Tree” is ready.
Airplane piggy bank
You will need: plastic bottle (0.5 l), colored paper, double-sided tape, pencil, scissors, ruler.
Master Class
- Make a hole for coins in the center of the bottle in this way: make a rectangular slot 2 cm long and 0.5 cm wide.
- Draw the body and tail of the plane in an "L" shape, then cut them out.
- Glue 2 blanks to the bottle using double-sided tape, then cut a hole for coins.
- Make engine stands in this way: draw 2 rectangles measuring 10x3cm on colored paper, roll them into tubes, then glue them to the bottom of the body on both sides.
- Draw the airplane wings, cut them out, then glue them on.
- Create a propeller: trace the cover onto the paper, then make a larger circle and draw the blades.
- Cut out the propeller, place it on the neck of the bottle and close the lid.
- Cut out 8 circles and glue them as windows on both sides.
- Prepare 2 stripes and glue them onto the tail.
- Get creative and make a plane in your favorite colors.
The piggy bank airplane made from a plastic bottle is ready! I recommend watching this video!
DIY