Welcome, friends, to my blog again! I want to dedicate today’s article to felt flowers. I wrote about flowers made from different materials with step-by-step master classes in this article, but today we will talk about felt flowers.
If you have already worked with felt, then you know that it is a very pliable material and very easy to work with, it does not need to be processed in a special way and it holds its shape well. Honestly, I really loved this material for its qualities and versatility of use.
For more than 5 years I worked with satin ribbon and made different flowers from it. I know from experience that working with ribbon is not so easy, it requires certain skills and experience, but if you take felt, it is difficult to find an easier and simpler material to work with, with Not only a novice craftswoman, but even a small child can handle it.
From this seller I found excellent sets of all sorts of different colors, if you need, I’ll leave a link - Felt for needlework with free shipping
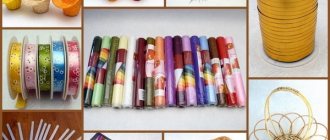
In order to make flowers we need:
- felt
- scissors
- thread with needle
- flowers or petals pattern
- glue
To make flowers, I found flower templates and various master classes.
Patterns can be printed or redrawn by attaching paper to the monitor. Then cut out the template and apply it to the fabric, I think there won’t be any special difficulties. The stencil can be traced lightly on felt with chalk, soap or pencil, or pinned onto felt with pins and cut out along the contour. As you prefer.
Tips for needlewomen
When creating compositions from felt, we advise you to pay attention to the various options for inflorescences and shapes that are found in nature. Such observation will help create the outlines and correct sizes for exquisite items.
The advantage of this material is that all existing variations can be made from it - lilies, poppies, dahlias and peonies. All you need to do is choose the right color scheme and shape of the petals. The presented templates will help make the task easier.
The finished product is assembled using glue or sewn together with stitches. Then you can safely start decorating. This process depends entirely on your imagination and creativity. We recommend using sequins, bugles, beads, embroidery and openwork inserts.
You can use felt flowers to make hairpins, elastic bands, headbands, brooches, decorations for clothes and shoes, and home decor.
All this will allow you to create an unsurpassed work of art, which will be an excellent gift for women on March 8 or other holidays and celebrations.
Easter basket for sweets with angel
Another win-win option for a decorative element for Easter is an angel. Just look how inspiring the basket with the angel looks.
Cut out the base shape for the basket from felt. We lift the sides up and sew them together with threads. We print templates for decoration from the Internet, cut them out and transfer them to felt. Hearts and flowers go well with an angel. We attach the finished felt decorations to the basket using hot glue.
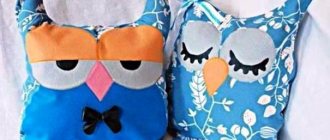
Toys for babies
Felt can be used to make excellent educational toys, such as:
- finger theater;
- numbers and letters;
- educational book;
- searcher;
- game food, transportation, etc.
Theater on your finger
To do this, you will need thick felt for the base and soft felt for making figures. As a first step, you need to decide what fairy tales can be performed in the theater. Usually they choose 1-2, among them “Turnip”, “Kolobok”, “Three Little Pigs”, “Mitten”.
For example, for the fairy tale “The Three Little Pigs” you will need:
- figurines of a wolf and 3 piglets;
- decoration of 3 houses;
- Apple tree.
You can draw animal patterns yourself or take ready-made ones, the main thing is to maintain the proportions. The size of the wolf and piglets depends on who will be the actor and on whose hands the figures will be put. The pattern is transferred to felt, 2 parts are cut out, and a muzzle is drawn or embroidered on the front side. Then the edges of the parts are sewn together, simultaneously sewing in the tail and ears.
The diagram of the house is first drawn on paper, correlating the dimensions with the figures of the characters. Then the template is transferred to felt, cut out, and interesting details are added (straw, brick, stove, door or window). An apple tree is made in the same way.
Book
An educational book is suitable for children over one year old. It is made according to the same principle as the theater, but all the figures are made flat. The theme of the book will be suggested by the imagination of the parents and the emerging interests of the child. This could be the sea with its inhabitants, seasons, plants and animals, large and small geometric shapes, the alphabet, counting, etc.
The base is made of hard felt, onto which fastening elements are sewn (the reverse side of the adhesive tape, buttons, loops, laces with stringed beads). The removable parts on the reverse side are equipped with Velcro or another element that will help the child secure the figurine in the book.
Goodies
Food crafts are also a hit with kids. After all, such products look realistic and tasty, they are fun to play with, and they can also be used as a keychain.
To make felt ice cream you will need:
- wooden stick;
- felt (white, red, pink);
- black and red threads;
- filler.
- According to the diagram, 2 parts are cut out of white felt - the base of the popsicle ice cream.
- A strip of red felt is sewn to the bottom, which imitates a fruit layer. Its height is ¼ of the entire height.
- Unevenly cut pink felt is sewn on top of the white felt to imitate icing, decorated with beads or a cherry is sewn on.
- Eyes and a mouth are embroidered on the central part of white felt.
- Sew the front and back parts of the “popsicle” with a seam “through the top”, not forgetting to leave an unsewn space at the bottom.
- Fill the product with holofiber, sew it up by inserting an ice cream stick.
This work is easy for beginners.
You can make pizza, burger, vegetables, fruits, and cakes from felt.
If you provide the “food” with Velcro on the back side, and make a kitchen out of hard felt, then it will be interesting for little housewives to learn the basics of housekeeping while playing.
You can also collect exciting versions of “tic-tac-toe”.
Four-piece product
This headdress can be sewn from drape, felt or other dense material. The pattern of a drape beret consists of the following parts: 2 parts of the side, a rim, and a bottom. The board may have the same or different heights at the front and rear. The length of the headband is equal to the circumference of the head.
The measurement is taken with a measuring tape. It should pass through the center of the convexity of the forehead and grasp the occipital protuberance at the most protruding point. The ends of the tape are closed in front, the distance is marked and transferred to paper. For each cut of the part, add 1 cm for the seams, and when cutting out the rim, the increase is 2-3 cm.
The lining is cut out to the same size as the bottom, also leaving seam allowances. The headband in this version is sewn without lining fabric. To decorate the beret, a bow is cut out of leather of a suitable shade. To sew a Scottish beret, you need to take plaid fabric.
Stitching the parts
First, sew the side. To do this, combine its front sides and grind it down. The finished seam is folded to one side and stitched, retreating 3-5 mm. When sewing a headdress from astrakhan fur or other fur, such a stitch is not used. The next stage is sweeping and stitching the side and bottom. Having connected the parts, make a decorative stitch on the front side.
The rim is folded in half lengthwise, the transverse edges are folded inward and smoothed with an iron. To make it more convenient to work, the cut is ground down and the seams are laid out in different directions; in addition, you can iron them. Now they sweep the transverse side. Sew down the side with the lining in the same sequence as when basting the top.
The final stage
The rim of the beret is attached to the underside of the side. This is a critical step, since you need to connect three layers of material, including one part of the side and two parts of the rim. The lining fabric is placed inside the beret, aligning the edges. The lower cut is folded 5 mm inward and the rim with the lining is swept away. Since the pieces are round, it is necessary to slightly gather the fabric or form small folds. Having basted these parts, a stitch is made on the front side using threads that match the shade of the beret. There is no need to decorate this beret, but if you really want to, you can attach a small tassel.
Helpful advice: using a pattern of 4 parts, you can also sew a fur headdress, but then the seam allowances need to be about 1.5 cm or a little more, focusing on the length and density of the pile. Some craftswomen sew berets from used knitted items. They definitely need a lining.
Flowers made of foamiran and buttons. 10 SUPER ideas
A bouquet of flowers is always appropriate, be it for a holiday, with or without an occasion, such a gift lifts your spirits, pleases your soul, and warms your heart. It’s interesting, because if you can’t buy fresh flowers, you can easily make them yourself, for example from foamiran or buttons. The effect will be amazing. Let's present 10 super ideas for making flowers from foamiran and buttons.
Spring bouquet of crocuses from foamiran.
Buttons are the simplest decoration for floral crafts.
The most delicate foamiran flowers with beads: wedding boutonniere.
When making flowers with your own hands, the center in the form of a button always looks advantageous.
Sometimes receiving such a bouquet is more pleasant than receiving a live one, because it will never wither.
Delicate composition made of foamiran.
And here is the step-by-step formation of a flower from foamiran using wire.
It is easy to make flowers using the indicated template.
Wonderful delicate flowers made of foamiran will serve as decoration for any occasion.
The magic of opened flowers with buttons sewn in several layers - the middle.
Read in full (link)
How to choose felt for crafts
Why is felt so popular among craftswomen of all ages? There are a number of reasons for this:
- the material is easy to process, it can be stitched and glued;
- cut edges do not fray;
- there is no front and back side;
- keeps its shape;
- Manufacturers produce material of different densities;
- a wide range of colors is available.
Small parts and appliqués are cut out of thin material; thick felt is used for the base.
- Woolen. Used for decorations. It has a high cost. Dense, but loose, may shrink when washed. Thickness 2.5-5 mm.
- Wool blend. Contains at least 50% wool fibers. Suitable for making dolls because... It easily takes shape, is flexible, and has a rich color palette.
- Viscose. Soft, breathable and absorbs moisture, used for clothing decoration.
- Synthetic (polyester, acrylic). Acrylic felt is quite hard and quickly loses its original appearance. It's cheap. The polyester craft keeps its given shape and does not fade. This is a good material for making children's toys. Its low cost is attractive. Produced in thicknesses of 1-4 mm.
- Simulated. It can be shaped by wetting it. After drying, the product retains its desired shape.
Ideas for creativity
Felt is good because it can be used to make flat and three-dimensional shapes; they can be filled with any filler:
- padding polyester;
- cotton wool;
- wood shavings;
- foam balls;
- plastic film.
Kids love to play with crafts stuffed with rustling cellophane, seed husks, and buckwheat. Adults will be delighted with a little thing with coffee beans inside and aromatic herbs. Felt absorbs odors well; if you drop a few drops of orange, coniferous or lavender oil on a souvenir, you will get a flavoring.
What interests children
If you want to spend a few quiet minutes with your child, keep him busy with creativity. School-age children are enthusiastically making sewn toys, and kids are gluing together parts cut out from patterns. If a child knows how to use scissors, he is entrusted with marking and cutting felt. By March 8th, soft bouquets are made for gifts.
Felt flowers are attached to a hoop or hair clips. If you hook the bud on a pin, you get a brooch. For the New Year holidays, they make refrigerator magnets or Christmas tree decorations with the symbol of the year. How to make a pig, read below in the master class. For Easter, an excellent gift would be a small chicken, an egg-shaped pincushion, souvenir paints, and a cake covered in glaze.
Things for adults
Women love to use soft, original-shaped cosmetic bags, key holders, small bags for phones and small items on a long strap made of durable tape. Soft jewelry looks original: brooches, necklaces, bracelets.
Soft felt panels and decorative crafts are trending:
- cacti in pots;
- decorative fruits;
- coasters for mugs;
- warmers for teapots or saucepans.
Young mothers make educational mats and boards from felt for babies, wall toys for storing pajamas. Craftswomen make custom soft letters for the baby's name - such gifts for newborns are very popular. For Valentine's Day, soft voluminous and flat hearts decorated with flowers and decorative buttons would be appropriate. Cases for phones and laptops are practical - they help preserve battery power.
Felt wreath
To make wreaths, it is better to download ready-made patterns from the Internet. They have clear sizes and parameters.
As a base, you can use a cake packaging tray or cut it out of thick cardboard. A ring of arbitrary diameter is required, which must be wrapped with yarn.
In order for it to hold tightly, it must first be fixed with a drop of glue. After it dries, you need to wrap the entire ring with tight turns of thread, without gaps. To increase rigidity, you can use liquid adhesives.
For decorations you need to take multi-colored sheets of felt. Figures are cut out of it: hearts, flowers, sponges. Decoration patterns are presented below.
To fix them, it is better to use glue. Regular thermosilicone or Moment-Crystal is suitable here.
To create a felt topiary you will need:
- felt in two or more shades to create flowers
- green felt for leaves
- large beads
- preparing a ball from foam plastic or other material
- chopstick (you can use a real tree branch or a Chinese chopstick)
- glass, pot or any other cute container
- acrylic paint in a can or jar
- ribbon, braid or other decorative options
- glue gun or any other reliable glue (for example, Moment-Crystal)
- scissors, pencil
How to sew a beret with your own hands
The fundamental principle in sewing a beret is to take measurements correctly and take into account the characteristics of the material taken as a basis. To correctly design a pattern, it is not necessary to use patterns; it is enough to remember the school formula for determining the radius of a circle:
Sewing a beret can be done according to the general step-by-step instructions:
Take your measurements. To do this, measure the circumference of your head by drawing a centimeter through the frontal tuberosity and the protrusion on the occipital bone. According to the measurement, open the cache-pen - a dimensional strip 5-6 cm wide, which determines the size of the beret. Your comfort when using the finished product depends on how accurately this measurement is taken and the cache-pin is cut. Take a standard circle for the base of the beret - 30 cm in diameter. Depending on the pattern, leave it whole or cut it into segments. Open the shelf. The pomp of the beret depends on its height. When creating a pattern, be sure to take seam allowances into account. For dense fabrics take 8-10 mm, for loose fabrics - 10-15 mm
If the fabric is too loose, it makes sense to use overlockers for home sewing. Sew the base elements if it consists of segments. Sew the shelf to the base. Cut the bottom of the shelf every 10-15 mm, not reaching 3 mm to the seam with the base - this is important for rounding the beret. Process the edges of the cache-pin, connect it into a ring, fold it in half and sew it to the hole for the head. Turn the beret inside out and onto your face. Smooth out the seams with the edge of a pair of scissors or lightly moisten the beret with steam and hang it straight on a mannequin or jar. If necessary, you can sew the lining using the same principle, securing it inside the beret using invisible stitches. Decorate your beret as you please and wear it to your health!
Important! If you want to learn how to sew, taking it as a “first try” is not a good idea. In this case, it is better to try to sew clothes for dolls, including a mini-beret in the ensemble
You’ll train your hand and won’t ruin the material for the beret itself.
There are a lot of patterns for beret patterns. You can use any, but different patterns require different materials for sewing. We have selected the optimal combination of shape and texture.
Beret from drape
This beret is quite dense, it can be sewn without a lining, which makes the work much easier. Even a novice seamstress can sew a beret from a drape with her own hands, using the following pattern:
Drape is an unpretentious fabric; its edges do not fray, which simplifies sewing. For such material, it is enough to provide 0.8 cm allowances in the pattern. For sewing, the exact measurement of the head is used - the material does not stretch. Drape berets are made from a single base, without dividing it into segments, which also simplifies sewing.
Felt beret
Felt is a thin felt, an ideal material for creating textured hats
A felt beret is warm but breathable, which is important in the mid-season. It is recommended to sew a felt beret according to the following pattern:
The double bottom of this product eliminates the need to use a lining, which makes the sewing process easier. Good felt hardly frays, but we recommend calculating allowances of 1 cm.
The bottom can be taken as one piece, but a felt beret looks much better if you sew it from 4 segments. It is convenient to decorate felt berets with flowers made from leftover material; you can add beads or seed beads.
Fur beret
To sew a fur beret with your own hands, use a pattern without a shelf. Use the standard cut of the cachepin, and for the base, cut out the following petals:
The more segments you make, the narrower these petals will be. To understand what it looks like, look at the drawing of a beret with 8 segments:
Please note that the pile on a fur beret must be located in one direction, and such a headdress definitely needs a lining, sewn with invisible stitches to the fur base.
Beret made of fabric
This beret can be sewn from old things made from knitwear (jackets or sweaters). To do this, you need very little - to be able to sew knitted parts. You can also make an ultra-fashionable beret simply using the technique of patchworking jeans.
Fabric berets lie beautifully on the head, especially if, when cutting, you slightly shift the center of the inner circle a little away from the center of the base. Use a pattern of 5 beret wedges and one base:
Cut the cache-pin according to generally accepted principles, 15-20 mm knitwear stretches. Don’t forget to sew the lining exactly according to your measurements, otherwise the beret will come out cold.
By increasing the height of the shelf it is easy to make the beret more magnificent. By reducing it, you can get closer to the male version of the headdress. The base can be cut whole or sewn from segments.
How to make flowers from felt with your own hands: ideas and templates
A big and warm hello to everyone! I really like handicrafts, and for quite a long time felt has been on the list of my favorite materials for creativity. The material is truly wonderful, amazing and easy to use. I have already shared my work with you and published several articles with ideas. And today there will be another piece of inspiration, which I hope will encourage you to try to make something with your own hands, for example, flowers from felt.
Flowers don't do anything for them. These include ribbons, fabric, foamiran and polymer clay. Each technique has its own highlights and its own beauty. But the easiest one, in my opinion, is the one in which felt is used during the manufacturing process. Even a novice craftswoman can easily and simply make a charming decoration in 10-15 minutes.
By the way, buds can also be used to decorate pillows, clothes, make bouquets or decorate the interior. In general, their use is not limited to lying in a box. Even photo frames will look a hundred times better if you decorate them with felt flowers. And what kind of hairpins they make for girls – beautiful!
In this article I want to share with you several examples of how to make flowers. I’ll also tell you where it’s appropriate to adapt them.
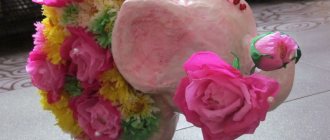
Decorating a flower pot with felt inserts
Last summer, due to severe drought, my money tree died; only small shoots were saved. All year the shoots took root, gained strength, grew, and it was time to transplant them into a larger pot. Well, it must be so. It's a good thing. I went to the store, bought a large white plastic pot and began to work magic on it. As always, I wanted something new, unusual, interesting, positive, original and so that my soul would rejoice. I want to share with you the transformation of an average pot into a designer pot. You know what they say in fashion magazines:
Well, now the story itself about reincarnation. I really wanted to use felt or felt decorations to decorate the pot. But I understood that this was not entirely practical (felt can accidentally get dirty when watering or spraying a plant, and it can also lose its appearance due to moisture getting on it). How to be? I didn’t want to give up the idea with felt. I started thinking and decided to make felt decorative inserts with a zipper. This way, they can be removed when watering or spraying and keep the felt from being damaged. Frankly, I was very fascinated by the idea of a sort of “clothing” for the potty. It sounds strange, but why not try it?
Wonderful decoration for New Year's holidays
Various craftsmen offer creative crafts for the Russian New Year holidays. But the most original ones are the ones you sew yourself. And we will help you, tell you how to create New Year's toys from felt with your own hands.
What have we prepared? Winter decor collection. All this with step-by-step manufacturing instructions. If you use our version of felt craft prompts, it will be very easy for you to repeat everything. We will show in detail how to sew flat and three-dimensional figures.
Christmas tree patterns:
The manual describes each stage in detail: we cut out the parts, sew them together and completely design the product. That is, we do and sew everything, from start to finish. All this is easy to repeat even with your child. This will be an unforgettable vacation and entertainment.
Pattern of a fawn:
Ideas for inspiration:
New Year's patterns:
Topiary
Topiary is also called the tree of happiness. Recently, this decoration has gained incredible popularity. Topiaries are made from different materials. In our master class we will teach you how to make such a bouquet decoration from felt. Follow the step-by-step instructions below. The finished product will be an excellent decoration for the interior of your home.
This is interesting: Topiar is a curly trimming of trees in order to give them interesting and unusual shapes.
Felt rose (master class)
This amazing accessory is ready to “settle” on the evening dress or coat of its resourceful owner.
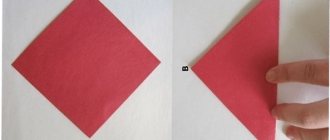
Let's start from the base of the flower. To do this, we will prepare a circle whose diameter will be 10 cm. We cut out semicircular petals along the edges of the circle, gradually moving from the outer edge inward.
The central part is rolled up, thereby forming the core of the future rose.
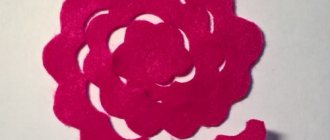
It needs to be secured with a pin and filled with a layer of glue. After the glue has dried, you need to wrap the rest of the felt around the resulting bud and close the cut from the bottom side.
This is such a wonderful rose that you will end up with!
If you make several roses, glue them to a piece of fabric and sew on a metal clasp, you will get a wonderful brooch!
For clarity, a few more roses made according to a similar principle:
Tsvoric shows how to decorate a hairband with felt roses (music by Key.peter):
What plants do not give
If you decide to give flowers, then get ready for a lot of conventions. There are many rules when it comes to gifting vegetation. The most famous of them:
- The number of flowers or branches should be odd.
- You cannot give artificial plants in vases or containers. They are brought only to funerals and graves.
- You cannot give those that bloom yellow - they bring separation.
- Do not choose varieties that are too delicate (they may simply not be grown) or those that require complex care.
- They do not give gifts to ficuses (they say they suck energy), cacti (a hint of cruelty, cynicism), hoyas (another name is “widow’s tears”), palm trees, creeping ones, ivies and vines.
- Red or burgundy bouquets are not given for weddings and family anniversaries - this is a wish for a break in relationships.
When choosing a gift, think about where it can be placed. For small rooms it is not advisable to choose large specimens.
When giving a living gift, not only the gift itself is important, but also the gift container for the flowers. An organic, original combination of container and plant will make the offering brighter and help express a wish.
Be sure to figure out how to decorate a flower pot for a gift, find a suitable greeting, buy or order a postcard.
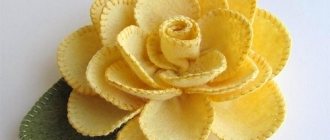
Felt peony
Let's look at beautiful options for other flowers, for example, voluminous peony. This is a lush fragrant flower, loved by many. It has many petals.
Stages of work:
- From red, pink or white felt you need to cut out 20 small rectangles (not squares) of various sizes.
- We make teeth (fringe) on one edge, and make the other semicircular.
- You need to pin the round edge and secure it with glue.
- From several identical petals we form a flower, for example, white.
- The second layer should be a slightly larger flower, maybe the same shade as the first flower or pink.
- Each layer can be gradually made darker: from white to red (pink). Glue the centers of the flowers together and wait for them to dry.
- For a beautiful core, take a yellow (orange) thin strip of felt. We make a fringe on one side and cut it with scissors to the middle of the strip.
- Then we roll the strip with the fringe up, the yellow center of the flower.
- We glue it to the center of our peony and close the cut of the flower.
If you attach 1-3 flowers to the headband, you will get a creative head decoration.
Schemes and types of original crafts in the photo of felt flowers.
What are they?
Felt flowers are a decoration that can be used for completely different purposes. They can be of different shapes or colors, and have from one to five layers (and even more).
Each option will look special. They can also be used to create elegant topiaries that will harmoniously complement the interior of any home.
This is interesting: Felt is felt made from rabbit and goat hair. It is a non-woven textile fabric. Wool and synthetic fibers are often used for the base. The edges of the wool have small “notches”, which is what ensures excellent adhesion of the fibers to each other.
Felt is often used to make various fakes
Required tools and materials
- Felt;
- Glue gun or Moment glue;
- Scissors;
- Needle and thread;
- Pins and pins;
- Decorating elements (beads, stones, sequins, etc.);
- Flower cores (can be purchased at craft stores);
- Floss threads (for finishing edges on some products).
Creating flowers from felt is very simple, because this material is quite pliable to work with. It is particularly dense and thick. Most often on sale are multi-colored felt sheets with a thickness of 2-2.5 millimeters and a size of 30x40 centimeters. Slightly less common are sheets measuring 20x30 centimeters with a thickness of 4 millimeters. You can choose any option you like or create a new one, because handmade products are always exclusive.
Patterns and templates
To create flowers from felt, you can choose completely different color patterns
You can make voluminous flowers from such patterns
From this template you can make a flower with many leaves
A huge number of patterns can be found in specialized stores and online catalogues. Most often these are simple, uncomplicated shapes that even a beginner can sew. But if you wish, you can choose a more complex pattern, for example, for a multi-layered flower.
How to make a voluminous flower
Despite the fact that voluminous flowers are made from a large number of parts, in this case even a pattern is not required. Beauty is created from simple elements that can be easily cut out by a child.
What is necessary:
- felt;
- scissors;
- glue.
Despite the fact that voluminous flowers are made from a large number of parts, in this case you don’t even need a pattern
Progress:
- Cut out at least 21 small rectangular pieces from the fabric.
- Round each element on one side and make a fringe on the other.
- Pinch the rounded side of the future petals and secure with glue.
- Form a flower from small petals.
- Cut a thin strip from yellow felt.
- Make frequent cuts on one side of the strip and then roll it up.
- Fix the yellow part with glue in the center of the flower.
Rectangular handmade felt basket
A cute product for sweets for Easter and more.
We prepare the base from cardboard. This can be a ready-made box with the sides cut off, or a homemade container. We make the edges of the sides of the box openwork.
We decorate the cardboard base using felt parts. Cut out green felt strips with lace edges to match the sides of the box. We make them from thick material. We decorate the details with yellow applications made of thin felt.
To make one applique, cut out 5 small circles from yellow material. The diameter of the circles is determined using a glue stick cover. Fold each circle in half.
Place the halves on top of each other and sew them together along the bottom edge. Open the top free edges. We attach the decorations to the green stripes on the sides of the product. Additionally, we decorate the yellow details with beads.
Glue the prepared parts to both sides of the box. We will attach the appliqués to the remaining edges after we secure the handle. To make it, take a strong tape (for example, that is used for boxes) and wrap it with braid.
DIY felt aster
These flowers look amazing in a basket or vase. Even just by attaching them to a hairpin you can create a perfect and unusual image. The process of making three-dimensional asters is a fascinating and not at all difficult task. If desired, absolutely anyone can create such a masterpiece.
What is necessary:
- felt;
- pencil with soft lead;
- hot glue;
- scissors;
- needle;
- floss threads;
- regular sewing threads;
- pins;
- rhinestones;
- beads.
Progress:
- Draw a flower with fairly thin petals on the fabric.
- Cut the workpiece along the marked lines and be sure to cut through each petal as close to the center as possible.
- Using the same principle, draw and cut out four more blanks, each of which should be a little smaller than the previous one, but not by much.
- Carefully sheathe each petal with floss threads.
- Place the blanks one on top of the other.
- Immediately sew them together and give the petals the correct shape, lifting them up a little.
- Cut a small circle from contrasting colored felt.
- Using thread and a needle, form this circle into a ball.
- Glue it in the very center.
Felt basket using an egg carriage
A great idea for conveniently storing colored eggs.
We take an ordinary carriage and cut off all the excess. We cut out wide strips from green felt. The width depends on the desired height of the basket. We cut the top of the strips, forming grass. From material of other shades we cut out flowers and other decor as desired.
We make several rows of grass in two shades of green. We glue the layers together and attach them to the carriage. We cut off the excess edges, getting small pieces of grass. These “trimmings” will serve perfectly for decorating the cells inside the basket.
We decorate the product with flowers and fill it with colored eggs.