Reads: 1,509
Reading time: 7 min.
no comments
If you love the most original things, then patchwork is for you. In such an outfit it is simply impossible to go unnoticed - patchwork clothing ideas for women become the very highlight that must certainly be in the image.
Don’t think that patchwork is only appropriate for outrageous looks or is only suitable for bohemians. Items made from scraps can harmoniously fit into a rather discreet outfit for every day.
Master class “Patchwork for beginners - blanket”
Tools and materials:
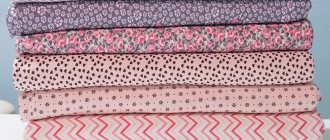
- 1 m of fabric of each color (width 220 cm) - 6 or 9 squares 45x45 cm;
- For the lining - 170 cm or 220 cm (the margin at the bottom goes away after the blanket is quilted);
- Sintepon of similar sizes;
Step-by-step instructions for MK:
- Cut into squares and stack, alternating colors.
- Cut this layer cake diagonally or randomly. It is convenient to cut with a roller knife.
- Take the part from above and move it down under a stack of similar elements. In a cut stack there will be 1 piece of the 1st color on top and 1 piece of the 2nd color.
- Machine sew all the squares along the cut line.
- On an ironing board, carefully press the seams to one side or press them flat.
- Fold the blanks into a neat stack in the same order - squares of the 1st and 2nd tones on top.
- Using a ruler and a knife, cut the entire stack again along any line (you can cross the first seam).
- Move one of the top fragments down under the stack. Sew and press, remembering to fold in order - now it’s better to match the seams.
- The operation is repeated until the last detail. The optimal number of seams is 6-10 horizontally and vertically.
- After ironing the seams, you need to trim the squares to get a figure with a side of 32 cm.
- You can assemble the blanket in different ways: first assemble the front part, then quilt it with padding polyester and lining. It's difficult on a typewriter. Or quilt each square separately, cutting padding and lining.
- Gather the quilted squares together, trim and cover the seams with narrow tape or strips of fabric. It is convenient to assemble according to the scheme: ribbons of 4-6 squares, then sew the strips.
- Along the edge of the blanket, you also need to trim it with an edging made of plain fabric or pieces of rags, as in the MK photo.
Dress
Dresses in the patchwork style are presented in both boho-style models and more traditional solutions. These can be summer light sundresses or insulated options that can be worn with turtlenecks and various jackets.
This sleeveless sheath dress, which uses patches of white, black and cocoa au lait, can be worn over a crisp white turtleneck, paired with black heeled ankle boots and a creamy neutral handbag.
Accessorize a light flared dress with a belt with ¾-length midi sleeves with maximally open sandals and a straw hat.
Wear a fitted warm sundress in red-brown tones with a white shirt and boots the color of dark chocolate.
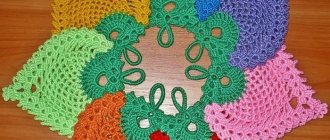
Pair this boho dress with crochet motifs with Indian-inspired sandals, lots of bangles and a woven handbag.
Shortened dress models can be safely worn with over the knee boots and stocking boots, and there is no need to hide part of the dress under a jacket.
A flared, lightweight sundress can be used as a skirt by wearing a loose, waist-length denim polo blouse over it. With this outfit, you can try on white sneakers or sneakers.
If a patchwork dress seems too bold to you, choose or sew a model in which only a few details are sewn from scraps. For example, the skirt of a dress can be plain, and the upper part can be made of patches or vice versa. Sleeves or even arbitrary inserts of different sizes can be made from the flaps.
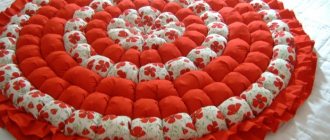
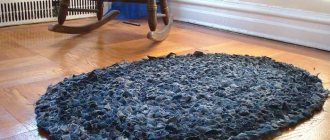
“Lyapochikha” technique
This is a fairly simple technique in which scraps of the same length are sewn in rows. Each of the elements is stitched in the middle, bending the edges to create the required volume.
In order for the product to keep its shape, the flaps are sewn very tightly. The splendor of the product depends on the length of the elements. The most popular item used using this technique is a rug.
We sew a hut block - a well using the patchwork technique
Patchwork using the well technique is considered one of the simplest. Its basis is a square, which is covered with strips of fabric. In the classic version, if the central square is red, then the block is called a “hut”, if it is blue, then the block is called a “well”. But you can make it in any other color, depending on what kind of product you want to sew using this technique.
Choose the colors of fabrics for stripes to your liking. All the strips with which you will cover the square are the same width. The length of the strips must be measured each time before sewing the parts together.
The following describes in detail the patchwork technique for beginners step by step, following which you will sew a finished block:
General rules for needlework
In order for a thing to create a pleasant impression, it must be made accurately in geometric terms and be neat. To do this, you need to follow some rules:
- To prevent an item processed using patchwork technology from shrinking after washing, the purchased fabric must be washed and ironed.
- If a previously used fabric is used for work, it must be treated with a solution of water and starch and ironed.
- To mark the fabric, use only soft crayons or, in extreme cases, a bar of soap. Ink pens and pencils will not work in this case.
- The fabric should be cut in the direction of the grain thread. This will help avoid unwanted deformations when stitching.
- To avoid deformation, strips and flaps of fabric must be smoothed across.
- All patches with images must be ironed in the same direction.
If you plan to manufacture a large item, you should first create a smaller sample of it in order to correct all the shortcomings in advance and finalize the design.
Types of patchwork
Before you start sewing any product, you should familiarize yourself with the patterns and templates. The activity seems easy and simple only at first glance. In fact, it requires special care and scrupulousness.
The execution technique must be carefully and carefully followed, then you will be convinced of the charm of the product itself.
Japanese
This technique combines the traditions of the West and the East. Silk fabrics and stitches are actively used. Various geometric shapes serve as the basis: squares, triangles, rectangles, rhombuses. In addition to making decorative bedspreads, this type is suitable for panels.
The spread of patchwork in Japan was also caused by the economic situation.
Knitted
Most needlewomen are familiar with it. The difference from traditional patchwork is that the patches are not sewn together, but are knitted or crocheted together. In this case, both fabric and knitting threads are used. The most popular accessory of this type is a woman's bag or a large bedspread.
It is almost universal - any product can be knitted using this technique.
Mill
It is considered the most common option. Consists of two pieces of fabric with contrasting colors. Provides the opportunity to create various figures and achieve original combinations.
Usually made from two fabrics in contrasting colors.
Log hut
The formation of patterns is done from stripes around the main element. Most often square. Laying occurs in a spiral. Another variation of this technique is to move the square into a corner.
You can also find another name for it – “Well”. In the English version it is called Log Cabin.
Note! In order for the pattern to be as clear as possible, the pattern must be assembled from strips of the same color. The collection takes place in pairs. It is worth remembering that everything should be in harmony with each other in color.
Crazy patchwork
Translated it means “crazy shred.” The main feature is the use of figures of various shapes. It may be irregular, crooked, or have the appearance of a non-standard appliqué. The seams are masked using braid or special embroidery. The product itself is decorated with various decorative details: beads, buttons or metal pendants.
Crazy – translated from English means crazy”, “crazy”.
What is patchwork
Craftsmen call patchwork many types of needlework, in which diverse parts are combined into one finished product. If we limit ourselves to wardrobe items, then patchwork is a technique for creating a canvas from individual flaps. From such fabric you can cut and sew a thing of any style.
There are several types of patchwork:
- Traditional or English, which uses flaps of the same size and shape.
- Сrazy (translated as “crazy”) - here randomly shaped flaps are sewn together, creating fancy ornaments (often the crazy technique involves joining parts with a zigzag seam and additional decoration of products with beads and seed beads).
- Quilting – bedspreads and blankets are often made using this technique; the products are supplemented with lining and insulation; outerwear is often found using the quilting technique.
- Knitted patchwork - not scraps of fabric are used, but knitted motifs specially created for a specific idea.
- Japanese patchwork - thematic images, most often landscapes, are made from multi-colored patches.
- Imitation is a product made of printed fabric that imitates patchwork.
The advantage of patchwork sewing is that an ultra-fashionable item can be sewn from almost nothing by cutting old clothes, bed linen, and leftover fabric into pieces. Let's see how to properly combine patchwork items with other details of the image, and evaluate fashionable couture solutions.
Patchwork herringbone: step-by-step execution
Herringbone patchwork is sewn by alternating multi-colored stripes, resulting in a pattern reminiscent of a herringbone or parquet.
- Take fabric in three shades of green, 3 shades of beige, as well as striped and terracotta colored fabric. All strips will need to be made 5 cm wide, and the length will need to be measured separately for each strip during the sewing process.
- Take a 7x14 cm piece of striped fabric. Fold it in half with the right side inward and draw a diagonal line from one corner of the square to the other.
- Along the line on both sides of it, lay two parallel lines.
- Cut the resulting piece along a diagonal line. Expand one triangle - you get the first square of the block.
- Cut a piece of green fabric 5 cm wide and a length equal to the side of the resulting square (7 cm). Sew it to the bottom side of the square, placing the two pieces right sides together. Press the seam on both sides.
- Cut out a piece of beige fabric 5 cm wide and a length equal to the right side of the resulting rectangle. Place both pieces right sides together, pin and stitch. Iron on both sides and remove excess fabric from edges (if any).
The result is the first tier of the “Christmas tree”. Continue to follow the patchwork master class and you will receive the finished product.
In order to sew the second tier, sew a green strip to the bottom edge of the first tier in the same way as described above: the width of the fabric is 5 cm, the length is equal to the side of the main fragment of the block to which we sew a new strip.
Sew the beige herringbone stripe in the same way.
- Continue adding tiers, sewing strips of fabric in matching colors one at a time. The number of tiers depends on your desire and design.
In this case, there were 6 tiers. Complete your herringbone with terracotta-colored stripes.
Experiment with color. In this case, a multi-colored square was made at the very beginning of the block, and then stripes were selected for the tiers in the tones of this square. Finish the block with a terracotta color that matches the first striped square.
Master classes on sewing raincoat fabrics with insulation
The first time sewing a product from raincoat fabric on insulation is both scary and difficult. If you doubt your abilities, we recommend watching our video tutorials.
- Master class on sewing a jacket with insulation using pattern No. 630. In the master class we show the technology of sewing a jacket with insulation, which is good for individual work. In addition to the detailed sequence of assembling the product, we give two options for processing a pocket with a zipper, and also share many other secrets that have been developed over the years.
- Master class on sewing a jacket using patterns No. 667 and No. 668. In this master class we will talk about modeling a product using insulation, as well as processing three types of sleeves. As a result, with one master class on the same pattern, you can end up with several completely different products.
- Master class on sewing a down coat using pattern No. 385. The master class combines all the classic knots of a coat with insulation. The processing method that we talk about in this master class can be used both in individual tailoring and in mini-production.
You can buy patterns for products made from raincoat fabrics with insulation in the GRASSER online store.
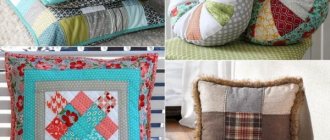
How to make a patchwork pillow (video)
Patchwork needlework is a real art. A variety of household items are made in this way, from primitive potholders or napkins to blankets and carpets. This style is increasingly being used in clothing; a tablecloth made from shreds looks chic. Each needlewoman chooses the most suitable technique for herself and creates her masterpieces with pleasure. This work is quite painstaking and requires special attention and patience, but the result obtained is definitely worth the time and effort spent. The products are colorful, unusual and unique.
Coat
A patchwork-style coat is a rather impressive-sized product, so it should be complemented with the most modest elements possible. If you do not want to distort the proportions of the silhouette, choose something sewn from small scraps. Large blocks arranged asymmetrically are suitable for fashionistas with a curvy or disproportionate figure.
Wear a multi-colored oversized cocoon coat with dark gray skinny jeans and black low-top boots. Accessories include a knitted beanie hat and a black tote bag.
A long coat made of patchwork with a variety of prints can be worn with a white shirt or blouse and boots that match one of the colors present on the coat.
A cropped coat made of fluffy patches in pastel shades can be worn with a plain cloche hat and knee-high boots with a tight top.
Wear a patchwork coat reminiscent of a blanket or plaid with simple pale blue jeans and taupe chunky boots.
A coat in a single color scheme can be complemented with a thin, monochromatic but bright scarf or neckerchief, while shoes and bags should be in neutral colors that are not conspicuous and act as a background.
This coat does not go well with all things; choose the most discreet tones, plain materials, and discreet styles. The coat will be the central element of the image; it is already a spectacular product; you should not overload the look with additional details or prints.
Varieties of patchwork
Over hundreds of years of existence, many varieties of patchwork have emerged. We invite you to get acquainted with the most popular ones.
Traditional (classic) patchwork
A distinctive feature is restraint in colors and shapes. The front side of the product is made of individual flaps that create simple geometric patterns - squares, rhombuses, triangles or trapezoids. The lining is most often cut out from a single piece of fabric. Product options: capes, blankets, pillowcases, potholders and kitchen towels.
Сrazy patchwork
When looking at the work done using this technique, one can recall the lines of an old song: “I molded you from what was, and then I fell in love with what was.” And, indeed, despite the apparent randomness of forms, materials and decorations in the form of ribbons, bows, beads, pendants and embroidery, Crazy’s works are original and have an attractive charm. This technique is most often used for small items - bags, clothes and decorative panels.
Japanese patchwork
Characteristic features will be contrasting colors, the use of silk, fringe, tassels and hand sewing with contrasting thread in the typically Japanese technique of sashiko stitch - a uniform hand stitch with a needle pointing forward. Ornaments can be either geometric shapes or oriental natural themes - flowers, plants and animals.
Quilting
American multi-layer sewing technique with a mandatory additional step of quilting the product. She enriches the classic patchwork with the use of appliqués, embroideries, decorative stitches and non-woven materials - leather and padding to add volume. Finished products are usually small - bags, cosmetic bags, decorative pillows, panels and clothing.
Knitted patchwork
Knitted patchwork comes in two versions. A combination of flaps, tied along the contour and fastened together using a hook or knitting needles, and exclusively using the knitting technique. In the latter case, the flaps can be conditional - the canvas is made continuously with periodic replacement of yarn to create a geometric pattern. This allows you to avoid skewing of the canvas due to the heterogeneity of the product.
Patchwork patterns for beginners
Patchwork patterns for beginning needlewomen are necessary in order to correctly calculate the size and number of patches needed to make the product. You should decide before starting work what you will sew and what appearance the finished product should have.
For cutting, stencils are prepared based on the diagrams. They are conveniently cut from thick film or plexiglass. Typically, geometric shapes in the form of a square or triangle of different sizes are used; they are easy to sew together and form a pattern.
To get started, decide which piece will be the first to be created using the patchwork technique. Select a scheme from those suggested below. Print it in whole or in parts, enlarging the necessary fragments using computer programs. Transfer them to plastic, cardboard or plexiglass and prepare pattern templates.
Vests
The main rule for combining a patchwork vest with other details of the image is that the top should be plain. It can be a turtleneck, shirt, blouse, T-shirt, thin pullover and even a sleeveless T-shirt. In the case of a T-shirt, T-shirt or knitted long sleeve, a compact print on the chest is allowed, provided that the vest is made from not too colorful patches.
Vests made from patches come in different styles - straight, elongated, shortened like a bolero, fitted for office or even below the knee, made of light flowing fabric. Some vests can be worn as a blouse or sundress directly over underwear. Thin elongated models can be complemented with a belt - thin and barely noticeable or, on the contrary, wide and standing out against the background of ripples of flaps.
Similar rules apply to patchwork skirts and trousers - all shirts and tops must be plain. If you are wearing a knitted item like a sweater or jumper, make sure there are no large voluminous patterns. Even a plain item with large braids or “bumps” knitted on it may turn out to be too rich and unsuitable for proximity to a product made from patches.
0 Comments