Selection of schemes
Crochet strawberry potholder for beginners
To work, you will need half-woolen yarn and an appropriate hook. It is important to determine the purpose of the product. For a decorative model, threads with acrylic are suitable. For a practical potholder that will be used in the kitchen, it is better to take wool blend yarn or with the addition of cotton. Such a potholder will not heat up from hot dishes and will become an assistant to the housewife.
Very beautiful and attractive crochet strawberries.
What you need for work
For a dense berry you will need the following materials and tools.
A decorative decoration in the kitchen that does not need to be hidden.
To knit a decorative potholder we will need about 20 g of green yarn, about 40-50 of red yarn.
Legend
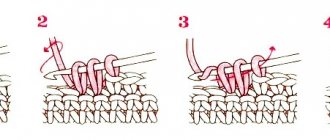
- v.p. - air loop;
- Art. – single crochet;
- senior sciences – double crochet;
- t2n. – double crochet stitch
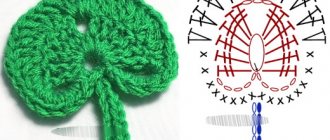
Pattern for knitting a strawberry potholder.
DIY crochet potholder
Start knitting 3 stitches. and close it in a circle with a connecting post. The product is knitted in circular rows.
Using green yarn, knit a chain of 16 chain stitches.
Close it in a ring.
The first row was tied.
The third row is knitted with green thread. Cut the thread.
Important! To make the circle even, add columns evenly. The first row is 6, the second is 12, the third is 18. Each subsequent row should be longer than the previous one by the number of loops of the first row.
In the 1st row, where there are 6 dc, connect a green thread in the center and tie a chain of 18 ch.
Join together at the center between 6 dc opposite.
Tie a ring 25 st.b.n., cut the thread, hide the end of the thread.
This is how the top of the berry was prepared.
Explanation: In the fourth row, the “nose” of the strawberry is formed. Repeat the next rows - st., 2 ch. in an arc of air loops from the previous row.
Continue working, following the described order, until the desired size.
Knitting a leaf for a strawberry potholder
Knit the leaves for decorating the potholder without tearing off the thread according to the description.
The crochet “Strawberry” potholder is ready.
The last leaf can be knitted at the end or in the middle. Make a loop from 8-10 stitches.
Tack binding and assembly
Tie the edge of the product with single crochets. The thread can be used red or matched by contrast. Start tying from the top of the strawberry to hide the unevenness with a leaf.
Arc tying
You can make a nice binding if you use picot. For beginners this may be difficult. A simpler method is tying with arcs of air loops.
Please your family and friends.
Knitting consists of single crochets and 3 chain stitches. between them. The arc begins at the first edge loop and ends at the second. It is advisable not to make omissions.
Tie the leaves in the same way and sew them to the berry. Embroider decorations on the red fabric with black thread in the form of ticks or dots all the way through.
Shell harness
An interesting potholder is obtained by using a shell pattern to bind the edge. To make the product look neat, start tying it with a shell after fixing the leaf.
An excellent gift for any holiday.
Finishing
Trim all protruding thread residues at the fastening points and hide the ends in the fabric.
Give warmth and joy to your friends, family and loved ones.
Wash the finished strawberries in warm water with liquid detergent. Dry by spreading onto fabric. Knitted items may become deformed at high drying temperatures.
Decorate your kitchen with these potholders and other decorative items.
There are many options for MK strawberry potholders. A very beautiful model is obtained by using the pineapple pattern with shell trim. But such a thing is not suitable for practical use. Many holes in the fabric of the product will not protect your hands from a hot pan in the kitchen. Some craftswomen knit double openwork potholders with an insert between the sides of dense flannel fabric.
Such potholders will not only lift your spirits, but also add coziness to your home.