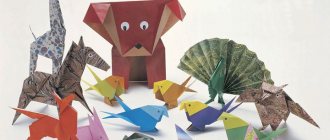
Materials for masks
Carnival masks in Venice were exquisite. They were made from expensive fabrics, decorated with precious stones, and trimmed with feathers and fur.
In the modern world, you can find well-established accessories, but papier-mâché variations, lace masks, and pieces made of feathers and felt are very popular. They are for sale, but you can create a stylish piece at home using scrap materials.
Types of masks
Materials for them can be:
- Fabrics;
- Plastic;
- Paper;
- Papier-mâché and others.
In accordance with the image and costume of the participant in the costume ball, the masks are complemented with various decorative details:
- Feathers;
- Beads;
- Rhinestones;
- Fabric inserts;
- Lace
- Sequins;
- Frills and stuff.
To make a mask you will need a template.
Current masks
To choose an option, we will find out the existing types of these decorative masterpieces. A small selection is presented here.
Exquisite mask
You will need: tulle, tape, scissors, A4 sheet, marker, cling film, black fabric paint, fabric glue or superglue, ruler.
Master Class
- Draw a mask template on paper or print it on a printer.
- Cover the mask template with cling film.
- Cut the tulle measuring 25x17 cm and attach it to the template.
- Trace the template with fabric paint and wait until it dries completely.
- Remove the tulle from the cling film.
- Cut out the mask.
- Cut 2 pieces of tape 50 cm each.
- Glue the tapes to the mask and wait until they dry completely.
The exquisite mask is ready! I recommend watching this video!
DIY paper masks
For the simplest crafts for games and events, a little preparation is required. After all, the item must fit the size of the person wearing it.
In order for the brainchild to please its owner for a long time, all attachments must be strong and decorative elements secured.
Materials:
Note!
- DIY paper machine craft: various options for creating a machine
- How to make paper flowers with your own hands for children - a master class on making
- How to make Minecraft figures and blocks from paper: step-by-step instructions
- White A4 sheets for the frame, colored for addition;
- Ruler and pencil;
- Centimeter or tape measure for measurements;
- Scissors;
- PVA and brush;
- Raw materials for decoration (feathers, beads, sequins, stars);
- Hole punch or awl for fastening;
- Ribbon.
Baba Yaga mask (papier-mâché)
An evil character from their Russian fairy tales with a hooked nose, how can I make this mask more like the original?
For this you will need:
- plasticine;
- any plastic mask according to the shape of the face for the layout;
- newspaper;
- PVA glue;
- glue brush;
- scissors;
- stationery knife;
- water;
- acrylic paints and brushes for decorating the mask;
- ribbon.
Step by step process:
- First you need to make Baba Yaga's face. To do this, take a plastic mask, newspaper for pasting, PVA glue, and water.
- Lay out the first layer on the mask with paper soaked in water, without glue. This is to easily remove the resulting mask. Next, you should glue several layers (3-4 layers) of paper soaked in glue. Leave the mask to dry for several hours.
- Make the nose and chin of Baba Yaga. To do this, make a nose with a hook from plasticine, like a mask, cover it with paper and glue, and also leave it to dry. After drying, cut the nose in half and take out the plasticine. Glue the nose to the face with pieces of paper. Make a chin out of plasticine and also make a piece out of paper. Wait until completely dry.
- In the mask, cut holes for the eyes, or for the mouth, holes in the nose for breathing. Collect the mask. The nose and chin are attached to the mask with pieces of paper soaked in glue.
- To make eyebrows, twist twigs out of paper, soak them in glue and attach to your face. Make holes along the edges of the mask for ties. Thread the ribbon from the inside out, tie knots inside.
- Decorate the finished mask.
Taking measurements
The first measurement is the distance between the center of the eyes. An even segment is drawn on a piece of paper. Next, the interval between the temples is measured and a sketch is drawn. Afterwards the bottom edge is marked. Dots are placed along the lower edge of the product, the middle - below the tip of the nose. This is done for any product so as not to get confused with the sizes.
Next, side slits and cutouts for the look are noted. They can be anything, it is important that they do not interfere with the view. The markings for the mask drawing are ready.
Decoration of masks
The mask, cut out and equipped with an elastic band, is not yet ready for the holiday. You need to use all your artistic skills and decorate the mask.
Gouache may be the best option for this. To avoid contaminating the child with paint, the finished product is varnished. The varnished surface is decorated with tinsel, beads, sparkles or rhinestones.
When choosing decor, you should not forget about the gender of the child. For example, bows and hearts would be inappropriate on a boy’s mask. A piping around the edges of the mask or New Year's tinsel is suitable for this.
Preparing the base
After transferring the dimensions, cut out an oblong piece of sheet, retreating from the drawing. Fold the sheet in two, with the fold line in the middle of the nose. Mark the interval between the eyes and divide it into two. Let's move this value away from the fold and make punctures for the eyes. Thanks to the large eye sockets, there will be no need to adjust the pad if the item moves off.
We complete the design and cut it off. If any inaccuracies arise, it is better to correct the workpiece by periodically applying it to the head.
Note!
- What can be made from a box at home for kindergarten: the best craft ideas + video master class
- How to make flowers from napkins quickly and easily: 15 ways to create bouquets of roses, carnations, peonies
- How to make flowers from corrugated paper with your own hands: step-by-step instructions for creating voluminous bouquets
Create a bear mask
This version of the bear mask can be made using 1 or 2 methods. To make the product original, we suggest using woolen threads that will help create animal fur.
- We will make the mask in the form of a three-dimensional base.
- To do this, we make notches in 4 places on the finished template.
- Carefully glue them together and get an unusual piece.
- We make holes for the eyes and nose.
- Places of deformation are covered with brown threads.
- The length of the villi should not exceed 2 cm.
- The animal's ears will be round. We cut out 2 semicircles from cardboard and attach them to the base of the mask.
- We decorate them with woolen threads. They add textured lines to the design of the craft.
- Now let's move on to the muzzle. To do this, we glue the wool overlapping the previous row.
- We decorate the animal's mouth with red paints. The photo of the mask shows the finished craft.
We strengthen, we formalize
We work with the prepared mask pattern. We trace the cut out paper shape on cardboard and multi-colored sheets and cut it. Durable material will strengthen, details will decorate. We glue everything together.
The dried prototype must be bent into a semi-oval shape and brought closer to the shape of the head. Then it is important to extend the model on the sides. Having fixed the art on the edge of the table, gently pull it towards the edge.
Fairy tale character mask
For example, at matinees it is often necessary to dress up a child for some role - a mouse, a bunny, a wolf cub, a cat, and a fox are common options. For New Year's crafts, the following step-by-step instructions and materials will be useful:
- multi-colored cardboard;
- scissors;
- double tape or glue;
- ribbon or elastic band.
Let's try to make a cat's face:
- We take wool-colored cardboard: black, white, reddish. Draw a face with mustaches, cheeks and ears on it.
- On white cardboard we draw the central parts of the ears, which will be smaller than the colored part. Glue the parts to the workpiece with glue or tape.
- Next we continue to work with white color. We cut out a mustache from the leftovers; the thicker they are, the better. We make a nose out of pink cardboard and glue all the details onto the blank.
- Then you need to draw eyes on the base, having previously measured the distance between the baby’s eyes. Cut holes in the base slightly larger than the markings.
- Everything is almost ready. We create a fastening with an elastic band or tape, having previously made holes on the sides with an awl or hole punch (the second option is more careful). We insert a long holder through the holes - and that’s it.
The production time required here is very short, and there will be plenty of fun for children. There are plenty of options for creativity and implementation of different ideas. There is a reason to make the face of a hare, tiger, pig, bear, wolf, fox or sheep, any animal - the choice depends only on your imagination. And the joy at a children's party will be genuine from such an amazing toy.
We decorate, make mounts
To decorate the original mask you will need feathers, glass beads, fabric, and lace.
Start designing and decorating as your imagination allows. To make fasteners, use a hole punch or a sharp awl to make holes on the sides. We will insert the tape into the holes. Alternatively, it is possible to attach the stick with a glue gun. Then you will need to constantly hold the craft in your fingers.
Goat mask
For such a mask you need very little:
- thick paper;
- a simple pencil;
- black or brown felt-tip pen;
- PVA glue;
- ribbons for ties.
Step-by-step implementation of the mask:
- Draw a mask according to the size of the face, shaped like an inverted pear. On the top of the mask, make two cuts 2 cm deep. Cut out holes for the eyes.
- At the bottom of the mask, draw the nose of the goat, making cuts.
- Glue the cuts at the bottom and top to add volume to the mask.
- Cut out the horns and ears, glue them on, and make holes for the ties.
- Thread the ribbons through the holes and secure them with a knot on the reverse side.
If desired, the mask can be decorated or covered with colored paper.
Raven head mask
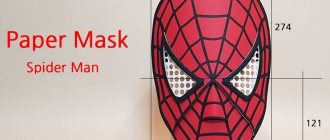
This celebration image is created through a simple manufacturing process. Therefore, it can be easily performed with children. You will need: snow-white Whatman paper for the bottom layer, black thick paper, scissors, glue, rubber band and stapler for fastenings, dark marker for coloring.
For the shape, it is important to cut off the nose so that a cardboard beak can be inserted in its place. Bend the leaf in half and draw half of the beak. The width at the base should correspond to the size of the cut pieces plus the flaps for gluing. Glue the inside of the mask on the inside.
For feathers, bend a sheet of cardboard as many times as possible. We cut the feathers and glue them with the bend inward. In the slots for the eyes we glue decorative parts according to their shape. We paint over all the joints where the base is visible with a marker.
You will also get images of other birds: sparrows, parrots, roosters. Only the beak should be made of light cardboard, and the feathers from dense material the color of the bird’s plumage. For example, for a parrot you can take multi-colored whatman paper for the feathers, yellow for the beak.
Making a wolf mask
To make a wolf mask, we suggest using the following master class.
- To do this, you need to draw a template and make small cuts on it. They are made in three places.
- To do this, triangular notches are made in the area of the crown and ears. Thanks to him, it is possible to create a three-dimensional craft.
- We carefully glue the places of the cuts. Thanks to this technique, the mask will be evenly located on the surface of the face.
- It is necessary to make round through holes in the eye area. To do this, fold the craft in half and cut out 2 semicircles.
- Let's move on to the wolf's ears. We cut them out of cardboard. We make a triangular notch in the center. We glue the elements together and get a three-dimensional figure.
- It is best to fix this part with a heat gun or thick PVA glue. We paint the inside of the ear with a light pink color.
- We make through holes in the side parts to fix the holding parts.
- Experts recommend using a thin elastic band. Unlike tape, it is convenient to attach it to the surface of the head.
- We decorate our craft with colored pencils or acrylic paints.
- Sparkling glitter around the edges of the piece will add bright details. Our craft is ready!
DIY Zorro mask
With the simplest method, many unusual variations can be made. You can make a Zorro headband at home.
For an accessory, it is better to take thick stretchy knitwear from which to cut a model. To add density, we fasten it to a cardboard base. Then the headdress will stay well on the back of the head. We sew textile ties on both sides. Hem or singe over a candle.
creative mask
You will need: cardboard, scissors, a thin rubber band or elastic thread, a stationery knife, felt-tip pens or pencils, a hole punch.
Master Class
- Fold a sheet of cardboard in half.
- Draw a mask template on the half.
- Cut out a hole for the eyes using a utility knife.
- Use a hole punch to make a hole for the elastic.
- Cut out the mask.
- Draw a face on the mask - nose, ears, mustache.
- Secure the elastic band.
The creative mask is ready! I recommend watching this video!
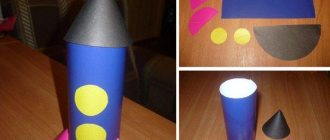
Volume mask
To give the brainchild volume, it is enough to stumble upon patterns of its component parts on the World Wide Web. Print the parts on a printer, cut them and glue them together.
The second modification of the accessory can be done independently. To do this, recesses are cut out on the temples and forehead. The cutouts on the top of the head and near the mouth are glued together, and inserts are added near the forehead. The lower segments of the product are brought to the center and glued. Traditional decorations and additional components are added.
Bunny mask – 3D cardboard mask
To work you will need:
- thick cardboard, a shoe box of a suitable size;
- white paper for template and decoration;
- stationery knife;
- paper scissors;
- PVA glue;
- simple pencil,
- ruler;
- scotch;
- elastic band for attaching the mask.
Process of creation:
- Make a one-piece mask template with ears on paper . Two parallel fold lines will run from the tips of the nose to the top edge of the cheeks. Make darts on the sides of the cheeks - from the nose to the edges with allowances for gluing. Cut holes for eyes and strings.
- Attach the template to the cardboard, securing it with tape, outline the outline , and draw the fold lines with a dotted line.
- Remove the pattern and cut out the mask from cardboard . Draw the fold lines with pressure. Do this in such a way as not to damage the cardboard and make it easier to bend the material in the right places. Cut out eyes and holes for ties.
- Cut out the mask . Bend the mask along the line of the nose and along the grooves. Glue the grooves. Leave the glue to dry. To ensure the strength of the gluing area, it does not come apart.
- After the glue has dried, the mask can be decorated . Cut out inner ears, eye rims and cheeks from white paper, and glue the parts. Draw dots on the cheeks to imitate a mustache.
- Thread the elastic tape through the holes and tie a knot on the reverse side to keep the tape in place.
Dimensions for mask:
- Height – 20 cm
- Top edge width - 10 cm
- Mask width - 20 cm
- The height of the ears is 10 cm, the width of the base of the ear is 3-4 cm.
- The depth of the grooves is 9 cm, the width of the grooves is 5 cm.
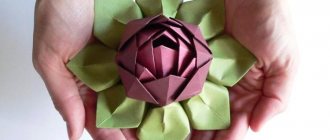
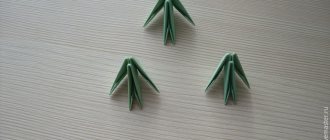
Origami mask
Origami is the ancient Japanese art of folding paper figures. It requires high concentration and finger dexterity to achieve more complex shapes.
Schemes can be found at the end of the article, but before creating in a large format and on durable paper, it is advisable to practice with small pages.
Mini origami devils are used as room decorations for Halloween. And we modify the origami Guy Fawkes mask into an exotic example by gluing a stick holder.
Mask templates
Choose the most interesting mask and start creating it with your own hands. Don’t forget to fantasize and experiment with color and design - because that’s when you’ll get not just an original copy, but your own exclusive!
Halloween mask idea
In stores on the eve of All Saints' Day, costumes of scary characters and horror movie heroes are on sale. They look very realistic: all the skin irregularities, folds and exceptional features that indicate a specific character are visible.
Such additions are made of latex or plaster. From the mass of newspapers, they turn out no less scary. This requires a special manufacturing technology, such as papier-mâché.
It uses old books, tabloids, paste or PVA, greasy cream or film. You can buy the basis for creativity. You can form a blank on the owner’s face.
Original mask
You will need: a sheet of A4 paper, marker, lace, nylon mesh, sticky spray, tape, superglue, ruler, press (something heavy like a thick book).
Master Class
- Draw a mask template and cut it out.
- Cut the lace measuring 25x13 cm.
- Cut nylon mesh measuring 25x13 cm.
- Place lace and mesh on the mask template.
- Bond the fabrics together using adhesive spray.
- Place the mask under the press and leave for a while.
- Cut out the mask.
- Glue the tapes to the mask and wait until they dry completely.
The original mask is ready!
How to make an “IT” mask
The main character of the film is the clown Pennywise, one of the characters in horror films, whose image can be used to create an impressive appearance at a party. Papier-mâché is the perfect way to create an image of a hero.
You need to start working by lubricating or covering the work surface with cellophane. The leaves are torn into small, uneven pieces. In a compact one, glue is prepared, diluted with water in a one-to-one ratio.
Soak the torn paper strips in paste and gradually apply to the face. Apply 10-20 layers of pieces, drying every 2-3. If you are making a blank, it can be made of 10 layers. After the 3rd layer, cover the future scary mask with bandages and lace, which will allow it not to spread. We leave the model's eyes blank.
When the craft dries on the “model”, you can carefully remove it. Next, we construct the elements: we press or draw indentations, add horns and other terrifying subtleties.
We create wrinkles and a specific grin for Pennywise. If you use a base, you can dry directly on it. Dry the workpiece at a temperature of 22-25 degrees for about three days.
After drying, prime the cool mask with a mixture of glue and chalk so that the pieces of paper do not fly around. We paint the sample with gouache or acrylic and coat it with varnish for strength. The villain's curls can be formed from cotton wool.
There is a paradoxical way of making it from polyurethane foam. In this case, the curls must be formed before coloring the product. With this addition, success at any costume party is guaranteed!
Thanks to the hit parade of decorations, we learned how to make a paper mask with our own hands. Here are simple decorations that even a child can handle.
The complex attributes of masquerade images are also described, the creation of which will require a lot of time and effort. A DIY mask is an exclusive accessory, and no one else has it.
Carnival mask
You will need: a mask template (it can be cut out of white cardboard), glue, rhinestones, glitter, feathers, scissors, ribbon.
Master Class
- Take a mask template and come up with a design.
- Carefully glue the rhinestones using glue and a toothpick.
- Apply glue and sprinkle with glitter.
- Glue feathers to the top of the mask.
- Attach the tape.
The carnival mask is ready! I recommend watching this video!
CARNIVAL MASK WITH YOUR HANDS ♥ MASTER CLASS
How to make a mask out of paper: photo examples of beautiful and unusual face masks
Please repost
0
Emotional mask
You will need: colored cardboard, pencil, eraser, scissors, glue.
Master Class
- Draw an oval on a sheet of cardboard of such a size that it covers your entire face.
- Draw the eyes and mouth corresponding to the emotion you want to show.
- Cut out an oval.
- Cut out the eyes and mouth.
- Erase the remaining pencil with an eraser.
- Cut out a stick from cardboard that will serve as a holder.
- Glue the holder to the mask.
The emotional mask is ready!