Materials for drainage installation
The drainage system is an important and very useful part of the building, but in conditions of a limited budget it is not always possible to equip it properly. For the same reason, gutter installation is carried out independently, without the involvement of professionals.
To install a simple drainage system, galvanized steel elements or plastic products are most often used, but both options have one common drawback - these materials are quite expensive. To reduce costs, you can use available materials, some scraps of wood or drywall.
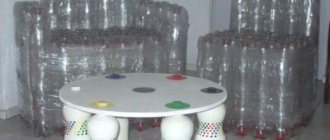
However, the most common budget material for assembling drains is plastic bottles, which can be collected in sufficient quantities without any problems. Even a small house will need a lot of bottles, and it is advisable to select ones that do not have various damages. As a rule, the drainage system is assembled from brown bottles - they look better and partially hide the debris that gets into them.
The connection of individual drainage elements is best done using wire (preferably with a protective coating that prevents the material from being exposed to moisture). It will be easier to simply buy brackets for attaching gutters and pipes - they have a very reasonable price.
Which fishing line is better?
It is impossible to give a definite answer to this question. Round types are universal, but star-shaped cords are not suitable for everyone. Experienced workers believe that the correct selection of thread will increase productivity and save a quarter of yard cleaning time.
It is necessary to take into account the category of the device for which you plan to purchase the cutting device. It is believed that twisted ones are best suited for bevelling with all trimmers (except for gasoline ones - they should be given cords with metal in the center). Curled lines cut grass easily, which is not always the case with smooth lines.
The thinner the threads, the easier the bevel, but their wear resistance is less, they quickly break or wear out. And thick ones overload the device and ruin the lawn, as they crush the greens.
Tools and components for the drainage system
To assemble a roof drain from plastic bottles, you need a small set of tools and materials:
- Most of the work will be done with scissors or a sharp knife needed for cutting plastic blanks;
- The main material will be pieces cut out from the middle of the bottles, about 15-20 cm long;
- You shouldn’t throw away the bottoms of bottles immediately after cutting - they can be used instead of plugs for the drainage system;
- To assemble plastic elements, you will need a furniture or large stationery stapler with good penetration (the width of the staples used is 10-12 mm);
- To fix the brackets, you will need a screwdriver, and in extreme cases, you can use a drill instead.
Before you begin installing the drainage system, you need to prepare everything based on this list, so that during the work you will not be distracted due to a lack of something.
Adapting processing to home conditions
There are no difficulties in recycling PET packaging waste.
But there are very important key steps that should be strictly followed:
- Sorting is the most important point. Plastic must be sorted by color, so the quality of the recycled material will be much higher. Caps, rings and labels must be completely removed.
- Pre-wash. If this is a water container, then this stage can be skipped. It is advisable to wash the inside of packaging for dairy products and drinks. This can be done with running water.
- Shredding bottles. Impact crushers with long, sharp blades are ideal. Industrial equipment is very expensive, so homemade devices are suitable for home use. Design options are described below.
- Washing. Regular containers (basins, buckets, tanks) are suitable for washing bottles. For bottles that are not heavily soiled, washing them in regular warm water is sufficient. To remove food residues, you can use a three-stage wash: soaking in a soda solution, washing with dishwashing detergent, rinsing in running water.
- Drying. You can use an oven. Drying temperature 100-120°C, time 2 hours. It is advisable to periodically turn the crushed pieces.
- Extrusion. Since it is intended to use exclusively a home-made device (description below), options for making either a granule, or a rope or thread are possible.
DIY installation of a drain from plastic bottles
No matter how simple the assembly of a drainage system from plastic bottles may seem at first glance, you still need to know and follow a certain technology that will allow you to create the most reliable design:
- First of all, it is necessary to design the future drain from bottles for the roof and draw it on paper. A preliminary calculation allows you to determine the required amount of materials and characteristics of the drain (for example, the degree of its slope).
- Next you need to prepare tools and materials. You need to remove all excess from the bottles and wash them - these actions allow you to create a design with acceptable visual characteristics.
- The next step is cutting the main elements of the drain. To do this, you need to take the bottles and cut off the bottom and neck. The resulting blanks are cut lengthwise into two parts, and they can be used as gutters.
- The cut plastic parts are attached to each other using a stapler. The parts need to be connected with an overlap of about 1 cm. The number of fasteners is usually determined individually, but practice shows that a do-it-yourself drainpipe made from plastic bottles holds well on three brackets. If you don’t have a stapler, you can simply make holes in the workpieces and connect them with wire.
- The parts attached to each other in the fastening seam must be sealed, for which simple sealants or adhesive tape are usually used.
- Once the gutters are assembled, it’s time to attach them to the wall or edge of the roof. First, using a screwdriver or drill, holes are drilled at the mounting location in increments of 20-30 cm. The plastic gutter also needs to be drilled so that the holes match. After performing these operations, the drain is fixed with wire.
- Having installed the horizontal gutters, you can begin to create vertical pipes that will collect water from the gutters. For a house, 2-3 vertical pipes are usually enough. The technology for manufacturing these elements is the same as described above, but now there is no need to make a longitudinal cut - the cut parts of the bottles are simply inserted into each other and connected.
- The vertical pipes are fastened to the walls using special brackets - ordinary wire in this case will not be enough for reliable fixation.
At this point, draining water from the roof from plastic bottles is considered complete, and it can be safely put into operation (of course, not forgetting the need to regularly clean the system).
Conclusion
In general, installing a drain made of plastic bottles cannot be called a difficult task. The technology for assembling individual elements of the drainage system is very simple, as is their installation - and all operations can be done with your own hands. The result is a simple but reliable design with acceptable external data. Given the possibility of significant savings, this option is worth considering if you have a limited budget.
Recommendations for working with plastic
Unlike other craft materials, plastic is available and is probably found in any home. It bends easily, takes any shape, and combines well with other materials. Children will be happy to make a variety of birds, butterflies, and flowers that can be placed on a bookshelf or near the garden path.
Bottle crafts are pleasing to the eye, pleasant to the touch, moisture resistant, develop creativity, imagination, practical skills in working with various tools, and are suitable for any age. Everyone will find interesting crafts made from bottles. Some will be interested in the manufacturing process, some will be interested in the practical side of using PET containers, for some it will become a favorite hobby, and for some it will be an opportunity to earn extra money.
What does cord thickness affect?
The diameter of the fishing line determines its effectiveness when mowing different types of wild vegetation.
Today on the market you can find cords of the following thickness:
- 1.6 mm – fishing line for mowing young soft grass;
- 2 mm – cord with this thickness is used mainly for mowing young wild vegetation and small weeds;
- 2.4 mm - this line is designed for removing young weeds and mowing large volumes of overripe wild vegetation;
- 2.7 mm - this type of cord is used to effectively combat large weeds;
- 3 mm - a fishing line with this thickness effectively copes with the removal of small bushes and thick old weeds;
- 3.3 mm – this cutting cord is suitable for removing thin shoots of young wild trees;
- 4 mm - the large thickness of this line allows it to cut large woody weeds and thick shoots of wild trees.
It is important to remember that the larger the diameter of the cutting cord, the higher the noise level during operation. In addition, thick fishing lines can only be installed on trimmers with high motor power.
For example, only mowing heads with a cord thickness of no more than 2 mm can be installed on electric trimmers with a line and a knife. Otherwise, the motor of the garden tool will quickly overheat.
Which fishing line to choose to refuel a lawn mower
The thickness of the polyethylene thread depends on the model of equipment and varies from 1.2 to 4 mm. She may be:
- with a round cross-section - this is the most durable material for mowing herbaceous plants;
- with a figured section - used for mowing soft plants;
- twisted - used for thin grass;
- professional type, not suitable for all equipment models.
To change the line on a lawn mower, you need to purchase a cutting thread that will be ideal for a particular type of mower.
You can soak the thread in a bowl of water for a few minutes to increase elasticity and strength.
We wind the fishing line
Slowly completed disassembly of the spool reel without losing its spare parts allows you to move on to the main task - winding fishing line into the reel. The technological features of the spool design and the number of working antennae determine the sequence of actions.
Reel with one working antenna
The simplest option and simple sequence of actions:
- The dimensions of the reel and the length of the original factory winding determine the recommended length of fishing line for winding - 2...5 m.
- One end of the fishing line is inserted into the fixing technological hole located inside the spool.
- The fishing line is wound onto the drum in the opposite direction to the rotation of the spool on the trimmer product - as a rule, on the inside of the reel an arrow indicates which direction the winding is going.
- A small section of the fishing line is left free to be brought out - it is fixed in a specialized groove on the inside of the bobbin, designed to hold the winding when assembling the spool into working condition.
- The remaining end of the line is passed through the hole in the outer part of the reel.
- The reel halves are assembled and put on the trimmer rod.
Installation nuances
After all the preparations have been made, let’s take a closer look at how to equip a drainage system with your own hands. Installation of brackets is carried out with the obligatory creation of a slope towards the funnels, when, taking into account the linear meter, a vertical displacement of 5 mm is assumed. If there is a need to accelerate the flow of water, this slope can be increased to 10 mm.
If the length of the pediment does not exceed 10 m, a slope is made to one side. A larger value involves the installation of an additional funnel installed in the middle with a drain pipe connected to it to form a drain. But you can also make two slopes of the gutter going from the middle of the gable.
To install gutters you need:
- fix the first bracket at the point of maximum height of the sewerage system;
- fix the second one, taking into account the fact that it will be lower than the first one, thereby creating the required slope;
- Stretch twine between the installed brackets, which serves as a guide for marking the attachment points for other supporting parts of this type.
The described process of installing storm sewers looks quite simple from the point of view of its implementation, but there are certain nuances. To create a slope, they mainly focus on the horizontal, which is the front board, known as the wind board.
But is it always installed with strict horizontality? It is advisable to verify this, for example, using a hydraulic level or level. You can also use a simple option in the form of a bubble device, but only if its length is 1 m or more.