Plastic bottles are difficult to recycle waste that litters our planet. But this is on the one hand. On the other hand, it is such an excellent material for crafts that it is difficult to imagine what else can be used to create so many diverse things.
And not only for decoration, but also for functionality. Flowers from bottles are truly masterpieces. Some of them look almost real, plus you can make lamps out of them.
A DIY rose will help you decorate your room or garden with an inspiring piece of art.
Making a palm tree from bottles
Trees and flowers from this material are made according to a similar pattern, so after understanding the principle of this master class, you can build any plant on your site. For implementation you will need:
- Green bottles are usually beer plastic.
- The vessels are brown.
- Scissors.
- Scotch tape or glue.
- Wire.
There is no point in painting bottles, as many people do. Over time, the paint will begin to crack under the sun.
The foliage is made from the middle part of the bottles; it is cut with ordinary scissors. The barrel can be made from the neck part by placing bottles on top of each other. The amount of material used depends on the height of the finished product.
To keep the structure in place, it is recommended to use thick wire. Using this introductory tutorial, you can understand the basic concept of how to make flowers from plastic bottles.
Gazebo made from plastic bottles in the country - elegant and convenient
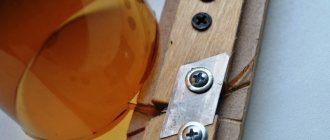
If there is a need to build a gazebo, support for climbing plants, greenhouses, you should stock up on a large number of identical plastic bottles, as well as patience, imaginative thinking and quick wits. The gazebo is fastened using small screws. If whole containers will be used, it is advisable to fill them with sand or earth in order to add reliability. If a frame is being made, do not overload it unnecessarily. Fabric or other light protective sheets attached to the bottles to decorate the sides will look good.
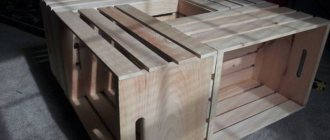
House made of bottles and wood
Canopy made of plastic bottles
Gazebo made from plastic bottles
House made of cement and bottles
Long-lasting flower beds in the garden
A finished flowerbed can not only become a decoration for the autumn and winter, but also become an ideal refuge for young plants. It's very easy to do:
- The bottles are cut into two parts, only the one with the bottom is used.
- Next they are painted with regular paint.
- Cover the sprouts of real flowers.
If you study ready-made examples of flowers from plastic bottles for the garden, which have already played a role in landscape design, you can find your own option.
Let's look at another option for creating a colored rose from a bottle
- plastic bottles, caps (different colors)
- candle
- tweezers (eyebrow pencil)
- awl
- scissors
- transparent glue.
- green plastic bag
- wire
1) For the blanks you will need the lower and upper parts of bottles of different heights 5cm and 7cm. (for an outlet), the difference in the height of the bottles should not be very small. For green bottles we leave the neck, for orange bottles we cut off the neck.
2) On each prepared element we make five petals with scissors. The number of prepared green petals should be equal to 6.7. The shape of these petals should be long and narrow.
3) Next, the blanks need to be scorched over a candle flame. To do this, hold the blanks over the flame and use tweezers to round the petals and give the petals the required shape. Then we heat the awl over the candles and make two holes in the caps of each bottle and in the sockets from the lower parts. We put the blanks on the wire.
4) From a green plastic bag we cut out a strip of such length that it can be used to wrap the wire around the lid, thus forming the stem of the flower. We wrap the strip from the bag tightly around the wire; for strength, you can glue it with glue. The rose is ready.
Roses can be created not only from bottles of different colors, but also from ordinary transparent plastic bottles, and they can be colored using acrylic or spray paints. The main thing is to work in a well-ventilated area; if this is not possible, then you need to choose a material that is suitable for working in the existing conditions.
colored hedge
Every summer resident has flower beds, even those who grow very little “for the table.” To prevent animals and children from trampling the harvest, you can build a fence in the form of flower vases made from a plastic bottle. There are several arguments in favor:
- Plastic is durable, unlike wooden stakes.
- You can paint it in different colors and design the area to your taste.
Summer residents recommend filling bottles with sand or stones for stability. Then dig the material upside down.
Note!
- DIY fruit bouquets - TOP-200 photos with instructions for creating a bouquet of fruits with your own hands. Unconventional ideas with simple diagrams and work overviews
Crocheted flowers: TOP-160 photos and step-by-step knitting pattern, review of finished products with your own hands. Crochet master class for beginners
- Paper lily - TOP 100 photos of the best product options. Master class with step-by-step diagrams and drawings for creating an origami lily with your own hands
If space is very limited and the housewife wants to decorate everything with fresh flowers. The bottles can be cut into several parts, buried bottom down and a beautiful plant planted in each vessel. Anyone can make flower pots from plastic bottles.
Orchids
Everlasting orchids are something out of science fiction. But making flowers from plastic bottles will allow us to defeat the laws of nature. To begin, prepare the necessary materials: several multi-colored soda flasks (milk, beer, etc.), plastic paints (acrylic, aerosol in bottles), glue for polymers, a candle or alcohol burner (a soldering iron or burner is also useful), scissors . All is ready? Then let's get to work! We will follow the step-by-step instructions:
- Based on Fig. 1, cut off the bottom of the bottle. This is an excellent planting base for an orchid - the upper petals are already there. All that remains is to adjust the shape of the 4 petals with scissors and slightly melt their edges with a candle flame;
- We continue to “grow” flowers from plastic bottles with our own hands: cut out a “false” flower from the body into 4 (6-8 - optional) petals. It can be glued to the base. Or, having made through holes in the details with a burner, assemble the orchid bowl on a decorative carnation;
- Make several inflorescences and plant them on an improvised stem - a woody twig painted green. This way you can collect large flowers from seemingly garbage. And if you work with your soul, artificial flowers will not be inferior in appearance to living orchids.
Surely you already have a decent vase for a luxurious orchid branch. No? Then make it all from the same familiar material!
Pots for outdoor flowers
The bottles transform well under high temperatures. Therefore, you can make anything you want from an ordinary bottle. Moreover, after repair work, there are often “bugs” left from under the primer or concrete contact, and you cannot hand them over to any collection point.
You can store both seedlings and ordinary long-flowered flowers in such pots. All you need:
- Free time.
- Several empty bottles.
- Additional material for decoration - it can even be simple covers that were left over from the palm tree.
- Paint - to give the desired shade.
You can transform the bottle using a torch or lighter. For inspiration, it is recommended to study the photo.
Making the whisks:
To implement the idea, you will need white yogurt bottles.
8:771 8:780
From them you need to cut out circles with a diameter of about 10 cm, inside of which you need to draw a small circle with a felt-tip pen, which will serve as the middle of the flower. Next, make 16 cuts around the circumference in each workpiece.
8:1148 8:1157
Using scissors, round off the edges of the petals and make a hole in the center with an awl. For the splendor of the flower, you can use two of these blanks. Then molding is carried out over a candle flame.
8:1515 8:8
This technique will give the petals a natural and slightly curved shape. You should be extremely careful here, because if you remain above the flame for a long time, the parts can be seriously deformed.
8:374 8:383 9:887
Making a sunflower from bottles
A sunflower made from plastic bottles will delight the owner even on the stormiest day. To implement the idea you will need:
- 3 empty bottles – it is advisable to choose transparent ones.
- 1 dark.
- Yellow paint – enamel.
- Glue dragon.
- Scissors.
Step-by-step instruction:
- Before creativity, the bottles need to be washed and rid of excess.
- Next, each transparent one is cut into three parts. The neck and bottom are carefully cut off.
- Next, the petals are cut.
Note!
- Crochet rose - diagrams and descriptions of how to crochet a rose with your own hands. Crochet technology + interesting craft ideas
DIY edible bouquets - TOP 130 photos with instructions for creating a bouquet with your own hands. Creative ideas with simple diagrams and photos of finished works
Craft primroses - simple instructions for creating crafts from scrap materials. Schemes of beautiful DIY products + photo reviews
From a regular 2 liter bottle you should get 7 pieces. The remaining 2 vessels are cut according to the same pattern. After this, take a brown one, from which only the bottom should be cut. Next, all parts are carefully painted and glued together. You can see the finished version in the photo.
Lilies
In summer there are countless water lilies on the river, but now it will be difficult to find Red Book lilies. But we can make artificial water lilies from plastic bottles in winter, and we don’t necessarily need to look for the graceful queen of ponds. Let's make lilies right now and don't forget about water lilies:
- Taking rice for help. 4, cut out several identical blanks from the plane of a white plastic bottle (milk) with the pointed petals characteristic of lilies. Provide a hole inside the part large enough for the bottle neck to pass through;
- For another bottle (for example, yellow), cut off the neck with a margin - it will go to the core of the lily from bottles with stamens (cut the “bunch” into strips and deform them by heating). Place the white blanks with petals on the bottom onto the neck thread, and secure the assembled products with a stopper.
And water lilies made from plastic bottles are a smaller version of the same lily. Make them yellow by significantly reducing the size of the petals and rounding them rather than pointing them. You can handle this easily. Now you can even make a sunflower from plastic bottles, not like the simplest river swimsuits.
Roses from bottles
Who doesn’t dream of roses that delight you with their beauty for several years? Anyone can make such a gift with their own hands. The color will depend on the bottle chosen. To make such a craft you will need the usual things at hand:
- Scissors.
- Candle.
- Plastic bottles.
How to do:
- Templates are made on a piece of paper. Using a marker or pen, you need to draw a flower consisting of 4 petals. There are 6 of these made in total, they should differ in size.
- Bottles are soaked in soapy water.
- Next, the plastic bottles are cut out according to the selected template.
- The leaves and stem can be made from green plastic.
A small hole is pierced in the middle of the cut flowers. You can secure it using wire or regular glue, and decorate the middle with a bead. To give the desired shape, a candle is lit. Thermal treatment is best done outdoors.
And to give shape, use a spatula or flat stick. These flowers made from plastic bottles for beginners are suitable even for a school exhibition.
DIY animals, birds and insects from plastic bottles
Not everyone is happy with real animals, birds and insects in the garden. Indeed, who would like it when a mole digs in the garden, a live wolf or bear wanders in, owls fly, or mosquitoes and wasps attack. But bright crafts made from bottles can easily decorate your dacha. More ideas for animals and birds made from plastic bottles in this article.
Animals from plastic bottles with photos
Making crafts from bottles is not at all difficult; anyone can find the material in any quantity, and multi-colored paints will give life to crafts. Therefore, the main problem that may arise in front of you is what exactly to do? Why not animals? Here, for example, are cats, mice and penguins made to decorate the site:
Chrysanthemums from plastic bottles
If the housewife did not have time to grow chrysanthemums on her plot, then she can make them from plastic. For sales, it is better to take colored bottles that do not need to be painted. Energy drink containers are especially suitable for this work. How to do it, master class for beginners:
Note!
- Crafting tulips from paper - TOP-100 photos of interesting ideas for creating tulips from paper + simple instructions for beginners
- Mimosa craft: TOP-160 photos of simple and complex crafts. Master class for children and adults on making mimosa with your own hands
- DIY napkin flowers - a detailed master class with simple diagrams. Non-standard solutions for creating flowers + photos of finished crafts
- Each bottle is cut into noodle shapes. To reduce the labor process, it is recommended to take 0.5 liters.
- Each flower is held together with wire or Dragon glue.
- You can also use plastic instead of a stem. A small strip is cut out, carefully rolled and singed with a candle.
Such chrysanthemums will delight the eye for decades.
Stems
If the flower is on a stem, then most often a hole is drilled in the middle of the workpiece. When it consists of several pieces, they are usually connected to each other during assembly by stringing them onto a stem. You need to make sure that the hole is not wider than the stem.
The base of the stem can be painted, wrapped with a strip cut from a green plastic bottle, held over a candle. Or you can use colored threads or green electrical tape.
The fastening can be strengthened using flexible soft wire - several turns are made above and below the rim, you can additionally fill the wire with glue. "Titan" will reliably fix the turns.
Video: plastic flowers on a wooden stem
Video: flower on a transparent stem
Video: assembling a flower on a stem from a knitting needle
If a stem is not intended, you can fasten the parts of the flower with wire or screw them with a self-tapping screw to the wooden base of the composition (stump, dry tree branches, etc.). If the base of the flower is the top of a bottle with a thread, then the bottle cap is screwed to the base with a self-tapping screw, and then the flower itself is screwed onto it.
Clematis made of plastic
Reproducing the beauty of real flowers is difficult. However, they are ready to please the owners only for a temporary period. To fill the void during the cold period, you can make clematis blanks from plastic in advance. How to make crafts from plastic bottles:
- As in sunflowers, the plastic bottle is cut into 3 parts. In this case, you can use 1.5 liter transparent ones.
- In order for the flowers to turn out identical, a paper blank is made from which the details are cut out.
Clematis are distinguished by a large number of shoots and tendrils. They can be made from green plastic using a lighter. The center is usually decorated with a bead, and the structure is fastened with hot glue.
Original and bright flower beds in the garden made from plastic bottles with your own hands
It’s very easy to use plastic bottles to create useful little things for your dacha and landscape pieces, including flower beds, gazebos, supports for greenhouses and canopies, frames for climbing plants, etc.
Flowerbeds made from plastic bottles are found quite often not only among amateur gardeners, but also simply near high-rise buildings. To make a flower bed, you need to select plastic bottles of the same shape and color. If you have time and desire, you can decorate them either with one color or using a whole palette. To decorate the borders of a flower bed, it is enough to simply dig containers around the perimeter to a sufficient depth. The result is an original fence.
Related article: Crafts made from stones and sea pebbles (40 photos)
Flowerbed sun with sides
Fencing a flower bed or garden bed
Making a flower bed out of bottles
Flowerbed decor made from plastic bottles
Plastic peacock flowers
Such products can protect crops from running animals and wild birds. Peacocks are very easy to make at home; you can use absolutely any bottle. To make the craft bright, I use enamel paint. How to do:
- One plastic bottle produces 1 flower.
- The neck part is cut off – “up to the shoulders”.
- Next, they begin to cut the bottle into strips, barely reaching the bottom.
- Each feather is sharpened with cuts.
- In the center you can make a “fur center” according to the principle of chrysanthemums.
To make the peacock bigger and more dangerous, you can fasten 2-3 parts of the finished products. For reference, you can use ready-made templates.
How to make flat plastic flowers
We prepare the containers - wash/dry.
Cut out a circle with petals from the bottles. The process is simple: first we cut off the top part of the bottle (with the neck). We cut the vertical part of the remainder into equal strips, from which we use scissors to make petals of the shape we need. The cuts from the bottom must reach the bottom of the bottle, otherwise the layer cannot be straightened.
In the same way as in the case of bottles, we cut out circle layers from plastic bottles.
It is necessary to take into account that the distance between all layers of petals should be the same - this way the flower will turn out harmonious. Maintaining the distance is not difficult - we simply cut out layers of petals from the bottles/bottles, uniformly decreasing in diameter.
Let's straighten out the circles. It’s a good idea to place them face down on a flat surface and press them down for a while with something heavy.
We paint the blanks. The fastest painting is with spray (aerosol) paint. Although there are many options, look - there is a lot of how and with what to paint crafts from plastic bottles.
If you are going to connect the layers to the petals with wire, you will have to make holes in the plastic. You can do this instantly with a hot nail or awl. To prevent the fastening from spoiling the appearance of crafts made from plastic bottles, make holes in those places that will subsequently be covered with the next layer.
It is very easy to staple the layers together, but you will need a stapler to do this. By the way, this is a very useful household item – it holds almost any materials together.
We make the middle of the flower - to do this, you need to find and attach a suitable lid to the center of the craft or use some kind of ball (tennis ball, for example), cutting it in half.
It is not difficult to attach such flowers from plastic bottles to the surface - you can simply nail them or use wire.
5.
Plastic bottles, which are most often used to create crafts for the garden, are a convenient material in terms of cutting, durability, etc. But often the flowers from it turn out to be “flimsy”, with thin petals that scream: “We are made of plastic!”
Dense, evenly colored petals
In many cases, even coloring does not help. It’s especially offensive when you make flowers from plastic bottles: beauty seems to be implied, but, frankly, it’s not there. What to do?
You can do like designer Laura Karnitz, who creates amazing crafts for the garden and interior from PET bottles with denser plastic, namely from bottles of shampoos, cosmetics and household products, milk, etc.
Another good thing about these bottles is that the plastic is already painted, and the colors are very beautiful. That is, all that remains is to work with scissors, then fasten the parts, and the craft for the garden is ready.
Making water lilies
The product is well suited for artificial ponds. It's very easy to do:
- Take large plastic bottles. All they need is the bottom.
- Each is cut into 4 equal parts.
- Using a lighter or candle, they are straightened according to the concept.
One lily will take 3-4 bottoms. Next, the parts are fastened with glue, and a “fur” flower made of green plastic is placed in the middle. Such a lily can even serve as a feeder for the inhabitants of a pond.
Layered flowers
Plastic from bottles can be used not only to create single heads, but also full-fledged floral compositions. Multilayer flowers look very lush, colorful and voluminous.
But making them is much more difficult; you need to have experience in heating plastic and molding parts. It is necessary to work in a well-ventilated area or in an open space.
Instructions on how to make flowers from plastic bottles:
- Make petal templates. If you don’t have experience, it’s better to first draw them on paper and then transfer them to the bottle, but you can do them directly on plastic.
- Prepare the required number of bottles. Ideally, you should take multi-colored containers.
- Mark and cut out individual pieces in the shape of flower heads.
- Bend the plastic so that the petals take their natural shape. All petals need to be bent in one direction.
- Plastic must be heated to bend. To create soft edges, run a burning candle or lighter along them.
- Collect all the details into a single composition. To do this, individual flower heads need to be connected together in the central part using PVC glue.
- You can also sew the elements by first making holes in the center with an awl.
The flower can be decorated with various elements, for example, sparkles. If desired, paint the petals in different colors.
The central part can be decorated with a bead or button. To make stamens, use the same plastic or wire.
Asters for the garden
Usually this craft is made from plastic forks. However, if you can’t find them, then you can safely experiment with bottles. How asters are made:
- You definitely need to take a closer look at the natural flower.
- Next, take one piece for 0.5, 1, 2 liters.
- The neck of each bottle is carefully cut off at the shoulder. This is the part that will be used.
- Each is cut into small strips, not reaching the edge.
- After this, all parts are carefully fastened together. You can place a yellow cork in the middle.
Additionally, you can “break” each strip. Then the variegated flower will turn out curly and beautiful.
How to attach flower petals to a base
First we make the middle of the flower. To do this, cut out a circle from plywood or use the bottom of a plastic bottle. We paint the middle in the color we need. Attach to the knitting needles in the center.
We begin to attach the petals one by one to the middle. For reliability, we also attach each petal to a knitting needle or rim.
When all the petals are in place, we mask the fastenings in the middle with thinly cut strips from a plastic bottle. By the way, the voluminous center of the flower is very beautiful.
Recommendations for painting plastic
Over the years, paint tends to crack and products lose their appearance. To prolong the beauty of the compositions made, it is recommended to pay attention to the following nuances:
- The bottles are washed to remove excess glue and paper.
- For degreasing, it is better to use regular alcohol.
- To ensure that the paint adheres without any problems, the bottles are pre-treated with simple sandpaper.
Although working with plastic is considered a safe hobby, it is still worth adhering to the unspoken rules:
- Do not melt while in the house. The vapors are poisonous and dangerous to humans.
- When working with sharp ends, it is advisable to use construction gloves.
The selected schemes will allow you to equip even the adjacent area of a high-rise building. Photos of flowers from plastic bottles will inspire housewives.
Precautions during operation
As already written above, the plastic will have to be heated.
For this you will need a very ordinary candle. Do not use a lighter, because leaving it lit for a long time can lead to overheating and explosion. Be sure to cover your work surface with thick paper. Plastic can melt when heated, and drops of frozen plastic from tables are usually scraped off along with the paint, forming ugly burns.
By the way, about burns. Be careful - drops of plastic and wax from the candle can fall not only on the table, but also on your hands. Do not wear rubber gloves, otherwise you may get double burns. It is better to carefully monitor the process and the resulting drops.
Also, do not forget about safety precautions when painting products - use a respirator when working with spray paint.
The room in which you are going to make crafts should be well ventilated. In general, it’s better to do it outside.
Tools for work
You will need for work:
- Plastic bottles of different sizes
- Sharp scissors
- Construction (large stationery) knife
- Candle
- Lighter or matches
- Wire
- Beads and large beads
- Glue, electrical tape, awl
- Paints
Scissors should be tough with sharp noses and good sharpness. Choose PVA glue or something similar, but with good tenacity. There is no point in using glue - it hardens very quickly, and the product cannot always be folded as expected right away.
Photos of flowers from plastic bottles
Rose from a plastic bottle with step-by-step instructions and video
Let's think about how many plastic bottles are thrown into trash cans and how much our environment is damaged by this. Let's turn what is usually considered trash into a beautiful and cute flower. Such a rose from a plastic bottle will be a wonderful decoration, pleasing to the eye, and will cause admiration among guests. You can create it in an evening, and it will never fade.
What the future flower will look like largely depends on the color of the bottle taken, since in most cases they are not painted later, like other plastic flowers, but exceptions are made.
The process of creating a flower
You need to prepare in advance all the necessary materials and available tools:
- plastic bottles of the intended color for the flower;
- green plastic bottles;
- paper;
- marker;
- scissors;
- awl;
- wire;
- candle;
- If you want, you can take a beautiful bead for the core of the rose, but this is not necessary.
The process of creating a rose yourself from plastic bottles is a very interesting process, thanks to the step-by-step instructions you will see it.
Pre-selected bottles must be soaked in soapy water. This will make it easier and faster to remove labels and glue from the surface.
This must be done very carefully, otherwise particles of dirt will soon stick to these places on the finished rose, especially if it is used for decoration outdoors. Because of this, the flower will lose its beauty and charm.
First we make templates for the rose on paper. To do this, cut out three squares measuring 9.5 cm, 7.5 cm and 5.5 cm. If necessary, the dimensions can be varied to obtain the intended size of the flower.
Fold each square four times and cut out a rose petal. A simple template for rose petals from a plastic bottle is finished.
To create one rose, you will need to prepare six parts, two of each size. We will cut the rose leaves out of plastic using one template.
After the bottles are well cleaned, remove their neck and bottom. And then we cut it lengthwise, so that we get a straight plastic sheet.
We recommend doing this in advance and placing the sheet under a press for a day, then it will be even and working with it will be easier and more comfortable.
Using a marker and rose paper templates, transfer to a sheet of plastic. After this, all the blanks must be cut out.
We make small cuts on the edges of the leaves. The shape of the leaves can be different, depending only on the idea and imagination of the master.
In order for a flower from a plastic bottle to be as realistic as possible, you need to cut out the sepals. In the future it will be under the bud.
Now we take each template and make a hole in the center of them all using an awl. To make it more comfortable and easier, you can first heat the workpieces.
The most difficult step for newbies is melting the blanks over the candle so that they have a rounded appearance. There are several recommendations to consider here:
- There must be constant access to fresh air in the room, since plastic releases toxic substances when heated.
- You can give the desired shape by taking two petals together and gently heating the corner between them.
- Most likely, not everything will turn out smoothly the first time, but plastic bottles are a very cheap material, so you can safely experiment without worrying about the family budget.
Now you can start creating a beautiful rose with your own hands.
First you need to put a bead on the wire and round the edge, simply fixing it.
Then we begin to put plastic petal blanks on the wire, starting with the smallest ones. For realism, the edges of the petals can also be treated with fire so that they take on an ornate shape.
At the end of creating a rose, the sepals are attached.
Now you need to decorate the flower stem. To do this, take green plastic and cut a thin strip, approximately five to eight millimeters wide. Then we gradually wrap the wire around it. From time to time we heat the strip over the candle so that it is pressed more tightly to the stem. In some selected places we weave in blanks of leaves pre-processed over a candle flame.
Now the interesting process of creating an extraordinary rose flower from an ordinary plastic bottle using this master class is completed. You can create a transparent, romantic and delicate flower using blue plastic.
If you paint the finished rose black and decorate it with sparkles, you will get cosmically alluring and unusual flowers. The appearance of the finished rose depends only on the imagination of the needlewoman.
Video on the topic of the article
In conclusion, we offer you several video tutorials on creating roses from plastic bottles. We watch, learn and create masterpieces to decorate your home and garden.
Similar articles:
knittochka.ru