Children's ideas
Crafts made from colored pencils are a great option for children who are bored with counting or developing motor skills with simple objects.
Wooden sticks are so nice to hold in little hands, they are bright and warm to the touch. It is not for nothing that parents choose pencils as a counting material or a sorting object for learning colors.
Moreover, repeated use makes it also budget-friendly, which is also important for mothers on maternity leave.
Masterpieces made from pencil shavings
Masterpieces made from pencil shavings
This website works best with JavaScript enabled
Advertising Details Category: Crafts Published: October 14, 2014
You can use the “print” button or save it to your computer by right-clicking on the picture you like and selecting the “Save picture” option.
Crafts from pencil shavings.
{social}
#fc3424 #5835a1 #1975f2 #2fc86b #f_syc9 #eef77 #020614063440
yapoznaumir.ru
Postcard applique “Christmas tree”
We will need green colored pencils. 6 pcs. segments of 5 and 5.5 cm. Glue gun and cardboard base:
- Prepare a background, color with paints, pastels, or take a ready-made colored sheet.
- Lay out the Christmas tree, and only then attach it with glue.
- Decorate the card with snowflakes and sparkles. Decorate Christmas trees with sequins, imitating Christmas balls.
- Once dry, sign with kind words.
Mini-sculptures made from colored chalks
Wax Crayon Sculptures by Diem Chau
Wax Crayon Sculptures by Diem Chau
Wax Crayon Sculptures by Diem Chau
Vietnamese craftswoman Diem Chau is no less famous than the previous author, thanks to her original sculptures made from colored crayons. She can turn a box of crayons into figures of people or animals, cut out a portrait of a real person, focusing on the image in a photograph, or create an abstract lace sculpture. It takes the artist 3-4 hours to create one such work. Diem Chau's latest works, which attracted the attention of society, are a series of 12 multi-colored signs of the Chinese zodiac and world-famous football players, including Didier Drogba, Cristiano Ronaldo, Wayne Rooney, Fabio Cannavaro, whose figures were commissioned by Nike. The artist spent more than two weeks on this unusual order, interrupting briefly for sleep and food, and the result of her work was 11 sets of mini-sculptures, packed in exclusive handmade cases.
Ideas for adults
Basically, all unique work is done on a cutting machine, pre-glued pencils into a cylinder. The works turn out to be very unusual, and not everyone can guess that they are made from such simple raw materials.
But there are also several ideas for patient and skillful hands. Don’t rush to throw away written-off or broken copies; these pencils will make cool DIY crafts.
Materials and tools
If there are children at home, there will be materials to implement ideas. First, the raw materials for work are sorted by length, color and shape - then it will be easier to create beautiful things. To bring your creative ideas to life you will also need:
- scissors;
- hot glue;
- thick fabric (fleece or denim);
- cotton yarn;
- Photo frame;
- sharpener;
- plasticine;
- Accessories for jewelry.
Master class on foamiran: brooch “Sprig of lilac”, video and photo
Hedgehog in the fog
- You will need a lot of blanks in the form of a 2 cm piece with a sharp edge. The pencil is cut with a thin wood hacksaw on a safe basis.
- And also a figure of a hedgehog made of foam plastic or papier-mâché.
- Glue the finished eyes onto the figure, assemble a polka dot string bag on a stick from scrap materials.
- Next, without missing a single mm of area, cover the figure with prickly blanks.
Pencil shavings applique: flower
With the arrival of children in the house, many things change, including attitudes towards garbage.
Yes, yes, don't be surprised. What was once just trash becomes materials for creativity: ice cream sticks, yogurt cups, cocktail straws, pencil shavings and much more. etc. Experienced parents know that from all this wealth they can make appliqués or crafts.
Today we will talk about pencil shavings, or more precisely about how to turn ordinary pencil shavings into beautiful and unusual applications.
The good thing about shavings is that even kids can work with them (from about 2 years old with the help of their parents), the material is natural and looks very noble on applications, the shavings can be of different sizes (the larger the diameter of the pencil, the wider the shavings) and colors (available in I mean the color of the border). And the shavings also stick perfectly to PVA. Totally positive, isn't it?!
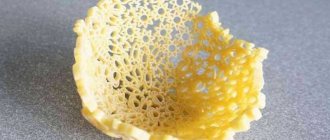
The possibilities of using pencil shavings in applications are also impressive: applications can be flat or voluminous, made only from shavings or combined, that is, supplemented with paper, straws, dried plants, branches, etc. Shavings can transform even the most boring drawing, becoming rays of the sun, flower petals, tree leaves, grass, hedgehog needles, bird feathers...
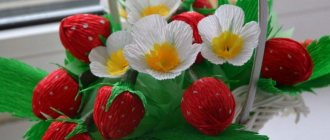
We suggest starting your child’s acquaintance with applications from pencil shavings with a simple plot - making a bouquet of wild flowers. We had blue pencils, so it turned out to be a bouquet of cornflowers. And the white ones would make daisies, and the yellow ones would make dandelions. All in your hands.
So. For a simple application from pencil shavings we will need: pencils, sharpener, PVA glue, white cardboard, colored paper.
- First we sharpen the pencils. We try to do this carefully so that the chips are even and long. We don't throw anything away!
- Then we outline the contours of the drawing and smear the first flower with glue. Apply the shavings and press with your finger. Apply glue again and apply a second layer. We continue gluing the chips until you like the result. Spread the middle with glue and fill it with colored powder obtained by sharpening a pencil. The first flower is ready.
- We make as many flowers as you like. We supplement the applique with leaves cut out of colored paper and paint on the stems. That's all. In 15 minutes I made an applique from pencil shavings. The application can be dried under a press, then it will be flat. Or you can do it just like that, then the flowers will look more voluminous.
Have you already tried making applications from pencil shavings with your children?
See you visiting Mary Poppins!
This is interesting
merypoppins.com
Decor for a children's room
- Cut multi-colored pencils with a saw into figures 5 mm in height.
- Fill identical jars with blanks.
- Place it on a shelf where access to children is prohibited to preserve it.
You can also make original, custom-made keychains, pendants, earrings and much more by simply combining pencils (or their remains) with accessories that can be bought at any fabric store.
Cool bright and environmentally friendly beads, made from beads in the form of squares made from pencils, will fit perfectly into an ethnic look or a child's look.
We recommend reading:
Crafts made from epoxy resin - stylish, original and beautiful products and decorations made from epoxy (110 photos)- Crafts from seeds: step-by-step instructions and tips for choosing the most beautiful ideas for crafts
Crafts from airy plasticine - ideas for creating beautiful crafts, the main steps and a description of how to make a craft correctly (100 photos)
Pencils, if they are used, always become dull and, not sparing the wood, are then sharpened, exposing the beautiful lead. The shavings are usually thrown away, but they make great work.
To begin with, you can do a simple job by simply gluing shavings onto PVA glue in the form of a butterfly or flower, or you can print the blank on a b/w printer and fill it with multi-colored shavings.
Pencil decor
A very non-standard solution when working with such material may not be its use to create crafts, but the decor of the pencils themselves. This decoration will delight your baby and can also be a great gift idea for any child.
Use your imagination for decoration, because there are no restrictions. We'll give you five simple ideas to help you get started.
Using glitter.
This is a great idea for girls, because together with glitter you can achieve a shiny tip in absolutely any color. Any child can do the job, but it’s best to supervise the process, as glue is used here.
Apply glue to the tip, then start dusting the surface with glitter. After this, remove the glitter from other parts and let the glitter dry. You can decorate the entire surface; it all depends on the wishes of the baby.
Fun tip
To implement this idea, we will need foamiran; it can be bought in specialized stores. It has a pleasant surface and good density, and also looks great in decoration. Cut out various shapes from it and make a small cut where you will insert a pencil. To create a figure, you can use a regular paper sketch.
Gift paper or tape
In stores you can find decorative tape, the surface of which comes in various patterns and colors. If you decide to use it, then simply wrap it around the entire pencil.
If you couldn't find it, then you can use regular decorative paper. To do this, cut a piece of the desired size. Treat the surface of the pencil with glue and apply it to paper. Allow your decor to dry and coat everything with clear varnish for added adhesion. If there is a coating, it is better to remove it with sandpaper, since otherwise the paper may not stick.
If you don’t know how to make a craft from pencils, then just start: as they say, the eyes are afraid, but the hands do. As you can see from our article, there is nothing complicated about this. Even a child can handle most of the work, you just need to interest him in the end result. The main thing in any creativity is to give free rein to your imagination and apply a little perseverance, then you can create a real masterpiece and bring a lot of joy to your child.
Paintings. Two unusual ideas for paintings in abstract art stele
There are not many ideas for crafts made from wax pencils, because they are not used as often as regular ones.
A non-trivial idea of using wax crayons is the effect of heat. We attach the pencils to the edge of the cardboard one by one and turn on the hairdryer. After drying, we admire the interesting picture.
Painting made from pencil lead by pouring onto glue. Those. A thick layer of glue is applied to a pre-printed outline, and then a sharp knife is used to grind off the multi-colored lead into piles, and a picture is formed, for example, a rainbow elephant or a giraffe.
How to decorate a pencil with nail polishes?
You can never use a bottle of nail polish until it's completely empty! Don't rush to throw away those jars of nail polish, because these precious drops of polish can allow you to work wonders.
Apply drops of nail polish in one line on a piece of paper, and then roll the pencil over these drops. You will get a very original pencil drawing.
Then hang the pencil to dry thoroughly.
You can also decorate the pencil with a paper topper in the shape of a juicy ripe apple, which is a symbol of knowledge.
And the most ordinary pencil can be turned into a pen. And let it be made of paper! But how original!
Master class and Pen template
DIY Sloth pencil decor (master class, template)
Photos of crafts made from pencils
1+
1
Mosaic portraits made from colored chalks
Huge crayon puzzle paintings by Christian Faur
Huge crayon puzzle paintings by Christian Faur
And in the portfolio of another artist, Christian Faur, a series of puzzle paintings lined with Crayola crayons occupies an important place. The same ones from which some of the already mentioned creative personalities carve sculptures. To create one painting, an artist needs several tens of thousands of such wax crayons. Subsequently, they are formed into stunning landscapes, portraits, or simply beautiful patterns, which can be multi-colored or black and white, like photographs. The only difference is that Christian Faur’s works are exclusively the fruits of his imagination, and their scale is so-called plus-size.
Desk lamp
If there is an old table lamp in the house for which you want to change the lampshade, you can make it yourself.
5 kitchen accessories made from old jeans
The lampshade is designed in this way:
- remove all parts of the device, leaving one frame for decoration;
- select pencils of different shades, but of the same length, sharpen one end with a sharpener;
- Use a glue gun to glue the material to the old frame, arranging it by color in any order. You can create a colorful rainbow or smooth gradients, decorate with sparkles or decorative items.
Papier-mâché technique
One of the most interesting craft techniques is papier mache. With it you can make many compositions and figures of different sizes. The technology consists of sequentially gluing pieces coated with PVA glue or a special solution onto a model of the desired shape.
The number of layers depends on the required strength. As a rule, this is 3-4 layers. But you need to take into account that the more there are, the longer it will take to dry.
For initial acquaintance in practice, it is recommended to create a saucer. For this you will need:
- newspaper;
- PVA glue;
- water;
- saucer;
- dye;
- brush.
Step-by-step instruction:
- Tear the newspaper into small pieces, 2-3 cm on a side. Cutting with scissors is not recommended, as then the edges will not stick well.
- The saucer is turned upside down. Cover the entire surface with pieces of paper soaked in water. Apply a layer of glue.
- Continue this way until 4-5 layers.
- Leave to dry. This will take 7-8 hours, so it's best to leave it overnight.
- Carefully separate the saucer from the resulting workpiece.
- Paint the workpiece and decorate it if desired.
Paper ideas
How to make a pencil case for school with your own hands. how to make a pencil case from paper, from fabric, from cardboard, from felt. How to make your own pencil case for pens and pencils. how to make a pencil case for dolls
Paper is a wonderful budget material for creativity. The art of origami is perfectly used in making coasters from this component. You can make a simple quadrangular box, or you can make a complex modular design for pencils. Cardboard is also ideal for the job.
Products made from it are in no way inferior to wooden ones. The only condition is to avoid getting wet. The cardboard technique is widely used in needlework. The easiest option is to download a template from the Internet and cut it out. Transfer contours and fold lines. Glue the allowances and connect all the elements following the drawing. This original masterpiece will wonderfully decorate your desktop.
How to make three-dimensional crafts?
To show the principle of creating them with your own hands, you can consider one of the master classes.
Paper application - step-by-step instructions.
- First, you should prepare the tools and materials: a frame with deep sides (candy boxes will also work), a stationery knife, a pencil, colored cardboard (it would be nice with a bright print), watercolor paper, PVA glue, scissors and a ruler.
- From a white sheet you need to cut a rectangle that will fit laconically into the frame.
- By hand (or using a template) you need to draw a heart that will fit into the frame 9 times in 3 rows. This is a heart measuring about 4 by 5 cm. Instead of hearts, there may be another figure - for example, butterflies (as in the photo).
- The drawn heart must be cut out, circled with a pencil, and first placed on white paper. There will be about 3 rows of 3 hearts each, but the quantity may vary slightly.
- The “wings” of the hearts need to be cut out with a stationery knife. This work requires special care. Cuts are made along the contour of the heart, and the lower and upper parts of the figure should not be touched.
- The cut parts of the figures must be bent upward and towards the center so that they become voluminous.
- The blanks should be glued onto colored cardboard. It would be great if it was printed paper for scrapbooking. It will be clearly visible through the folded “wings” of the hearts. That is, the work becomes layered.
- The work remains to be placed in a frame, secured on the back side with glue or double-sided tape.
There are other options for making a similar picture. You can cut out the hearts completely with regular scissors, and then bend them in half. Make a flower from bent hearts by laying them out in a circle. And there can be many such flowers, small and large. They all fit into the shape of a big heart.
Review of volumetric crafts
Multi-colored shavings allow you to make not only an applique, but also a three-dimensional figure. The material is suitable for making souvenirs. This is a good solution for a gift to a relative on behalf of a child.
The base itself is usually made of papier-mâché. The dried figure should be covered with glue and covered with colored pencil shavings. Decorative material should be applied from bottom to top. Only the head, if we are talking about animals, is pasted over in the reverse order. All details, such as the beak or scallop, are processed separately.
A bright souvenir will be good as a gift or decoration for a children's room.
Interesting crafts can be done with older children, for example, with schoolchildren. The shavings are well suited for imitating animal fur, which is why they are made more often. The work will take some time, but the result will be fascinating.
Let's try to make a fox.
The following materials are needed:
- newspaper;
- metal bending wire;
- wallpaper glue;
- pencil shavings;
- hot glue gun and rods for it.
Before starting work, you should make a frame. The wire is first bent in the form of fox legs. The resulting frame is wrapped in newspaper, which is secured with simple tape or thread. You should also twist the body and attach the hind and front legs to it. The next step is to prepare the frame of the tail and head - they are wrapped in newspaper and attached to the rest of the structure.
After forming the fox, it is necessary to detail the head, make ears and nose, eyes. Gradually the workpiece will take on the desired appearance. The entire frame should be covered with white napkins using wallpaper glue and left to dry.
Wood shavings should also be prepared in advance. Not ordinary spirals are used, but imitation wool. The fibers should be slightly separated. The length should be approximately the same so that the overall appearance of the fox is neat.
Is it okay to put pencils in the wastebasket?
In general, you should not throw pencils in the trash bin, since most pencils cannot be recycled:
- They are made from mixed materials, which makes them non-recyclable, or
- they are very small to be recycled.
Pencils made from wood usually fall into the latter category. Pencil shavings are very small to organize unless they are collected in large quantities.
Mechanical pencils are usually either metal, a mixed plastic, or a mixture of both. Some of the plastic cannot be recycled, and some is very small and is sorted and processed.
But still, you can always use a mechanical pencil again, refilling the lead. You can also collect them in large quantities and send them to recycling organizations like Terracycle, which collect hard-to-recycle waste for recycling into materials and products. To do this, take a box that you fill with pencils that you no longer need. Then send the box specifically to them.
Kitchen stand
An unusual, creative stand for dishes can be made from pencils. It will fit harmoniously into the interior of the kitchen of a country house. To do this, it is enough to prepare a wooden board and drill holes in it at equal distances, equal to the diameter of a pencil.
Prepare material of the same color and length, glue it to the board.
Watch
Decorating watches with pencils will make outdated models more modern. Long pencils are glued both on the reverse side and on the front side, forming a drawing. Filling depends on quantity:
- if there are 6 pencils, they are attached to the main numbers;
- if there is a lot of material, the entire circle is filled with pencils located from the inside out;
- The degree of protrusion of the parts is independently regulated.
Children love to draw; there are many pencils in the house. Funny crafts are invented and assembled together with the children. Joint activities bring the family closer together, help them spend time usefully, develop logic, and introduce them to work.
Vases
Select cylindrical containers in the form of a cup, jar or plastic bottle without a neck. They are used to make bright flowerpots or small boxes for storing various small items.
The container is covered with transparent glue. Material of the same color is placed around the perimeter, or different shades are selected for beautiful transitions. The vase can be coated with colorless varnish. A bright ribbon or decorative braid, tied around the perimeter and tied in a bow, adds completeness to the product.
Wooden pencil holder
In order to independently assemble a container for pencils from wood, it is preferable to use rowan, linden, cherry or cedar. You should refrain from using birch or hazel, as this is a fragile and hard base that is difficult to work with. The following materials and tools are used:
- drill equipped with an 8 mm drill bit;
- varnish;
- chisel;
- sandpaper;
- napkins for decoupage;
- wood paints;
- canvas threads.
The procedure begins with the selection of a suitable material, which can be used as a cube cut from a wooden pallet, or a large branch from a tree. After this, it is given the required shape using a chisel. Usually the material is made square or cylindrical, although other options are possible. The surface is sanded with sandpaper.
The required number of holes is drilled on the top of the workpiece. They should not be through, as in this case the paste from ballpoint and gel pens and pencil leads will stain the table surface. You can also make one hole using a Forstner drill.
After this, you can move on to decorating the pencil holder. First, it is coated with 1–2 layers of varnish and allowed to dry. Next, decoupage is most often carried out. To do this, apply a primer to the wooden surface and dry it again. Using PVA glue, glue a napkin with the image you like and cover everything with varnish again.
You can paint the pencil holder in bright colors. This option is most popular with children. The surface of the pencil container can be generously coated with glue and then tightly wrapped with canvas threads. Tie a small decorative bow on top.
Box for small items
To store small items (pins, buttons, threads) you can use a bright homemade box:
- prepare a box with a lid;
- cover the inside with colored paper or cloth;
- decorate the outer side with multi-colored pencils of different sizes, forming a picture from them, or simply arranging them horizontally or vertically;
- open the craft with varnish.
Home accessories made from old sweaters: putting your favorite sweater to good use
Flower bouquet
This version of crafts for children made from paper and cardboard is best offered to the child before March 8th. There is nothing complicated here. Only very young masters will need parental help. Necessary materials:
- colored cardboard;
- paper;
- glue;
- two types of scissors (with sharp and rounded ends).
First, the stems are made from green cardboard. Then they move on to making flowers. The white sheet is folded lengthwise and cut. The half is folded in half and many cuts are made on one side.
The same actions are carried out with the second half of the paper. The number of parts should be equal to the number of stems. Next, assemble the bouquet, fixing its components with glue.