The idea of replacing conventional building materials with plastic bottles first came to the German engineer Andreas Froes. This founder of the environmental standards ECO-TEC developed and brought to life the idea of building a house from plastic bottles with his own hands. I propose to understand the advantages of bottle houses and the features of construction from different materials, as well as other possibilities of plastic.
Source blogspot.com
Advantages and disadvantages
Initially, the technology was intended for third world countries, because the first dozens of similar buildings appeared in Honduras, Colombia, and Bolivia. Later, interest in the topic of environmentally friendly consumption and recycled resources became worldwide, and houses made from plastic (as well as glass) containers began to appear in developed countries. The technology has gained popularity due to its following advantages:
- Low construction costs. The main trump card that influenced the spread of plastic bottle houses. Used containers are worth nothing, and their recycling is not organized everywhere. So there will definitely not be a shortage of raw materials.
- Durability of the material. Both plastic and glass containers retain their original properties for at least a couple of hundred years.
- Performance characteristics. If the construction technology is followed, bottle walls become strong and reliable. Such a building turns out to be more resistant to loads than a brick house.
Source fantasticviewpoint.com
- Comfort. Bottle walls maintain a comfortable microclimate, keeping you warm in winter and cool in summer.
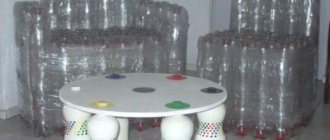
- Variety of applications. Not only housing is built from bottles, but also a variety of garden buildings, including a greenhouse, gazebo, fence, and children's playhouse.
Critics of bottle houses make the following claims:
- Problems with material accumulation. Somewhere in Bangladesh there won’t be such a problem, but here the process may take longer. Alternatively, you can negotiate with a couple of restaurants and cafes to pick up used bottles (they still go into recycling).
- Delaying construction. Construction will take a long time if you do it alone.
Source avaz.ba
Let's start to "build"
To create a truly fabulous masterpiece of “architecture,” just like in real construction, you must make a plan and strictly follow it. First, develop a layout together with your baby, determine with her which rooms will have what kind of furniture. By the way, you can also make furniture for a dollhouse with your own hands.
Creating a project
Before you bring to life what you and your baby have in mind, draw it. The drawing will help you understand what you will ultimately build. You can identify and correct many flaws and shortcomings at this stage.
Only the drawing must necessarily contain the dimensions of the future “house construction”. So one of the very common mistakes is the low height of the rooms. For free and convenient movement of dolls around the rooms, the height of the rooms should be at least twice the “height” of the dolls that will “live” in this house.
For ease of play, the upper “floor” should be no higher than the daughter’s eye level, and the optimal depth of the rooms should be from 30 to 45 centimeters. If the house is quite large, then provide wheels on the bottom, so the baby can more easily move the house on her own. I repeat, the drawing must indicate all the dimensions of the future “structure”, and the drawing must also be proportional.
Preparing the details of the house
According to the project, draw all the details of the future house on a 1:1 scale and transfer the drawings to your material. Let's assume it will be cardboard. Such a drawing on a scale of 1:1 will at one time help you determine the amount of material that will be needed to “build” the house. After all, it’s not good if there is not enough cardboard or plywood during the construction process.
Transfer images of parts onto the material. Then cut out the parts according to the resulting contours. If your house will be “built” from cardboard, then use scissors, and if you decide to make a dollhouse with your own hands from plywood, then an electric jigsaw will help you cut out parts from such material; you will also need not very coarse sandpaper for cleaning the end surfaces. Just like in any construction, you will need a ruler, tape measure and pencil.
We connect the prepared parts
It is best to connect the prepared parts of the house using glue. Which glue is best to use depends of course on what material you plan to use. Carpenter's glue is suitable for wood, and regular PVA works perfectly for cardboard. To pre-fix the parts, use masking tape.
The final stage is finishing
Usually children simply adore the finishing stage. To decorate toy rooms you will need:
- Colored paper (you can use colored cardboard).
- Pieces of old wallpaper.
- PVA glue (where would we be without it).
- Self-adhesive paper.
Decorating premises is a deeply individual process. Your little one should lead it, because very soon she will become the mistress of this house.
So I'll just give some advice.
- Consult the future owner of this house. Consult her on all, even the most insignificant, in your opinion, issues related to finishing.
- Windows can be “glazed” by cutting out “glasses” from transparent plastic bottles.
- It is much easier to cover the walls, floor and ceiling with wallpaper before assembling the structure.
- For lighting, if the hostess wants it, use small battery-powered lamps. Fortunately, buying them is not a problem in almost any hardware store.
- The easiest way to decorate external walls is with thick paper and paints. Using paper on the glue, the desired relief is created, and when the glue dries, paint the walls in the desired color.
- It is good to provide drawers in the house for storing various small toys.
Believe me, a doll house created with your own hands, and even if the baby took an active part in its creation, will bring much more joy than a purchased house.
How to build from plastic bottles
Homeowners inspired by the idea of green building will be pleased to know that the technology does not require the use of special skills or special tools. The construction of a bottle house goes through the following stages:
- Preparation of building materials. Simple, but tedious and time-consuming work. Thousands of bottles (at least 10-12) must be tightly filled with sand or earth, and the lids must be screwed on tightly. To make it secure, the neck of each container is tied with a mesh.
- Laying the foundation. The strength of the structure is determined by the columns; foundations are laid for them, at least 4 pieces. For each foundation, a hole is dug and concreted, sufficient to lay bottles in a circle with their necks towards the center (10-11 pieces). The fittings are fixed in the center, the necks are tied with nylon twine.
- Construction of columns. The gaps between the bottles of the first layer are filled with cement mortar and allowed to dry. Next, new circles of bottles are smoothed out and filled with solution, each offset by the width of the container, until the column reaches the desired height. It is important that in each layer the plugs of adjacent containers touch.
Source lachat.ru
- Column finishing. The gaps are additionally filled with broken bricks or stones. After drying and shrinking, the column is plastered.
- Foundation. Since the walls are light, a solid foundation is not needed; it is made in the traditional way, from concrete or brick.
- Walling. Bottles are laid out on the solution in layers, with corks inward; window frames are inserted in the right places. When the wall is ready, the necks are tied with nylon; a mesh structure is obtained, which increases the strength of the wall and facilitates further work.
- Wall decoration. Significant gaps remain between the plugs, which are filled in several stages and then plastered.
- The final stage. It is no different from the construction of any other house: they install engineering equipment (pipes, electrics), mount the roof, install windows and doors, and carry out finishing work.
Source pinimg.com
What to make from
First of all, let's decide on the material to create this toy. Such a house is relatively easy to make from many different materials, each of them has its own positive and negative qualities:
- Cardboard is an undoubted advantage of this material; it is easy to process cardboard (cut with ordinary scissors). The disadvantages undoubtedly include the low strength of cardboard; the consequence of low strength is the fragility of the structure.
- Plywood - an undoubted advantage of plywood is that a house made of plywood is pleasant to the touch. The disadvantages include the fact that the material gluing the layers together may contain harmful substances; plywood often contains formaldehyde. And cutting out such material is not easy; it is better to entrust this part of creating a house to specialists. Fortunately, the market is now full of cutting offers.
- Drywall - The advantage of such a “building material” for a dollhouse is that the drywall can remain from repairs. And cutting drywall won’t be too difficult. A significant disadvantage is that the usual method of fastening is not suitable for creating a dollhouse (after all, the screws that are usually used to fasten drywall stick out from the back side, and this is dangerous, because they are sharp) and the drywall will have to be glued, and this method of fastening imposes requirements the cleanliness of the cuts is much higher.
- OSB board - the advantage of this material is its strength. The disadvantages are the content of harmful substances in the adhesive composition, the complexity of cutting, and also the fact that the slab, although warm to the touch, is not very pleasant.
- Chipboard - the advantages of the chipboard material are the same as when creating a house from OSB boards, the disadvantages are similar. The disadvantages include the large weight of the house made of chipboard.
- Glued furniture board - the advantages of furniture board are those that are inherent in most wooden materials. The main disadvantage of furniture panels is the high price.
It is worth noting that materials can be combined.
How to build from glass bottles
Visually, glass walls look more beautiful than plastic ones, but they are also more expensive. In general, building housing from glass is similar to building from plastic. However, glass is a heavier material, so the following nuances appear in the technology:
- Use empty, properly sealed bottles.
- The reliability of walls depends on how correctly the internal load is distributed. Therefore, during the construction of walls, you need to ensure that the walls of the bottles are separated by the solution (they should not touch).
- Every two or three layers, a polymer mesh is laid to enhance adhesion between the rows of masonry.
- With each new row of bottles, the thickness of the solution layer is reduced slightly, from 40-50 mm at the bottom to 20-30 at the top. This technique will help strengthen the structure, since it will not be overloaded from above.
Source anotherwalkinthepark.com
Playhouse in the apartment
Even in a small room, it is quite possible to install a small frame covered with fabric in the form of a tent or wigwam. If square meters allow, build a full-fledged wooden or plywood house in the nursery in the form of a fairy-tale hut, carriage, trailer, rocket or ship.
Wigwam house
As you know, a wigwam is a special structure consisting of several long poles connected at the top and covered with thick fabric. Such a structure can be easily disassembled and stored, moved from room to room, taken out into the fresh air, into the yard, or packed into the trunk of a car and transported to the garden plot.
And it’s not at all difficult to make such a children’s wigwam playhouse.
- carefully sanded and varnished or varnished wooden slats 120 cm long and 2-4 cm thick; For installation outdoors, you can also use strong tree branches, but only if (!) even the smallest branches are cut down
- PVC water pipes
- lightweight aluminum pipes, for example, left over from old curtains
Scheme for making a wigwam
To cover a tent house, it is better to choose thick linen or cotton that allows air to pass through well. Under such an awning, children will feel comfortable and easy to breathe even on hot days.
The simplest structure is a wigwam - three poles, firmly tied at the top at a distance of 10-20 cm from the top. To make the fastening strong, it is better to connect them with bolts by drilling holes in the upper part of the frame.
The design can be slightly more complicated by making a rigid base for it from wooden slats or pipes, which will be installed on the floor. There is no need to make a crossbar from the entrance to the wigwam - children will constantly trip over it.
Pattern for a wigwam tent
In principle, you can build a full-fledged tent in the shape of a quadrangle or a tent, but you will have to tinker with the frame fastenings a little longer. We'll talk about this below.
Tent or marquee made of PVC pipes
Craftsmen have long been using plastic water pipes not only for their intended purpose. After all, they make quite durable and comfortable garden chairs, tables and even greenhouses.
Types of outdoor children's tents
A children's house made from PVC pipes will be very comfortable. And the likelihood of getting hurt even if naughty children knock it over is minimal - after all, the frame will be light.
READ ALSO: PPU pipes in a polyethylene sheath What is it
By the way, this is why it should be screwed to the floor. Otherwise, he will constantly move from place to place.
So, we tell you in detail how to build a children's house from PVC pipes:
How to sew an awning for a children's tent-house
You can buy new fabric or use unnecessary bedspreads or curtains to sew an awning. You can decorate a white sheet with themed appliqués or paint with paints together with your child.
Fold the thin fabric in half so that it does not sag. It’s great if there are bright colored scraps in the house - they can be sewn into a single fabric.
- textile
- scissors
- fairly thick threads
- braid for ties
So, let's get to work:
Fairytale cardboard house
There are already ready-made cardboard buildings on sale - all you have to do is decorate them at your discretion. But it will be better if you make and paint the house from start to finish together with your children.
Children's house made of cardboard
Its design can be as simple as a door and window, or as complex as design. You can attach a tower, a porch to it, make a home for children from several rooms with furniture, etc.
The costs of producing such a structure are almost negligible. But this will hardly make the children less happy.
- several large boxes made of thick cardboard (boxes from under a refrigerator, TV, etc. will do)
- construction knife: it will be more convenient to cut parts
- stapler and tape for fastening individual parts
It is better not to cut doors and windows all the way through - let them be opening and closing. Although they can also be hung with tape. It is better to make window and door openings in the form of an arch or any thematic figure. The gable roof is also secured with tape. The joints must be glued on both sides.
To make furniture, use a double layer of cardboard - this will make it stronger. If the home is spacious enough, you can make from cardboard not only tables, chairs and armchairs, but also a washing machine, a kitchen stove with painted burners, a TV, a refrigerator, a doll bed, etc.
Attach a bright doghouse to the house where your favorite toy puppy will live. Build a cardboard fence next to the house and “plant” a few carrots, flowers, or an apple tree cut out of cardboard from colored paper.
Young artist at work
Decorate the windows of such an impromptu house with chintz curtains and lay down a rug. The outside of the home can be covered with fabric, remnants of wallpaper or colored napkins, painted with paints, decorated with appliqué, bright inflatable balloons, flags and garlands.
READ ALSO: What are Ends for Polyethylene Pipe
Let your child participate in the finishing process by handing him a brush and paints.
Plywood construction
It will take no more than a couple of days to make such a house:
Garden ideas
The low cost of the technology makes it a convenient tool for creating a variety of garden buildings, and not just houses made of plastic bottles; crafts are limited only by the imagination of the site owners. You can build a greenhouse for seedlings, a shed for storing garden tools, a fence, an outdoor shower, and a playhouse for children.
For non-residential structures, the technology is simplified, since a lightweight structure does not require a foundation or laying columns. All you need to stock up on besides bottles is reinforcement bars and frame material (for example, an aluminum profile or wooden blocks). Walls are made in two ways:
- The bottom of each bottle is cut off, then the prepared containers are strung on a rod; in this case, one bottle is inserted into another, forming a column. The finished posts are fixed to the frame.
- The walls are assembled from whole products. This option is suitable for making a quick greenhouse.
Source stjohnssevenoaks.com
About houses made of plastic containers in the following video:
Design
The structure is assembled from PVC pipes. The master class shows a collapsible design; you can make it non-dismountable by soldering the connections. You can fix the connections using: bolts, screws, self-tapping screws, studs, etc. For a collapsible structure, the ends of the PVC pipes must be ground off using a special tool, carefully adjusting the cutting depth.
PVC pipe cuts
To create the structure you will need 23 cuts of PVC pipe and 4 cuts from leftovers. In the screenshot the PVC pipes are colored, the next screenshot will show the dimensions.
You can see more details in the diagrams and patterns: A house made of solid fabric and a house made of several pieces of fabric.
- Cut 1440 mm, – 1 pc. (Orange color)
- Cut 800 mm, – 4 pcs. (Yellow)
- Cut 610 mm, – 4 pcs. (Purple)
- Cut 621 mm, – 4 pcs. (Pink color)
- Cut 918 mm, – 6 pcs. (Blue color)
- Cut 882 mm, – 4 pcs. (Green color)
- Cut 40 mm, – 4 pcs. (Red color)
Fitting
- Equal tee – 4 pcs. (Blue color)
- 45 degree angle – 4 pcs. (Purple)
- Two-plane tee – 6 pcs. (Green color)
- Two-plane crosspiece – 4 pcs. (Yellow)
Briefly about the main thing
Plastic and glass bottles are an unusual building material with its own undeniable advantages. For several decades now, houses have been built from it all over the world, so the construction technology is considered proven and fairly established.
The buildings do not need a heavy, expensive foundation; the main task is to properly stack and secure the bottles in the wall structure. Here, plastic and glass have fundamental differences. In addition to residential buildings, fences and various utility buildings are built from used bottles.
Question
Write in the comments what you think - is it difficult to care for glass walls? Will dust and dirt accumulate on them over time?
Assembling floor and ceiling frames
Perform a similar operation with the horizontal crossbars of the ceiling (pipes 90 cm long). Cut the front horizontal ceiling pipe into 2 parts of 45 cm each, the ceiling pipe above the window into 3 parts of 30 cm each. Connect each pipe back into a solid structure with tees.
Assemble the ceiling frame - 2 prefabricated pipes of 90 cm (along the width of the house) and 2 solid pipes of 140 cm (along the length), using tees. All free tee pipes must be located at an angle of 90 degrees in relation to the ceiling plane.
Assemble the floor frame using pipes 90 cm long (the width of the box) and 140 cm long (the length). First cut the rear floor pipe - from the window side - into 3 parts of 30 cm each, the front pipe - from the door side - into two parts of 45 cm each. Connect the pipes back with tees. Leave two 140 cm pipes uncut.
Smooth and fresh skin: dermaplaning, or why a woman needs to shave her face
A Brazilian travels 36 km by bike every day to take his loved one home.
It’s good to wash often: myths about shampoo and hair care that only harm
Pattern of a house from pieces of fabric
Schematic representation in finished form
Details of a pattern for a playhouse made from pieces of fabric
More details in Patterns and diagrams for a children's house made from pieces of fabric
Watering can
For such a product, it is optimal to take a canister of detergent or other products that has a slightly flattened shape and a comfortable handle .
It is necessary to thoroughly wash the internal parts from any remaining liquid, then drill thin holes in the lid. The optimal size is 1-1.5 mm. Just above the handle you need to make a larger hole for air supply: if this is not done, watering the beds will be more difficult due to the pressure difference.
If necessary, you can equip the watering can with a plastic tube, which can be purchased at hardware or plumbing stores: it will increase the spray range.
Filling the water is done through a plug; for this it is convenient to use a funnel or hose so that the liquid does not spill.
You can also cut a wider lid, then using a funnel when filling with a regular bucket is not necessary. However, in this case, you should ensure that when watering the plants, water from the watering can does not flow onto the ground through the lid.
Theoretical basis for the use of glass containers in construction
The physical properties of glass do not change over time.
A tightly sealed bottle is a good thermal insulation material , so the use of glass containers for the construction of building elements is completely justified.
It has been proven that a panel constructed from 1 row of bottles retains heat no worse than a brick wall about half a meter thick.
Structures made from glass containers have good light transmittance. Wall panels can be designed in any color scheme, imitating elements of various architectural styles.
To build houses from glass containers, 2 methods are used:
- frame;
- wall
The resulting design will compare favorably in cost - you will get the bottles for free or at a purely symbolic price , and the main cost item will be the components for preparing the solution.
Further in the article we will talk about how to build from bottles with your own hands, from the practical side of this issue.