I decided to make myself a walking stick, which is very useful when walking in nature, especially in the hills and mountains.
You can use a simple pole for walking, but I decided to decorate it to make it more interesting to use and just nice to look at, because I love creative things.
To make your own wooden cane, you will need a wooden pole (I used oak), some duct tape, a pen or marker, a chisel and, optionally, an engraver.
I have made several videos on how to make a cane. I use power tools in them, but if you don’t have them on hand, you can just get by with a chisel.
It seems very difficult
Maybe this sounds like something that will start and never end, or take too long. Luckily, there are plenty of instant options, ranging from specialist woodcarvers to deals on eBay.
You will probably find that everything #8220; ready to use #8221; The proposals are quite expensive and can cost anywhere from $50 to $150 for custom work.
Making Your Stick: The Process
Once you have decided what kind of wood you want to use or have chosen what is available to you, if it is fresh, you will have to dry it. If it is dry and shows no signs of insect damage or infestation, rotting or other damage, you can skip the drying instructions...
You don't have to use a perfectly straight stick; Some twists and curves can add to the stick's personality. Just make sure that the piece you choose overall has good balance and doesn't warp or break around bump failures. The next question is how long should a rough stick last.
To start, your stick should be about 30cm (or one foot) longer than the finished product. The length of the finished product can be measured depending on its height and taste. Be sure to wear hiking boots when calculating your desired height.
Design and types of canes
The cane is a simple structure of 3 elements:
There are several types of products.
The main classification is based on the material of manufacture:
An equally important classification is based on the design of the stick.
The barrels of such sticks are equipped with grooves and a height adjuster
Multiple support points guarantee increased stability
Depending on the ability to fold the cane, there are 2 groups:
Folding models are convenient for travel
: Cutting the cane
We use a metal handle as a template to determine where to shorten the cane. You need to leave enough space for the tang under the curved handle.
Clamp the cane in a vice and drill a hole. Gradually increase the diameter of the drill until the hole is the desired size. Mark the depth of the hole with electrical tape to prevent over-drilling.
The transition from the antique pen to the cane will be rounded.
Once the handle is installed, the overall length of the cane will increase.
DIY fisherman's cane
To make this homemade product you will need the following materials:
Step 1: Get rid of old varnish
The first step to do is to remove the old varnish from the reed. To do this, use sandpaper. Gently sand the entire surface of the cane.
Step 3: Trim the cane
You will see that after the handle is in place, the length of the cane will increase.
Step 6: Attach the Rings
Take a cane and decide where you want to install the rings. Now take a pencil and mark the lines where the rings will be installed.
Step 6: Varnish
Now the cane should be coated with transparent varnish. Since the cane is round, the best option would be if you hang it. Apply at least 4 layers of varnish. Let the reed dry thoroughly.
While the cane dries, start decorating. You can use a big old hook and a bobber. Make a small composition. Here you can show your imagination.
Let's find a big old hook, which, after modification, will also go into use.
Step 7: Putting it all together
Harvest Responsibly: Know Your Trees
We are confident that as a traveler he has a strong conservation ethic. You don't want to trim a branch of any tree just to satisfy a whim. While it may be tempting to pick up #8220; found #8221; item or delete a branch, make sure this is allowed, especially if you are in a nature reserve, heritage or national park.
Even if you are allowed to harvest from trees, make sure the species is unprotected or rare. If your heart is set on rare or unusual wood (and an experienced woodworker), turn to a supplier such as the renowned Rory Wood, who sources rare wood from around the world from 2 locations in South Africa and Maine, EE. UU..
These samples are obtained in an ethical and legal manner, without threatening the scarce resource or its environment...
Put your hands on a good stick
Make cane starts by getting your hands on the best piece of wood you can find. This means you should look in the area and monitor the following characteristics:
size
It depends on your height. Your instinct may be to choose something that is slightly higher than your waist, like your arm when it is bent at the elbow. But for maximum comfort and a good grip, take a stick that reaches your armpit and is of appropriate length.
See also: How to Walk: A Step-by-Step Guide to Improving Posture and Walking for Life
When it comes to diameter, choose something that fits well in your open palm. Don't make anything too big or your arms will hurt. In contrast, getting a smaller diameter causes the walking shaft to easily fall out of his hands, making him more prone to blisters, especially if his hands become sweaty.
Some other popular internet sites showing how to make your own DIY stick claim that it is best to choose a tree branch that is as tall as you are because:
- You may make mistakes during the production process.
- It's better to have a longer counting stick if you're going to be walking for a longer period of time.
If you're not sure what to choose, aim for a length of around 35 inches, which should cover all your bases.
form
The branch you choose should be fairly straight. It may bend a little, sometimes flexibility is an advantage, but it shouldn't be bent anymore.
resistance
It is better to take a stick made of hardwood because you can rely on its durability, it has excellent traction and you can use it more easily. Typical options that you may encounter in nature:
- American chestnut.
- ash
- aspen
- Linden
- elm
- maple
- sassafras
The type of wood you choose is especially important because you can cut it easily. You should make your cuts when you find curves or curves to get a strong grip. Plus, it also makes it look great.
Essentially, your cane should be:
- hard
- strong
- soft
But there are other ways to prepare your stick, and some even involve using green wood.
Yes, we know we said dead wood is best, but that's only if you don't have the tools and time to prepare green wood. So for this difficult job you need to dry and cure the stick with melted wax, which takes much longer.
years
When it comes to this feature, middle age is better. Your choice:
- Get a fresh green tree branch. Do not do that. Breakfast and you don't want to harm the trees and destroy nature...
- Getting a fresh branch but from the ground. This is definitely something you should do. He is strong and tough enough that you will feel confident that you can trust him.
- Receiving an old branch of soil. Don't choose a piece of wood that is visibly fragile or damaged. If you have holes, or if there are bugs from it, you should definitely stay away from it, or cracks in the first stage. However, the worst thing that can happen is taking something like termites or ants into your backpack or home...
place
Location is also important to get the best wood to make the cane. Suppose you are not only walking in an area with a mild climate. This could even be in the desert and still need good staff to help you, so you should get a cactus trunk if the law allows it.
General rules:
- Do not take branches of private or public property such as parks.
- Do not cut or take protected tree branches.
- Get only dead branches.
- In some areas you may still be allowed to cut tree branches, but only if they are low enough to the ground to cause accidents...
- You may also be allowed to cut tree branches if they are blocking the path and getting in the way of hikers.
- Don't trim shoots.
What should the handle be like?
Its shape is an important criterion for choosing this device. And it’s not just about beauty, because the handle used to be a decoration for the cane, often being a work of art. But now it is more important that it is comfortable. If the handle is not selected correctly, pain in the hand and wrist joint may occur.
It is best to choose a cane with an anatomically shaped handle that follows the contours of the palm. For some, a large, voluminous handle will be more convenient; for other people, it is more comfortable to lean on if it is small. The main thing is that the brush is positioned freely on it. The shape of the handles may vary. In addition to the most common ones, they can be in the form of a swan neck, beak or hook.
The material from which the handle is made is also important. It should not cause allergies or slip. It is best that the material is pleasant to the touch. Most often, cane handles are made of medical plastic, sometimes of wood.
Making a carved cane “Eagle”
This time we will make a carved cane with a carved shaft and a handle in the shape of an eagle.
It all starts with plasticine and a sketch, we sculpt a model. The sketch can be any photo. In my case, they sent me a sketch by email.
We select a suitable material (birch) and glue the required size of the array.
We glue them together, clamp them with clamps and leave them in this state to dry for a day. Let's take the shaft. We sharpen it on a lathe, the material is birch. The shaft will be carved, so I thought about the relief and geometry of the shaft in advance. Also, a recess is immediately machined at the end of the shaft along the inner diameter of the ring for the tip.
The shaft is ready, let's apply the markings.
We take chisels and joints and begin to transform the shaft.
How to make a cane with your own hands from scrap materials
I decided to make myself a walking stick, which is very useful when walking in nature, especially in the hills and mountains.
You can use a simple pole for walking, but I decided to decorate it to make it more interesting to use and just nice to look at, because I love creative things.
To make your own wooden cane, you will need a wooden pole (I used oak), some duct tape, a pen or marker, a chisel and, optionally, an engraver.
I have made several videos on how to make a cane. I use power tools in them, but if you don’t have them on hand, you can just get by with a chisel.
To make a cane we will need:
cane blade
We cut off a 30 cm long piece from the axle shaft. Next, we start the forge and forge what we need.
Here's what I got. Unfortunately, we ran out of gas, so we continue to supply everything manually. I expected to stretch it by at least 60 centimeters, but here it turned out to be almost fifty dollars.
We finish everything using a grinder manually.
Well, what can I say, a mountain of sawdust, half an hour of work and something is already more or less emerging.
Now all this needs to be adjusted in width so that it fits all the way into our hole here.
Our blade blank is ready. The total length was 44 cm.
Cane handle
We cut out a handle of the desired shape from a wooden block.
Blade attachment
The blade is welded to a threaded pipe and then simply screwed in.
Cane trunk (shaft)
We glue our fitting into the elbow of the fishing rod.
I will glue this sleeve to the thinner tip of the knee.
As a result, I ended up with this homemade cane with a secret.
For a detailed manufacturing process, watch my video.
Friends, subscribe to my channel. This will be simply an invaluable contribution, let’s say, to my difficult task. I will be very grateful and grateful.
Author of the article “Do-it-yourself cane with a secret” Steel Wood
Source
Dance shoes
What kind of shoes can you choose for oriental dance classes? Historically, oriental belly dance has been danced barefoot. This emphasizes that the dancer’s connection with the Earth is inextricable and constant.
However, if for some reason you cannot or simply do not want to perform barefoot, then you can wear slippers, ballet shoes or just socks. For a performance, shoes are chosen to match the color of the costume: if it uses silver or gold tones, then the shoes should be made in a similar shade.
How will your cane be??
Having said all that, we limited our instructions to making a quick stick. Or at least in a decent amount of time and with some simple tools that you might even have in your backpack.
Even so, your cane may look very different from how someone else reads these instructions. Check out our informative article on how to choose the best walking sticks for your next adventure.
Tell us more: what kind of wood are you going to use? Will you be adding some complex dimensions? Will you be doing staining and sealing? What type of clutch will you add? Do you think basic protection is a good idea? Did we miss something in this article? Comments below!
How to make a carved cane from wood with your own hands
I decided to make myself a walking stick, which is very useful when walking in nature, especially in the hills and mountains.
You can use a simple pole for walking, but I decided to decorate it to make it more interesting to use and just nice to look at, because I love creative things.
To make your own wooden cane, you will need a wooden pole (I used oak), some duct tape, a pen or marker, a chisel and, optionally, an engraver.
I have made several videos on how to make a cane. I use power tools in them, but if you don’t have them on hand, you can just get by with a chisel.
Cane handle.
Hi all. This is the handle for the cane that I carved out of wood, in the shape of a snake. Tamiya paints and varnish on top.
Other works can be viewed here VK https://vk.com/dssergeevich Instagram drevelsergei
Possible duplicates found
Handicrafts
27.6K posts 43.5K followers
Community Rules
1. Be polite, try to write correctly.
2. Use clear and beautiful photographs in your publications.
3. The author of a post with the tag [my] can leave a link to his profile, group or channel on other sources, provided that the links ( active and inactive
) do not lead to direct sales. No more than four links are allowed and only at the end of the post (clause 8.5 of the basic rules).
-advertising/spam links;
-links leading to stores indicating the cost of the product/service;
-links leading to calls, purchases, sales, subscriptions, reposts, voting and the like.
(violation of the basic rules of the site, clause 8.1 and clause 8.2).
When following a link, the presence of active (clickable)
links leading to the above in paragraph 3, the content of such keywords as “product”, “sell”, “in stock”, “to order”, etc.
3.1 Posting the author’s contacts (by the author himself or other users) in comments is prohibited and subject to deletion (clauses 9.1 and 9.3 of the basic rules).
First, get a good Stout Stick
This may sound like an introduction to an old-fashioned recipe, and it should be. People found or made canes for walking and protection since they could walk on two legs. Depending on where you live, this could also be as simple as walking into the nearest forest, forest, or forest.
For those not so fortunate, this may involve visiting shipyards, craft or carpentry stores, or even shopping online. You should also know a thing or two about the types of wood and whether they are suitable or not. Very hard wood is durable but heavier and requires a lot of work, and if the wood is too soft it will break and/or break easily.
Let the reed air dry
As we've already said, the middle-aged type of wood is better when it comes to a good cane. Literally. This is because it is still young enough to be easily trimmed and trimmed while it is old enough to provide much-needed support.
However, this support can only be obtained if you are willing to spend extra hours (or rather weeks) and let your stick dry. Contact with air will eliminate the water molecules inside, making it stiffer and able to support its weight longer.
What You Should Know Before You Let Your Stick Dry
There are many things to consider before deciding how long the drying time should be. While most wilderness experts recommend a couple of weeks, some last up to a month, keep in mind:
- The type of wood you are using. Solid woods require less time to dry.
- Climate and humidity. Warm and dry climates require less drying time than wet seasons with heavy rains.
- You have time. Of course, the less time you have before hiking, but let it dry stick..
- Your aim. Not using a cane for very difficult rides also reduces overall drying time.
However, you shouldn't be very happy if your stick dries out very quickly, because this can make it brittle and break more easily.
The steps you need to follow to air dry well will ensure your reed doesn't become too brittle. So:
- Rotate it frequently so that the other side is open to air.
- Secure it with metal clamps to a large piece of wood to prevent it from bending.
- If the weather is very hot and dry and windy, bring your cane inside.
Customize your stick
The finishing touches you can add show your individuality and imagination, but depend on your skill. Some DIY sticks look very professional, with caps that have amazing faces sculpted into a person or animal.
Since you need the right tools and skills to do this, we'll tell you what the easiest settings you can make with a simple wood burning tool such as:
- Your name if you want people to know who the cane belongs to.
- Your partner's initials if you want others to know who you love.
- An important date if it brings back memories.
- The name of a special place if it motivates you while walking.
- Simple geometric shapes such as circles, squares or mixed triangles for an extravagant appearance.
- Spiral groove for comfortable and practical grip.
In any case, if the plan of having an embellished top doesn't work out, you can always cut it down. This is if you cut the stick a little larger, as we previously advised.
Protect your work
This is done through dyeing processes and sealed, they are optional. However, if you want your cane to look better and also last longer, you should definitely consider it by following these steps.
- Use thick sandpaper to remove large impacts.
- Use fine sandpaper to completely smooth out the stick.
- Clean up any remaining sawdust.
- Apply a little paint to the cloth and rub the stick with it...
- Apply the first coat of wood following the instructions.
- Let the stain dry for 10-12 hours...
- Use fine sandpaper to soften this coating layer.
- Clean the stick with a clean cloth.
- Repeat the process a couple of times to increase the durability of the coating.
- Make the sealing part by applying three coats of clear urethane coating.
- Use fine sandpaper between these applications too.
These steps also require special attention for your safety, so remember:
- Work with the windows open to avoid getting intoxicated by the fumes.
- Wear gloves to keep your hands free from toxic paint...
- Wear safety glasses because the fumes may damage your eyes.
- Cover your mouth and nose for added protection.
You can also refer to our simple backpacking gear guide.
Add capture
As we said earlier, you can easily cut your own handle. But if you don't feel comfortable doing this, you can buy it to apply after adding protective layers.
The best pens on the market are made from materials such as:
- leather.
- leg-split.
- nylon.
- rope.
- adhesive film.
- Grip tape.
To get it, follow these steps:
- Wrap the item you bought around the stick where you will have your hand.
- Secure the handle with small nails to prevent breaking the cane.
- Make a hole in the top of the stick.
- Insert a piece of cord or leather through this set.
- Tie this fabric into a loop around your wrist for a more secure grip.
Cover your base
Once the top is completed, you should also consider protecting the other end of your cane. Since you'll be using this to walk around a lot, constantly hitting the ground could break or break if you're not adequately protected. Even if it is not damaged by constant use, weather conditions can affect the base of your cane.
If this happens, you must follow these steps:
- Clean the base of your stick with coarse sandpaper.
- Use finer sandpaper to smooth it out.
- Cut a little if you can't fix it any other way.
- Add protection for later use.
Better protection is easy to add using tools and equipment you have around the house, such as wood tenons and epoxy glue. Some ideas include:
- Rubber plugs.
- Rubber plugs.
- A piece of copper pipe.
Patterns of belts for oriental dances
Before cutting out, you should make a blank. The preparation is carried out as follows.
We measure the volume of the hips. For example, let's take the number 66 cm. Divide this number by 2. In our example, we get the result 33 cm. Now you need to draw two lines parallel to each other on paper. The distance between them is the width of the future belt. Choose the width at your discretion. In this example, the width is the same along the entire length; the shape can be changed if desired.
On each line we mark the middle. From the top mark we measure 2 cm down. Connect with the edges of the top line. We round off the resulting lines. We perform similar actions with the lower point.
Since the belt should fit around the hips, it should be made round. We extend the lower lines, as indicated by the dotted line in the figure. At the bottom we make an indent of 2.5 cm and connect the mark with the top line. We repeat the same steps on the second half of the workpiece. At this stage, fitting of the paper blank is required. If the bottom edge is puffy, we reduce the indentation, and if the top edge is, we increase it.
IMPORTANT! If there are supposed to be fasteners on both sides, then we duplicate the pattern. We leave space on both sides for fasteners. If there is a fastener on only one side, you just need to leave some extra fabric for the gap.
So, the pattern is ready.
How to choose the right one
Like any orthopedic device, a support cane must be selected individually. There are several criteria for choosing a walking cane. If they are not followed, it will not be able to protect a person from injury, and may also cause additional problems.
- First of all, the cane must be suitable in height. Only then will it be able to fulfill its functions. If the cane is higher than necessary, more stress will be placed on the arm, and if the cane is very low, the person will have to hunch over.
- An important criterion is also the strength of the material. Wooden canes used to be more popular, but for some patients they are considered heavy. In this case, you can choose a stick made of aluminum, it is light and durable.
- The shape of the handle should be comfortable to avoid hand fatigue.
- It is very important that the weight of the cane does not cause additional problems. Usually it weighs from 100 to 400 grams. Support canes for women should be lighter so that the hand does not get tired.
- For many patients, the determining factor when choosing a cane is its appearance. This is especially true for young people who need to use this device after an injury.
Types of wood you can use
If you don't know where to start, here are some types of wood that are suitable for making walking sticks or walking sticks and walking sticks. Ideally you should use fresh or green wood, but old wood can also be used, you just need a different treatment. Here are some woods that are popular for this purpose..
There is a useful site called #8220; Tree Database No. 8221; which, although not including all the possible species listed, is very complete. Started by Eric Meyer, who makes musical instruments, this is a useful compilation of the types available and their properties that he needs for his own purposes. It is also available as a book..
Eric diligently trusts his employees around the world, some of whom are suppliers. What is also very helpful is Eric's description of how wood can affect it if you are allergic. Some tree resins can have a very strong smell, which may affect you when working with them, even if you are not sensitive to the resin.
This is a list of some recommended woods for carving to get you started on your search.
- Aspen - Poplars are popular. There are European and North American varieties. They make lightweight poles, not the most durable, but economical and suitable for their first project.
- birch - There are many types of birch trees. Cheap, quite durable.
- cherry - Cherrywood is easy to use, economical and durable..
- Hard Walnut - A heavier wood in America, very durable and should last a lifetime. Includes pecan in the genre...
- maple - -There are quite a lot of maples. I would look for hard maple if you want the most durable look. Bird's eye maple is not a species, it is a form of tree.
- oak No presentation required Durable and attractive.
- willow - There are several willows around the world. Diamond willow is not a species, it is caused by a fungus. Good for carving and cheap.
You might also consider bamboo or reed, which is traditionally used for reeds and reeds.
Start cutting
There are different preferences when it comes to cutting, or rather leaving a crust, like on a staff. So, when you make reeds, it's all up to you, depending on:
- How much time do you have to complete your homework?
- The duration of your hiking trip.
- Who is this cane for?
- Why do you need it (for example: for fun, appearance or actual support).
Obviously, if you have a lot of time and are doing an extended hike that involves walking from sunrise to sunset every day over rough terrain, you probably want good finish and reliable traction. So, in this case, it is better to cut off the bark of your stick.
Even if you decide to skip this step, you will still have to make some small changes to eliminate any annoying branch your flash drive may have...
To make this work, follow these steps:
- Get a reliable cutting tool like an airplane.
- Get rid of any branches or large knots your cane may have.
- Start cutting away the bark.
- Your job is finished when you can see the wood grain, as your stick may have more than one layer of bark to carve.
Tips for Better Job Cutting
- The plane is good, especially if you stick to a DIY project that will be completed at home, but if you are outdoors, a knife will work well.
- When choosing a tool, ease of use should be your top priority.
- A good rule of thumb is to start with larger hits and then smaller ones.
- Whitling is best done with very short and quick strokes. If you use long, neat strokes, you'll end up cutting too much into the actual stick instead of getting rid of the bark.
- Effective cutting work requires a lot of time and patience, so be prepared with this.
- It should never be dropped to your body because it increases the risk of cutting if it hits the lump. It is especially difficult to cope with the short and fast movements required for contraction.
- If you have never done this before, it is advisable to watch some online videos that will show you exactly how it is done. Getting help from someone who has carpentry skills is even better if you're new to the whole DIY business.
- Remember to keep your legs spread when you cut so the knife doesn't accidentally hit them.
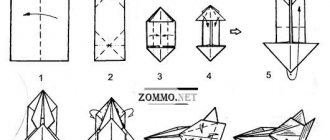
Making an umbrella-cane for a doll
I accidentally found a photograph of the process of making a non-opening cane umbrella for a doll. I want to share with you. The photos were taken during the process (at night), so their quality is average. But I think the process will be clear to everyone despite this