How to make a differential for a walk-behind tractor with your own hands?
Despite the fact that the differential for the walk-behind tractor has a rather simple design, before making it yourself you will need to prepare and study the drawings. They should indicate the dimensions of the mechanism spare parts and methods of fixing them in the device.
Practice shows that every homemade differential has a small rotation angle of the wheels in the free position. As a rule, this parameter does not exceed 250 °. This disadvantage is due to the fact that the design of the mechanism includes a transverse groove, which significantly reduces the power and efficiency of the design. Another significant disadvantage is the rapid wear of the parts of a homemade differential, especially if a large amount of dirt accumulates between them. In this regard, self-made differentials should be used for exceptionally light models of walk-behind tractors.
In order for a homemade differential to be more durable and effective, you should adhere to a number of rules:
- there is no need to leave too small a groove in the space between the bushing and the extension axle. If corrosion occurs, these parts will quickly stick to each other;
- in order to timely lubricate the differential without regularly disassembling it, you need to place a pressing oiler on the mechanism bushing;
- For the manufacture of extension cords, it is best to use carbon steel. As a result, the mechanism will be more reliable and, at the same time, not expensive. The video will tell you more about making the differential.
Making a differential for a walk-behind tractor is not a complicated procedure. By following all the recommendations listed, you will be able to assemble a durable mechanism that will quickly pay for itself with further use.
DIY axle for a car trailer
Useful tips. Axle for a passenger trailer: types, how to make it yourself. Hubs for passenger trailers and trailers with a total weight of 3.5 tons. How to make a passenger trailer axle from a Zhiguli hub. Axle for a trailer, axle for a trailer, buy an axle for a passenger trailer, price. How to make a trailer for a walk-behind tractor with your own hands: diagrams, drawings
VIDEO ON THE TOPIC: Why the trailer AXLE BENDS // Chernak
Dear readers! Our articles talk about typical ways to resolve legal issues, but each case is unique.
If you want to find out how to solve your particular problem, please use the online consultant form on the right or call the numbers provided on the website. It's fast and free!
- How to make a trailer axle with your own hands
- Axle for a passenger trailer: types, how to make it yourself
How to make a trailer axle with your own hands
Useful tips. Axle for a passenger trailer: types, how to make it yourself. Hubs for passenger trailers and trailers with a total weight of 3.5 tons. How to make a passenger trailer axle from a Zhiguli hub Axle for a trailer, axle for a trailer, buy an axle for a passenger trailer, price How to make a trailer for a walk-behind tractor with your own hands: diagrams, drawings Axle for a hub with your own hands without a lathe - .
Types and characteristics of hubs for walk-behind tractors
The hub for a walk-behind tractor is an important element of the design of an agricultural machine. Its presence, paired with an installed special attachment, significantly improves the quality of plowing the soil, hilling beds, planting potatoes, harvesting and other activities in the garden.
There are two types of hubs on sale.
Among them stands out:
- differential hub - this part is considered universal and can be mounted on all walk-behind tractors, regardless of their class and design features. Differential hubs are required for use on those walk-behind tractors whose factory equipment does not include a wheel unlocking mechanism, as well as for those models of equipment that cannot be freely deployed at the end of the cultivated bed. This walk-behind tractor wheel hub is equipped with bearings, which significantly increases the maneuverability of the unit:
- ordinary hub - a part of this type has a simpler design, but is less efficient in use. It only slightly improves the maneuverability of the walk-behind tractor, so every year it is in less and less demand among farmers.
Differential hubs, or semi differentials as they are also called, consist of one or a pair of bearings, as well as retainers. When using such a part, in order to turn the walk-behind tractor, it is necessary to disconnect the lock from the corresponding latch.
Depending on their diameter and shape, differential hubs for walk-behind tractors can be of the following types:
- round hub;
- sliding part;
- hexagonal hub - can have a diameter of 24 or 32 mm.
This kind of classification of semi-differentials allows the farmer to select the part that is optimally suited for installation on his walk-behind tractor and will bring maximum benefit when used.
Differential for a walk-behind tractor - how it works and what it’s capable of
Diary entry created by user CaimanTeh, 02/26/15 .188,
Recently, a video of the Caiman Vario walk-behind tractor with a snow thrower attachment was posted on YouTube. During the story about the features of winter use of the walk-behind tractor, “additional differentials” installed on the wheels were mentioned.
To demonstrate the differentials, Denis turned the walk-behind tractor back and forth. The demonstration was short, but this option interested the participants in the Pubert & Caiman Motor Tillers
In the topic, it seemed like they quickly figured out what these additional differentials were for a walk-behind tractor, but since the question arose, I decided to make a short photo report. After filming, the demonstration walk-behind tractor with a differential was full of gasoline and oil, so it was taken to the service room. It's cramped there, there's a lot of other equipment around, so we couldn't spin it. All I got from Caiman Vario was a photograph.
Differential for Caiman Vario walk-behind tractor
So, here are these differentials, or rather semi-differentials installed together with standard rubber wheels of size 4.00-8. (The set of two semi-differentials is called “Differentials with extensions for the VARIO/Q Junuor/Q Max walk-behind tractor” and has code R0101.)
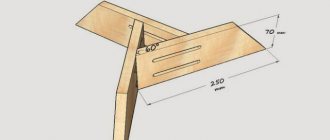
The design of such differentials for walk-behind tractors (and walk-behind cultivators, by the way) is extremely simple:
- the wheel hub is not secured to the axle
- there are protrusions on the axle and hub (indicated by green arrows) that prevent the wheel from turning a full turn
How it works
During normal movement of the walk-behind tractor, the protrusion on the axle rests against the protrusion on the hub and transmits rotation to the wheel. In this case, both wheels will rotate simultaneously.
Tips for choosing a hub for a walk-behind tractor
On the open market you can always find a large selection of hubs designed for installation on various models of walk-behind tractors.
In order not to make a mistake when choosing a part, farmers should adhere to a number of certain rules:
- when ordering a hub for a walk-behind tractor, you should indicate the class and model of the agricultural implement;
- in most cases, when selling a walk-behind tractor, one set of hubs is included in its kit. In this case, when using attachments, there is no need to rearrange the hubs. This, in particular, applies to the lugs used on the walk-behind tractor. This feature will save a lot of time when working in the garden;
- If the walk-behind tractor is equipped with pneumatic wheels, then its delivery set will necessarily include hubs.
By adhering to these simple rules, every novice farmer will be able to choose a walk-behind tractor equipped with hubs or choose the right parts, separately from the agricultural machine.
Why does a walk-behind tractor need this element?
The walk-behind tractor wheel, which follows an outer arc when turning, must travel a longer distance. And here the need arises for a differential or other mechanism for distributing power, which will avoid slipping. If the wheel device does not have this element, this will cause straightening of the movement. Moreover, the greater the distance between the wheels, the more difficult it will be to turn.
The main part of the work that is carried out on the ground, for example, cultivation or fertilization, is carried out in a straight line. But this does not mean that the device will never turn. Of course, the standard version of a walk-behind tractor with a rigid 2-wheel drive makes it quite convenient to use in most agricultural work. But if frequent turns are necessary, the problem with slippage and control will have to be additionally solved. If special mechanisms are not used, the vehicle will be braked by lugs. Such work will be difficult even for a person with great physical strength.
Most often, experts choose to use overrunning clutches as a solution to this issue.
These are simple and universal installations that allow you to correctly distribute the load between the wheels if you need to turn the walk-behind tractor. The versatility of this method lies in the fact that overrunning clutches can be used not only on a rigid axle, but also on a connected one. In this case, when turning, the wheel will tend to rotate faster than the front shaft. This makes it possible to conveniently operate the machine and work even in small areas, as the device becomes more maneuverable.
Making a hub - step-by-step algorithm
As in the case of a differential, to manufacture a hub for a walk-behind tractor, you will need to prepare drawings. A detailed diagram will make it possible to complete the work faster and avoid common mistakes.
The correct sequence of actions when making a hub is as follows:
- First you need to grind the workpiece. To do this, any metal part is taken and processed on a lathe;
- A fairly popular option is to make a flange and then weld it to a metal pipe or rod. When processing a part, you should be extremely careful and observe the dimensions indicated in the selected drawings;
- It should be remembered that during operation the hub will be subject to constant loads, which is why it is better to choose a reliable material for making it yourself - for example, hardened steel.
After manufacturing the hub, it can be installed on the walk-behind tractor and tested in operation. You should not place high loads on the part immediately after installing it on the unit - otherwise it may become deformed. It is best to walk with the walk-behind tractor several times on a flat surface in the yard, turning the car around several times. After this, the hub will finally fall into place, and the unit with it can be used for work in the garden.
A self-made differential or hub can be successfully used to equip Neva brand walk-behind tractors. The design of the units of this brand allows you to easily install the part, and, if necessary, remove it easily and quickly.
Do-it-yourself overrunning clutch for a walk-behind tractor
Overrunning clutches are often used as differentials. It is necessary for easy turning, since most walk-behind tractors operate on a rigid drive, which copes well with straight-line movement on a flat surface. However, when performing work that involves frequent turns, or when driving on an uneven surface, controlling the walk-behind tractor becomes difficult. When turning, it is necessary to lift one edge to prevent the wheel running along the outer arc from slipping, which can cause significant inconvenience. The overrunning clutch allows one of the wheels to move faster, which makes controlling the walk-behind tractor easier.
You can make an overrunning clutch in different ways, using special parts or what you have on hand. For example, it can be made using a hub from a Zhiguli, in this case there is no need to purchase or create a disk. The advantage of a homemade overrunning clutch is its price - in specialized stores its average price is 2,500 rubles.
Video with detailed instructions for creating an overrunning clutch from parts from Zhiguli:
https://youtu.be/Nu7PFGu780g
Homemade devices for walk-behind tractor
The necessary attachments on the farm include:
- land cultivators - plows, cutters, rippers;
- for crop care - hillers;
- rake;
- snow shovels;
- seeders, planting devices.
Rake for walk-behind tractor
Homemade rakes for a walk-behind tractor are used when preparing hay for livestock on a small farm. They are made by hand from narrow metal pipes and rods. To create a durable structure, the parts are assembled for welding.
Homemade rakes are foldable for easy transportation.
By designing the rake yourself, you can make the grip width at your discretion. The pick-up height of the rolls is adjustable. Rake rods are made for collecting hay or mown grass on the site. In the second case, both the width of the structure and the size of the teeth can be reduced.
Homemade crow's feet cutters for walk-behind tractor
Crow's feet cutters help to deeply loosen the soil and crush large clods of earth.
This device is a one-piece welded structure, so it is stronger and more durable than conventional walk-behind cultivators. The cutter qualitatively processes hard soil for sowing potatoes. It can be used to plow the ground under the snow.
The quality of plowing depends on the degree of sharpening of homemade cutters. The soil becomes lush and rises 5-10 cm if the edges of the flat cutters are sharp. They crush large and small roots, destroy harmful beetles and wireworms, and saturate the soil with oxygen.
Homemade “crow’s feet” for a standard input mount must be made with a diameter of 52 cm, a gripper of 1.25 m, and a number of beams of 30 pieces. Each beam is bolted to the coil.
Homemade plow
A homemade plow for plowing is easy to make even for a person with minimal skills in working with metal. Milling cutters are used to loosen already used soil. The plow is used to cultivate virgin soil and compacted hard soil. It has a greater margin of safety. The plow is expensive, not every summer resident can buy it, but you can try to make it yourself.
You will need a plate 4-5 mm thick and a pipe with a wall of the same thickness. The structure is attached to the frame. The main element of the device is a sharpened plate; it must be cut with a grinder in the shape of a blade. The ploughshare has the shape of an elongated flat trapezoid. We fix the pipe and assemble the structure completely. It is connected to the walk-behind tractor via a hitch.
In a separate article you can find a drawing of a plow for a walk-behind tractor.
Reversible plow
The plow of this design is a little more complicated. A rounded feather is attached to the top of the homemade product. Not only the land is plowed, but also the cut layer is dumped - when processing virgin soil, this is sometimes necessary. The complex structure of a reversible plow requires its manufacture by a professional craftsman who can calculate the exact parameters of each part.
One of the varieties of such structures is the Zykov plow. To assemble it yourself, you will need a stand with which it clings to the walk-behind tractor, the plow body itself with the ploughshare, a board for support and a curved blade for turning over the layers. The plow moldboard is made of a pipe with a diameter of 50 cm.
Blade-shovel
A walk-behind tractor can be used to level land plots for the construction of utility structures. Like a bulldozer, it can clear sidewalks and paths of dirt and snowdrifts. To make a homemade blade, you need to take a metal sheet 2 mm thick. For strength, plates of thicker metal are welded vertically inside the blade - they will not allow the rear wall of the blade to sag. You also need the lower part of the shovel; it is lined with tin so that the bottom does not get stuck in the ground or snow. The bottom of the shovel is placed at a right angle to the lower base.
Homemade products for a walk-behind tractor can be made with your own hands from used materials.
To make a homemade shovel you will need a metal saw, a drill and a welding machine. A 200-liter steel barrel is suitable as a material. It must be cut along the height into 3 parts and the outer two of them welded together. The metal of the barrel is thick enough to make the device durable.
Potato planter
A very popular and indispensable piece of equipment in the garden is a homemade potato planter. It has a tuber expander with a hole at the bottom and disks for burying them in the ground. The rear wheel on the inside must be covered with a plate so that the planting material does not fall under the wheel of the walk-behind tractor. The entire structure is mounted on a steel frame. The depth of its fixation is adjustable.
The bunker can be made of plywood or galvanized thin sheet. A wooden box can be painted with waterproof paint. To prevent the tubers from being damaged, the inside of the bunker is lined with rubber.
The planting device consists of a metal tube with a diameter of 10 cm, to which a furrow opener is attached. Its height, and hence the depth of the furrow, is regulated by the vertical movement of the structure.
The furrows are sealed with discs directed towards each other at an angle. They move due to bearings. The width of the row is changed by loosening the bolts of the stepladders and moving the disks. To ensure that there are no traces left on the ground from the planter wheels, the ground can be loosened with cultivation legs welded to the frame.
The seat of a homemade sower for a walk-behind tractor is attached to a metal base frame.
Disc hiller
From scrap materials, you can assemble a convenient device for hilling vegetable crops planted in rows with your own hands. The main elements of a homemade hanger will be two metal pot lids or disks of the same size. Their diameter is at least 50 cm. The edges of the covers or metal disks must be sharpened like cutters. These are the main details of the hiller. Flat lids are rounded inward using a hammer.
Disks that collect soil into a roller around the stems of potatoes or other crops are mounted on a metal frame. Small wheels are welded to the bottom of it for support. It is necessary to secure the disk rods movably so that you can adjust the angle of inclination of the processing surfaces.
Simple design for a walk-behind tractor
Many farmers, when using conventional equipment, often think about how to make a differential for a walk-behind tractor with their own hands. A similar idea may come to a repairman if an old element breaks down. There are no particular difficulties in making a differential for a walk-behind tractor with your own hands. But first, you should stock up on a suitable diagram or prepare drawings.
Those who are thinking about what type of differential to choose for a walk-behind tractor should remember that this type of equipment does not require prolonged rotation of the wheels relative to the axis. That is why you can choose the simplest options.
Often, universal differential systems are used for walk-behind tractors. They allow the wheels to deviate from the axis by a certain degree.
In the simplest version, you need to take a bushing with a transverse slot and insert a short axle into it. The last element must be fixed with a bolt, and only then attached to the wheel structure. This system works quite simply. The drive axle must turn the bushing all the way, that is, until it hits the bolt. It is worth noting that with this element the master can initially set the most suitable wheel rotation angle for him, which also depends on the size of the slot.
The peculiarity of this detail is its maximum simplicity. You don’t have to be an experienced craftsman or mechanic to make such a differential for your walk-behind tractor. You just need to have certain skills in operating a machine. This will be enough to obtain the basic elements needed to make such a differential.