History of light guide lighting
Home lighting using light guides
The first attempts to create a light guide for indoor lighting were made back in 1874. Russian electrical engineer Vladimir Chikolev made a pipe with a mirror surface inside, with the help of which he provided lighting into the dangerous production rooms of a gunpowder factory.
The modern method appeared on the market relatively recently. The first devices that conduct daylight appeared in 2005. The devices have gone through several stages of improvement. The final version was presented to consumers in 2011.
A light guide is a closed type mechanism for the directional transmission of daylight. Another name is optical waveguide. The devices are designed in such a way that they can have any directional curve, but at the same time deliver maximum illumination. Allows you to save on electricity and standard light bulbs.
Economic efficiency of introducing light guides
The main advantage of light tunnels is financial savings due to immediate cost reduction and payback. This is noticeable in industrial premises. For example, in buildings with an area of over 100 sq.m. the average consumption per 1 sq.m is 1,500 rubles. After installing the light guides, the amount is reduced to 600-700 rubles. Warehouses and factories pay for the installation of the system in 2-3 years (average).
The choice of light sources depends on the type of room, capabilities and preferences of the owners. Light guides are an alternative lighting method that suits any room.
Source
Light gun. For what, why and which one exactly?
When you decide to purchase such a rare piece of equipment as a light gun (or tracking spotlight), you know exactly what you want.
This type of equipment is in demand only if its customer has an idea about its further use.
The light gun itself is a spotlight that illuminates a specific location. This is to explain its purpose very superficially.
Only this is not quite a spotlight. The light gun is a product of modern technology and an example of a modern approach to stage design, and not only that.
The principle of operation is that the device, at a certain or given moment, focuses the attention of others on a specific object or area of the area by concentrating a light beam on it. The beam itself is created by passing a light source through a number of lenses focused in a given direction.
The operating principle is similar to that used in security camera equipment.
The use of a tracking light spotlight in the interior design of various buildings or stage areas began a long time ago. Over time, it became clear that light guns, due to their mobility and compactness, easily replace stationary lighting equipment, surpassing it in service life and service life.
Areas of application of tracking spotlights
- Decoration of places for public events.
Any modern stage or venue where a performance takes place cannot do without light guns.
Being located in appropriate places on the stage (and even outside it), at a certain moment they will highlight from the general cast of performers the one who, according to the director’s plan, should currently be in the spotlight.
This is especially true in a nightclub setting, as you can read about here. A light gun is used for the mirror ball, thereby creating stunning lighting effects.
The tracking spotlight (according to its function) will accompany the object as it moves.
Light gun for disco
- Part of the facility's security system.
No one can be surprised by security cameras. They are able to work in a wide variety of conditions. As a complement to them, light guns are increasingly used. Light guns duplicate the actions of conventional stationary searchlights, complementing them with the ability to accompany a moving object along the entire route.
- Home interior element.
Tracking spotlights play the role of your guide around your own apartment, turning on at the right time and turning off at the wrong time.
- Lighting of staircases.
This way of saving on general utilities is not the last. Many utilities find benefits in using light guns to save on overall energy consumption. Read about the rules for lighting housing and communal services here.
Tracking spotlight for illuminating the local area
Having decided on the question “why?”, move on to the question “for what?”. In terms of their functional purpose, light guns are approximately the same. The only differences are in the features of their application.
Purpose and main factors
This is any place for presentations, performances or competitions.
What is needed here are directional LED guns with the following functions: light changer (colorchanger), volumetric projection (creates an element of extraneous presence on the stage), projection (simply transmits the image to any plane).
Within this segment, guns are divided into so-called. "intelligent" or "non-intelligent". The division occurs depending on their ability to be controlled from the outside.
When designing a scene, you will not need the object tracking and automatic switching functions at all. Read about the rules of stage lighting in this article.
When concluding a purchase or rental agreement for the appropriate equipment, pay attention to the absence of these functions in the characteristics of the spotlight or demand its replacement with one that meets your requirements.
Stage lighting with light guns
- Office (area around).
Let's use a floodlight. Serves to provide visual contact with the illuminated area. Adapted to the electronic security system of the facility and serves for the convenience of external patrolling.
If a light gun is used for this purpose, it must be equipped with motion sensors.
The tracking spotlight performs the work of a light load regulator. It is able to provide maximum visibility when entering a house or entrance.
The installation comes with a built-in motion sensor. Using a light gun for its intended purpose in this case does not imply any additional assimilation into its design.
No tracking sensors, thermal imagers, etc. are needed.
Rules for organizing and controlling lighting in an apartment
The choice of lighting is greatly influenced by the type of room and its purpose. To properly organize light, you need to take into account the size of the room, taking into account the furniture, determine whether zoning is necessary and how many lamps will be needed.
Living room
Light in the living room can be organized using a central chandelier and spotlights. You can additionally highlight paintings and other interior items and visually divide the room into zones. The living room should have a lot of light, as this room is one of the most used in the house.
Bedroom
Combined lighting is suitable for bedrooms. General light can be created using chandeliers. Also, sconces or spotlights are installed along the edges of the bed. The backlight should be soft and not strain the eyes.
You can install dimmable lamps in the bedroom. Then you can independently control the light for a comfortable sleep.
Children's
In a children's room, you need to pay special attention to the choice of light, because the psychological health and mood of the child depend on it. Lamps should not be bright and annoying. Additionally, you need to make decorative lighting
Additionally, you need to make decorative lighting.
Kitchen
Multi-level lighting is traditionally installed in the kitchen. The workplace should be well-lit for the convenience of the hostess. The desktop is also illuminated separately - for example, with a small chandelier. Additionally, you can provide the ability to adjust the brightness.
Hallway
The corridor is a place where there is no natural light. Therefore, all the illumination is provided by built-in lamps. There are no requirements for organizing light in the hallway; everything is determined by the wishes of the residents. You can install several spotlights on the ceiling and additionally illuminate the mirror.
Bathroom
The lighting in the bathroom should not be too bright
Particular attention is paid to protecting the lamp from moisture. You should rely on this parameter when choosing lighting devices for the bathroom.
Lighting Features
Using LEDs you can illuminate the ceiling, walls, and interior elements. For this, various types of lamps, strips, and panels are used.
Ceiling
The traditional light source for the ceiling is a chandelier. In small rooms, the main lighting is organized using spotlights. On multi-level ceilings, ribbons look advantageous, and on stretch ceilings, the “starry sky” effect.
Stan
It is recommended to install lighting devices on walls that can be rotated. Mirrors, paintings and other design elements are illuminated using strips, panels and spotlights.
Paula
Spotlights or strips are installed at the bottom of the wall to make it convenient for residents to move around the house at night. They are installed in the corridors. It is recommended to install a light with a motion sensor - then the backlight will turn on automatically.
Scheme 1
A lighting device with a silver umbrella installed slightly to the right of the camera was used as a key light. We placed two lights with strip boxes on the sides and slightly behind the model.
To prevent the backlights from affecting the background, we installed white panels between the background and the lamps. The panels cut off excess light from the background and redirected it to the model, making the backlight more voluminous, and the background itself was illuminated only by the main key light.
The intensity of the background illumination in this scheme can be easily adjusted by the position of the key light. If you raise the lamp with the umbrella higher and tilt it more steeply towards the model, then the main light falls on the model, and only the light from the upper peripheral part of the octobox hits the background, the background in this case becomes darker.
If you lower the drawing lower and turn it more frontally, then in this case quite a lot of light from the main source will fall on the background, it will become whiter, but a shadow from the model may appear on the background.
How the light tunnel works
Operating principle of the light guide
The devices are mounted through the roof, with spherical glass placed on top (the shape is close to the type of roof window). The inner surface is mirrored. Thanks to the reflective elements, light passes through the pipe. Length may vary. The main thing is that it goes through the ceilings into the room.
Glass with a scattering effect is installed at the bottom (from the room side). Externally, the light tunnel resembles an ordinary lamp. Some models have a built-in light for night-time operation. Installation time and cost remain within reasonable limits. At the same time, the device allows you to save on electricity and appliances.
LED lamp technology
Despite the advantages of LED lamps, they have one drawback - high price. A homemade LED lamp is a way out. This is a fairly simple and inexpensive process, even if the lamp is made from LED strip.
Let's look at it using the example of a common product for household use. When constructing a simple lamp, the following materials and parts are required: LEDs-3, driver-1, radiator and double-sided tape. It is recommended to take more powerful LEDs, since when working with them the labor intensity will be much lower; output LEDs are considered preferable. Recommended power: no more than 1 W. The next step is choosing a driver. The right choice will provide the LEDs with the required voltage and a long service life. In order to ensure long-term operation of the lamp, it is necessary to determine the material for the radiator. It should preferably be made of aluminum.
Output LEDs
Let's get started:
- First, a strip of 6-7 mm adhesive tape is cut;
- The bottoms of the LEDs and the radiator are degreased. For these purposes, it is recommended to use acetone so that the LED lens does not lose brightness;
- The radiator is marked by sticking tape;
- The LEDs are installed on tape and lightly pressed for better contact;
- Tin is applied to the LED terminals and the driver is soldered;
- When using LED strip, the protective film is removed and the sticky side is applied to the installation site.
After completing the assembly of the lamp, it is left on for 2-3 hours. After this period, the heating level of the radiator is determined - if it heats up, then the lamp is working. When constructing complex and more powerful models, other materials and parts will be required, but the principle of the device is the same. The created lamp can be designed in different styles, depending on the purpose for which it will be used.
Do you want everlasting LEDs? Uncover soldering irons and files. Or DIY home lighting
Once upon a time, when I was still in school, and it was the end of perestroika, my uncle (who instilled in me an interest in electronics) locked home a bag of goods taken through the entrance of the factory
. In fact, he brought such bags home quite regularly, replenishing the supplies stored in the sofa. This sofa, as you might guess, beckoned, and sometimes in my uncle’s absence I looked into it with delight. But some of this bag did not end up on the sofa, but ended up in my hands. My uncle handed me a pack of about ten breadboards, and a brand new, unopened box of LEDs, which were in short supply and not cheap at that time. Moreover, the LEDs were not simple: instead of the usual marking AL-whatever, there was a four-digit code on the box, as I understood - they were experimental. And they were bright. Compared to the usual AL307 or AL310, they are simply dazzling. And there were a lot of them - about 50.
The idea of “where to use this wealth” arose instantly: the LEDs were soldered onto one of the breadboards - as many fit in (not all fit in), and from them came a magnificent red flashlight for printing photographs, which did not illuminate the photo paper at all, even at point-blank range. True, I immediately learned that “LEDs do not heat up” is a lie, so the current had to be halved, from 10 mA per LED to 5. And after another six months of successful operation, I also learned that “LEDs do not burn out “This is also not true: the first LED in the assembly went out and turned out to be broken. And over time, the entire lantern became unusable.
And now I again hear from every iron about “eternal” LED light bulbs, and at home, in less than a year of switching to LED lamps, the third one has already burned out.
Why don't LED light bulbs last forever?
Yes, because nothing lasts forever.
An LED is also a thin thing. Literally. Its structure contains layers a few nanometers thick, forming quantum wells. Diffusion and electromigration are merciless to such layers - they blur them, create defects, gradually reducing the light output and increasing the likelihood of a catastrophe on the scale of a tiny crystal, in which, by the way, light and thermal energy is released, the specific value of which per cubic centimeter of a pn junction can be compare it with a nuclear explosion (a bit exaggerated, but estimate the energy release density yourself). The hotter the LED, the faster all these negative processes will go. And, as we already know, it heats up. It heats up even when a current of 10 milliamps flows through it. And even more so when it is a powerful device, the current through which is at least 100 mA, and sometimes even an ampere, or even three amperes. And, despite all the energy efficiency of LEDs, a significant portion of the electricity supplied to the LED is converted into heat. From two thirds to three quarters. Where to cool the LEDs in an LED light bulb? And nowhere, by and large. The LED itself is designed to be cooled. The crystal is soldered to a massive base made of copper or highly thermally conductive ceramic; this base has a special pad for soldering to an external heat sink, which is a board with an aluminum or copper substrate. And this substrate, in theory, should be screwed through thermal paste to a good radiator with a large area. And it is screwed, at best, to the metal body of the LED lamp, the area of which is completely insufficient to dissipate more than a few watts of heat, and even in a closed lampshade. At worst, the case is completely plastic, and heat from the driver and from the light that did not come out and was lost in the depths of the light bulb still gets into this case. So LEDs are fried at temperatures exceeding 100, or even 130°C. And, by the way, not only LEDs, but also the driver, which also often fails.
What should I do?
One of three.
Or we, leaving the old chandelier in place, put lower power bulbs in it. They will heat up less and are more likely to live a long time. Of course, the room will become dark: we will return to the times when chandeliers, for the sake of economy and fire safety, had 25-watt bulbs, which were abandoned and replaced by fifteen-watt energy-saving ones, which turned a dark den into a bright room in which it is pleasant to be. Or we buy a new chandelier into which we can screw in more light bulbs. This will leave us with a brighter room and (possibly) longer life for the bulbs. Just like the light bulbs, you will have to spend money on the chandelier.
And finally, the third option: we forget the very concept of “LED lamp”, like a bad dream, and replace the chandelier with a specially designed LED lamp. Thoughtful both in terms of good use of the luminous flux (for LED lamps of the “pear hangs - you can’t eat” type, this is not always good in devices designed for incandescent lamps - they shine rather poorly from the side and back), and in terms of high-quality cooling.
Market
There are such lamps on the market.
But for the most part, they are, firstly, expensive, and secondly, scary. These kind of industrial gizmos that are appropriate in a garage, a workshop, a hypermarket sales area, an office, and finally - but not in an apartment. No, there are both beautiful and designer lamps that look very impressive. But - firstly, again, the price, and secondly, cooling was sacrificed to the design. So, a classic Chinese LED pancake chandelier is fifty watts of LEDs sitting on an aluminum board in the form of a ring with a diameter of 45 cm and a width of 8 centimeters. And that’s all. No case with fins for you, nothing. And again, the board is in an almost tightly closed case. Well, at least the driver is moved out a little. Verdict: It will live like an LED light bulb. Only when it dies, you will have to change not a light bulb for 150 rubles, but a chandelier for five to ten thousand.
In general, there seems to be only one way out: skillful hands.
Homemade lamp: design
I’ll say right away: the lamp will not be based on an LED strip and will not have Bluetooth.
First, let's estimate how much light we need. It's a matter of taste, but I like it when there is light in my home. I love any kind of intimate twilight on special occasions, in romantic settings, but in everyday life it evokes melancholy. You can count in any way, but I will use the fact that with a chandelier with five 15-watt energy-saving lamps, each giving 950 lumens, the room was good. That is, 5 kilolumens will be enough for us. Now we go to the Cree website, find there the Datasheet for the CXA2530 modules. Why on them? Yes, because I have several of these modules, and they are convenient to work with: wires are simply soldered to them, and the modules themselves are mounted directly on the radiator using the included flange. It’s also easy to buy them - a well-known Chinese online store can help. For the T4 luminous flux bin modules I have, this corresponds to a nominal luminous flux of 3440-3680 lm. We immediately subtract 20% from this figure - they will be lost on the diffuser. We get a luminous flux of 2750-2950 lm, and taking into account that this flux is obtained at a power of about 30 W, we get the power required for lighting (supplied to the LEDs) about 50 W. Since our room is long, we will remove the chandelier from the center and make two identical lamps of 25 watts each.
Taking the efficiency of LEDs to be 25% (a fairly conservative estimate - most likely better, but certainly not worse), we find out that 18.75 W of heat is released in each lamp. And our task is to choose a radiator for this heat dissipation. Here's how we'll do it.
We will assume maximum crystal temperature = 85°C and ambient temperature = 35°C. That is = 50°C. The temperature difference is proportional to the power dissipation, and the proportionality coefficient is called thermal resistance: and it is measured in kelvins (or degrees Celsius) per watt. In our case, the crystal-to-environment thermal resistance should be equal to 2 °C/W. What does thermal resistance consist of? Its first component is the thermal resistance inherent in the LED body itself. Cree does not give this value directly in the datasheet, suggesting using a strange graph, but early publications in magazines about the release of new LED matrices indicated a value of 0.8 °C/W.
The second component of the overall thermal resistance is the resistance created by the layer of thermal paste between the case and the heatsink. As thermal paste, we will take the good old Alsil-3, with thermal conductivity = 1.7-2 W/m*K. With a layer of paste 50 microns thick and a heat-dissipating surface area of 2.8 (the area of a circle with a diameter of 19 mm under the radiating surface of the matrix), we obtain = 0.105 °C/W.
So, we are left with 1.1 °C/W for the radiator. Based on this figure, we select a radiator, taking into account 30 percent “lies”, the spread of heat from a small matrix and the fact that the radiator will not be optimally oriented in space. For example, we will use the AVM-076 profile with a cross-sectional size of 176x40 mm with a thermal resistance of a piece 100 mm long of 0.5 °C/W. A piece of this profile 80-100 mm long is enough for us. 100 mm are standard pieces available for sale, 80 must be ordered from the manufacturer (Virtual Mechanics, virtumech.ru), this option looks somewhat more aesthetic due to its smaller width.
All that remains is to select the driver. The criteria for its selection are the current and operating limits of the output voltage. A power of 25 W is obtained at a current of about 0.7 A, and the voltage on the matrix will be about 35-36 V.
Design
After going through several design options for the lamp, I settled on a diffuser made of matte translucent plastic, shaped like a semi-cylinder.
This shape is obtained in the simplest way - by attaching a curved plate to the sides of the radiator. The method of fastening is quite arbitrary - with screws with pressure plates, with glue - I used red double-sided tape "Moment". As a diffuser, I used a diffuser film from the backlight of a broken LCD monitor - it has very good light transmission. You can also matt laser print film or any other thick plastic film with abrasive. The matrix with pre-soldered wires is installed using the supplied flange in the center of the radiator using two M3 screws (it is inconvenient to use nuts, so you will have to work with a tap). Before gluing the diffuser, it is recommended to cover the flat surface of the radiator free from the matrix with aluminum tape or paint it with white paint - this will reduce light loss.
Regarding thermal paste, I would like to note that the use of dark thermal paste is not recommended: it will reduce the luminous flux by 10 percent. I noticed this clearly on two copies, one of which I made with Alsil-3, and on the second there was not enough Alsil and I used the paste from the Scythe cooler kit, which had a dark gray color. The difference when measured with a lux meter is obvious. There is also no point in using thermal pastes that are more expensive than Alsil and have higher thermal conductivity: and in the worst case, Alsil drops a couple of degrees, they won’t make any difference.
After assembling the first lamp (in which I used a heatsink from a Pentium II processor and which settled in the kitchen, it has a slightly lower power of around 15 W), I decided to put not one matrix, but two into the lamps for the room - it “smeared” a spot of light on the diffuser and made the light more comfortable. In this case, it would be more reasonable to install less powerful modules, say, CXA1820. I connected the modules in parallel, this did not cause any undesirable consequences in the form of uneven distribution of current between them - both matrices glow the same to the eye. But I equalized the length of the supply wires just in case.
I attach it to the ceiling using a rocker arm made of rigid steel wire with a diameter of 2 mm, the ends of which are threaded into holes in the outer fins of the radiator and bent. A hook attached to the ceiling is hooked to the center of the rocker - such a length that there is a distance of a couple of centimeters between the suspended ceiling and the radiator. The driver is hidden behind a suspended ceiling. If the lamps were made up to the ceiling, it would be possible to hide radiators in it.
The surface of the radiator can be painted black with a permanent marker or a thin layer from a spray can (no need for a thick layer - thermal insulation). Or you don’t have to paint it, it’s not particularly an eyesore.
results
Light. Under lamps at tabletop height - 450 lux, in the middle of the room 380 lux. The light is comfortable, the color rendition is quite good (however, in the kitchen it turned out that raw meat under this light looks as if it had been slightly tinted with blueberry juice). After many hours of operation, the radiators are warm, but not hot. Flicker is zero (credit to high-quality drivers).
And at prices: the matrices cost 550 rubles each (the rate has changed since then, of course), radiators - 600 rubles, drivers - 250 rubles, the film was free. Total - 2200+1200+500 = 3900 rubles. Plus two to three hours of work.
Side glow method
The system is a light-receiving dome with lenses that capture and redirect rays into the light guide
This method does not require complex technical diagrams, installation takes little time, and you can do it on your own without the involvement of professional installers. The difference is the installation of the projector outdoors, the presence of LED fibers.
No heat sources should be located near the installation. The diffuser is installed from the side walls. This arrangement allows you to illuminate the room so that no additional sources are required during the day. This is true for rooms without windows (dressing rooms, baths, storage rooms, basement). Light guides for LEDs can be made with your own hands.
Making a large LED
So, let’s first figure out what an LED consists of.
The first is two pins that go into the body of the LED. Next you can see two pads, one smaller is the anode, and the other larger is the cathode. On the cathode there is a platform with a reflector and a semiconductor crystal. Above all this there is a lens, which is a monolith with an LED body. First, let's make an imitation of a large semiconductor crystal with a reflector. We take the LED strip and solder the chip elements from it. If you don’t have a hairdryer, heat it up with a soldering iron. Let's cut out such a board from a piece of foil PCB. We tin it and solder the LED chip onto it. We also solder the contact and the current-extinguishing resistor. Let's check the power supply. The crystal is ready. For greater visual similarity, we will cut out the cathode and anode from PCB. The elements are located at the bottom of the body. We take a thick wire and make contacts from it. We solder them to the pads. Next, we coat the light module with hot glue and glue it perpendicularly to the largest area - the cathode. Solder the pins to the board. Next we need to prepare a mold for pouring epoxy resin. A plastic bottle will serve us for this purpose. Let's cut it in the middle and put the top part on the bottom. There is an empty area in the lid area where the epoxy will be poured. In order not to waste extra material, we fill the voids of the neck with foil. Strictly according to the instructions, mix the hardener with the resin and mix well. We fix the insides with office clips so that they float in the air. Pour the composition into the mold. We are waiting 24 hours. After drying, cut the bottle with a scalpel and remove parts of the bottle from the surface. This is what happened: Using a mechanical tool, we cut off the foil and polish the surface irregularities. Sand with fine sandpaper, dipping it in water. This will remove all the smallest scratches. It's time to polish. Polishing paste can be obtained from motorists. In extreme cases, toothpaste will do. The lack of light in the premises is compensated in different ways - additional windows, devices, lamps and the like. One of the innovative solutions of recent times has been light guides for lighting. Small devices are installed on the roof or walls, accumulating and delivering rays inside.
Stages of making an electric heat gun with your own hands
The scope of application of thermal electric guns is quite wide. Industrial units are used to heat production, warehouse and even residential premises. And in small areas, you can get by with a homemade heat generator design, which is quite capable of heating a garage or country house.
But let’s take a closer look at what an electric heat gun is: you can assemble it with your own hands from scrap materials.
What you need to know about the electric gun
Unlike other types of heat guns, an electrical device can be made by almost any home craftsman familiar with the basics of electronics.
Although the efficiency of an electric gun is much lower than diesel or gas devices, it does not emit combustion products harmful to health and can be installed in any room - a residential building, a greenhouse, ancillary buildings.
The power of industrial guns varies from 2 to 45 kW, and the number of heating elements in them can reach up to 15 pieces
Let's look at how an electric unit works.
Design and principle of operation of the heat generator
Any electric gun consists of three main components: a housing, an electric motor with a fan and a heating element.
Additionally, the device can be equipped with any “bonuses” from the factory units - speed switch, heat regulator, room thermostat, housing heating sensor, engine protection and other elements, but they increase not only comfort and safety during operation, but also the cost of the homemade product.
The rate of heating of air throughout the entire volume of the room depends on the number and power of heating elements - the larger their area, the more active heat transfer will occur
An electric gun works like this:
- when connected to the network, the heating element converts electric current into thermal energy, due to which it heats itself;
- the electric motor drives the impeller blades;
- the fan forces air from the room inside the case;
- the cold air flow comes into contact with the surface of the heating element, heats up and, forced by the fan, is removed from the “barrel” of the gun.
If the appliance is equipped with a thermostatic element, it will stop the heater when the programmed temperature is reached. In primitive devices you will have to control the heating yourself.
Advantages and disadvantages of homemade guns
The main advantage of a thermal electric generator is the ability to use it in any room where there is a network of at least 220 W.
Such devices, even in a home-made version, are mobile, weigh little and are quite capable of heating an area of up to 50 m2 (theoretically, more is possible, but it is better not to experiment with high-power devices and buy a ready-made unit, and a gun from 5 kW will already require connection to a three-phase network) .
The performance characteristics of the device must correspond to the heated area. On average, for every 10 m2 you will need 1 kW, but much depends on the room itself - building materials, quality of glazing and the presence of insulation
Pros of a homemade electric gun:
- Saving money - factory units are not cheap, and you can assemble a heating device with a minimum of purchased parts or even completely from improvised means, removing the missing elements from old devices.
- Safety - of all homemade heat generators, the electric device is the easiest to operate, since it does not require a connection to gas or refueling with flammable fuel. With proper assembly of the electrical circuit, the risk of spontaneous combustion for such guns is minimal.
- Quick heating of the room - the work of a heat gun is much more effective than other options for homemade electric heaters, for example, fireplaces or oil radiators.
What are skylights made of?
Light guides work on the following principle: light is accumulated in the upper spherical part, then transmitted inside along reflective surfaces. Losses range from 10 to 40% per meter of pipe, up to 40% on bends. The classic version of the light tunnel consists of the following parts:
The external parts of the lanterns are made of durable materials - polycarbonate, plexiglass. No cleaning required - just rain. The collection of light waves is greatest in cloudy weather, in the evening and in the morning.
Advantages
The devices are used more and more every year. Additional natural lighting is installed in industrial premises and private homes. You can install the light guide yourself at home. Installation takes little time and effort.
Tunnels allow you to save energy - according to average data, light guides allow you to spend up to 60% less. When installed correctly, the light guide lamp lasts 10 years or more - the manufacturer's warranty is at least 5 years. The devices are thermally insulated - they do not allow heat to pass through in summer and cold in winter (important for residential premises, floriculture and others).
Light tunnels are easy to maintain. It is possible to regulate the lighting. Additional functions include ventilation, a classic lamp (depending on the model).
Flaws
Despite all the obvious advantages, such mechanisms have several disadvantages, which should be familiarized with before installation. A light guide is a device that accumulates natural light. Therefore, a sufficient amount of time is required for normal operation - the tunnels are not suitable for use in areas with short daylight hours.
Difficulties may also arise in winter. If the dome is covered with snow, performance and light transmittance will decrease, sometimes to zero. Therefore, you need to either install another source or clean the glass in a timely manner.
The initial installation has a high cost. Although this drawback is temporary - the usual payback period is 2-3 years, and the operating time is more than 10 years.
What is needed to make edge lighting with your own hands?
The most basic thing you need is desire, a creative idea (a sketch of the future image), and a small list of materials and tools:
- compartment for batteries (3xAAA), LEDs, resistors (100 Ohm), wires, heat shrink;
- a pair of wooden blocks for fastening, bolts, nuts, washers, small nails;
- self-adhesive paper, superglue, paint or varnish;
- pencil, ruler, wire cutters, soldering iron, scalpel, drill with drills and milling attachments;
- plexiglass.
Alternatives to LED Lighting
Among the promising alternative light sources already produced, induction lamps can be mentioned. They have a long service life (up to 150,000 hours), high light output (up to 160 lm/W). Induction light sources are insensitive to voltage surges and frequent switching on and off. True, they are only suitable for lighting large spaces: industrial, street. The use of induction lamps in everyday life is limited by their large dimensions and harmful radiation (ultraviolet and electromagnetic).
New lighting technologies are being developed around the world. In the USA, they proposed an alternative light source based on polyvinylcarbazole with iridium with multiwalled carbon nanotubes. In Russia, scientists will test the technology of cathodoluminescent lamps.
But so far these are only developments that are far from being introduced into production. LED lighting remains in the leading position.
Scheme 9
The umbrella is rarely used in the studio, but on the road it is very popular due to its compactness and quick readiness for work.
For the key light, we used a silver umbrella source, which produces a soft, enveloping light that is extremely difficult to control.
Light spreads from the source in a continuous wave of light, illuminating almost everything in its path. In our case, a large parabolic umbrella was used, the light beam from which was still controllable; it expanded or narrowed by simply moving the light source on the axis of the umbrella (closer to the umbrella or further away).
The umbrella was placed almost above the photographer’s head, a little to the right, and directed steeply down.
Classification of LED floodlights for street lighting
LED floodlights for street lighting according to the level of protection can be classified as follows:
- IP 44 – LED floodlight, which is used only for illuminating the interior of buildings;
- IP 65 – LED floodlight, which is used to illuminate the external objects of buildings and is considered a street floodlight;
- IP 67 – LED floodlight, which is used to illuminate open spaces, that is, on the ground;
- IP 68 is an LED floodlight that is used to illuminate underwater spaces.
LED floodlights, which are used in conditions of increased risk of explosions, are equipped with a special protective housing. These devices are also divided according to the voltage used and the color of the light emitted.
LED floodlights can be:
- 12 volts;
- 24 volts;
- 220 volt.
The light emission of spotlights by color can be:
- White color;
- yellow;
- red;
- green;
- blue.
White and yellow radiation are the most popular. Other colors of light emission can create amazing shades of color and can easily decorate architectural objects and solutions.
LED spotlights are most often found in two shapes: rectangular and square. The use of these modern spotlights is possible in different places. Starting with private household plots and ending with the lighting of billboards.
A special offer is oval or round LED spotlights. These devices are good at creating accents in the external perception of objects.
The power of each lighting device determines the technical capabilities to create a certain level of illumination. Led lamps are lamps that are used in the electrical circuits of LED spotlights with a power of 10-100 W or more.
Why do you need backlighting?
In the interior, edge lighting is used for several reasons. Firstly, it looks unusual, creating a diffused light flux. Secondly, this solution is practical: it is possible to organize high-quality lighting that consumes a minimum of electricity. And the final argument is the combination of aesthetics and functionality.
Edge lighting can provide a pleasant atmosphere in the home
Canvas lighting is used in tandem with the following designs:
- ceiling panels;
- false windows or framelights;
- kitchen apron panels;
- shelves;
- handrails of stairs, etc.
Read more: plexiglass apron for the kitchen.
In fact, you can turn any idea into reality.
BMW 5 series AC Schnitzer › Logbook › Lighting the handles with your own handles))
I have long been hatching the idea of illuminating the door handles from the inside due to the fact that everyone who sits behind them constantly cannot touch the handle and therefore dabbles on the entire card!
So I decided to make the backlight with my own hands, since there is no original (as for example in the E38)! I didn’t want to just drill a hole in the handle and glue an LED there (as I once did in Tavria), because this is a fucking collective farm! Therefore, I decided to do it more or less beautifully and, most importantly, connect it wisely! A definite decision was made regarding the color - mainly the color of the interior lighting!
I decided to make a flat rectangular light guide, something like the diagram below:
I removed all the cards, removed the handles from them and got to work! As it turned out later, this whole thing dragged on for almost a month))) due to work, family matters and holidays.
The first step is to cut rectangular holes in the plane of the handles; I made them 45 mm long and 4 mm thick. At the same time, I stepped back from the edge that is adjacent to the card about a centimeter and a half (I don’t remember exactly), otherwise the light guide would not be inserted flush against the card! Having marked the contours with an awl, I used a soldering iron to make holes in the center and then cut them with a stationery knife and then sharpened them with a file! It's quite a hassle! And so on all four handles! (even on eight, since a friend also got excited about the idea and we did it for him on the E36 at the same time)!
It’s fortunate that there is a good guy who has a locksmith’s garage full of tools and a good buleryan!
Next, we get to work on making light guides or lampshades for LEDs! I cut rectangles about 55 mm long from plexiglass, so that there were 3-5 mm grooves with which the light guide would be inserted into the hole (as in the diagram)!
Next, we saw, sharpen, polish, in short, we make these lampshades look divine! I did it all with a file and a hacksaw!
The following is very important information:
I made the seat not like in the above diagram, but in my own way!
I made a cut for the diode in the middle of the light guide, so that the diode looked into the handle, since the brightness with this position of the diode is higher (during a test run, it seemed to me that when the diode is on the side, the brightness is too low)! Now I understand that what I did was too bright for me! Therefore, I would advise doing exactly as in the diagram!
I clamped the light guides in a vice and used a needle file to adjust them to the size of the hole in the handles and used a file to make a cut into which the LED was then fixed! I sanded the plane that looks into the handle a little with a file so that it is smooth, pleasant to the touch, but at the same time matte, so that the light can be better scattered.
The finished light guides look like this:
Next, make sure that everything is inserted well and fixed (although the light guides will be glued to the handle body) and you can move on to the next stage!
Let's move on to manufacturing the LEDs themselves! Everything is simple here for those who are at least a little familiar with a soldering iron! All LEDs of this type are 3 volts, in the car 12 volts (not knowing this, I immediately burned a couple, well they cost 2 UAH in total), so we take an LED and solder a resistance of 1 kOhm to it, or as I have 2 pieces in parallel 500 Ohms each, maybe even 2 kOhms, then we solder pieces of wires and terminals that anyone has (I had some from Chinese central locks lying around) and tighten all open contacts with heat shrink or electrical tape! We get the following light emitter:
Then I glue these LEDs into the light guides using a glue gun! And they are ready to be installed in handles!
Well, then the longest and most labor-intensive process! This is making and laying wiring! My principle of connecting and operating the backlight was invented by me personally, since the options are “from the dimensions” or “from the ignition”, etc. I was not satisfied with the practicality! Because the ignition is not always on in the car and the dimensions are not always on! I took the difficult route and connected the backlight from the ESP button backlight! The principle of their operation is as follows: you open the car using the standard alarm - the backlight lights up and goes out “as if welcoming the driver”, then the backlight turns on when you turn on the ignition and stays on all the time until the ignition is turned off and the door opens - the backlight goes out, when you close it to the factory alarm or The central locking lights turn on and off “as if seeing off the driver and passengers.” I called this method “polite highlighting”! )) The invention is patented))
Also, in order to reduce the complexity of the whole process to a minimum, I decided to arrange the wiring along the cabin wiring and connect everything only through standard door connectors!
In order to supply power to the backlight of the ESP buttons, I removed the internal sills that cover the door seals and the trim of the side pillars, and the kick panels at the feet of the front driver and passenger, and got to the door connectors! With the help of friend Drundia, it was established using ETM diagrams that the brown-yellow (-) and gray-violet (+) wires that go to the door connectors are responsible for the illumination of the rear door ESP buttons (from which I was powered)! BUT, there is a button on the central ESP buttons that blocks the operation of the rear ESP and, accordingly, the power supply for the backlight of the rear ESP buttons disappears!
To get around this trick, I took the plus one for our lighting (as it should be), but I took the minus one from the interior wiring harness (it’s just brown, the thickest)!
Sunglasses
Did you go on a shoot and forgot to take a polarizing filter with you? Or do you simply not have it at all? Don't panic prematurely. This rather expensive piece of glass in a frame can easily replace your most ordinary sunglasses. They will help you achieve the same effect in your photographs that a polarizing filter gives. Sunglass lenses can reduce glare to some extent, and they also change the properties of reflected light.
Depending on what idea you decide to put into your photo, a photo taken through these glasses should turn out to be very interesting. Well, for example, the one you see on this page.
What's better?
To choose which of the angel eyes options you prefer, you can watch the following video. Installing an element such as angel eyes on a car is a fairly common form of tuning. At the very least, it is accessible and can be done with your own hands. Such luminous elements are often used as DRLs, indicating the position of the car on the road.
Those who are engaged in the independent production of original headlights or rear lights sooner or later face the problem of what lens to use for LEDs? If earlier there was no need to worry about this, then since 2014, when the large automakers Mercedes, BMW, and Audi announced their next car models, many became interested in their optics. Now the light in them was evenly dispersed, while the optics looked stylish and beautiful. Many people wanted to have lanterns with a similar glow at their disposal.
Application of a light guide for studies of the refractive index of substances
Refractive index is one of the most important characteristics of optically transparent materials used in physical research and practical applications. Therefore, it is relevant to search and implement methods for its determination, in particular for liquids. This work demonstrates a simple and fast method for determining the refractive index using light transmission through an original design of a light guide immersed in the liquid under study. The dependence of the refractive index of water on its state of aggregation and the concentration of table salt solution has been established. Using the same light guide, the dependence of the intensity of light transmitted through it on the wavelength was studied.
I often read and saw some photos of the illumination of door interior handles.
Other ways to diffuse light from LEDs
The next method is to use milky acrylic with a thickness of 2 to 5 mm.
Mostly 3 mm plexiglass is used. It perfectly scatters light from the LED, but its main disadvantage is that milky plexiglass absorbs light very strongly, which is why the brightness drops by 30-50%. It is also worth remembering that if you do not have a milling machine, then shaping plexiglass yourself has certain limitations. You can bend it with an industrial hair dryer, but not at all the sides. You can buy it at any advertising agency.
The third method is to use Microprism diffusing elements from ceiling lamps. Their main feature is their texture, reminiscent of small pyramids, which perfectly refract light and scatter it accordingly. Approximate technology is used in the headlamps of BMWs, Mercedes, Audis; light guides with notches or texture are used there. But if you have powerful LEDs, then a microprism will not help you; it will not be able to disperse the light properly.
Have you ever held a huge LED in your hands, the size of a human fist? Of course not, because they don't exist. I'll show you how to make such an original thing with your own hands. This LED will be exactly like its smaller brother, except that its brightness will be many times greater.
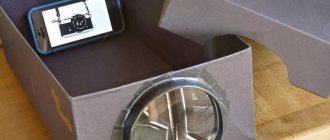
How to add light to dark rooms and basements without paying for electricity?
In any country house there are rooms that “do not get” sunlight - attics, bathrooms, storage rooms, basements, etc. But natural lighting is not only a factor of comfort for humans, but also a significant energy saving. We’ll tell you what technical solution will help organize insolation of rooms without windows or with insufficient daylight
We will talk about light tunnels (otherwise known as solar wells or tunnel-type lanterns). Structurally, these are simple devices consisting of external and internal elements and a light-conducting channel connecting them.
External element
is a square module that is installed in a flat or pitched roof, in the enclosing walls, and in the case of an underground floor - in the slab covering the pit. The module has a round light receiving hole with a diameter of 190 to 740 mm or more and is equipped with a polyurethane or aluminum frame for hermetically sealed installation. Please note: Light receiving units with a metal base can be cut and bent to fit specific installation conditions. The opening can be protected by a removable 4mm tempered glass cover (clear or frosted, with a stain-resistant coating) or a dome made of impact-resistant acrylic or polycarbonate.
External blocks with a cover are designed exclusively for roofs with a slope of 15 to 60º and are built in the same plane as the roof. The flashings of such modules are specially adapted for profiled or non-profiled roofing materials, equipped with a drainage gutter, special brush seals that prevent condensate from freezing, as well as vapor and waterproofing contours for connection with the layers in the roof “pie”.
Dome-type blocks with a head rising above the base plane allow installation in both inclined, vertical and horizontal enclosing structures. The spherical shape of the light catcher increases the efficiency of the device in cloudy weather, during snow and rain (precipitation does not accumulate on the dome), and especially
in the morning and evening hours, when the sun is low above the horizon.
In addition, polycarbonate hemispheres serve as filters that cut off UV radiation, which prevents its impact on other components of the system, as well as fading of interior items. Double walls improve the thermal insulation properties of the dome without reducing its light transmittance.
Light level measurements show that roof tunnels with a diameter of 350 mm, even on a gloomy winter day, illuminate the room in the same way as a 60-watt incandescent light bulb would.
Standards for artificial lighting in residential premises according to SanPiN 2.2.1/2.1.1.1278-03
Illumination standard,
Lx
Library, billiard room, office
Kitchen, living room, bedroom and other living rooms
Hall, corridor, bathroom
Stairs, basement, attic
Internal element of the system
- this is a diffuser lamp installed in a room - usually round or square, but the product can be made to order in other shapes. The lampshade evenly distributes soft light (scattering angle 150-170º), which does not dazzle the eyes and does not distort the color of objects. The diffusers are equipped with decorative frames and are made of two layers of polycarbonate or frosted double glass with an argon layer (as in a double-glazed window), which prevents heat loss and the formation of condensation on the light diffuser.
the light tunnel itself
- a channel that transmits light over a distance with minimal losses due to the reflective properties of its walls.
This can be either a rigid aluminum pipe (tube) or a corrugated fiberglass sleeve, the inner surface of which is coated with a mirror coating containing silver. Pipes provide a reflection coefficient of 98% or more; for hoses it is slightly lower.
Flexible pipes are available in lengths up to 2 m and cannot be extended; they are usually used if it is necessary to bypass any obstacle in the tunnel path. The basic length of metal pipes ranges from 0.8 to 1.7 m. If necessary, the channels can be extended with additional segments that have a simple snap-on fixation system. To connect the elements, adapters are used - elbows with tilt adjustment from 0 to 45º. For the needs of a private home, as a rule, light guides Ø 250–350 mm with a maximum length of up to 6 or 9 m are sufficient, capable of serving rooms of up to 10 and 20 m², respectively (bathrooms, kitchens, stairs, hallways, corridors, dressing rooms). To fully illuminate spacious living rooms, rooms with high ceilings, etc., you will need channels Ø 400–550 mm with a possible length of up to 15 m, designed for an area of up to 35 m². It is important to take into account that each additional linear meter of pipe, as well as bending of the tunnel, results in a loss of 10% or more of the light transmission volume, significantly reducing the efficiency of the system.
Special calculators will help you choose the right light tunnel for a specific room.
Solar wells are the best option for lighting those rooms where the use of electrical appliances can be potentially dangerous, for example, fuel storage facilities, gas boiler rooms, showers, etc.
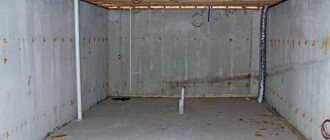
Basement insolation
So that sunlight can penetrate into the basement rooms, windows are made in the basement area (as a rule, these are wide, but very low structures that appear almost under the basement ceiling). It happens that the size of the plinth is not sufficient for such windows, and then they have to be partially lowered below the surface of the ground, and pits must be created in the area of the openings - fences made of reinforced concrete, covered with gratings on top. The bottom of the pit is made at a distance of 20 cm from the bottom edge of the window and gives it a slope to allow water to flow into the drainage network.
You can also provide insolation to the basement using daylight tunnels. Having installed a pipe (flexible hose) in the wall, gravel is poured into a concrete pit (necessarily with drainage) and covered with a monolithic or steel slab with a light-receiving dome brought to the surface.
Additional functions
The Russian market offers solar lighting systems from the following brands: Solargy, ALLUX, VELUX, FAKRO, Solatube®, Sunway, etc. Manufacturers adapt their products to the peculiarities of our climate and expand their functionality, making them as comfortable to use as possible.
Thus, VELUX offers a device for additional ventilation of rooms through a light guide and LED lighting in the diffuser for organizing lighting in the dark. Sunway, in addition to LED lamps, can equip tunnels with a dimmer that creates shading up to blocking the light flux, and protection against penetration (for channels Ø 560 and 780 mm). Solatube® development is a hybrid lighting system based on a light-sensitive sensor and a motion sensor, allowing you to save up to 94% of energy. And the Solargy company has a unique Peresvet technology using a heliostat. It is a stationary panel that “collects” the rays of the rising and setting sun falling at a small angle (up to 15°) and directs them into the light guide.
Tunnel with ventilation valve for installation in bathrooms and toilets
A night lighting device is installed in the tunnel, accumulating light during the day
Benefits of using light tunnels
Disadvantages of using light tunnels
Source
How to make a portable lamp from a spotlight
A spotlight can be used not only in plasterboard structures, but also for homemade projects. In a garage or country house there is a need for portable spotlights.
What you will need
To create a portable lamp you will need the following components:
- spotlight;
- internal socket;
- cord 10 meters long;
- a piece of 110th sewer plastic pipe;
- scraps of small tin;
- aluminum rivets;
- lampshade;
- construction profile.
Step-by-step instruction
The luminaire is installed in the following mode:
- We disassemble the spotlight and rotate the socket 180 degrees.
- We install a socket at the bottom of the soffit.
- We close the contact part in front with a lid, and in the back with a sewer pipe.
- We cut out the required structure from the tin and install it to the soffit using rivets.
- We connect the cord to the cartridge and use the carrier.
KIA Spectra 2007, 101 l. With. - just
Cars for sale
Kia Spectra, 2011
Kia Spectra, 2006
Kia Spectra, 2008
Kia Spectra, 2007
Comments 56
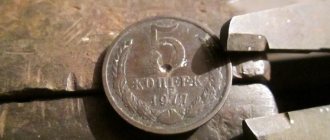
Where can you buy them in Moscow?
Hello, can you tell me where I can buy light guides?
Hello, can you tell me where I can buy light guides?
Interesting and very useful post!
That's how I'll do the rear turn signals))))
Hello, honestly, I didn’t read everything, and maybe I missed it, but where did you buy such rods? give me your address and what is the price? Happy New Year!
I bought it at Obi, in the blinds department. But in December it was no longer there, I was in three Obi stores, they said they seemed to have stopped buying them because they were not in demand. Now I’m looking on the internet for where to buy one closer to home.
Thank you! Very useful post!
not bad... but I have a question, first of all, which diode should I use for illumination, everything is always good in the photos, but only when you put it on the car it turns out faded and “no way”, because even 1W? those that I took to experiment did not shine as brightly as I would like (I would like to have more intensity so that they would burn instead of the marker bulbs)…
secondly, how will this “plexiglass” behave over time, since, for example, the tapes that I used after six months peeled off, oxidized and had to be thrown away... so now I’m thinking about how to implement dimensional lighting...
True, one frame flashed here, he soldered “piranhas” into a chain and filled this with sealant into the body of the desired shape (he made angel eyes), as a result, a good “glow” was obtained, which is comparable to the standard analogues.
You need to take point diodes and not scattering ones, that is, if the diode is already in the housing, you need to file it so that it is not round but straight. PS If it’s not too difficult, PM me a link to the page where they do all this, I’m talking about a chain filled with sealant
not bad... but I have a question, first of all, which diode should I use for illumination, everything is always good in the photos, but only when you put it on the car it turns out faded and “no way”, because even 1W? those that I took to experiment did not shine as brightly as I would like (I would like to have more intensity so that they would burn instead of the marker bulbs)…
secondly, how will this “plexiglass” behave over time, since, for example, the tapes that I used after six months peeled off, oxidized and had to be thrown away... so now I’m thinking about how to implement dimensional lighting...
True, one frame flashed here, he soldered “piranhas” into a chain and filled this with sealant into the body of the desired shape (he made angel eyes), as a result, a good “glow” was obtained, which is comparable to the standard analogues.
When heated, the transparent sealant becomes dull and acquires a yellowish light... tested
This is the whole joke: if you take very bright LEDs, they will give off a blue light, and with a tarnished sealant there will be a pleasant white-yellow light, and in the matte sealant the light will dissipate and as a result the product will look very nice...
Source