Paper clip stand
The stand can be easily made from a paper clip. All you have to do is bend it correctly. This won't be difficult because the paperclip can be easily shaped and is strong enough to break under the weight of the phone.
Photo tips on how to make a shelf for a phone
https://www.youtube.com/watch?v=vNDudSdgoCc
https://www.youtube.com/watch?v=iicaATqu26A
Paper clip stand
How to make a phone holder? One of the simplest homemade coasters consists of a paper clip. You can use this phone stand on your desk.
Now we will talk about creating a more advanced design. However, to create it you will again need office supplies - paper clips.
Step 1. Find the clamps You need to take 1 or 2 medium-sized clamps. You can choose any color you like.
Step 2: Bend Bend one end of the clamp so that it becomes a J-shape.
Using one clamp, one of its ends is grasped. You need to bend it into a J shape. This will keep the phone in place. You can use the gap between two tables or a desk drawer. Insert one end of the clip between the tables and then bend it to form a J shape.
There is also an option to insert the end when closing the desk drawer. You need to close the drawer until the clip forms a J-shape.
Step 3. Paste one into the other. Now you need to insert the first clamp (J-end) inside the second clamp.
The first J-end clamp must be inside the second clamp. Both clamps should be parallel to the table. One end of the first clamp should be able to hold the phone while its J-shaped end should be parallel to the table.
You can also add a USB dongle at the top of the end of the first clip. This will provide a larger area for the back of the phone. Everything worked out!
Corner shelf
In the previous instructions, we learned how to make a wall shelf for a phone. No less practical would be a product that can be placed in the corner of the room. It will be compact and fit into any interior.
Let's look at how to make a corner shelf for a phone:
- For the first sheet, we take the canvas parameters: 40 cm in length, 15 in height, thickness depends on your preferences
- For the second, we take a sheet with almost the same measurements, only the length should be less than half. This will be the fastening rib
- The third sheet will be completely identical to the first. This will be the bottom shelf.
We fasten all the elements. Two screws between each element are sufficient.
Dinosaur stand
If you have a plastic toy lying around (in this example there will be a dinosaur), then you can also make a stand out of it. Please note that it should be returned to its original condition.
Step 1. Find the dinosaur. A favorite toy is selected. You need to make sure that it stands firmly and securely. You should also look at its tail to see if it is long enough to rest on the surface, since it is through this that the stand will be held.
Step 2. Cut. Using a utility knife, the dinosaur is cut in half. It is better to use a toy that is hollow inside.
Step 3. Seal the space. The dinosaur's tail must be caulked. You should use your fingers to make sure that the inside is caulked.
Note!
- Do-it-yourself easel - types of designs, choice of materials for creation + step-by-step instructions and simple diagrams for beginners
- DIY wedding glasses: a detailed master class for DIY decoration, selection of decorative elements and materials (photo + video)
- Do-it-yourself busy board: we make interesting educational boards for boys and girls from different materials
Step 4. Insert the suction cup. While the caulk is still wet, you need to insert the suction cup. The phone is applied to ensure that the suction cup is at the correct angle. Remove excess putty using a small brush.
Step 5. Seal the legs. This is important to ensure that the dinosaur's tail stays in place when used as a stand.
It is worth noting that the caulk inside the dinosaur tail takes several days to dry (about 4 to 5 days). But having a phone stand with a dinosaur is original, interesting, and inexpensive. So for the sake of this, you can be patient.
Phone shelf on the wall
The most convenient and practical option for the product would be a shelf that can be hung on the wall. She won’t waste precious room space, and taking the phone and other related things will be much easier.
Let's look at how to make a hanging shelf for a phone.
You need to find the place where you want to place the product. It is worth marking the exact marks on the wall with a pencil.
We attach the edging. Before you begin this work, get yourself an iron or other heating tool. Heat it up and attach the edging.
To hide the drilling, you need to use a thin blade to cut out a circle whose diameter will exactly match the parameters of the screw. Fill the hole with glue.
We make blanks from wood and connect them together. You can apply the work that we mentioned in the first instructions.
Next, you need to use wall mounts to secure the product to the wall, exactly at the planned location.
Stick stand
If the reader likes to make vlogs through his phone, then this project recording stand is what he needs. A very simple project on how to make a smartphone stand out of chopsticks.
Step 1. Glue the chopsticks together. Chopsticks are glued into the desired shape using wood glue. You can start with a U-shape. You will need 13 chopsticks. 6 sticks on each side, 12 in total. Then the last stick is cut into small pieces. It requires gluing them on the bottom of two glued 6-piece chopsticks. You need to make sure that the phone can slide into the U-shaped stand.
Note!
DIY photo album - step-by-step instructions for creating a photo album- DIY lampshade - a detailed description of how to make different types of lampshades
- The most interesting DIY home crafts: a selection of the best interior crafts
Step 2. Stick as a bolt. Using another chopstick as a bolt, you need to secure the U-shaped phone stand. This U-shaped stand is ideal for many recording needs. But you can always think about other projects and find what best suits your needs.
Simple holders
- The easiest and most affordable option would probably be to use cardboard as a manufacturing material. We cut it out according to the diagram, taking into account the features and dimensions of our device. Don't forget about the back part, which should bend well so that the holder does not diverge. You can also make a similar accessory from a regular disposable cardboard cup.
- If you have a damaged or unwanted CD that you were about to send to the landfill, then take your time with your actions. It may be useful for its further reincarnation into a tablet stand. We take the disk and make marks on it, adjusting it to the size of our gadget. Very carefully draw the corresponding lines for bending with a marker. Now you need to take care of safety, since you will be working with fire - slightly heat the disk in the places where the lines are located, and then bend it. We repeat the procedure for the remaining parts of the former storage medium, and enjoy our new accessory.
- The third in the collection of budget options will be a holder made of straight wire. It needs to be bent with pliers in the appropriate places. For greater stability, connect the wire with a rubber band, and if you paint the wire, it will take on a completely different look.
- How could you forget about LEGO constructors? They are ideal for the role of a tablet stand, if you approach the creation process with imagination. A creative person will find a lot of options for producing such a product, and it will be possible to remember a little childhood, succumbing to nostalgia for the past. Combine business with pleasure.
- Well, the most budget-friendly and simplest option would be to use a regular book stand. Also suitable as a support for decorative plates or other types of home decor.
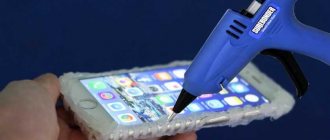
Suction cup stand
Step 1. Take the suction cup. With the suction cup you choose, you can start creating your own design on it. The design is limitless - whatever you want can be done. Using different colors of nail polish, the suction cup can be painted.
Step 2. Hole. Now you need to make a vertical hole in the top of the suction cup.
You can use something metallic or sharp. For example, heat a needle over a candle. When it is still hot, you need to immediately poke it into the center of the suction cup, starting from the right side. Repeat this until the top of the suction cup on the left side is pierced.
Step 3. Insert the ring. Once the hole is large enough, the key fob ring is inserted into it. Do this until everything goes through.
Great, now your DIY phone holder is ready! You can use this device both as a smartphone stand and as a holder. Quite convenient combination of 2 functions in one element.
Types of shelves
Shelves can be divided into several types depending on the purpose of their use. So, you can select shelves:
A corner shelf in the hallway will create its own atmosphere
On a note! There are also specialized shelves designed to store a specific item. For example, a shelf for a musical instrument.
The shelves can also be divided into:
Beautiful corner shelf
You can make shelves for walls with your own hands from available materials.
In the table below we will take a closer look at the main and most popular types of shelves for walls according to the most common classification.
Table. The most common types of shelves.
| Type | Description |
| Wall mounted | These shelves can be fixed either on the wall or even rest on the floor or other furniture. They are usually very durable and can support quite a lot of weight. Often used for storing heavy, bulky items. They take up very little space. |
| Classic | These are ordinary rectangular shelves that are mounted only on the wall. They may not have a back shelf; they allow you to place objects both inside and on top. Very functional, often used to store items and create coziness at the same time. |
| Multi-tiered | These shelves have several tiers at once and look very original. They can be asymmetrical and have storage areas of various sizes. Sometimes this is quite convenient, especially if you need to create books of different parameters - large and small. Often such products fit surprisingly easily into certain interior styles and become their direct complement or even their embodiment. |
| Corner | Such shelves allow you to save a lot of space, as they occupy the remaining free corners in the room and do not interfere with anyone. They can be placed in absolutely any room, but most often they can be seen in the bathroom or kitchen. |
Making shelves on the wall with your own hands
Stand from a hanger
If you have an unnecessary clothes hanger (which is made of thin metal or wire), you can also use it to create a stand for your smartphone with your own hands. The hanger's durable wire will contribute to the stand's strength and durability.
Step 1: Cut the wire. First you need to cut the wire from 35 to 45 cm long. Then bend it in half, but do not bend it.
Step 2. Make two 90 degree turns. Mark the center. Then you need to measure about 6.5 cm in any direction from the center. Bend two corners 90 degrees in one direction. Now you have a three-way wire with an open end.
Step 3. Bend each side 90 degrees perpendicular. Measure 1.3 cm on each side of the triangle. Bend the wires 90 degrees perpendicular to the previous bends.
Step 4. Bend each segment 45 degrees in the opposite direction. Fold again to 2 cm, approximately 45 degrees in the same direction on both sides.
Step 5. Bend each segment 90 degrees in the opposite direction. Raise the checkmark halfway and bend it approximately 90 degrees. This will hold the gadget in place.
A do-it-yourself smartphone stand made from a hanger will hold the device in both portrait and landscape mode.
In a similar way, but with different dimensions and a thicker section of metal, you can make a stand for your tablet yourself.
Models from scrap materials
If you need a DIY smartphone stand urgently, items lying on the table may come in handy:
A simple design is made from stationery clips and a plastic (or paper) card. It is enough to secure the binders on opposite sides of the base by placing the device on them.
An alternative to clamps are paper clips, bent into miniature stands. No cardboard base is required for this holder. Two large paper clips are usually enough to hold a smartphone.
An unusual DIY phone stand is made using a toilet paper roll, which is a hollow cardboard tube. You can make a device in it where the device will be located. And plastic cups around the edges will give the design the appearance of a portable speaker.
A compact stand can be made from a plastic card. Considering that after such an upgrade the bank card will become unusable for its intended purpose, it is better to use an unnecessary discount card or gift certificate.
The plastic is cut off from one corner to create a support, and on the other side a connector is cut out that matches the width of the phone.
The base for the stand can be wire 2-3 mm thick. You just need to bend it into the shape of two letters “L”.
If you wish, you can assemble the holder from Lego. Various combinations are allowed here. Moreover, the homemade structure is just as easy to disassemble.
If you have any tape cassettes left in your home audio library, you can borrow a case from one of them for a while. To conveniently place the phone, just turn the design back side out.
If you have 6 pencils in stock, you can make a stand out of them, fastening them with elastic bands. In order for the structure to stand firmly, it needs to be made like a pyramid. The phone is placed on the base of a triangle made from two pencils.
Another version of the stand is made from wine corks connected to each other.
The simplest support for the gadget will be a roll of tape. If the diameter is sufficient, the smartphone can be placed inside.
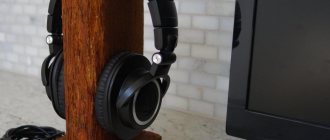
Wooden stand
First of all, for a wooden phone stand, you need to choose two bars so that they contrast with each other in color. Then you should make sure that they are the same height and their edges are square.
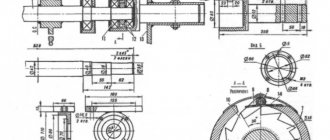
Dimensions of the wooden stand. The sizes are selected in accordance with the parameters of the gadget. If necessary, you can find a project diagram on the Internet.
Making a wooden stand. A band saw is used to cut a thin strip of a larger piece of wood. Then the 3 parts are glued together. In this picture you can see the final dimensions of the main face.
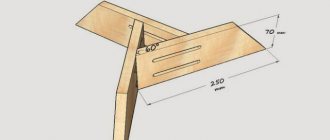
Then another piece of wood is taken, which must be cut, giving it an acute angle (about 55 degrees).
Now you should glue it to the main structure.
You also need to cut a small piece of wood that will hold the smartphone. It is also glued to the body. Your DIY wooden phone stand is ready! The final stage. After sanding, the smartphone stand should be varnished.
What you need to make a wooden phone holder
The main element is the basis of the future stand. Any board or piece of wood of suitable thickness will do. A long structure will take up too much space, but it should be enough to give the model stability.
The lack of length is compensated by the thickness of the base - this will make the stand more stable
You need to select a workpiece based on your phone model. The groove for long smartphones will have to be made deep, with a slope. Before starting work, you should make a small cutout and install the device into it, expanding it to the required size. A right angle is also acceptable, but working with the device will be less convenient.
The minimum kit for preparing to create a stand includes:
- The basis. Wide beam of required thickness. There is no particular difference in the choice of wood, but some varieties are more difficult to process.
- Tool. A wood hacksaw, ideally a router, to create a recess. Sandpaper and files will help give the stand a nice appearance.
- Marking supplies - pencil, marker, ruler.
- Additional materials for creating complex and unusual models. Varnishes, paints, glue, decorative elements.
A simple design can be created using ready-made diagrams.
Photos of DIY phone stands
Wall shelves for telephones in Moscow
Not enough space in your home for little things like stuffed animals and books? There are two options: buy the missing furniture, new shelves, but this will be expensive and will also take up your time and effort. It is much easier to buy a hanging shelf “Lovely home”. This is a station wagon.
Pickup, Russian Post, Courier, Logistics company
Wall shelf “Lovely home”, 26.5.
Open wall shelf for storing small items. Store containers with spices on it in the kitchen, gadgets in the office, books or small toys in the nursery. Hang it in front of your bathroom or hallway mirror, display it as decorative favors in your living room, or use it as a display.
Pickup, Russian Post, Courier, Logistics company
Wall Shelf Straight Alice, 70x11x9 cm, 1 piece.
Pickup, Russian Post, Courier, Logistics company
Wall shelf Straight Mini, 26.7x7.6x6.4 cm.
Quite often there is a need to connect additional external devices to the TV, such as a digital tuner, SMART set-top box, satellite receiver, etc. If your TV is mounted on the wall and you need to connect one or more external ones to it.
Pickup, Russian Post, Courier, Logistics company
Wall bracket ITECHmount DVD-2
Wall bracket purpose: universal Number of shelves 1
Pickup, Russian Post, Courier, Logistics company
Source
Wall shelves for telephone
Not enough space in your home for little things like stuffed animals and books? There are two options: buy the missing furniture, new shelves, but this will be expensive and will also take up your time and effort. It is much easier to buy a hanging shelf “Lovely home”. This is a station wagon.
Pickup, Russian Post, Courier, Logistics company
Wall shelf “Lovely home”, 26.5.
Open wall shelf for storing small items. Store containers with spices on it in the kitchen, gadgets in the office, books or small toys in the nursery. Hang it in front of your bathroom or hallway mirror, display it as decorative favors in your living room, or use it as a display.
Pickup, Russian Post, Courier, Logistics company
Wall Shelf Straight Alice, 70x11x9 cm, 1 piece.
Pickup, Russian Post, Courier, Logistics company
Wall shelf Straight Mini, 26.7x7.6x6.4 cm.
Quite often there is a need to connect additional external devices to the TV, such as a digital tuner, SMART set-top box, satellite receiver, etc. If your TV is mounted on the wall and you need to connect one or more external ones to it.
Pickup, Russian Post, Courier, Logistics company
Wall bracket ITECHmount DVD-2
Wall bracket purpose: universal Number of shelves 1