What to make a stand for devices from
Manufacturers offer ready-made stands made of wood, plastic, metal, ceramics, or combinations. You can also make your own kitchen accessory from these materials, but only if you have the skills to work with them, special machines and tools.
Simpler options are made from scrap materials: tin cans, wooden boxes, kitchen boards. Additionally, you may need: acrylic paint in aerosol cans, jute thread, thick fabric, pieces of leather or suede.
Mosaic stand
Natural materials also look great as a stand. For this purpose, sea pebbles, shells and pieces of multi-colored or plain ceramic tiles are used.
Rubber or thick fabric is used as the base. Before gluing, mosaic pieces must be degreased with alcohol. The binding material can be glue, epoxy resin or plaster.
You can use a silicone mold, which is filled with epoxy resin, and mosaic elements are laid out inside.
Preparatory work
First, choose 4-6 containers of the same size. The height of the cans should be 2/3 of the length of the cutlery. First, they are thoroughly washed, dried, and the upper part is smoothed out from burrs using pliers. Then they are painted with acrylic paint, which will protect against corrosion.
Reference! For work, it is better to use paint in cans, which lays down in an even layer and makes painting the inner surface easier.
To properly cut the board, place it on the table and place 4 or 6 cans on it (2+2 or 3+3). A second plank is laid between them, which will serve as an intermediate support. They mark, cut, sand, paint.
Place the jars on the base, mark holes in the center using a long nail or screwdriver and hammer. Small holes are made on the board in the marked places. In this way, the cans will be attached to a wooden base.
Similar operations are performed with an intermediate support installed between the banks. In the upper part of the containers adjacent to the base, the fastening point is also marked with a nail. You can use jute rope as decoration by wrapping it around the top and bottom of the cans in 3-4 turns.
Cutlery stand: step by step
There are several ways to make a placemat.
Stand made of tin cans
After preliminary preparation of materials, all that remains is to assemble the entire structure together. This is done in 3 steps:
- Using self-tapping screws, the cans are secured to a wooden base at the designated points.
- Install a second board between the cans and secure them with self-tapping screws.
- A ready-made furniture handle or one made of leather is attached to the end of the board for easy carrying of the stand.
Attention! As an intermediate board, you can use a ready-made kitchen board with an elongated upper part and a hole cut in it for mounting on a hook. It will make it easier to carry the stand without a handle.
For jars without jute decoration, you can use small signs cut from the same leather as the carrying handle. Write on the sign the purpose of each container (forks, spoons, knives). You can draw some small drawings (smiley faces, spoons, forks, figures). Glue with special glue.
Stand made of kitchen boards
To work, you will need 3 identical kitchen boards, thick fabric with any pattern (checkered, flowers, polka dots), and braid. Assembling a kitchen accessory step by step:
- A rectangle is cut out of fabric along the width of the board, 2/3 of the length of the cutlery in height.
- Place the prepared fabric on a board and decorate the top with braid.
- Using small furniture nails or a stapler, attach the braid with fabric to the wooden base.
- Boards with pockets are hung on 3 separate hooks or on a ready-made hanger for kitchen utensils.
Three boards hanging next to each other with pockets for knives, spoons and forks look unusual and original. If the material is selected in the right color scheme, then the set will definitely become a decoration of the kitchen.
Source
Original stands
- A stand made from old disks - the disk is covered with fabric, and an additional lining of synthetic padding is added inside.
- Plastic bottle caps are suitable for plates and cups, but pots and kettles that are too hot can melt and emit an unpleasant plastic smell.
- Wine bottle corks - they are glued to a base made of thick fabric and look very nice when finished. Instead of fabric and glue, the corks can be fastened together using regular toothpicks. Such stands easily absorb grease and other contaminants, so they are not considered particularly practical.
- Laying ceramic mosaics on a solid base.
- Paper coasters in quilling style.
Idea 1. Tablet stand made from a cutting board
Watching your favorite TV series on your tablet or peeking at a recipe book while cooking will become easier if you make a special stand for this from... an ordinary cutting board. Making this kitchen craft with your own hands will take no more than two hours, and it will be used every day.
To make a holder for a recipe book or tablet you will need:
- You can use an old cutting board or buy a new one (wood is best, but bamboo will work). Its size should not be much larger or smaller than the tablet.
- A small wooden plank, or better yet, a piece of molding (this is what will hold the tablet/book).
- Another block of wood or plywood from which you can cut a sharp triangle;
- Paint or stain in the desired color, for example, to match the countertop, facades or kitchen backsplash;
- Paint brush or staining rag;
- Jigsaw or saw;
- Wood glue or any other strong adhesive.
- Using a saw or jigsaw, cut your strip or molding to the desired size (the width of the board), sand the edges with sandpaper, then simply glue it to the bottom of the board.
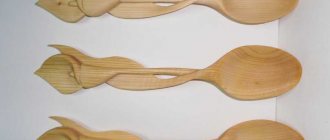
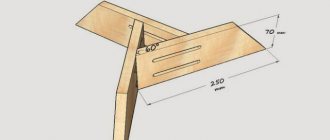
- Cut a support for the stand from a piece of wood in the shape of an acute triangle with a right angle as in the photo below and glue it too.
The angle of inclination of the holder will depend on the inclination of the hypotenuse of the triangular bar
- Paint the entire piece following the paint manufacturer's instructions and leave to dry.
- If desired, the handle of the resulting stand can be decorated with jute rope or ribbon. This way, when the stand is not needed, you can hang it on a hook.
Method 8: sliding tabletop
A large additional tabletop can also hide under the main one and extend from under it, turning 90 degrees, like the blade of a pocket knife. For support, it needs one or two legs on wheels, which will move out of the free space between the floor modules of the kitchen. If desired, it can be closed with a swing door.
By the way, if you are planning to build in a large additional countertop, do not forget to think about the lighting. Place small spotlights or ceiling spotlights in the place where the table will extend - and then it will be really convenient to work here.
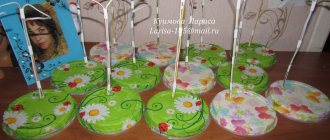
Idea 2. Jute coasters
If your kitchen (or, for example, a country or summer kitchen) is decorated in a rustic, Mediterranean, rustic or nautical style, then you will probably love this kitchen craft idea. In just a couple of hours you can make coasters for plates for the whole family and guests with your own hands.
To make one substrate with a diameter of 33 cm you will need:
- 10 meters of jute rope 1 cm thick (sold in construction and hardware stores);
- Hot glue gun;
- Scissors.
Just start rolling the rope in a circle, applying glue to small sections one by one and fixing them for a while. Once the mat is formed, cut the end of the rope and glue it down.
Hot stand in patchwork style
You will need the following materials:
- Stack of colored scraps 14 x 14 cm.
- A piece of fabric for sealing.
- Marker.
- Wear-resistant fabric for the reverse side.
Process of creation:
- 2 layers of lining material are attached to the inside of the block, after which the layers are sewn together. This tiny blanket is quilted the way you feel comfortable doing it.
- We select a suitable round object, apply it to the blanket and outline it with a marker.
- Carefully stitch around the intended line. We recommend going through the sewing machine 2-3 times.
- A circle of fabric is cut, then the circles are combined with each other and pinned together with small clothespins.
- Having created a small indent, all the elements are sewn together on a sewing machine, leaving only a small gap for turning inside out.
- Short cuts are made in a circle so that the material does not protrude in the future.
- Then the backing is turned inside out and the last gap is sewn up.
- Now we need to thoroughly iron our product.
- After making a 3-centimeter indent, a stitch is made in a circle.
Idea 3. Organizer for cutlery and kitchen utensils made from cans
Tin cans cost nothing, but they are durable, easy to clean, and their shape is just right for storing all kinds of spatulas, ladle, forks, spoons and other utensils. If you put in a little effort and creativity, you can make a convenient and cute organizer out of them, which, even if it doesn’t fit into the interior of a city kitchen, will definitely fit in at the dacha. You can also use an organizer made with your own hands from cans to store tools, brushes, felt-tip pens and other small items.
Stand for spoons and forks made from cans
To make such a stand for spoons and forks, you will need:
- 4 or 6 clean and dried cans, without lids or burrs;
- Acrylic paint for metal or enamel paint (it will protect the cans from rust);
- Several wood screws and a screwdriver;
- Thick nail and hammer;
- Furniture handle or leather strap with fittings;
- A small wooden plank.
- Paint the jars inside and out and let them dry for one day.
- If necessary, saw the wood to the desired size, sand it, clean it and finally paint it (not necessarily to match the cans).
- Take a nail and a hammer and make a hole for the screw in all the cans.
Tip: To make this process easier and not damage the paint layer, place a small block on the table using a clamp, then wrap the block in felt and only then put a jar on the block (see the picture in the lower left corner in the next photo collage)
- Place the cans against the board and align them the way they will be mounted later. Mark the location of the holes on the board with a pencil.
- Make small holes in the board where the marks were marked, using a hammer and nail.
- Screw a screw into the hole of the first can to attach it to the board. Repeat the procedure with all remaining jars.
- Finally, install a furniture handle or leather strap on the end of the wooden board using the same self-tapping screws. Ready!
Here are a few other deco ideas and modifications to the design of cutlery stands made from cans.
Classification of products from parts of cookware
Crafts made from cutlery are very diverse both in their forms and in their purpose. They can be used in all areas of human life, to satisfy many needs, or simply to decorate the interior of a house or apartment.
Note!
How to make a craft with your own hands: what you can do with your own hands at home
DIY foam crafts: snowman, Christmas tree, sculptures, original figures with instructions (photo + video)
Papier mache from egg trays, boxes, cassettes: the best ideas on what can be made from egg packaging
There is something for everyone. This option would be an ideal gift for any celebration or holiday. And if you have unnecessary things lying around at home, then do not rush to throw them in the trash, but turn them into wonders of the flight of creative thought. Crafts made from metal forks and spoons are very diverse:
Idea 4. Topiary for kitchen or home decor
Topiary is a small decorative tree that is used to decorate a dining or coffee table, chest of drawers or mantelpiece. And topiary is an excellent addition to a gift, especially if you decorate its crown, say, with candies or flowers. Making such a craft with your own hands does not take much time, does not require the use of expensive materials, and even beginners can do it. Once you master the basic principle, you will be able to create topiary for any occasion, any shape and design. Take a look at our selection of DIY home decor photo ideas, you're sure to find something you'll like!
Kitchen Decor Idea for Halloween
To make this craft you will need:
- Base made of polystyrene foam, plastic or floral foam in the shape of a ball or other desired shape;
- A trunk (a straight tree branch, a pencil or any other small stick);
- Decorative elements for creating a crown: coffee beans, artificial flowers, pine cones, colored beans, etc.;
- Decor to disguise the pot filler, for example, moss, pebbles or sisal fiber;
- Flower pot;
- Filler for a pot that will fix the trunk. For example, cement mortar, the same polystyrene foam or alabaster (the best option) will do;
- Thermal glue in a gun;
- If necessary, you will need paint to decorate the trunk, base or pot. The trunk can also be decorated with ribbon or twine.
- To begin with, it is advisable to paint the base in the color of the crown elements so that possible bald spots are not noticeable. You can also paint the trunk and pot and leave them to dry.
- Cut a hole at the base of the crown, a couple of centimeters deep, for the trunk, fill it with glue and secure the trunk.
- Take the base of the crown and start gluing the decorative parts one by one. The principle of action at this stage is simple: first, large parts are glued, then medium-sized and, finally, small elements fill in the bald spots. You need to glue the decor quickly, before the glue is absorbed into the base.
- Dilute the mixture to fix the trunk in the pot according to the manufacturer's instructions and fill the pot with it, not reaching a couple of centimeters to the edge. Next, insert the barrel, hold it for a while and then leave it to dry for a day.
- Disguise the filling of the pot with a decorative “cover” (you can fix it with a little glue).
For detailed master classes, see the materials:
Made from polyester
This mat is also great for drying dishes. As a rule, such products are very practical and easy to use. In addition, they have a very affordable price. This rug absorbs moisture perfectly, and the table surface remains completely dry.
The product can be washed even in a washing machine, after which it does not lose its properties. Today you can find similar products in a variety of colors and with various patterns, which allows this practical accessory to become a harmonious addition to the overall interior of the kitchen. This product also has no disadvantages, since it is very unpretentious and does not require special care.
How to make a polyester napkin with your own hands
The same as a microfiber cloth: cut out a piece of the desired shape and stitch the edges with thick thread, then you can embroider in the form of diamonds or other patterns.
Idea 6. Stand for mugs and glasses
If you're the type of person who collects wine corks (either for fun or in the hopes of one day making something useful out of them), then you'll love this craft idea.
To make one mug stand you will need:
- 8 corks (accordingly, to make a set of 4 stands you will need 32 corks);
- A roll of cork board, mat or coaster (for cutting out the base of the coasters);
- Hot glue;
- Leg-split.
Step 1: Lay out your corks in pairs in a square format as shown in the photo below. Using hot glue, apply a bead of glue between the two corks and press them together for 30 seconds. Repeat the procedure with all other pairs.
Step 2. Cut a square from sheet cork (board, rug) corresponding to the size of the future stand. Next, apply thermal glue on it, wait 15-20 seconds. and glue your blanks.
Step 3: Fill the gaps between the corks with glue and let it dry. For better adhesion of the glue to the corks, you can put some kind of press on the workpiece.
Step 4. Wrap the craft with twine and tie a knot.
Handmade coasters for mugs, glasses and glasses can be beautifully packaged and given to a friend
If desired, the stands can be made round, triangular or hexagonal by cutting off the excess with a knife.
Using the described principle, you can make such a hot stand with your own hands. By the way, an old CD will work as a basis in this case.
Idea 7. Wall panel
Another craft idea for the home and kitchen that you can make with your own hands from wine corks is a wall panel for decorating the interior and storing notes, memorable photos and postcards.
Framed cork panel from Ikea
To work, you will only need a beautiful frame (from a picture or a mirror), paint of the desired color, hot glue and a large pile of corks. Corks can be laid out in a herringbone pattern, in a checkerboard pattern, in even rows, and in other ways that you like. If necessary, for example, if there are not enough corks, they can be cut lengthwise or crosswise. To make the corks easier to cut, you need to soak them in hot water for 10 minutes.
Find other interesting ideas for making wall panels with your own hands here.
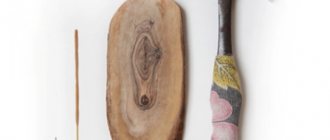
Idea 8. Universal knife holder
A knife holder is a very useful kitchen gadget that helps keep your workspace tidy and keeps your knife blades sharp for longer.
Making a knife holder with your own hands is very easy - just pick up a small vase and fill it tightly with bamboo/wooden skewers, colored beans or... colored spaghetti, as in our master class.
To make a knife stand, prepare:
- A container or vase is the height of the blade of your largest knife. The shape of the container can be any, but without any bends;
- Spaghetti, lots and lots of spaghetti;
- Several large ziplock bags (or just large bags that can be tightly tied in a knot);
- Alcohol (for example, vodka);
- Liquid food coloring in the desired color (or several colors if you want to make a multi-color filling);
- Baking trays;
- Aluminum foil or old oilcloth tablecloth;
- Paper towels;
- Kitchen scissors.
- Make sure your container is clean and dry, then fill it tightly with spaghetti. When the container is full, remove the spaghetti and add a couple more bunches of pasta to the pile as a reserve (in case you make up for broken sticks).
- Divide the spaghetti evenly between the bags and pour enough alcohol into the bags to wet all the sticks. Next, add 10-40 drops of food coloring to each bag.
- Seal or tie your bags, then place them in additional bags to avoid leaks. Slowly shake and turn the bags to mix the coloring into the alcohol and pasta. Next, place the bag on one side and leave for 30 minutes, then turn the bag over again and leave it for another half hour. Continue soaking the spaghetti in this manner (no more than 3 hours) until it reaches the desired shade.
- Cover your baking sheet with aluminum foil, then a layer of paper towels (or oilcloth). To protect your hands from staining, it is advisable to wear gloves. Remove the spaghetti from the bags, after draining all the liquid, place them on a baking sheet in a single layer and leave to dry. From time to time, the spaghetti needs to be sorted to dry evenly.
- Once your spaghetti is COMPLETELY dry, start placing it in the container.
- Shake the filled container and smooth out the spaghetti. Insert your knives to determine the optimal filling density, adding pasta or removing excess if necessary.
- Now, using kitchen scissors or other very sharp scissors, trim the spaghetti to the desired length without removing it from the container (it's best to do this over the sink). It is important that the spaghetti does not exceed the height of the container by more than 2-3 cm, otherwise it will break quickly.
Idea 9. Jars for storing spices and bulk products
When you don't have enough storage space in the kitchen, the bottom of a wall cabinet and a few glass jars with tin lids will help you out. Depending on the volume of the jars, you can store spices, cereals, sugar, salt or any small items in them.
- Make three holes in the lids using a nail and hammer.
- Screw the lids to the bottom of the wall cabinet using self-tapping screws. It is best to choose a cabinet that is closest to the stove and work area.
- Fill the jars and screw them onto the lids. Voila, the organizer is ready!
Method 2: mini shelf with legs
Another simple solution: free up space on your countertop. To do this, you need to put some things on additional shelves. But what to do if it is not possible to attach a regular shelf or rail to the wall? Just buy a shelf with legs! It can be placed anywhere, even above the sink. And all the little things that need to be kept at hand or that do not fit in the cabinets will be moved to the shelf.
Idea 10. Storage basket
There can never be too many baskets in the house, because they are so cute and help organize the storage system more rationally. Fortunately, you can make baskets with your own hands from newspaper tubes or just sheets of paper. Moreover, paper baskets can be very strong and practically no different from baskets woven from rattan. Perhaps this is one of the best ideas for crafts for the home and kitchen using scrap materials.
Read how to make such a basket for storing household items with your own hands in our step-by-step master class.
Today we will talk about an express technique for making a paper basket, which can be used to store small items (keys, stationery), yarn, as well as for an unusual presentation of fruits, Easter eggs, bread or pastries for a holiday table or as a gift.
Even a child can weave such baskets quickly and easily
- About 15 sheets of thin A3 paper, cut in half lengthwise (this can be printer paper, a full sheet of newspaper, or even baking paper);
- A container of suitable size with straight sides (for example, a jam jar);
- Glue in stick;
- One skewer;
- Spray paint (optional).
- Starting at one corner, begin to roll the sheet of paper tightly around the skewer to the diagonally opposite corner to create an even and long tube. Once the tube is ready, add a few dabs of glue to the corner of the paper to hold it in place and remove the skewer. Do the same with all the remaining sheets. In this master class, 30 tubes were required to weave 2 baskets.
- If necessary (for example, if you used newspaper sheets) or if desired, paint the tubes with acrylic paint.
- Take an even number of tubes and connect them together as shown in the photo in the upper left corner. In this master class, for a basket the size of a jam jar, 6 tubes were required, for a larger basket - 8 tubes.
- Start braiding: Take one of the outer tubes (which is under the grate) and lay it over the adjacent tube, then pass it under the next tube, then run the tube again over the next tube, etc. Continue weaving by lifting the already entwined tubes vertically (from now on we will call these tubes stands).
- When 2-3 cm remains from the first working tube, increase its length. To do this, apply glue to the new tube and insert it into the remaining “tail”. Continue weaving over and over again, adding paper tubes as needed.
- Once you have weaved a base of the desired diameter (the same size as the container), place the container on it and begin weaving around it, pulling the stand tubes close to the walls.
- Having weaved the basket to the end, remove the jar and carefully wrap the end of the working tube into the weave.
- Tuck the ends of the posts inside the weave and trim if necessary. Next, you can spray paint from a can as in our master class.
Idea 11. Wall holder for towels and kitchen utensils
From an ordinary grater you can make such a convenient and beautiful holder for a towel and storage of kitchen utensils or even live or artificial plants.
From a flat grater you can make your own kitchen decor in a country, Provence or shabby chic style
To make a heated towel rail and a tray for small items you will need:
- A grater (preferably an old one, but a regular new grater will do, as long as it is metal);
- Patina for metal (for artificial aging of the grater);
- A small cutting board or just a wooden board;
- Wooden die (for the bottom of the grater);
- Glue.
- Following the manufacturer's instructions, cover the grater with a metal patina, for example, green as in this master class.
- Install a wooden bottom in the inside. It must first be cut to the size of the upper part of the grater. As a rule, at the top of the grater there are protrusions from metal handles; it is on them that the bottom will be attached.
- Screw the grater to the board using self-tapping screws, after making holes in it with a nail and hammer.
- Place the board on the wall near the sink, hang a towel on the handle, and put your spatulas, ladles or flowers inside.
Rubber drying mat
A rubber mat is also quite suitable for drying dishes every day. The main thing is to choose a product from high-quality material that does not have any foreign odors. The best option is a thermoplastic rubber mat. This product is completely safe for use, practical and durable.
Like silicone mats, rubber mats can come in a variety of colors and have a grooved surface. The accumulated moisture will also need to be drained regularly and the mat thoroughly dried. It is better not to place hot pots or a kettle on a rubber product, as it is only intended for drying dishes.