Commercial wind turbines are usually equipped with helical propeller motors. They have high efficiency - up to 49%. But such engines are difficult to manufacture, so homemade wind generators usually have a standard rotary motor design.
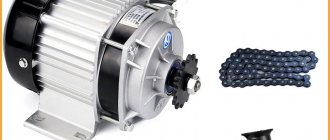
Wheel motors for electric bicycles and hoverboards are often used as generators for home wind power. In fact, an MK for a bicycle, scooter or electric car is a ready-made 3-phase current generator using magnets.
Characteristics
We list the important features of bushing electric motors:
- In generator mode, the wheel motor begins to produce current without delay. The rated power of the MK with this use case is achieved at 500–700 rpm, depending on the features of the model.
- Electricity generation is ensured immediately after installing the wind generator, even with low wind force (1–2 m/s).
- The output voltage is proportional to the rotation speed.
- To increase the output power, it is enough to connect additional windings.
- To brake the MK, it is enough to short-circuit the windings among themselves.
- To adjust the power, you can remove or connect additional windings by short-circuiting them first.
Types of motor wheels
Motor wheels come in geared and direct drive types. For use as an electric current generator for a windmill, only direct drive models are suitable. Not only are they more reliable and last longer thanks to their simpler design, but they also offer energy recovery capabilities. In addition, the absence of gears on a direct drive electric motor reduces mechanical losses.
Based on weight and power, direct drive MCs are divided into 3 categories:
- Models weighing 4.5–6 kg with a rated power of 600–1000 W and an efficiency of about 85%.
- Devices weighing 8–10 kg with a rated power of 1.5–2 kW.
- “Heavyweights” weighing up to 24 kg and power up to 8 kW.
To obtain a good inertial effect, the wheel motor used as a generator must be heavy. To obtain a powerful windmill, a 1000 W and 48 V MK is suitable. A universal model can be assembled from an 800 W MK, and a compact version is based on a 500 W hub electric motor.
Kit for turning any car into a hybrid / Sudo Null IT News
Students from Middle Tennessee State University, led by Dr. Charles Perry, have been working since 2008 on a kit that will turn almost any car into a hybrid.
There are many problems with modern electric or hybrid cars. The design of the drive requires processing, this requires costs that affect the final cost of the car. Plus, no one is offering to convert your car into a hybrid - if you decide to try it out, you will have to sell the old horse and buy a new one. At this rate, it is completely incomprehensible when at least half of the cars will drive using electricity - the new product is penetrating into life very sluggishly.
But Charles Perry and his comrades offer a completely different option.
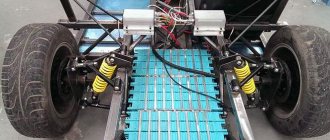
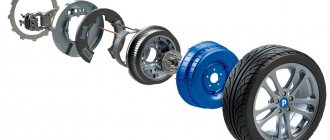
From ordinary components, without any expensive innovations, they assemble a kit that can be installed on almost any car. The batteries and controller of this cooled device are placed in the trunk. The innovation lies only in the placement of the thrust. The three-phase brushless DC electric motors themselves are placed in the rear wheels in the free space that is already there - around the brakes. The stator electromagnets are arranged in a circle, and the rotating disk to which the wheel is attached is equipped with permanent magnets. The electromagnets are controlled by a controller, and when the system is turned on, the wheel turns into an electric motor.
Thus, no components of the car are modified or affected - brakes, suspension, bearings remain unchanged.
The system is created as an auxiliary system for an internal combustion engine, and is designed for city driving at speeds up to 40-45 mph (up to 60-70 km/h). The controller works completely transparently - if the driver does not know about this setting, he may not feel it. As soon as the driver presses on the gas during acceleration, the system automatically turns on and helps accelerate and drive.
When high speed is reached, the system also turns off automatically. Dr. Perry claims that in their tests, fuel economy is 50%, which means that when driving in urban conditions, you can travel twice as far with the same amount of gasoline.
In the video, the batteries with the controller look quite voluminous, but Dr. Perry claims that this is a test setup, so it is a little larger than what they expect to end up with.
Perhaps the time will soon come when anyone will be able to buy such a kit for themselves and upgrade their swallow - just like you can now buy an electric kit for a bicycle.
habr.com
Voltage selection
When purchasing a direct-drive MK for a vertical windmill, you need to choose models with increased voltage. For example, for a 12 V battery system, a 24 V gearless electric motor is suitable, for a 24 V battery, a 36 V motor, etc. This difference in voltage is necessary to compensate for its decrease on the controller and to operate correctly at increased speeds on the windmill. In addition, the voltage of the electric motor must be higher than the specified output voltage in order to prevent it from critically decreasing when rotating at partial power.
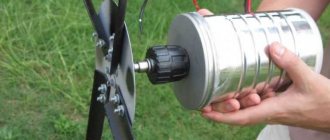
Bicycle generator | DIY master class
I just recently bought a bicycle for commuting to work, and in general, to ride and enjoy cycling. For safety, I turn on my front and rear lights to help road users see me better. My LED flashlights run on two AA batteries. And the charge only lasts for 4 hours of driving. Actually, this prompted me to think about purchasing a bicycle generator that could power all the lights. I didn't find anything in stores. All flashlights are battery powered. Then I decided to make a generator for a bicycle myself, from whatever came to hand, so to speak... And then I remembered that I once made a generator from a stepper motor. I decided to repeat the idea. But where can I get a stepper motor? They are found in almost all office equipment. I went into the closet and found an old printer. Naturally, it contained a pair of stepper motors. I took some, I don't need any more.
What else do you need for a generator?
You will need a few things if you want to build a generator for your bike. Here's what they are:
- – Stepper motor from a printer or other equipment.
- – 8 pieces of diodes, any, for a current of 0.5 – aliexpress
- – Voltage regulator LM317 – aliexpress
- – Radiator for LM317 – aliexpress
- – Development board – aliexpress
- – Switch – aliexpress
- – Housing for the regulator – aliexpress
- - Wires.
- – Attachment from the wing.
- - A wheel from a car.
Regulator circuit with rectifier
We need to assemble a voltage regulator so that it not only rectifies the current from the stepper motor, but also regulates the output voltage, thereby protecting the LEDs from voltage surges when driving. The regulator circuit is simple. Diode rectifier bridge and voltage regulator on the LM317 chip.
I assembled everything on a breadboard with holes. I simply inserted the parts, bent the contacts in the direction of soldering and soldered everything together. I soldered the wires and now my regulator-rectifier is ready. The toggle switch can be used to turn off the generator.
Generator assembly
We assemble the mount of the stepper motor to the wheel. The principle is simple: the wheel is rotated by a stepper motor, the motor generates electricity. I thought for a long time about how to implement the fastening in a simpler and more reliable way. Here's what I came up with: I took the mount from the wing (boot, mudguard). I screwed an aluminum corner to it, trimming it a little. And I already attached a stepper motor to the corner. That's it - the design has been tested and works fine. Of course, it would be desirable for it to spring the engine to the wheel, but in principle, this is quite normal. Oh yes. A machine wheel with a rubber tire is placed on the stepper motor. Electrical tape is wound around the motor shaft so that the wheel is pulled tightly onto the shaft. Nothing better came to mind.
Regulator mount
I also thought for a long time about where to place the regulator body, where to attach it, because it must be in the vicinity of the stepper motor, otherwise I will have to pull 4 wires from the stepper motor. Finally, I came up with an idea and decided to mount the regulator on stands on the same bar where the stepper motor is mounted. I cut a rectangle out of thin aluminum foliage and screwed it with long bolts through 1 cm long posts. Well, I attached the regulator to the rectangle.
Checking generator operation
The stepper motor I took was 24 volts.
And at normal bike speed it produced more than 30 volts. The output regulator produced 3.1 volts. Which is quite normal. If you are not satisfied with this voltage, adjust it with 150 and 220 Ohm resistors. In general, you can solder a variable resistor and adjust the voltage as you like. I connected the wires from the regulator to the front light. Connected in parallel with the batteries. As a result, when the bike is stationary, the light shines from batteries. And when the bike rides, the lamp shines from the generator, and the elements are slightly charged. Ideally, of course, you need to use batteries, but AA batteries with a voltage of 1.2 volts, the flashlight will burn dimly. In principle, you can throw out the batteries altogether, and the headlight will only light up when you are moving. In general, whoever wants it.
I gave you the idea, only you can develop it further! Good luck, friends!
Original article in English
sdelaysam-svoimirukami.ru
The principle of operation of a wheel motor as a windmill generator
To start the MK you need a source of torque. To turn the wheel motor into a source of energy, you need to initiate its rotation and make the device work as a generator. To do this, you need a profitable starting point, such as wind energy. To use it to generate electricity, it is enough to assemble and install a windmill from a motor-wheel.
The main elements of such a structure are an axis of rotation, blades for catching the wind and a mast for lifting the structure to the required height. The position of the generator can be vertical or horizontal. The vertical option is better, because... minimizes rotational resistance. The blades can be made of polypropylene hemispheres or others, at the discretion of the developer. The main thing is that they start moving even with a slight wind movement.
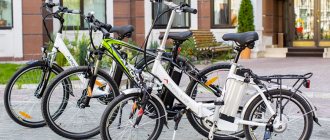
A simple and powerful generator for a bicycle
A bicycle is an excellent exercise machine that gets rid of extra pounds, makes your body slim and fit, and also increases your endurance and keeps you in good shape.
Now many people ride a bike to work, home, etc., and there are times when at night you need electricity for a flashlight or to charge your phone. This is what the author will do, he will make a very powerful and compact electric generator that will charge a phone, a flashlight, etc., well, let’s get started. Tools
1. Drill 2. Glue gun 3. Wrench set
Materials
1. USB boost regulator: 0.9V – 5V to 5V 600MA 2. DC motor 3. small wheel
STEP 1. Making a wooden stand
At this stage you need two pieces of wood. Make 2 through the hole with a drill. These holes are for attaching the generator to the bike. Place one small piece on top of another piece using a glue gun.
STEP 2. DC Motor
To produce electricity you need a mechanical system. The rotating DC motor converts mechanical energy into electrical energy.
STEP 3. Solder the USB boost stabilizer to the motor
Solder the USB boost regulator wires to the motor. Then glue it all with glue onto a wooden stand as shown in the photo.
STEP 4. Add. fastener
Add. We attach the motor to the rack.
STEP 5. Putting on the wheel
A DC motor requires a small wheel to turn. This is a wheel holder on the motor shaft. See full collection in image.
STEP 6. Attach the generator to the bicycle
We fasten the generator to the bike with fasteners, as can be seen in the photo. If you ride at average speed, you can quickly charge your phone, flashlight, GPS navigator, etc. I gave you the idea, only you can develop it further! Good luck, friends!
Homemade video:
Source Delivery of new homemade products to the post office
Receive a selection of new homemade products by email. No spam, only useful ideas!
*By filling out the form you agree to the processing of personal data
Become the author of the site, publish your own articles, descriptions of homemade products and pay for the text. Read more here.
usamodelkina.ru
Assembling a wind generator from a motor-wheel
The process of assembling a windmill with your own hands includes the following steps:
- Preparing the wheel motor with suitable voltage, power and torque values.
- Manufacturing and installation of blades. They can be constructed from PVC pipe, polypropylene, fiberglass, wood and other materials. To be able to rotate even in light winds, the blades must be spread to the maximum distance from the axis of rotation.
- Connecting the blades to the wheel. Checking the strength of the fastening.
- Installation of the rotating mechanism necessary to rotate the blades from the slightest breath of wind. In terms of strength, it is better to use a steel unit so that it can withstand even hurricane impacts.
- Preparing the controller needed to measure output power.
- Installation of a turbine for the installation of a wind turbine. For example, you can connect metal corners with fasteners. Place the finished turbine on the axis of rotation and perform static balancing.
- Connecting the MK to devices that consume energy.
Read the previous VoltBikes blog article about choosing voltage for an electric bike.