How can you produce electricity without batteries? With magnets of course! In this tutorial, I'll show you how you can use a magnet and some electrical components to make a simple flashlight that doesn't require batteries! This type of flashlight is great for hiking, camping, and emergency situations. Eliminating batteries means the eternal flashlight is always ready to go!
Required materials for a self-charging flashlight: a small piece of PVC pipe, magnetic wire, neodymium magnet, LEDs, 4 diodes or 1 diode bridge, capacitor, resistor, wire, breadboard and electrical tape.
Eternal flashlight - how to make a simple and quick device with your own hands
There are many amateur experiments with electric current. It can be obtained even from the temperature of the human body, as well as by the induction method or the Faraday method. About the first one briefly, and about a flashlight without batteries a little lower and at length enough for everyone to use the method.
Battery finger
A certain community of foreign inventors managed to create a device, or flashlight, Lumen, based on the capabilities of a thermoelectric generator (TEG). It does not generate a powerful beam, but it shines no worse than pocket flashlights from Chinese consumer goods at any bazaar.
- This technology, of course, is not applicable for a powerful “spotlight,” but for small pocket flashlights the circuit is simply ideal.
The principle of generating electricity with a mini-TEG in a Lumen flashlight is surprisingly simple. The generation supplies current to several LED “bulbs”. The glow is enough to read or write text in the dark.
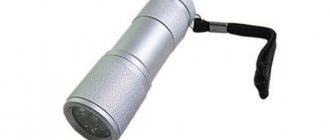
The flashlight, weighing only 45 grams, is called a “finger” flashlight. It “turns on” at a temperature (warmth) of less than thirty degrees. It can also turn on at the appropriate air temperature.
The inventors installed a window on the device for your finger - touch it and light will appear. He can work like this without interruption indefinitely. The flashlight was announced for sale for $15. Look at the photo of the eternal flashlight, which never appeared on sale
This message was given by many sites back in 2015, as well as the promise of enthusiasts to begin producing flashlights in a year. In total, they lacked 5 thousand dollars for the final technological breakthrough. But according to the crowdfunding they announced (people's help), in just a couple of days such collections exceeded the amount by 328 percent. Where's the thermal flashlight? The Internet is silent.
Anyone can create alternative light
Craftsmen will be able to assemble a flashlight without any other voltage modulator than a truly effective TEG. It is called “Faraday’s” after the author’s surname. What is its principle? We will tell you what you can use to make an eternal lantern.
This is not to say that a Faraday flashlight does not require a battery. The factory product even has a battery. Let's put it this way: it is completely discharged and the light does not light.
To light it, you need to shake the flashlight, then a neodymium magnet or a whole battery of them runs up and down through the induction coil. This suggests that making a flashlight using batteries and magnets is possible.
An alternating current of 3 volts will appear in it. It passes through the rectifier diode bridge, and its amplitude is equalized, turning the current into direct current. After all, only direct current can charge any battery, including a flashlight. Once recharged, its battery will turn on the light. But you can “ignite” immediately only from the internal battery charged using a magnet – a “slider”.
The flashlight itself contains the main elements, without which there will be no effect - an electric generator using the solenoid method and a rechargeable battery. The magnets at the top and bottom must receive pushes in the opposite direction from rubber plugs or metal springs. Then the battery charging and the brightness of the LEDs will be constant.
Here's a homemade one
So, any instruction on how to make an eternal flashlight will say that it can be placed in a cylindrical shape from a piece of PVC tube or plexiglass, as well as placing any structure in a box with a protruding LED light bulb.
You need a pair of magnets from a used computer hard drive, two rectifier diodes, and a white LED. The function of energy accumulators will be performed by capacitors.
Let us recall the features of coil winding. The most inductive windings are when the wire is laid thread to thread and layer by layer. This method can be done manually, or with a well-type wrench, but the wire must be factory wound. Then it is easier to transfer it to a new bed.
But we have an amateur design, so the winding is called overlap. Our solenoid consists of a coil with two windings. As you noticed from the diagram on the website, the coil consists of two windings, the total length is 40 mm. Conditionally divide it into two halves. On both sides we wind 600 turns of copper wire with a thickness of 0.08 mm.
Install magnet repellers in the solenoid. Further installation will be suggested by a diagram for making an eternal flashlight, which you will find on the Internet.
- Want a more powerful light source? To make it from a PVC pipe with a diameter of 20 millimeters you will need:
- round neodymium magnets 15x3 mm;
- copper wire;
- low power triode with reverse conduction;
- a bridge of two or four diodes or a 2W10 rectifier;
- resistance;
- powerful capacitor or ionistor 1F 5.5V;
- power button;
- five-volt LED;
- hot glue;
The efficiency of the device depends on the quality of the coil winding. We wind a wire with a diameter of not up to ten centimeters on the tube strictly according to the markings - about 500 turns. The first few of them are fixed with glue. The initial row of the coil should be laid close together. Next - as consistently as possible.
Solder the contacts to the places indicated in the diagram, insert neodymium. Shake the cylinder, and soon the LED will shine: you have made an eternal flashlight with your own hands.
Photo of an eternal lantern
A small flashlight in a disposable syringe housing
Hello to all DIYers!
Recently I needed a very small flashlight. This flashlight was needed to check the chicken coop in the evening in the dark.
The fact is that chickens, sitting on roosts, often fight for the best places or the opportunity to take a place closer to the rooster. In this case, it happens that one or more chickens fall to the floor. In the winter, when we turned on the lights in the chicken coop in the evenings, it was not a big deal, since the chickens would immediately jump back onto their roosts.
However, now, the amount of daylight has increased, and we no longer turn on the lights in the chicken coop in the evenings. Therefore, chickens climb onto roosts at dusk. And since they see very poorly at dusk, if they fall to the floor, they can no longer climb onto their perches on their own and often remain sitting on the floor all night.
Therefore, in the evenings, when it is already dark, I have to go to the chicken coop and check that all the chickens are sitting on the roost, and also put in those that have fallen on the floor.
Naturally, this needs to be done in the light, so at first I turned on a big light.
However, this turned out to be very inconvenient, because in the light, the rest of the chickens, who had already fallen asleep while sitting on their roosts, began to wake up and walk around.
That's why I needed a small flashlight. Moreover, such a flashlight had to satisfy two requirements:
Firstly, to be very small and light so that it can be constantly carried in a jacket pocket. And secondly, it should not be very bright (and even dim enough) so that its light does not wake up sleeping chickens, but at the same time it does not illuminate the entire chicken coop very much.
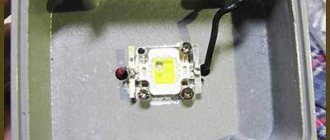
Since none of the available commercial flashlights met the above requirements, I decided to make a homemade small flashlight. To do this, I rummaged through my supplies and found this LED with a small battery compartment, left over from an old lighter.
I put batteries in it.
And it turned out that everything was working fine and the LED was on.
It turned out that this is actually what I need. Almost finished mini-flashlight. However, it was necessary to make some kind of housing for it.
And I decided to make such a body from a disposable medical syringe with a capacity of 5 ml. In addition, I needed a 3 ml syringe to make a flashlight button out of it.
Materials and tools for making a flashlight
In general, to make a flashlight, I needed the following supplies:
Materials
- The basis of the flashlight is an LED with a battery compartment and a tin plate for turning on (from an old lighter);
- Two plastic disposable syringes with a capacity of 3 ml and 5 ml.
Tools
- Awl;
- Electric drill;
- Metal drill with a diameter of 5 mm;
- Construction knife;
- Powerful scissors.
Making a flashlight
Do-it-yourself eternal Faraday flashlight
There are times when you need to illuminate it in the dark, but then again, it turns out that the battery in the flashlight is dead or you simply forgot to buy it and insert it.
Therefore, just in case, there should be a flashlight in the house that will never run out and that does not require batteries or accumulators.
We suggest making an eternal flashlight or, as it is also called, a Faraday flashlight with your own hands, it is made from improvised and cheap materials and can be made in one evening. Just shake it for a few seconds and it’s ready to go, and by pressing the button it starts to light up!
Do-it-yourself eternal Faraday flashlight
To make an eternal flashlight we need the following details:
- Ionistor for 0.047 Farad and 5.5 V (can be used for another capacity) - buy on Aliexpress;
- Transistor MP38A;
- Ferrite ring, about 1 cm in diameter (can be taken from the ballast of an energy-saving lamp);
- Large tact button;
- Resistor 1 kOhm;
- Resistor 4.7 Ohm (you can take a value close to this if there is no specific one);
- Winding wire in varnish insulation from 0.25 to 0.5 mm in diameter (for the converter coil);
- 1, 2 or 3 LEDs (optional);
- Neodymium magnets 10x2 mm, you will need about 10 pieces, but you can take one long magnet - buy on Aliexpress;
- 2 5 ml syringes with rubber pistons;
- 30 ml syringe;
- Winding wire in varnish insulation from 0.1 to 0.25 mm in diameter (for the main coil);
- SMD Schottky diodes SS14 or SS34 – 4 pcs.;
- Flashlight lens;
- Thermal gun;
- Screwdriver.
How to make a Faraday flashlight, step by step instructions:
Step 1
This eternal flashlight is built on the basis of the classic Faraday flashlight but has a difference for the better, since it has a voltage converter - “Joule Thief”, which will allow the LED to illuminate even from a lower voltage, starting from 0.25V, which will give it the ability to last longer glow even after a few shakes.
Do-it-yourself eternal Faraday flashlight
How to make a “Joule Thief” on our website several articles are devoted to this topic, which describe the process in more detail, for example, in this article about a flashlight powered by a single 1.5V battery. We will assemble the design of an eternal lantern according to this scheme:
Do-it-yourself eternal Faraday flashlight
Do-it-yourself eternal Faraday flashlight
An ionistor is used to accumulate the energy generated by the magnets and the coil, but you should not take ionistors with a large capacity, since they will take a very long time to charge, and they are not cheap, and besides, they are mainly used at a low voltage of 2.5V.
For my Faraday flashlight, I took an ionistor (or rather, these are two ionistors standing in series and enclosed in one housing) 0.047 farad designed for a voltage of 5.5V, it fits very well into our design, and it is also quite compact.
Do-it-yourself eternal Faraday flashlight
- It is better to use a Soviet germanium type MP38A transistor, which will allow the LED to glow longer, since this transistor can operate at very low voltages.
- Step 2
- We take two 5 ml syringes with rubber pistons; we need them to cushion the magnets, for quieter operation when shaking and to protect the neodymium magnets, since they are quite fragile.
Do-it-yourself eternal Faraday flashlight
We cut off the part from the syringes from the side of the spout, in the place where the 2 ml mark is, as shown in the photo.
Do-it-yourself eternal Faraday flashlight
Do-it-yourself eternal Faraday flashlight
We cut out two rings from thin plastic and put them on the syringes; these will be the limiters for the coil; we additionally strengthen them with hot glue. Next, we fasten the syringes together end-to-end using regular tape.
Do-it-yourself eternal Faraday flashlight
Do-it-yourself eternal Faraday flashlight
Do-it-yourself eternal Faraday flashlight
Do-it-yourself eternal Faraday flashlight
Do-it-yourself eternal Faraday flashlight
Now we will wind the coil, you can do it manually or, like me, using a screwdriver, you need to wind about 1200 turns, using a winding wire with a diameter of 0.1 to 0.25 mm, placing the syringes on a long bolt and putting washers on the sides to fix the syringes and then tighten it with a nut, insert the bolt into the screwdriver and quickly wind the coil.
Do-it-yourself eternal Faraday flashlight
Do-it-yourself eternal Faraday flashlight
When the coil is wound, you will need to test the flashlight, to do this, solder an LED to the terminals of the coil, and insert a magnet inside and start shaking, quickly moving the magnets in one direction or the other as they pass through the coil, and if the number of turns is sufficient, then the LED should flare up. The maximum current that comes out of this generator for me reached up to 50 mA, which is quite good for such a flashlight.
Do-it-yourself eternal Faraday flashlight
Do-it-yourself eternal Faraday flashlight
The electromagnetic generator is ready, now the winding can be wrapped with tape for fixation.
Do-it-yourself eternal Faraday flashlight
Step 3
Assembling the Joule Thief converter:
Induction flashlight
There are many designs of flashlights that do not require batteries. A flashlight using the phenomenon of electromagnetic induction is described below: The coil consists of two windings, the total length of the coil is 40 mm. Divide mentally hit.
In the first half, we wind 600 turns of the thinnest wire with a diameter of approximately 0.08 mm. And in the second half there are 600 turns. That's it - the two-section coil is ready. Don't forget about the limiters so that the magnets repel and jump quickly.
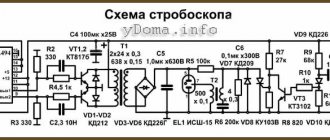
Scheme
A battery-free flashlight can be made using the piezoelectric effect. A similar flashlight is described in the publication here. The second option is attractive because it does not require winding a coil of many hundreds of turns. The author tried to repeat this design using the well-known ZP-1 piezoceramic bells. These bells were located at the ends of a plastic tube along which a ball from a ball bearing rolled freely. When the tube was shaken, the ball hit the bell housings one by one, causing electrical impulses of several volts to appear at their terminals. Thus, the mechanical energy of the ball's movement was converted into electrical energy. To prevent the ball from the ball bearing from quickly destroying the piezoceramic bells, they were covered with modern Russian 10-kopeck coins at the points of impact.
However, such protection greatly weakened the impacts, which reduced the brightness of the glow. Without it, continuous blows to the sound emitter led to its rapid (within a few blows) destruction. Thus, the repetition of the design failed. Maybe, of course, the author didn’t try hard enough. However, a heavy metal ball quickly destroys the piezo emitter.
In any case, the piezo emitter is not designed to withstand continuous impacts on its surface. So, the first option seems more promising, at least in the purely subjective opinion of the author.
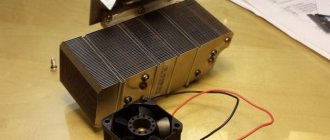
Flashlights that use the phenomenon of electromagnetic induction are commercially available, but it is more interesting to make such a light source yourself.
Scheme 2
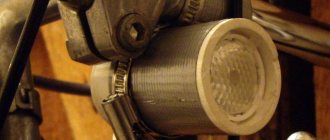
Since the author still did not want to wind the coil himself, such a ready-made coil was used, taken from the author’s amateur radio supplies. Probably, the coil was part of a magnetic starter, however, the author cannot say for sure.
Review: Eternal Faraday flashlight “Universal” - Interesting technology
Plastic body, strong magnetic field, weak light.
Good afternoon. To be honest, the flashlight fell into my hands literally the day before yesterday, so I won’t tell you anything about the duration of use, except that it looks quite shabby in appearance and the instructions for it (in German) are well-worn.
Glancing at it out of the corner of my eye, I immediately noted that a flashlight would come in very handy for us in the family, especially in the fall, since rolling blackouts or, well, turning on the lights would probably come in handy ahead :-), and we would definitely need an extra light source. When I decided to test it, I was a little surprised. Judging by the thickness of the body, I figured that the flashlight should be designed for the 373rd type of battery. For the price it would be very expensive, about 3 pieces long. I don’t even know for sure whether such batteries even exist. But after twirling the flashlight in my hands and finally examining it more carefully, I was even more surprised. Firstly, the flashlight does not have any cavities inside to accommodate the battery, no holes for the charging plug, and, in my opinion, it does not even spin up at all, although no, the light bulb, or rather the LED, can still be replaced. Inside you can see some kind of circuit board, a coil of copper wire, and some kind of piston dangling along its entire length.