Among mechanical gyroscopes, the rotary gyroscope
- a rapidly rotating solid body, the axis of rotation of which is capable of changing orientation in space. In this case, the rotation speed of the gyroscope significantly exceeds the rotation speed of its rotation axis. The main property of such a gyroscope is the ability to maintain a constant direction of the rotation axis in space in the absence of the influence of moments of external forces on it.
Be sure to watch this video. This is a store-bought gyroscope:
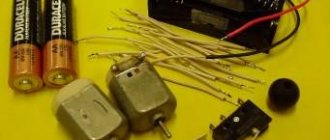
Yes, from the trash)) we will need - 1. a piece of laminate (found a scrap from my grandfather on the balcony), 2. The bottom and lid of a tin can (ate beans - got a can) 3. Steel stick (the most difficult part - found on the street) 4 .Plasticine (stolen from my sister) 5. Nuts or/and sinkers 6.two screws, a center punch (sharp thing at the end, an awl will do, everything from my grandfather) 6.wire (thick copper, found from my grandfather)) 7.Poxypol (or other hardening glue, taken from my grandfather)) 8. Electrical tape (ibid.)) 9. Threads (for starting and something else, from my grandmother)) as well as a saw, a screwdriver, etc.... the general idea is clear here
Next, we’ll cut out a frame from the laminate and bend the wire into a ring; we also need to punch an awl into the recess in the screws (I didn’t do it again, I just disassembled my gyroscope and took pictures of the parts...))
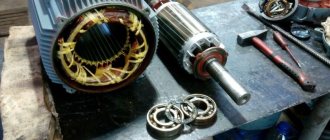
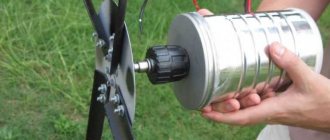
then we’ll assemble the main part - the rotor (or something else)) take the bottom and neck (they are the same) and make a hole in them (in the center!!) the hole should be as thick as an iron stick. We’ll cut the iron rod to length and sharpen the ends. If the alignment were better, insert the rod into the drill and, just like on a machine, sharpen it with a file on both sides; you also need to make a groove for winding with thread (you will find it in the photo)) we will spread plasticine on one of the disks, and stuff nuts and weights into it (who has a steel ring is absolutely gorgeous) then we connect both disks (sandwich) and pierce them through the holes with an axle. Lubricate the whole thing with poxy-pol, put it (the thing)) in a drill and while the poxy-pol cools, we will center the disk (so as not to hit) this is the most important part of the job. The balance must be perfect.
we assemble it according to the picture, the free movement of the rotor up and down should be minimal (you can feel it, but just a little), put a wire guard, attach it with a thread, and you’re done.
Instructions
- With these parts in hand, we can begin assembling the rotor. We punch holes exactly in the center of the can lids, preferably with the same nail as the one from which we will make the rotor axis. Next, using plasticine, we fasten the nuts on the lid, you can put more than six, the weight along the edge of the rotor will increase the time it rotates.
- Next we make the axis. To do this, secure the electric drill in a vice, tighten the nail without a head in it and sharpen it with a file. This way the axle sharpening will be located as close as possible to the center of the axle. It is necessary to sharpen on both sides.
- Without removing the sharpened axis from the drill, we will make a groove for the thread that will run the rotor. We attach the cover with nuts to the axle using glue, but do not use one that hardens too quickly. Poxipol works well. Coat the nuts with the same glue.
- Now the most important thing is balancing. While the glue is drying, you need to position the weights perfectly around the edge of the lid. We turn on the drill (vertically), if the rotating rotor hits in one direction, then some load is not positioned correctly. We fix it and try again. Lubricate the nuts on top and cover with the second lid. We glue electrical tape to the edges of the rotor. Let's dry it. The rotor itself is ready!
- We take two longer bolts, fasten them in a vice and punch holes in them in which the rotor will be fixed. Now we need to come up with an outer frame. Cut out a circle from the laminate. It is better to draw it with a compass in advance. Immediately draw vertical and horizontal lines at an angle of 90 degrees. Inside we cut out a smaller circle, but such that the rotor fits there. Along horizontal lines we make holes for the bolts opposite each other. We screw in the bolts. Between them we place the axis of our gyroscope. At the same time, you cannot tighten it too tightly, otherwise friction will dampen the rotation speed, and nothing will work. Leave about 1 mm of travel, but so that the gyroscope does not fall out of the bolts. We glue the bolts to the bar so that vibration does not unscrew them from the frame.
- All that remains is to install protection. Take a thick wire and bend it into a ring. At the location of the marked horizontal line we attach it to our product. The gyroscope is ready. We wind the thread around the axle and, sharply pulling it, check its functionality.
Among mechanical gyroscopes, the rotary gyroscope
- a rapidly rotating solid body, the axis of rotation of which is capable of changing orientation in space. In this case, the rotation speed of the gyroscope significantly exceeds the rotation speed of its rotation axis. The main property of such a gyroscope is the ability to maintain a constant direction of the rotation axis in space in the absence of the influence of moments of external forces on it.
Be sure to watch this video. This is a store-bought gyroscope:
Yes, from the trash)) we will need - 1. a piece of laminate (found a scrap from my grandfather on the balcony), 2. The bottom and lid of a tin can (ate beans - got a can) 3. Steel stick (the most difficult part - found on the street) 4 .Plasticine (stolen from my sister) 5. Nuts or/and sinkers 6.two screws, a center punch (sharp thing at the end, an awl will do, everything from my grandfather) 6.wire (thick copper, found from my grandfather)) 7.Poxypol (or other hardening glue, taken from my grandfather)) 8. Electrical tape (ibid.)) 9. Threads (for starting and something else, from my grandmother)) as well as a saw, a screwdriver, etc.... the general idea is clear here
Next, we’ll cut out a frame from the laminate and bend the wire into a ring; we also need to punch an awl into the recess in the screws (I didn’t do it again, I just disassembled my gyroscope and took pictures of the parts...))
then we’ll assemble the main part - the rotor (or something else)) take the bottom and neck (they are the same) and make a hole in them (in the center!!) the hole should be as thick as an iron stick. We’ll cut the iron rod to length and sharpen the ends. If the alignment were better, insert the rod into the drill and, just like on a machine, sharpen it with a file on both sides; you also need to make a groove for winding with thread (you will find it in the photo)) we will spread plasticine on one of the disks, and stuff nuts and weights into it (who has a steel ring is absolutely gorgeous) then we connect both disks (sandwich) and pierce them through the holes with an axle. Lubricate the whole thing with poxy-pol, put it (the thing)) in a drill and while the poxy-pol cools, we will center the disk (so as not to hit) this is the most important part of the job. The balance must be perfect.
This homemade product will be interesting, first of all, to young children. Especially if you put it together. In general, making a rotary gyroscope from improvised materials is a great way to have fun and usefully spend your free time. Despite the visual complexity of the entire structure, it is very simple to make, because, in fact, a gyroscope is an ordinary top, only with a “secret”.
However, the very principle of operation of the gyroscope is also quite simple: the flywheel rotates clockwise around its axis, which, in turn, is connected to the ring and makes rotational movements in the horizontal plane. This ring is rigidly fixed in another ring that rotates around a third axis. That's the whole secret.