Doing something with your own hands is always pleasant and somewhat unexpected. Moreover, today you can do this not only for the soul, pleasing yourself and your loved ones, but also to produce some products for sale. The Internet world provides all the tools for this: you don’t need to go to the market, stand behind the counter - everything can be done through advertisements or your own online store on the Internet.
Souvenir lamp
Therefore, a new direction has become very popular - creating plexiglass products with your own hands. Let's figure out how this can be done, what you can get and what nuances and secrets there are in all this.
Material advantages
- Resistance to ultraviolet radiation. The radiation does not make the material yellow or brittle.
- Excellent light transmission. Considering the composition, glass can have a transparency of ninety-five percent.
- Resistance to chemicals: acids, salts and alkalis cannot adversely affect the material.
- Ease. Plexiglas is 17 percent lighter than polyvinyl chloride and almost three percent lighter than ordinary glass.
- Waterproof. The material is successfully used to create various products that come into contact with water: aquariums, even yachts and ships.
- Strength. According to this indicator, plexiglass is five times superior to ordinary glass. Consequently, the service life of such material is much longer.
- Environmentally friendly - minimal release of harmful substances. The production of plexiglass products is not harmful. The combustion temperature of the material is 460-635 degrees. At the same time, hazardous substances are practically not released, as is the case with other types of plastic.
- Resistance to low temperatures. Even severe frosts do not affect the quality of the material.
- Is a dielectric. Therefore, it can be safely used in places where there is a possibility of stray currents.
- Ease of processing. This allows us to organize the production of plexiglass products of varying complexity and colors. Thickness can vary from one to twenty-four millimeters.
Substrate manufacturing
Taking into account the fact that the average thickness of the acrylic slab, which is used in the production of countertops, is approximately 10-12 mm, and the working surface itself is at least 40 mm thick, a logical question arises: what is inside the countertop made of artificial stone, what is it made from? To thicken and stiffen the structure, a base is glued under the acrylic cut. Its production begins after cutting out all the composite parts. The shape of the lathing follows the acrylic blank.
The small base is made solid. If the design has roundings, then they are also made in a single solid fragment. In order for the substrate to fit tightly onto the kitchen module, even at the first stage, when measurements are taken for the drawing, the location of all furniture blocks is taken into account. The lathing is made of chipboard, MDF or plywood. Through experience, we came to the conclusion that it is better to make the substrate from moisture-resistant MDF. Since plywood is multi-layered, when moisture gets in, it delaminates, unlike solid, strong MDF.
For large work surfaces, it is better to use chipboard as a substrate, since such a base can withstand heavy loads.
How to make a countertop from acrylic of complex shape
Acrylic stone has a wonderful quality - when heated, it bends well. You can use this property to make custom-made countertops with an original curved shape. In a special oven, the composite is heated and shaped into the required shape. The same technique can be used to round the edges.
What can be made from the material
The range of applications of organic glass is constantly expanding. For example, very often such material is used for the manufacture of structures for outdoor advertising (signs, letters, plates, etc.) or souvenirs - products for advertising purposes. As a result, plexiglass is an excellent material for branding retail outlets and other establishments. Thanks to the ability to combine glass with other materials, you can create original designs that attract attention.
Also, plexiglass products can often be found in supermarkets. For example, in the form of food containers or containers for fruits and vegetables.
In everyday use, the material can be found in the form of vases, dishes and other decorative elements, and bathroom accessories.
The material is also used for roof glazing, for example, greenhouses or picture glazing.
Due to its ease of processing and wide application, plexiglass becomes a good basis for creating your own small production. You can create various stands, price tag holders, souvenirs, etc.
Decorating with fabric
To update upholstered furniture, the method of upholstering it with fabric is used. This method allows you to radically change the interior of the room. In a few hours of work, you get a completely new sofa and armchairs that are no different from those bought in a store. In order for the new upholstery to lie perfectly evenly, you need to remove the old fabric from the upholstered furniture. A construction stapler is used to attach the new material. This decoration method is quite complicated and may not work the first time.
If the master doubts his abilities regarding the upholstery of the sofa, then he can make a new furniture cover. This way you can refine upholstered furniture without spoiling its original appearance.
The fabric can also be used to decorate other furniture - tables, chests of drawers, chairs, cabinets and shelves. Decorating with fabric is done using a combination of two techniques - decoupage and patchwork. Work on updating old furniture can be divided into several stages:
- Preparatory stage. Before carrying out work, it is necessary to prepare the surface, namely, clean it of varnish using sandpaper and remove any contaminants. In addition, you need to remove fittings from the furniture - hooks, locks, handles and more.
- Decoration. To decorate carpentry with fabric, you can use either a whole roll of fabric or remnants of various fabrics. It looks very beautiful when the fabric on the furniture repeats the fabric of the curtains or bedspreads. The fabric must be soaked in PVA for 30-40 minutes, and then applied to the surface of the product using an adhesive spray. You can decorate the fabric with colored ribbons, lace and other accessories.
- Consolidation. To prevent the fabric from fraying and getting dirty, it must be generously coated with a layer of varnish.
Thus, furniture decor is quite an interesting and creative activity. It does not require expensive materials, since you can use everything you can find at home. By upgrading old furniture, you can not only save on buying new ones, but also surprise your guests with the unusual cozy atmosphere of your home.
Types and applications
- Transparent. It is a colorless, transparent sheet with a smooth finish and a high sheen. Its light transmittance is 92 percent. It is used to create screens to protect various devices, for the production of shop windows, and glazing of buildings.
- Colored transparent. The material differs from the first option in its uniform coloring. The most popular colors are gray, brown and blue. It is used for the production of partitions, stands, aquariums, advertising items, and vehicle glazing.
- Corrugated transparent. In this case, on one side of the product there is a relief pattern, and on the other there is a smooth surface. It is used to create various decorative elements for interior design, furniture, glazing of shower cabins, doors, etc.
- White matte. Such sheets transmit light by 20-70 percent and have a shiny surface on both sides. They are used to create advertising structures, podiums, suspended ceilings, and illuminated floors.
- Colored matte. A complete analogue of the previous type, only with uniform coloring.
Stages of industrial stone production
The acrylic stone production technique includes 3 stages:
- Preparing the mold for the future product. It must be smooth, therefore it must be carefully polished, have a zero coefficient of adhesion, for this it is treated with a special solution that prevents the adhesion of the poured mass.
- Preparing the mixture for pouring. The composition includes stone chips (marble and granite, quartz), resins, dyes, hardeners. The mass is kneaded in a vacuum mixer until it has a homogeneous consistency.
- Pouring and curing. The mixture is poured into the prepared form, where it gradually hardens. The finished product can be sanded and polished after removal.
Products are produced by:
- South Korea;
- China;
- USA;
- Germany.
The highest quality products are made in the USA.
See what the production line looks like:
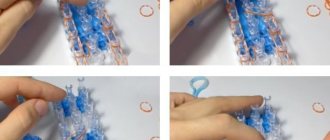
Tools
To process the material with your own hands, you will need to use certain tools, but it is not necessary to buy them. To create products at home, simple techniques and equipment will be enough. For example, using strong thread, you can make products of the most complex shapes.
Therefore, you can prepare a similar set:
- table;
- ruler;
- sharp knife;
- spiral made of nichrome wire. It can be taken from an old step-down transformer. You can see what it looks like in the photo.
You can make a thermal cutter yourself. It is a wooden frame containing nichrome wire. The device operates under a voltage of 6-12 Volts.
To bend a sheet of plexiglass in a straight line, you should heat the area along the bending axis.
To cut sheets, you can use an improvised cutter made from an old blade from a hacksaw for metal. For ease of use, one end of the canvas should be wrapped with electrical tape. You need to cut the sheet on a flat surface. The blade can be sharpened with a stone. We put a ruler on the sheet, draw it several times with a cutter, then remove the ruler and cut it. As a rule, edges after cutting do not require further processing.
How to paint furniture with acrylic paint correctly
Remember an important rule: before starting work, always apply new paint to a test surface, because... Paints from different manufacturers may differ in color, even if the color name is the same.
Article on the topic: Do-it-yourself carved solid wood furniture
As a rule, there are no difficulties with choosing paint of ordinary colors, but how to paint old furniture in the color of gold, silver, tin, bronze, copper or get various imitations of these colors?
To do this, you need to purchase metallic acrylic. This acrylic paint reproduces all these colors. It is necessary to obtain various imitations when painting and decorating objects and furniture elements.
To get started, purchase a selection of metallics in various shades of gold and silver. If such a set is not found, buy acrylic paint separately - light gold with any name. For light silver, buy metallic No. 806. Gold has many names, as well as shades; you will need to purchase both warm and cold tones.
Sometimes the promised paint color indicated on the tube or in the samples may not match the contents of the package. Therefore, it would be right to buy paints where you can check or see the color.
Choosing gold acrylic paint for decoration is not difficult, but choosing silver and bronze is a problem. Silver is mostly offered in dark gray, dull shades, while bronze is often copper-colored. Take advantage of the offers of Italian manufacturers.
Recommendations
First, you should purchase several sheets and experiment, starting with the simplest shapes and figures. You can make stands for displaying goods, which can be found, for example, in mobile phone stores.
If you plan not just to work as a hobby, but to earn money, it is better to produce products to order. Then you can take an advance payment for materials from each client. If you create products for subsequent sale, you will have to invest your own funds, and then be prepared for the fact that you will have to wait until these funds are returned.
DIY acrylic kitchen countertop
The manufacturing technology and repair process of such a countertop are not particularly difficult, so even a non-specialist without special skills and experience can do all the work on their own.
Making a countertop
To make an acrylate countertop you will need:
- two-component glue;
- waterproof plywood, which is used as a substrate;
- artificial sheet stone;
- milling cutter;
- drill;
- circular or miter saw;
- jigsaw;
- sander
The manufacturing technology for acrylate countertops is as follows:
- Before starting work, design your future countertop on paper. Make a model in real size. For these purposes, it is better to use an MDF template, which will immediately show all the gaps and unevenness of the walls. On its surface it is convenient to mark the contours of the sink and hob, and the edges of cabinets.
- Transfer all dimensions of future parts onto sheets of artificial stone. Use a plunge-cut saw to cut the end strips of the tabletop and baseboard. Carefully mill all surfaces of the parts that will be glued together.
- Glue plywood cubes onto the top surface of each part to be glued along the joining line with hot glue. First degrease this area with alcohol or acetone. Leave a gap of 1-1.5 mm between the workpieces, into which you will pour two-component glue. It is important that it is evenly distributed over the entire surface to be glued. At the same time, place masking tape on the workbench along the joint.
- After filling the seam, tighten the parts with clamps. While the glue is still wet, use a cube and a hammer to check that the area is level. After 20 minutes, remove the clamps.
- Gently knock down the plywood cubes with a hammer and remove the hot melt glue with a chisel. Sand off any excess two-component adhesive.
- Using the previously made template, apply the contour lines of the tabletop to the front surface of the workpiece. Cut along them with a plunge-cut saw. Cut out the curved part with a jigsaw. Mill the finished contour.
- Prepare the quarters for gluing the end strip. To obtain a quarter, turn the tabletop onto its back side and mill along the inner contour with a cutter with a lower bearing. In the corner, increase the area for gluing with an annular cutter. If the contour of the tabletop is curved, prepare an end strip of the appropriate shape. To do this, heat the straight piece on a special stove to 165ºC, place it in a quarter and secure it with clamps after 8-10 cm. After cooling, remove the molded part. Paste it in later.
- Before you start gluing the end strips according to the markings previously applied to the back side, make cuts for the equipment. In this case, use only a plunge-cut saw and do not finish the cuts. Upon completion of this operation, glue the ends, securing them with clamps. In addition, to strengthen the corners of the cutout for the hob and sink, glue 10x10 cm squares of stone in these places, and to reinforce the seam, glue a 10 cm wide strip.
- After the artificial stone countertop has acquired its shape, make a frame for it from moisture-resistant plywood. To do this, having taken all measurements, make logs that are glued with silicone around the perimeter and along the edges of the cabinets or every half meter.
- After 5 hours of setting, begin milling the protruding parts, removing excess glue and sanding the frame. At the end of this work, turn the tabletop over to the front side and, using a jigsaw, complete the cuts that were not completed with the saw.
Article on the topic: How to paint old furniture with acrylic paint
The final stage of any kitchen design idea is installation of the countertop . If the product consists of a single part, the installation process consists only of attaching the tabletop sheet with glue to the base surface. If the kitchen surface consists of several parts, all parts are adjusted to each other, and before installation they are first measured on site. After attaching the countertop to the kitchen base, holes are cut for sockets and plumbing fixtures, then the sink is installed.
Reference. You can decorate the countertop with LED lighting for the kitchen.
Countertop repair
How to restore the original appearance of the work surface:
- Fix large chips and cracks with two-component glue. First, degrease the damaged area and pour glue into the crack. Once cured, sand and hand polish the surface.
- Sand small stains and shallow scratches with sandpaper. To do this, initially use coarse-grained sandpaper, gradually moving to fine-grained sandpaper. Also additionally polish the surfaces using a drill and a special felt attachment.
- If you need to eliminate blisters and stains, use a router to cut out the defective area, then fill in a patch from the remaining liquid material. All that remains is to wait for the material to harden and polish and grind the repaired countertop.
Safety rules when working with resin
In order to avoid harm from the vapors that are formed when mixing the hardener and resin (the polymerization process entails significant heat generation), it is necessary to follow some safety rules.
- Arm yourself with gloves.
- Wear a protective mask or respirator to prevent harm to yourself.
- Ventilate the room while working.
- Warn your household not to enter the room while you are busy, or be sure to wear a mask.
- Before you start work, organize your workspace so that you won’t be distracted afterwards.
If you don’t have a special surface to work on, you can use film or a simple file so you don’t have to worry about the table and what might happen to it during work.
Step-by-step instruction
Let's look at the procedure for creating a plexiglass case.
Preparatory stages
First you need to prepare the tools:
- metal jigsaw, hacksaw or grinder;
- heat gun or glue;
- self-tapping screws;
- metal drill;
- plastic legs.
Before you start creating a plexiglass case, you should take the markings from the old case
To make calculations, first measure the old case, then add 1.5–2 cm to each side. Also note that you will need a stand for a motherboard of the appropriate size, as well as racks for FDD, HDD and CD-ROM. For simplicity, they can be made the same as they were in the previous building.
Use plexiglass no thinner than 5 mm. For the bottom and back wall, on which the fan and other parts are attached, you can take sheets up to 10 cm.
To connect individual elements of the body, use self-tapping screws, a heat gun or glue. The first option is more convenient: at some point you may need to disassemble the structure. In any case, at least one side wall must be removable.
To create a plexiglass case, plexiglass sheets no thinner than 5 mm are used
Before using self-tapping screws, test them on a small piece of the same plexiglass from which the body elements are made. If the material cracks when screwed in, choose either a stronger sheet or thinner screws.
For plexiglass you can use such types of glue as Acrifix, COLACRIL, Cosmofen, Dichloroethane. Please note that the latter remedy is extremely toxic and when working with it you must carefully observe safety precautions.
What to glue
Whether it is a crack or the need to connect parts made of transparent material, you will have to choose what to glue the plexiglass with. The logical answer is a specialized composition. There are two types of these:
- solvent-based adhesive made of acrylic
- two substances of identical composition are combined with the help of a third, similar in composition, which ensures the transformation of all components into one whole; - — dries quickly, ideal for eliminating cracks.
In addition to glue, plexiglass will be combined with strong acids and some other caustic substances that are often found in the workshop: glacial acetic acid, vinegar essence, methyl alcohol, formic acid, dichloroethane (a very poisonous dangerous substance, but it glues tightly).
It will not be possible to glue plexiglass with vinegar, even if it has a concentration of 7 or 9%. Vinegar essence (70%) and acetic acid will do the job perfectly. The bonding procedure does not proceed very quickly, but the resulting seam is characterized by increased strength. Vinegar essence does not dissolve the surface of plexiglass, but only slightly softens it.
When deciding how to glue plexiglass, it is worth considering that all products, including adhesives, are divided into two groups according to the principle of action:
- The composition dissolves the bonded surfaces before joining, resulting in the formation of a monolithic seam; in some cases, such a joint is called “cold welding”.
- The surfaces do not dissolve, an intermediate layer is formed, which ensures adhesion of the areas covered with a layer of glue (such gluing is very fragile, since plexiglass has no pores, and there is nothing for the adhesive to cling to).
The best option would be to use glue designed specifically for polymer and acrylic glass.