In the midst of autumn, in many kindergartens and schools, children now and then prepare small amateur performances. Often, educational institutions do not provide costumes for their young actors, so parents have to design and sew outfits themselves. However, even if you do not have sewing and cutting skills, we recommend that you try to make an outfit with your own hands from scrap materials. Today we’ll tell you how to make Emelya’s costume from the popular Russian folk tale “At the Pike’s Command.”
The hero of your favorite fairy tale: what is he like?
Before you start making a costume, remember a Soviet-made cartoon or an illustration for a book. In both the first and second cases, the image of Emelya suggests the slightly sloppy appearance of a young man lying on the stove all day long. Accordingly, he cared little about his appearance and clothing. Hence a padded jacket made of warming fabric, a hat, patches on trousers, a painted shirt and, as usual, bast shoes.
Also pay attention to the general relaxation of the image. Clothes are wide and spacious, warm, so as not to feel chilly. Based on the image and approximate characteristics of the image, try to sew Emelya’s costume for the New Year.
Advantages and disadvantages of long-burning stoves
Like any other unit, such ovens have their pros and cons.
The undeniable advantages include:
- economical consumption of firewood;
- high efficiency, up to 85-90%;
- versatility in the choice of fuel, firewood, waste from woodworking enterprises, sawdust, and pellets are suitable;
- small sizes;
- ease of control - using an air damper;
- simplicity of design, thanks to which it is easy to make a long-burning stove with your own hands.
Long-burning stoves are not without their disadvantages:
- during combustion, condensate is released, on which soot is actively deposited in the chimney, therefore special requirements are imposed on the chimney design - it should not have corners, bends, its design should be as accessible as possible for cleaning;
- To switch to the long-burning mode, the stove must first be heated in the usual mode to warm up the stove itself and the chimney, otherwise the combustion process will stop.
All the described features of long-burning stoves are relevant both for industrial heating units and for home-made stoves.
You can increase efficiency by adding a water circuit to the stove, as shown in the video.
Emelya's simple outfit from a fairy tale
To make a costume for a children's party or production, it is not at all necessary to have sewing skills on a sewing machine. It is enough to be able to make an even seam and process the edges of the material. However, you can often do without sewing at all. For Emelya's costume you will need: a blouse made of light fabric with a large print, contrasting braid, multi-colored scraps of fabric, faux fur, old cotton (or pajama) pants, a hat.
First of all, it should be noted that most of the components of this outfit can be made from ready-made clothes. You just need to slightly correct it to guess Emelya’s image. Therefore, find in your wardrobe an unnecessary blouse with a large print and a straight shape. Having tried it on the boy, roll up the sleeves and sweep them with threads to the desired length.
Now sew a bright braid onto the collar and bottom of the blouse. Here it is better to use a machine to save time.
Make several squares from pieces of fabric and sew them onto the pants with an uneven seam.
From gray fur, cut out a rectangle with a length equal to the circumference of the child’s head and a width of 8 cm. Sew it onto the bottom of the hat. In general, Emelya’s children’s costume is ready. If desired, complement it with a sleeveless vest with fur trim. An old and worn item will do. These are the ones who make Emelya’s image realistic.
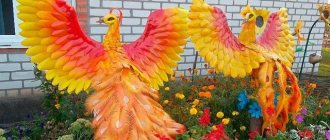
Master class on making three-dimensional decorations for fairy tales “Russian stove”
Vera Aksenkova
Master class on making three-dimensional decorations for fairy tales “Russian stove”
Dear colleagues, I would like to offer you a master class on making a three-dimensional decoration “Russian stove”. We use it at matinees, open classes, in theatrical fairy tales, as well as to introduce children to ancient life
I just want to remember the words of the poet Yulia Kalyakina
Russian Stove, Russian Stove!
There is no warmer place in a good house!
Hands of tireless and generous creation -
Thanks to the great ancestors!
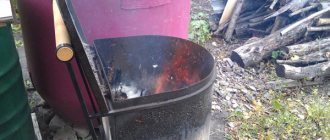
We started work by selecting boxes of different sizes.
We glued them together, covered them with white paper, and made slits. When the stove was dry, we covered the base with white water-based paint. Made pencil sketches of the main patterns.
The stove itself was painted with gouache paints. Firewood made from paper can be placed in the bottom hole.
There is a hole in the back of the pipe into which we insert an air humidifier - it simulates smoke from the pipe. I will be glad if someone uses my idea for work.
Master class on three-dimensional applique for Easter “Here I come!” Hello, dear friends and guests of my page! I offer a children's master class “Here I come!” For work we will need: . Master class on three-dimensional applique “Basket with tulips” Hello, dear guests of my page! For me, a tulip flower is the beginning of spring and women's holiday. I really love seeing them. Master class on three-dimensional appliqué “Cosmic distances” Hello, dear friends and guests of my page! The holiday is coming soon - Cosmonautics Day. I would like to offer a children's master class “Space. Master class on three-dimensional applique “Cheerful Clown” Hello, dear friends and guests of my page! I would like to offer a children's master class “Cheerful Clown”. Ha ha ha! Here I am! Clap. Master class on making decorations for graduation. The Royal Castle. Master class on making decorations for prom. The Royal Castle. According to the script, we planned characters from the fairy tale about the Bremenskys. Master class on making a three-dimensional number “Unit” Not long ago I showed how to make a tutu skirt with your own hands, now I want to tell you how to make a three-dimensional number. I did one. Master class on making a three-dimensional postcard for mothers on March 8 IMG]/upload/blogs/detsad-420847-1457051251.jpgThe idea of creating such a postcard is not new. I offered the children several options to choose from. Master class on making three-dimensional cards for mothers on March 8 Good day! So the bright, warm spring holiday of Spring has passed - March 8th. I want to share my experience in creating greeting cards. Master class on three-dimensional applique “Apple Tree Branch” Let’s take red cardboard of A4 size. Glue an apple tree branch from thin brown cardboard onto it. Let's prepare mugs of different sizes for... Master class of three-dimensional postcard “Peep a peek at summer” So much greenery all around! What is this? This SUMMER is finally rushing into our house. Summer is the best time. The cold weather has ended and the most beautiful things have appeared. Source
Second costume option
Despite the fact that Emelya’s costume for a boy involves certain colors and elements, you can achieve recognition without using some of them. Therefore, we will look at different outfit options for a children's theater production.
For the Emelya costume for a boy you will need:
- wide braid with folk pattern;
- red trousers;
- patterned blouse;
- black cap;
- red and white fabric;
- black thin satin ribbon.
Start making your outfit by lining the blouse collar with braid and shortening the sleeves. If possible, sew it on both the sleeves and the bottom of the shirt. Use a thin cord as a belt.
From white fabric you need to sew something resembling underpants. To do this, measure the circumference of the child's boot and the length from ankle to knee. Cut two rectangles of fabric, adding about 10 cm in width. Sew the ends of the material together to make a pipe. Try them on a boy. The fabric should not squeeze the child’s calf; on the contrary, it should be loose and even fall off it. To maintain an element of the look on your legs, use a black ribbon, simply wrapping it around your legs.
Types of mini-stoves
Crafts for boys Victory Day modeling construction military equipment from matchboxes paper cardboard matchboxes
Tourist stores offer a good selection of camping stoves, which are popularly called “fireless campfires,” “wooden primus stoves,” or “Indian candles.” There are many simple and more complex models, and each of them has its own characteristics. For example, the Bushbox camping stove, despite its popularity and complex design, has a number of inconveniences. To ignite it, you need to use only a certain type of fuel. The combustion process cannot be regulated, which is why the wood burns out very quickly, and the food does not have time to cook.
Many factory-produced camping stoves were designed for car tourism, so they are often large in size.
As an alternative to a stove when camping, you can use a grill. But, firstly, it is not very convenient to transport, and secondly, difficulties arise with fuel. This design requires special firewood, which leaves behind coals after combustion, and not all types of wood have this property.
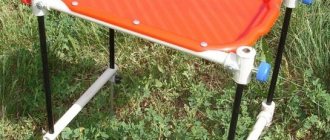
Therefore, a stove heated with ordinary wood is more suitable for tourism. This design combines a number of advantages:
- Lightweight and easy to transport due to low weight.
- Ease of use and ability to adjust power. When choosing a small container for the body, for example, a mug or a tin can, the oven is suitable for heating small volumes. If you use a bucket as a body, then using this stove you can prepare lunch for a large company.
- Unpretentiousness in fuel. Any combustible materials are suitable for ignition: branches, firewood, pine cones, dry grass and leaves.
- High efficiency thanks to specialized design.
- Low fuel consumption. By burning just a few wood chips, you can boil a liter of water. Due to the fact that the wood burns first in the middle, then along the edges, the camp stove heats up evenly, and the wood itself can smolder for a very long time.
- Possibility of universal use.
- Safety. Due to the fact that the fire burns inside the wood, the body remains warm and can be safely held in your hands. When the fire crackles, the sparks remain inside the jar and cannot harm others.
How to make a flower from fabric?
To decorate your cap, you can use a ready-made flower on a pin. Or you can do it yourself. To make a scarlet flower from fabric, cut out the petals from red fabric. The petals themselves should be drop-shaped. Place the two petals overlapping each other, making the center of the flower. Glue them together with a glue gun along the sides. Then add another petal. Thus, by sticking the petals one after another, you will get a beautiful scarlet rose. Once you have completed the flower, you can attach it to the cap of Emelya’s New Year’s costume.
Stove with cooking plate
Do-it-yourself laying of a small stove made of solid brick is the simplest and most popular option; step-by-step instructions and photos are included.
The dimensions are:
- depth - 53 centimeters;
- width – 78 centimeters.
The work goes better and faster if the master has everything he needs. Therefore, you should purchase in advance; you will need:
- grate;
- red solid brick;
- blower door;
- combustion door;
- pipe valve;
- cast iron stove on a single burner.
If the stove burns wood, it does not require fire bricks. And red must be chosen very carefully so that it is free from unevenness and cracks. You will need no more than 107 pieces. The remaining items on the list are needed in a single copy.
Preparation of masonry mixture
The recipe for preparing the masonry mixture is quite simple. For it you will need:
- water – 1 part;
- clay – 4 parts;
- sifted sand - 8 parts.
The ingredients are simply mixed together. Sand is added last. It is actually very easy to calculate the correct consistency of the finished solution - it should slide off the trowel without leaving any traces. And during laying, it will not leak out of the seams (the thickness of which should not exceed 5 millimeters).
The volume of the mortar is calculated based on the amount of bricks available. On average, one bucket of masonry mixture is enough for fifty bricks.
How to sew a blouse with your own hands?
If you don’t have a suitable straight-cut blouse in your wardrobe that serves as a shirt in Emelya’s outfit, then you can sew it yourself. For a blouse you will need cotton fabric and wide painted braid, as well as a sewing machine. It is best to choose a thin fabric so that the child does not feel hot in the shirt.
After measuring the child and writing down the necessary measurements, draw on the fabric the necessary details indicated on the pattern and sew them on a typewriter. When taking measurements of the boy, do not forget that the shirt has a wide, loose style. Therefore, feel free to add another half to the resulting centimeters in the waist and sleeves. I made my own braid from Emelya’s costume.
What materials will be needed?
- Cardboard. For DIY box crafts, various cardboard containers are used. These can be boxes of shoes, chocolates, milk, juice, corrugated cardboard packaging from household appliances, furniture, you can create crafts from matchboxes, or you can buy cardboard in craft stores. When selecting material, it is necessary to take into account the quality of cardboard. For crafts that you will use often, the cardboard should be strong and dense. Household appliance boxes are best suited for this. For children's toys, it is better to use softer, looser corrugated cardboard. It is difficult to injure the delicate skin of a child with such cardboard.
- Masking tape. Very convenient for connecting craft parts. Since masking tape has a paper base, it is easy to stick decorative elements, such as fabric, onto it, and paint also adheres well to it.
- Glue gun, Titan glue, Moment Crystal and the like, PVA glue. The glue gun glues the parts together very quickly, but if there are sagging marks left after joining the parts, it will be difficult to get rid of them. Also, a glue gun requires some skill to use. Titanium and Moment Crystal adhesives are very suitable for working with cardboard, but have a specific smell. You need to work with such adhesives in a ventilated area. It is not convenient to use PVA glue to join parts - it takes a long time to dry. But for gluing fabric or decoupage - it’s very suitable.
- Scissors, breadboard knife. Cutting cardboard with nail scissors is not convenient. For crafts, it is better to use large paper scissors or even tailor's scissors (for larger items). A breadboard knife is very convenient for cutting out cardboard, but it is not advisable to give it to small children, even under adult supervision.
- Pencils, markers, felt-tip pens, pens - for drawing cut lines or folds of parts.
- Ruler. Metal rulers are most convenient. Not only do they draw clear lines, but you can also cut the cardboard with a breadboard knife and create bending lines. Wooden or plastic rulers can be cut through with a knife and will no longer be suitable for use.
- Sponge. For applying glue, priming and painting the product, as well as for applying the structure.
- Materials for finishing the finished product. These can be various fabrics, pieces of fur, leather, buttons, hooks, etc. Beautiful serving napkins can also serve as decoration - decoupage is widely used on cardboard crafts. For painting it is better to use acrylic paints. They are odorless, diluted with water, and fit well on cardboard. Also, after drying, the acrylic paint covers the product with a thin protective film and the product can be wiped off dust with a damp cloth.
How to decorate a shirt?
Decorative ribbons with patterns and a variety of braids are usually used to decorate a kosovorotka. It can be used to cover both the bottom of the product and sleeves with a neck.
In addition, you can also make a belt for a shirt in the Russian folk style from a beautiful ribbon. Measure the required number of centimeters of tape and machine its edges. Then try it on with a shirt.
Costume made from old clothes
Here’s another idea on how you can make Emelya’s costume from scrap materials and old things. This outfit option involves the use of unnecessary pajama or cotton trousers and bright-colored long sleeves, which it wouldn’t be a shame to decorate with patches and other decor. The photo shows Emelya’s costume from a fairy tale.
So, to make Emelya's outfit, you will need clothes, pieces of bright fabric, a hat with earflaps and faux gray fur.
The first step is to start decorating with trousers and a sweater. Cut a 10 x 12 cm oval from bright fabric with the top cut off. Using a sewing machine, sew the pocket to the pants without finishing the edges. Sticking threads and not very smooth edges will give the outfit a special look. Just the kind required by the image of the lazy Emelya, lying on the stove all day long.
Cut out different patches from other fabrics and sew them in a chaotic manner to the long sleeve.
For greater similarity, you can dilute the outfit with socks or leggings sticking out from under the trousers.
Cover the earflap hat with gray fur and lightly comb it in different directions to create a frayed effect. You can also apply white fur crumbs to the fur and rub. Or cut a few tufts from a fur headdress.
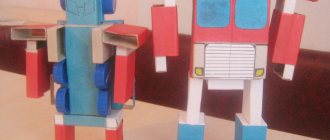
At the behest of the pike, at my will
How do dolls come into our homes? We buy in stores, at bazaars, and online. Some (well, very lucky ones) find dolls in garbage dumps.
(addresses of SUCH TRASH TRASH, please send me a private message)… The most pleasant event in the life of every doll lover is receiving a doll as a gift!
So a gift came to me - a Soviet Emelya doll!
Thank you, Irina, 33r0h0ds Emelya is wonderful! Emelya brought with him many different gifts: Christmas tree decorations, candies... very tasty! My husband ate them and praised them! I barely had time to grab myself some candy. Emelya’s gift turned out to be the biggest, Emelya was so important.
All Emels were released at the Moscow factory on March 8th.
And how different they all are! The eldest Emelya’s height is 24 cm with a cap.
There are two Emelyas 18 cm tall and two babies 15 cm tall.
They were whispering about something...
and asked to read them the fairy tale “At the Pike’s Command.” Read...
Now Emelya, so modestly, asks for a stove, saying it’s too cold to sit on the shelf!
I invited them to go down to the first floor and sit on a real stove or by the fireplace. No, they demand their own stove.
I probably need to think about how to make a stove for my Emelyas?
I can
: Hello! My name is Irina. I make custom furniture in scales 1:144, 1:12, 1:6, 1:4, 1:3 and a variety of accessories for dolls.
I can
: I am engaged in making jewelry and accessories for BJD dolls of any format!
vote
Article rating
How to make Emelya's vest?
Almost each of the options for Emelya’s costume proposed above includes a vest with fur inserts. In general, this particular detail is one of the characteristics of the hero of a Russian folk tale. You can trim the edges and collar area of a finished vest with fur, or you can sew it yourself. To make it, you will need brown or gray fairly dense fabric and short fur that looks like lamb.
First you need to measure the boy. You can use as an example one of his clothes that fits him well. For example, taking a child’s sweater, measure the circumference of the sleeve at the top, the length of the product, and also the width. Based on these data, make an approximate calculation of the fabric you will need for the vest. Remember that the vest is a loose item and should not be tight.
Lay the fabric out on a flat, flat surface. Using measurements of the boy's sweater or the child himself, draw a pattern on the fabric. Here is the simplest version of a vest, without buttons and complex designs.
After making a drawing on the fabric, cut it out and carefully sew the parts together using a sewing machine. Finish the edges of the product and try it on your child. Now it's up to the decor. Take the prepared fur and cut it into strips about 3-4 cm wide and equal to the length of the vest. Now baste by hand onto the edges of the vest, then machine stitch. The finished vest can be decorated with a flower on a pin or a small patch of colorful fabric.
Tools and materials Time: 1 hour Difficulty: 3/10
There are probably no kids who don’t like funny soft toys in the form of dolls, animals and similar animals. You can easily sew such a toy for children or young-at-heart adults yourself. And not just one, but a good dozen! Look what beauty we will sew for you!
This soft toy fish will fit into any interior of a children's room or country house. There is nothing complicated in making it, but you will be provided with an exciting activity