Imitation malachite
The use of malachite as a material for jewelry has been known for a long time. The semi-precious stone fascinates with its unique patterns with colors of all shades of green. That's why many people want to see it as the decor of their premises.
How to make a craft box that looks like malachite yourself? There are different ways to recreate the color palette of a stone:
- Painting with a roller or brush;
- Plasticine modeling;
- Tinting the dough.
A plasticine product can be a wonderful decoration. Soft during operation, and subsequently strengthened with a special varnish for hardening, it copes with this task perfectly.
A malachite box is a craft that will surprise all your loved ones and can be made together with your child. Such creativity
Compatibility with other stones
Malachite is loyal to its neighbors, with the only exception being stones of the element of Fire - diamond, pyrope, ruby and others.
Jewelry with malachite goes well with turquoise, jadeite, tiger's eye, hawk's eye, jet, and chalcedony.
The energy of the stone will not decrease from proximity to emerald, aquamarine, sapphire, moonstone, aventurine, opal, tourmaline, and labradorite.
A combination of aquamarine, emerald, moonstone, aventurine, tourmaline, sapphire, labradorite, and opal may be successful.
Neighborhood with “airy” gems will be neutral and will bring neither benefit nor harm. Air minerals: rock crystal, amethyst, golden beryl, chrysoprase, uvarovite.
Making a plasticine casket
In order for a fairy-tale object to “appear” in front of you, you need the most ordinary means:
- A set of plasticine and a knife;
- Rolling pin for rolling out parts;
- Fixing varnish with brush.
The basis for the work can be a cardboard box, an unnecessary box or a purchased blank. If you have cardboard on hand, then using the template, you can make a similar item yourself. To decorate the inside you will need velvet or satin.
The color of the stone is reproduced using different colors of plasticine. Whitish, very dark, light green, shades of dark and light green and, of course, emerald. All shades are selected according to the taste of the manufacturers.
Usually, in this case, two types of varnish are used to process the finished craft. Decoupage or glassy.
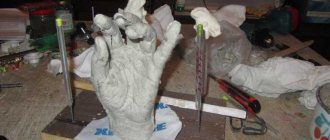
The sequence of actions is as follows:
- Plasticine is rolled out from pieces into sausages, and then sausages of different thicknesses are made from them;
- They are cut into squares. The order of the colors is not important. The pattern of malachite is always random by nature;
- Stacks are made from pieces of different colors and flattened a little;
- An even stick is useful as a rod, around which a separate stack is bent;
- Then the stick is taken out and the work is completed without it;
- The columns are rolled into even sausages;
- The common plate is laid out from “sausage” cuts;
- The taken base is covered with layers whose color resembles malachite. The box is ready.
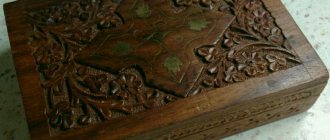
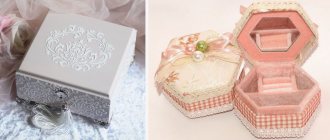
You can use the idea of P. Bazhov’s fairy tales to make your own malachite box as a craft for kindergarten. The basis can be a wooden box covered with organza with a satin lining on the inside.
“Moment” is quite suitable for pasting it. You can attach a “fairytale” lizard to the top, and decorate the sides with a golden ornament with rowan berries.
The portrait of the author of the beloved fairy tale can be secured with a stapler on the inside of the lid, framed by a frame of multi-colored stones.
Such a treasury can be replenished with various “values” over time. For example, there you can store jewelry made of natural stone, figurines of your favorite characters made by yourself, the crown of the Mistress herself, and many items that will always be interesting to look at for both children and their parents. Love for the fairy tales of the great writer comes with time, but begins from childhood.
Plasticine chamomile step by step
What could be simpler and sunnier than a chamomile flower? The simplicity lies in copying this flower. Anyone can create a flowering head with their own hands from plasticine, because everyone knows what this popular wildflower looks like. Chamomiles are collected and dried to obtain medicine, woven into wreaths and added to bouquets, and even romantic people use their tremulous petals to tell fortunes. Any representative of the fairer sex treats these romantic flowers with trepidation. And sunny chamomile can be called because its appearance and subtle aroma alone lifts your spirits and immediately makes your soul warmer. See how to make paper flowers here.
To sculpt a lush field chamomile you will need:
- cardboard circle;
- yellow, white and green plasticine;
- stack.
How to make a daisy with your own hands
Since sculpting a chamomile is planned, the chosen colors of plasticine are quite justified. It is better to make the middle not pure yellow, but mix such a piece with orange. The petals of the flower will be pure white, the leaves will be green.
Divide the prepared green plasticine into 2 parts. Make a leaf out of each one. First, the pieces should be turned into cakes. Then the cakes should be given the required shape with your fingers or cut with a stack. The outer edge should also be cut with a stack. A couple of leaves are enough to fill the composition; more will weigh down the tremulous bud.
Glue the prepared leaves on top of each other, then onto the cardboard circle. Press the plasticine on top with your fingers so that the parts stick.
Cut the white block into small portions. The more details there are, the greater the number of petals you will get. Also, the value depends on the prepared balls. Press each ball one by one with your fingers, forming triangular blanks. The outer edge of the petals can be pressed as much as possible with your fingers so that it becomes wavy. Also press down on each white piece with the back of the stack, positioning it lengthwise.
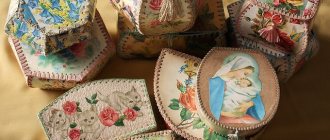
Tubular newspaper box
It is very interesting to make crafts from newspaper tubes, where boxes are no exception. The products turn out to be so beautiful, memorable and original that for many this activity has long turned into an exciting “hobby”.
Initially, the tubes are prepared, and then the most interesting process occurs - braiding using a wide variety of patterns. They can be complex - for masters, or easy and simple - for beginners.
The corresponding coloring gives the product shades. Such a product can later be modified using a beautiful case and decoration items.
Historical information about vases
The first vases were used to store bulk materials and liquids. These vessels were made exclusively from clay. For greater strength, finished products were fired in special ovens or dried in the sun.
Vases were used to decorate the tombs of rulers and rich city dwellers. In Ancient Egypt, funeral amphorae were filled with fruits, gold and precious stones. The Egyptians believed that the pharaohs would need food and familiar luxuries in the afterlife. Already in ancient times, Greek and Egyptian potters decorated their amphorae with everyday scenes, plant ornaments and images of animals. Archaeologists use such finds to recreate scenes of everyday life, military battles, and festive rituals.
Paper plus cardboard
To make your own original box from cardboard and paper, you need a little:
- Colored paper set;
- Glue with scissors;
- Cardboard (you can use a ready-made box);
- All kinds of decor.
How to craft:
- A base is cut out from the workpiece, which then needs to be glued together;
- A drawer that can be pulled out is made in a similar way from leftover cardboard. It is best to cover it with paper of the selected color;
- The upper part of the product is glued;
- For a partition, a small piece of cardboard with paper glued on top is suitable;
- The box is placed inside, and the box is decorated to your liking.
Chamomile made of plasticine.
There is nothing simpler than ordinary chamomile. However, this flower attracts with its charm, so let's try to make this plant from plasticine. There will be nothing complicated in such work, so feel free to involve the smallest sculptors in the creative process. A plasticine daisy is something that can be made with children aged 3 years and older. And such a craft will be in demand on the eve of any holiday, for example, March 8, Teacher’s Day, or the birthday of one of the family members. Let's get started with the process.
1. Immediately select three colors from the plasticine set; most likely, you yourself guessed what shades they should be: white, yellow and green.
2. Let's start creating a flower from its core. Roll the yellow ball, then press it lightly onto a hard surface.
3. Cut the white block into thin slices. In this case, it is convenient to use a special plastic tool, which is placed in plasticine sets.
4. Mash each portion in your hands and roll into a ball.
5. Roll each white ball into a long drop.
6. Rub the drops with your fingers until they form cakes. These will be the petals for the future beautiful daisy.
7. Attach the petals around the circle of the yellow center. You can either simply glue them, or use pieces of toothpicks as fasteners.
8. To make the chamomile more like a real one, use a stack. Pierce the yellow center many times, and also make longitudinal stripes along the petals.
9. To sculpt the stem, it is best to use something durable, such as a match, or a longer skewer, an empty ballpoint pen, an old felt-tip pen or a pencil. To sculpt the leaves, make two green oblong cakes.
10. Place green plasticine on the match and attach the leaves to the sides. Don't forget to draw the drawing in a stack.
Photo crafts box
Useful tips and interesting design ideas
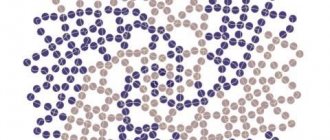
So, we got a lot of beautiful sections with colored stains. Will they really turn out to be a real malachite box made of plasticine? How to make the lining of a chest as similar as possible to real stone? Everything is quite simple: start filling the existing surface with pieces of plasticine. If you wish, you can lay out the pictures or arrange them in random order. There should be no gaps between individual elements.
A malachite box made of plasticine will look more natural if all external surfaces are covered. The finished craft must be coated with transparent varnish so that the decor is not damaged during use. A plasticine box deserves decoration inside. Cover the inside of your chest with velvet paper, fabric or foil. Don't forget to make a lock and a device to make opening easier.
Send your photos
Cardboard bookmark “Japanese”
Reading is always beneficial! Those who like to read before bed know very well that without a bookmark in this...
DIY photo album
The master class was prepared by Emelina Oksana from Syzran, Samara region, with her little assistant...
Romantic photo frame (decoupage)
DIY photo frame design From a white square photo frame you can make a unique, romantic…
Pencil “Bunny” (crochet)
Crochet pencil “Bunny” School season is just around the corner! Preparations are in full swing and in the bustle of...
Vase with flowers for Barbie doll's birthday
Master class for the competition “Premonition of Spring”. Vase with flowers for the birthday of Barbie doll Ilyin...
Painting “Spring flowers”, ribbon embroidery
Master class by Lyudmila Nazarova on ribbon embroidery of pictures with spring flowers. For satin embroidery...
How to sew napkins in a red corner
Another work by Elena Ermasheva is a master class on how to sew napkins in a red corner. For registration…
Box for needlework (decoupage)
There is no doubt that every needlewoman has several storage facilities for her materials and various little things...
“Gift for Grandma” (decoupage of a flower pot)
Another work for our competition is decoupage of a flower pot. “My name is Gracheva Ksenia. I am 10 years old….
Mini garden in a pot
Mini-garden in a flower pot It’s still winter, but do you want greenery, clean paths and dry benches? ...
Photo frame “Heart” with nylon dolls
How to update a chair
There is often a situation when old chairs absolutely do not fit into the new interior of the room,…
Tags: Crafts for home, DIY box
Tools and materials
The malachite pattern consists of arcs, loops, waves and streaks of various shades of green. It is easy to depict these color tints with watercolors, but plasticine will give a greater resemblance to a valuable stone.
Tools needed for work:
Materials for creating a box:
Sometimes the resulting product is additionally decorated using beads, beads, buttons, and braid. This is a matter of an individual approach, the main thing is to make a high-quality base, and whether it will need decorative additions is secondary.