It is not good to throw away something that can be reused .
This is especially true for environmentally harmful materials such as tire rubber.
Used tires are a valuable material for craftsmen.
At home, in the country and in the yard you can build many interesting crafts from old tires.
The skillful hands of the craftsmen transform them into proud swans, a fence around the site, decorative wells, and comfortable benches.
How to make furniture from tires with your own hands - further in our article.
Homemade jewelry box
It is made of the same material. Here's what it took to create this necessary thing:
- 3 disks;
- textile;
- padding polyester;
- needle with thread;
- scissors.
Take a sheet of paper and a compass. Draw 2 circles. The inner one will be equal to the diameter of the disk with a small margin - 12 cm, and the outer one - 20 cm. At the same time, the height of the box is 8 cm, you can change this value at your discretion. Divide both circles into 16 identical sectors. To make your task easier, first divide in half, then into 4 parts, then into 8 and 16. Transfer the pattern to the fabric or immediately draw on it. You need to make 2 such blanks from canvas. Now sew along the markings, making 16 stitches from the outer to the inner edge. Place padding polyester in the resulting pockets. Sew up the top of the disc box.
If you want to make handles, then weave a braid from three strips of fabric.
To make a lid for a box with your own hands, fold two pieces of fabric in a pile, place on a disk, outline with chalk, cut out with a seam allowance of 7 mm on all sides. Cover the disc on top and bottom with these fabrics. If you want the lid to be soft, then cut out two circles of padding polyester and cover the disk first with them and then with fabrics. Sew along the edges with a blind stitch.
Here's how to make a box.
DIY wheel table
Table top for a computer desk: materials for manufacturing + assembly
For those who are not looking for easy solutions, but at the same time strive to make the furnishings in their home full of style and individuality, we offer an extraordinary solution - a table made from a wheel from an airplane from the Second World War.
To make a table, you will need a piece of an exhaust or other pipe, and the working part of an office chair will be used as the base: the table will have quite a lot of weight, and in this simple way you can give it the desired mobility.
Step #1: Wheel!
You will need the actual airplane wheel. Of course, not everyone has such a wheel lying around in their garage, and you can’t buy it at a car wrecker, but on the Internet, at auctions, it’s quite possible to buy it. And if the wheel has minor damage or defects, the price will be quite attractive.
Before connecting all parts of the structure together, you need to install the tire and inflate it. The pressure in the chamber must be sufficient for bottles of beer and plates of snacks to stand on the glass “tabletop” without problems or distortions.
Once the wheel is assembled and awaiting your further actions, select a piece of corrugated plastic of the appropriate size and shape that will cover the lower part of the wheel structure.
When choosing a chair, pay attention to its strength and endurance; the weight of the table will be quite large
The vertical base for the table was a piece of exhaust pipe. The pipe can be painted silver, black or any other. If its diameter is larger than the diameter of the chair base, then secure the parts using suitable glue. To prevent any excess from getting inside the base of the chair, cover all excess holes with adhesive tape.
To thoroughly secure the wheel to the pipe, it is necessary to make eight wooden wedges. Choose strong wood, such as oak, so that during use they do not crack and reduce all the work to zero.
You may have other ideas for how to secure the wheel to the base.
Step No. 7: Cover up the excess
The junction of the base and the wheel must be protected from prying eyes using light plastic. You can secure it with hot glue.
To prevent the wheel from scratching the glass surface, place and secure transparent silicone bumpers at the eight points of the wheel around the circumference.
Coffee table made from a car tire
After the next seasonal re-shoeing of the car, there were 4 ownerless tires left, which were not advisable to use next season and had to be disposed of. The idea came to mind to utilize one of them for the greatest benefit.
An original coffee table that will be distinguished by its originality
The main advantage is that if you trip over it in the dark, it won't hurt as much.
First of all, you need to choose the most intact wheel (with the least number of cuts and other deformations), which will still stand in plain sight.
We thoroughly wash the wheel with detergents and a brush, removing dust and dirt, as well as glass and stones that have stuck into the rubber. As a result, the tire should acquire a uniform matte black color.
In order for the coffee table to stand steadily on any surface, I decided to install three legs (instead of four).
To do this, we mark the tire into three equal parts.
But simply screwing the legs to the tire is not enough, since it is still rubber and in the heat it will wrinkle and deform over time. In addition, the legs will wobble and the coffee table will look like jelly. Therefore, the tire needs to be modified and given rigidity by installing stiffeners.
First, we drill holes in the designated places d=10mm. But I want to note that drilling holes is not so easy, since the tire contains a cord of thread and wire.
Insert M10 studs into the holes and secure with nuts on both sides. Then we drill holes with a crown for the legs.
But rigidity and studs are not enough. It will be necessary to make tire inserts from thick plywood (16mm). To do this, cut out a template from cardboard that will follow the internal contours of the tire (except for the bottom).
Email We cut out 9 fragments with a jigsaw and glue 3 pieces together. together, additionally secured with screws.
An insert will be inserted into the bottom of the tire, which also serves as a platform for the stability of the leg.
Use a plane to give the board a rounded shape.
Groove for a hairpin, 10 mm wide. We do it using a circular saw.
We are preparing legs for a coffee table, which can be made from a shovel handle. The best option is if you can find a lathe and make the legs conical.
First, screw the legs to the bottom platform and insert the legs into the holes from the inside. Then we install the stiffeners.
From the outside, we screw the tire to the lower platform on four sides with screws. I recommend using longer screws so that they additionally fit into the stiffening ribs.
At the bottom we cut out a circle of plywood 5-6mm thick. To prevent the bottom from falling through, we put large washers on the studs.
For the coffee table lid we use 16mm. plywood Carefully process the surface using a fine-grain sander. Then we open it with stain.
Painting the table
Apply several layers of furniture varnish. After the first application of varnish, the pile may rise. Therefore, it is necessary to let the tabletop dry and re-treat it with a sander.
Inside this coffee table there is a lot of space for storing board games, magazines, books, etc.
By the way, such coffee tables can be used not only in the home but also in car services, car washes, clubs and other automotive-related establishments. I think visitors will enjoy this kind of themed design.
DIY crafts from old car wheels with manufacturing instructions and photo examples
Variability of table-book sizes depending on the model
An original recreation area can be made with the participation of the male half of your family and several metal disks.
Crafts from wheels for the garden
The entire work process takes no more than 5-6 hours.
Difficulty may arise at the stage of searching for bricks for finishing.
This homemade fire pit can be used to cook your favorite dishes outdoors.
DIY crafts from CDs for the home
Now let’s look at the process of making a coffee table from a car wheel, which can decorate any modern living room.
| Illustration | Description of action |
| We cut the disks into two parts. For this we use a grinder. | |
| To make it, you will need to make a “rustle” in the garage: find a brake disc, hubs, pipe, washer and bolts. | |
| We connect the hub to the brake disc. | |
| We insert the metal pipe into the brake disc and secure it. Next, we turn the structure over. | |
| We attach the car disk to the hub. Next, we attach the glass to the holders. |
We talked about some options, a small part of all the ideas that can be realized with the help of seemingly junk things. To implement ideas for making an interesting and unique product, you don’t need much, just find the time and the material that is needed.
What kind of furniture can be made from tires?
Due to their versatility, tires are great for implementing various ideas, as well as for creating practical interior items. This solution will be an ideal option for decorating a summer cottage or a country house.
It will allow you to turn your vacation spot into a comfortable area where you can spend time with family or friends. Rubber itself is a fairly durable material, but at the same time it has a high level of elasticity. And this makes it easy for workflows:
The following furniture can be made from rubber:
Important! Many people recommend using old tires. This is because they have had much more time to undergo the oxidation process and get rid of the dangerous chemicals. Fresh air will help get rid of the specific rubber smell.
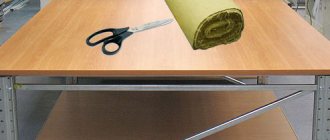
Stylish garden table made from car tires
Tire tables have already become popular among the population. They will become an original piece of interior decoration for the room, as well as comfortable furniture in the country.
The main materials are:
First, the tires need to be washed and dried. Then cut a circle from a plywood sheet using a jigsaw that will match the diameter of the tire. Secure to the rubber surface using glue or nails.
The tires are connected to each other using construction adhesive, which is given time so that it can dry completely. You need to lubricate the rope with the same glue and completely cover the entire surface of the rubber in a circle. Plywood can be painted in any color or patterned.
Tables, ashtrays and clocks
Engine block table. how to make a table from an engine
Anton assembled his first table from a motor together with a friend in the garage in mid-2014 - for himself, purely for fun. The table still stands at his home. “I didn’t know how to drill or use a grinder,” recalls the young man. “But the idea seemed very interesting to me, and I decided to try it.” We picked up tools from our fathers and came to the garage every day after school.” He spotted the idea in the Top Gear studio - the hosts of a popular British TV show dedicated to cars were sitting at a table made of an engine.
In May 2014, the first table was ready. The friend soon lost interest in the idea, and Anton decided to try to benefit from his new hobby and continued making furniture. As a result, in September of the same year the first table was sold. The buyer turned out to be a Finn who saw Anton’s ad on the Internet and was not too lazy to come from Finland for the table.
Popular business training helped to get production flowing. “There I believed that everything was possible, became more sociable and realized that success depends on the number of attempts made - it sounds pretentious, but it means a lot to me,” says the young man. During his training, he sold two more tables with a motor instead of legs. Tables still bring the main income to Anton’s company - up to 70% of the profit. The second most popular product is ashtrays made from gearboxes, the third is wall clocks made from brake discs.
Now the production of a table with assembly takes Anton 5-6 hours, but it happens that one table takes 150 hours. But the profitability of such a business, according to Anton, is more than 60%.
Most often, furniture is made upon request, with an eye on a specific buyer. “A girl calls: she wants a gift for her husband - a table from a Nissan GT-R. There are no more than 100 such machines in Russia. This means that you will have to look for a motor or order it from abroad,” says Anton.
The most expensive order in the company's history to date is a table made from an entire Porsche engine (EngineTable usually makes furniture not from a whole mechanism, but from several cylinders).
“The total weight of the table was about 170 kg, the minimum budget was 300 thousand rubles,” says the master entrepreneur. It took the longest time – 2 months – to make a sofa from a Mercedes-Benz W201.
Anton creates his collections, inspired by the creations of Romanian and English furniture makers, who also experiment with car parts. He monitors their work via the Internet. The EngineTable workshop is located in the Piterland shopping center.
Non-standard is coming
The company's turnover in the first year of operation was about 2 million rubles; in 2 years, according to the plan, it can reach 40 million per year. Since March 2016, Anton began collaborating with one of the St. Petersburg Porshe showrooms. “There is a workshop at the salon. They give me engines that fall into disrepair, gearboxes and other spare parts. I tell you what design objects I can make from them, I make them and sell them to the salon,” says Anton. Then the salon independently sells furniture to clients. By the way, representatives of the salon contacted Anton through Instagram.
“The most difficult thing in this business is finding material,” admits Anton. “Sometimes we receive very unusual orders, for example, furniture made from an aircraft engine.” To find and buy an engine from a workshop, Anton always takes an advance payment of 70% from clients.
Anton has no competitors in St. Petersburg; the closest ones are in Moscow: the RollingStol project has also been developed by novice businessmen since 2015.
The volume of the furniture market in St. Petersburg is estimated at approximately 30 billion rubles per year. “There are few manufacturers of custom furniture in the city; usually these are piece production or design studios,” says Alexander Kanygin, designer and architect, owner of a design studio. “We can’t say that it is very popular among St. Petersburg residents, but the crisis has not affected the market in any way: people continue to buy such furniture, most often for the home.”
What can you make from old disks with your own hands?
Throwing away unique decorative material is extremely inappropriate. Using unwanted CDs, you can do whatever your imagination allows. Such crafts are suitable for home decoration. They will be appropriate for ordinary holidays and themed celebrations. In addition, there are many ideas for making unusual household items from CDs. Check them out, add your creativity and implement original ideas with your own hands to make life brighter!
Lamp
If your old chandelier has become unusable, or you simply realized that it is too outdated and therefore spoils the interior, replace it with an unusual lamp made from old disks. To make it at home, you don’t need anything special, just a set of simple materials and a little perseverance. Write down step-by-step instructions so you don't forget:
- We prepare 12 CD/DVDs, 30 metal staples or paper clips, a drill of minimum diameter (2 mm) and a socket with a lamp.
- Using a protractor, we divide one disk, which will later be used as a stencil, into 5 segments. The angle between the lines separating the segments is 72°.
- Drill 5 holes at a distance of 3-4 mm from the edge.
- We put the stencil in the box with the other 11 disks and drill them at the same time, along the intended holes. To prevent them from moving relative to each other, we insert solid rods into the finished holes. They will act as guides. Pieces of ballpoint pen paste are suitable for these purposes.
- We install a cartridge in one of the disks. There is no need to adjust the hole; it already fits perfectly.
- The main part of the lamp is ready. Using paper clips/brackets we attach the remaining disks to it.
- Before installing the latter, screw a lamp with a power of up to 25 watts into the socket.
Dress
Some people will be taken aback by imagining a dress made from CDs, but this is quite real. Computer disks, which are perceived by the modern generation as useless waste material, are suitable for creating an extravagant outfit. Decorating a dress with fragments of CDs is not at all complicated. With a minimum of effort, you will become the happy owner of an original outfit.
Making a mirror pattern on a dress from CDs:
- Using large tailor's scissors, cut the discs into small triangular pieces.
- Polish the rough edges with fine sandpaper. Apply clear nail polish to them.
- We attach a pin to each fragment on one side using construction glue.
- We attach decorative elements to the dress.
Disco ball
There is nothing easier than making a disco ball with your own hands. To do this, you will need a large round balloon, a couple of unnecessary newspapers, water, paste and a couple dozen CDs. Stock up on everything you need, free up 3-4 hours for needlework and get started. Step-by-step instructions for making a disco ball are given below:
- Inflate the balloon to its maximum size. Place newspaper soaked in water on the rubber surface. The pieces should be small so that there are no unevenness.
- When the paper dries a little, apply a second layer of newspaper soaked in paste on it. Repeat this procedure several times to ensure a strong shell.
- Leave the ball in a warm place until completely dry. After an hour it will become hard.
- Punch the ball with a needle and pull a strong thread or fishing line through it. This is necessary in order to subsequently hang the finished product from the ceiling.
- Having finished preparing the frame, we move on to the main part. Cut several CDs into square pieces measuring 1x1 cm. Treat the edges of the fragments with clear varnish so that the magnetic surface does not peel off.
- Cover the ball with mirror pieces in a circle, making sure that the puncture point, from which the pre-inserted fishing line peeks out, is on top. The lower part of the sphere must be pasted over especially carefully. For the upper half, which will be under the ceiling, you can use irregularly shaped pieces, where they will not be visible to the eye.
Wooden tables
The classic version of a serving table is wooden. It is not fragile, but at the same time it is not as heavy as, for example, glass.
Most often it is made in golden or chocolate shades using noble fittings.
The only drawback of such a table is the need for regular maintenance, since wood is many times more capricious than, for example, glass.
When choosing a serving table for your home, it is important to take your time and evaluate as many different options as possible so that in the end the choice will please you for many years
Discs and useful things for the home
Under no circumstances should you throw away something as good as CDs. They can be useful for creating very interesting things. For example, they can be used as a hot stand. Here the disc will play the role of a base, on top of which a cover made of bright fabric is put on. This product is sewn very quickly, and the benefits of it are difficult to underestimate.
Hot pads play a big role, as they save the table from exposure to excess heat. If they were not previously used by the owner of the house, the surface of the piece of furniture where hot dishes are placed could be seriously damaged. However, this is no reason to despair, much less throw away the table. You can simply cover it with a tablecloth, but this is far from the most interesting solution.
Table decoration made from disks
It would be much more original to make a table decoration from disks. To do this we need glue, a large old disc, clear varnish, scissors and plasticine.
Crafts from disks
First of all, we cut the material for the mosaic. We do this according to the standard pattern, that is, in the form of squares, rhombuses and triangles. Then we lay it all out very carefully on the table surface and glue it.
Decorating a door with discs
Next, along the edges of the table we make sides from plasticine or any other suitable material. Fill the table with transparent varnish so that its surface is smooth. Before performing such a task, you must first check the level of the table.
Stand for pens made of discs
It is important that the varnish completely covers all the discs and covers them with a thin layer. Otherwise, the surface will be uneven, and for such a piece of furniture this is a huge minus
After the varnish has completely dried, the sides must be carefully removed. This way you can decorate your table with CD discs not only in the form of a mosaic, but also in whole circles. It looks very interesting if the discs are laid out in an original way.
Disk candlestick
Disc bracelet
For example, a fashionista can create a very convenient earring holder from such material. To do this, we need a pair of disks and a smoothly processed rod, which can be made, for example, from an ordinary but carefully processed tree branch, which can be found in any park
It is important that the thickness of the rod matches the diameter of the hole in the middle of the disk
Casket of disks
One of the CDs will be the base, that is, the lower part, and the second will be the holder itself. On the second disk we make small holes at a distance of a centimeter from each other. Then we put this circle on the top of the rod, and attach the second disk to the bottom of the stick. It can be varnished if desired.
Decorating a bag with discs
The rod must be taken of such length that it fits even the longest earrings. Once the jewelry holder is ready, you can safely hang the earrings on it, threading them into the pre-prepared holes.
Photo frame made from discs
Tire coffee table
Garden furniture can be created not only from cut down stumps or ready-made wooden pallets, but also from available scrap materials.
So every motorist (or people who live near a tire service station) always has a couple or three unnecessary old tires in the barn.
This is a fertile material for garden creativity: you can use them to make flower beds, garden decorations, fences and coffee tables.
Using a jigsaw, cut two circles from plywood that match the diameter of the side circle of your wheel. Using a drill, drill holes on four sides and use a screwdriver to attach the plywood circles to the sides of the tire with screws.
Glue the end of the hemp twine into the center of the plywood circle, and gradually, winding it in a spiral, glue it. When you glue the horizontal part, then move on to the vertical one and decorate it in the same way. When the vertical part is completely pasted over, the excess twine can be trimmed and its end carefully glued.
Main author and ideological inspirer. Loves family comfort, flora and fauna. He is interested in needlework, knitting, and decorating. There are always a lot of interesting ideas in my head, which I talk about on the pages of this blog.
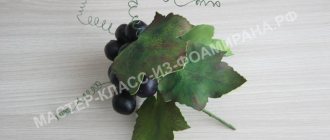
Floristry salon Mona offers you hundreds of ready-made flower bouquets, compositions and baskets of flowers, desserts and flower toys, spring and summer flowers, wedding floristry and celebration decoration, free flower delivery, more than 10 payment methods (online, non-cash and cash) , sales and seasonal promotions. We will decorate any of your events or holidays according to your wishes!
Source
Making a barbecue from disks yourself
In order to make your own grill from car disks, you need to think in advance about the design of the future product. Decide on the amount of consumables and prepare the tools. To perform high-quality work, you must have the skills to use a grinder for cutting metal, as well as a welding machine.
Preparation of materials and necessary tools
In order to make a barbecue from rims with your own hands, you will need the following materials and tools:
- old car wheels;
- Bulgarian;
- nozzle for cutting metal;
- disc for removing rust in the form of an iron brush;
- file;
- drill;
- hammer;
- bolts;
- profiled pipes or steel rod;
- grill grate.
A grinder and a welding machine are the main tools when working with metal.
All these tools will be needed to process and connect the parts of the grill. It is convenient to make legs from profiled pipes and rods. In total you will need 3-4 of them.
It is advisable to clean old wheels from rust in advance.
You need to prepare the wheels themselves in advance. If there are traces of rust and paint, clean the surface with a metal brush using a grinder or drill. All excess is cut off.
Simple option
Several options for manufacturing such grill structures should be considered. You need to start with the simplest thing - a single barbecue made from a wheel disk on legs. In order to do it, you will initially need to carry out a number of manipulations with the disk itself:
- On one side, the inner part is cut out - the partition. A container similar to a cauldron is formed.
- If there are too many holes in the bottom or they are large enough for coals to spill through them, you need to weld an additional plate. You should not completely close the gaps, since the coals must be blown out to maintain heat.
- Legs are welded on the sides to the bottom or closer to the top. Usually they are made 40-45 cm in length. This height of the barbecue is optimal, as it ensures the stability of the structure and ease of use.
Metal legs are welded to the back of the discs
Next, if necessary, you need to clean the cuts so that there are no sharp edges left. You can additionally install a grille. It is not necessary to weld it; it is more profitable to use removable parts. Also, for the convenience of maintaining heat and cleaning out ashes, you can make a window for firewood on the side of the disk. For transfer, the structure is equipped with handles, welding them symmetrically on the sides of the wheel.
The top is cut to accommodate the installation of a barbecue grill
Barbecue option without legs
Smoking chamber
It is more profitable to make a brazier from car rims that can be used in different directions. For lovers of homemade balyk and sausages, a smokehouse will be an indispensable device. In order to turn old wheels into such a useful thing, you need to use at least two units of material.
The principle of operation is that you need to connect two disks into a solid hollow structure. The top can be adapted for frying kebabs according to the principle of the previous model, but to preserve the smoke you need to take care of the arrangement of the lid and smoke exhaust system. You can leave the partition with holes, which will simplify the task, and use the product as a hob.
Structural and functional features of the grill-steam locomotive, cost of the product, selection of materials for self-production, construction installation technology.
In order to combine two disks, it is necessary to cut off the partitions. Next, the wheels are joined and welded with a continuous seam to each other. The legs are welded to the bottom of the lower element. A door is equipped to provide access inside. To make it, you need to go through the grinder approximately in the middle of the product and cut out a rectangle.
Horizontal welding seam runs through the center of the door
To secure the door, one nut at a time is welded to it, symmetrically with respect to the welding seam. One bolt is also attached to the barbecue by welding so that the door nuts can be put on them.
The sash is secured with welding bolts
Such homemade barbecues allow you to create all the conditions for relaxing with barbecue with minimal costs for equipment. In addition, there is no need to apply any extra effort, because all stages of the work are extremely clear and easy to implement.
Tables
There are several options for creating tables from tires. Let's look at each of them in detail.
On two stacks of wheels
Washed, dried, degreased rubber wheels without discs are first painted with acrylic, bitumen, enamel paints.
The most suitable coloring mixture for treating tires is rubber paint . It can withstand hundreds of cycles of sudden temperature changes, as well as precipitation, without cracking or deforming.
The tires are stacked one on top of the other in the place where the table needs to stand. It is necessary to install two stacks of tires 4 pieces each , preferably of different colors, at a distance of about half a meter between the outer walls.
A rectangular sheet of strong material, which is at hand, is placed flat on top of two stacks of multi-colored tires:
- flat plywood;
- plastic;
- Fiberboard;
- chipboard;
- thick safety glass;
- metal sheet.
The tabletop is fixed to the top rail of each stack with four screws diagonally at the contact points.
The edges of the sheet should protrude beyond the outer diameter of the tires by at least 10 centimeters.
The table cover can also be painted in any color pleasing to the eye.
To prevent the wheels from moving, there are two ways to fix them:
- pour earth or sand inside each stack of tires ;
- Lubricate each joint between the tires - hot bitumen mastic 1 cm thick, which will allow the tires to reliably stick to each other after drying.
Depending on the design, such a table will be perfect for a country house, a playground, or a garage.
Magazine
This type of product is made from one tire, but in larger sizes . Using the same principle, you can make stools and chairs.
Of course, it will not work as a full-fledged dining table, but it can serve perfectly as a coffee table.
Let's get started:
- Wash and dry the tire of the required size .
- Find four legs from an old chair or make them yourself.
- Screw the legs to the tire with screws.
- Place a circle on top to cover the disk seat.
- Decorate - completely wrap the tire on all sides with yarn or create a pattern on the tabletop.
Such a decorative table with legs will serve as an effective stand for a beautiful vase, magazines, or pocket items.
Wicker
The next method will require a little more effort and creative skills.
Procedure:
- Cut a truck tire along the tread into two equal halves . One half will serve as a countertop.
- Cut the outer beads from five smaller diameter passenger tires to create five rubber rings .
- Using screws, screw four rings from below on four sides vertically to the table top. Using the fifth ring, connect together the vertical rings on the floor surface. This will be the reference plane of the table.
- Use the remaining rubber strips to tightly weave the mounting hole for the disk in the tabletop.
At such a table it is perfect to play board games in the evening at the dacha or read newspapers.
DIY tire table
Any person who has a car has more than once encountered the need to change the tires on their car. As a rule, drivers need to recycle old wheels, but instead of throwing them away, they can do something unusual and useful in everyday life.
The product that is offered below will not suit every interior, but for some rooms it will be just right. In this issue we will look at how to make a small table from old tires. We will do it ourselves, using plywood, screws and several tools.
Let's take simple old tires that have remained unclaimed. It is desirable that the tire has a good appearance. We thoroughly clean and wash it, bringing it to its original state with a matte black color. After this we divide into three sectors.
At the marks that we see in the diagram, we make holes of 10 millimeters. The pins will subsequently be inserted into them, they will create rigidity of the table structure.
Holes must be made in the side part. We insert pins into these holes and secure them. We take the crown and make three more holes of a larger diameter where the legs will be located.
DIY electronics in a Chinese store.
The studs alone are not enough for the normal rigidity of the table. Therefore, we take plywood 16 millimeters thick and create blanks from it that repeat the pattern of the inside of the wheel, excluding the lower half. They will remain even. We make a pattern from cardboard and draw all the contours on plywood. You will need 9 elements on each side, three.
It is convenient to cut out the parts with a jigsaw. You can use another suitable tool. Three pieces are connected using glue. It is also advisable to use self-tapping screws for rigid connections.
You will need to install an insert at the bottom of the tire. It will be the platform on which the legs will be installed. On the board, using a cardboard template, we form a rounding. Use a plane to grind the workpiece to the desired look. Next, we take the blanks and use a saw to create grooves for the studs in all three. We process and varnish the future table.
Now you need to prepare the legs. A shovel handle is suitable for this. In the middle of the blanks from the cuttings we make holes for self-tapping screws. If desired, you can give it a carved or conical shape.
Next, we attach the legs to the bottom of the platform, threading them through the hole. We install stiffening ribs. We attach the outer part of the tire to the platform. It is advisable to use long screws so that they can pass through the grille. Stiffening ribs made of plywood sheet 6 mm thick. We make a circle for the bottom part.
We attach iron inserts or large diameter washers to the studs; they will hold this piece. For the coffee table cover we use 16 mm thick plywood. We make a circle, process it by grinding and varnish. If lint appears, after the varnish has dried, treat the surface with fine sandpaper. After this, finally one more coat of varnish.
On the opposite side of the tabletop we will attach stops for center alignment. The photo below shows the final result of the work.
An unusual designer table in which you can put various small things, magazines, etc. a table made of tires is another option.
Making a table from a tire (tire) with your own hands - master class step by step!
Welcome to Art Empire!
Elena Crassula — [email protected]
- Get inspired to get creative!
- THE NEW BEST IN THE HANDMADE WORLD!
- Floral decorations from Budantseva Marina
- Author's dolls from Nina Tatyanchenko
- Designer jewelry from TaSinel
- Iron Man from Andrey Nikolaev
- Wooden products for the home from Lafchonka
- PORTFOLIO OF MASTERS
- Author's dolls and furniture by Leonid Amelekhin
- Scrap metal products from Andrey Nikolaev
- Recycling Art from Dmitry Mitrofanov
- Do you need a decorative plaster specialist?
- WITH YOUR OWN HANDS!
- Night light Paper house
- DIY tire table MK
- Bouquet of ribbons and bows
- How to decorate an old alarm clock
- Angel wings made of paper on the wall
- Rustic decor from glass and MK branches
- Sweater lampshade
- Dior style bag
- Pillow made from an old sweater
- Rope bracelet
- Tutu skirt for girls without sewing
- Beautiful DIY top
- T-shirt bag without sewing
- Bouquet of burlap flowers master class
- Plate made of polymer clay mk
- How to draw a spruce on canvas
- DIY boho bracelets
- Fur cape for girls
- Flower brooch made of tulle and satin
- Dress for a girl from an old sweater
- Necklace with fabric flowers
- Bracelet made of denim fabric MK
- 25 hairstyles for long hair step by step
- Tutu skirt for girls
- 77 gift wrapping ideas
- DIY tapestry master class
- 45 ideas on what to make a home bar from
- 70 rustic wedding decor ideas
- DIY concrete candlestick
- DIY cake stand
- Rope lamp
- 30 home ideas made from old jeans
- How to make a lampshade from threads
- Cardboard children's house
- 55 ideas for country furniture made from pallets
- Abstract painting
- Sew a rug for a nursery
- 62 ideas on what to make a candlestick from
- Dressing table for girls
- 39 furniture ideas from an old suitcase
- ART CREATIVE OF THE WORLD!
Paper sculpture by Junior Jacquet…
Recycling Art Paintings from trash by Zach Freeman…
3D Street Art Andre Gonzaga…
Flying houses - art design by Laurent Chehere...
- String art portraits from Kumi Yamashita
- Scrap metal sculptures from Miina Äkkijyrkkä
- CD sculptures by Sean Avery
Source: https://xn—-7sbqlbwvefo4m.xn--p1ai/idei/article_post/delayem-stol-iz-shiny-avtopokryshki-svoimi-rukami-master-klass-poshagovo/
Advantages of wooden furniture
Wooden furniture is primarily valued as products made from natural materials. Plus, when properly processed, wood is practical and durable, and its processing is not difficult if you study the rules for creating wooden furniture. Products made from natural wood will make the entire room presentable with their mere presence. And there are usually no problems with finding wood - a homemade table can be easily created even from pallets or old bars.
Tables are made from various building materials, but wood comes first in popularity. Furniture made from natural wood is expensive, although there is nothing complicated in creating some designs. The thing is that this is a noble material that has a lot of advantages:
- Environmentally friendly.
- Ease of processing.
- Attractive appearance.
- Natural drawing.
- Possibility of decorating products.
Wood colors after impregnation treatmentSource kakpostroit.su
From specially purchased boards, pallets or small bars you can create a dining or computer table that will last for many years and decorate any room or garden area.
What can be made from old wheel rims?
DIY barbecue made from wheel rims
The simplest idea for using an old disk is to make a grill or barbecue. Light a fire in the disk and hang a cauldron over it to cook pilaf. It is better to use forged or steel wheels; they are not afraid of high temperatures.
You can place a barbecue made from wheel disks on the ground and use from one to four disks; you can install it on legs, using ingenuity and invention.
Oven made of wheel rims for heating
If you install several disks one on top of the other, cut a hole in the central disk, you can get a heating oven and you won’t be afraid of the cold in the garage. What to make from wheel rims? You can make very simple things, or you can make very original things.
What can you make from old car discs?
Disc hose holder
When using watering hoses in a summer cottage, they often just lie on the ground. You can make a hose holder from an old disk, attach the disk to the wall and wind the hose. It will always be in one place and will last longer.
Tables made from waste wheel rims
You can make a lot of different tables from old disks. Cast or forged wheels with a beautiful internal pattern are used. Tables are made either on one support from folded disks or on two supports. In this case, it is better to make the tabletop from glass; it can be round or square, so the table will look creative. If you stick cleaned parts (bearings, nuts) onto the inside of the tabletop, then such a table will invariably cause a lot of delight among your friends.
Lamp or chandelier
And if you mount the disk on a wall or ceiling and use diffused light sources, you will get a lamp and a chandelier.
Original chairs
Having made armchairs and chairs from disks, together with a lamp and a chandelier, you can equip a room in the country or even use it to decorate a bar or cafe in a car style. To make armchairs or stools you will need a soft seat; it can be purchased separately. Armchairs and chairs are made both stationary and mobile. To do this, wheels or rollers are attached to the bottom.
Panel from old disks
You can hang panels of disks on the walls. To decorate the panel, you can use old spare parts or all kinds of dried flowers and herbs, as well as paper and fabric.
Shelf holders
By cutting the disk in half, or cutting off a third part, you can use these parts as shelf holders. Hang these shelves in your garage and you can put a lot of things you need on them. And if you try, you will get a whole rack.
A simple workbench made from car rims
If you don’t know how or don’t want to work with a cutter and fasteners, then simply place several disks horizontally on top of each other, fasten a wooden tabletop on them and the workbench is ready.
If you are not afraid of difficult work, then you can take on making a sink from a disk. You need to weld all the holes, clean and polish the inside of the disk, insert the finished sink into the cabinet and install the siphon. It's a lot of work, but the result is worth it. What can you make from car wheels with your own hands?
Umbrella holder
By placing the disk vertically and making holes in the end part, you can use it as an umbrella holder.
Clock made from old wheel rims
What can you make from car rims with your own hands? Fix the clock mechanism and hands inside the disk, draw numbers on the top and your watch will look unusual.
Country chairs made from old tires
There are several options for creating a product. Let's focus on the most popular, spectacular and uncomplicated.
- Cut off the beads of one of the tires. Cut the resulting ring on one side.
- Cut off one third of the second tire along with the bead.
- Paint two whole tires, one piece with the beads cut off to form a cut ring, and a second piece representing one third of the beaded tire.
- To make one chair from bald tires, you need to stack two whole tires on top of each other.
- To fix the joints between them, it is necessary to coat them with hot bitumen mastic . Glue or sew a plastic lattice onto the top tire with a strong thread.
- Screw or bolt vertically one third of the tire with the bead at the bottom to the top tire .
- screw the middle with the cut off beads to the top of the vertical one-third of the tire with the Bend this part into the shape of the back and handrails of the chair.
- Secure the lower ends or bolts to the upper lying tire.
It turned out to be a very comfortable chair made from tires for a summer house, a private farmstead, or a recreation center.
It is best to build several of these chairs for all family members.
Another chair option:
- You will need one whole tire, and from the second tire you need to cut a sector the size of one third .
- Wash both parts, dry them, and paint them with black rubber paint.
- Find legs from an old chair or from a Soviet TV. Screw the legs to the bottom of the whole tire with screws.
- Saw off two or three wooden blocks measuring about 5x5 cm, 40 cm long. Sand and paint with black rubber paint.
- the hole for the disc in the whole tire with a plywood circle covered with leatherette. This will be the seat of the chair.
- The inner cavity and ends of the second tire with the cut out sector are also covered with plywood and covered with leatherette . This will be the back of the chair.
- Assemble the structure: screw two or three bars to the tread surface of the whole tire with screws.
- The backrest is also screwed higher to the bars.
The result is a cozy chair with a minimalist and laconic design.
It can be as in the photo or slightly modernized depending on the materials that are at hand.
Why not an impressive leather chair from a designer furniture showroom!
It’s not a shame to furnish not only a country courtyard, but also the creative interior of an apartment or house.
In Europe, such furniture in residential premises has long been not uncommon, because the environmental trend is gaining popularity every year.