A simple homemade washing machine from scrap materials, detailed photos and a description of how to make a homemade product.
Good day! I would like to show you instructions for making a simple washing machine. Its production will cost almost free.
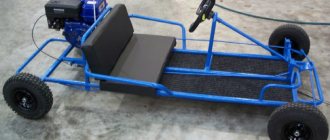
The washing machine can be operated manually, and if necessary, you can use a drill. Everything is assembled very simply on the basis of a gearbox from an angle grinder, which increases the speed and makes the position of the handle convenient. If this homemade product interests you, I suggest you study it in more detail!
When do you need something like this?
To some, the phrase “homemade washing machine” will seem absurd, but in reality such a solution can be very useful. For example, this is a great thing for a summer house. It’s hardly worth buying a new car, knowing that for most of the year it will just sit in an empty house.
Another situation is that the automatic washing machine has broken down and is taken to the workshop. The breakdown is serious, repairs are delayed, hand washing is not an option - you can spend a few hours and assemble a simple device with your own hands. Among other things, a homemade car will be a good solution for young families forced to huddle in rented apartments.
Products from shoe boxes
Every home has boxes of new shoes. So as not to throw them away, we put them to good use by decorating them with flowers and other things.
- Stash for gadgets. Such boxes are moderately strong and should have additional holes for threading cords. You can store headphones and chargers here so you don’t have to look for them around the house.
- Stand for jewelry with studs. Chains and beads will not get tangled in such a stand attached to the wall or in a bedside table in a vertical position.
- Box for creativity. The box can contain threads for knitting or sewing, embroidery items. In general, everything for your hobby.
- Cosmetic bag for women. Creams, cosmetics or perfume bottles can be stored here. We decorate it beautifully and can even be used as a gift.
- Shoe rack. We take boxes of the same size, fasten them with glue, a stapler or sew them together. We decorate the sides of such an improvised bedside table, and cut holes in the front. You can store dry, clean shoes here.
- Spice storage in the kitchen. We put pepper, turmeric, dried herbs, etc. here.
- A multi-storey bedside table for documents made from identical boxes, quite long. It allows you to sort folders with documents.
- A bookcase where you can take boxes of different sizes. There is no limit to the imagination for designing such a product.
- A flowerpot for indoor flowers that can accommodate several pots; use the decoupage technique for decoration.
- Children's toys from a shoe box are very interesting: A garage for cars, just make holes - races;
- A stroller for dolls, you can attach wheels from an old car or cut it out of cardboard;
- Toy house;
- Mask for the holiday;
- A bag for toys with handles attached on both sides.
The field for human imagination is wide. To make the toys look neat and beautiful, the knife and scissors must be sharp, but you need to act carefully. There is no need to hope that you can then correct everything with sandpaper or a damp cloth. Let the creative process bring joy to you and your children.
Full-fledged washing machine from scrap parts
Of course, it will not be possible to make a homemade automatic device with many washing programs at home, however, if you have more or less straight hands, it is not difficult to assemble a simple machine with an activator.
The principle of its operation is extremely simple. There is a tank into which laundry is thrown. Water is poured into the tank and detergents are added. The engine rotates the activator (a plastic or textolite disk with blades), which in turn mixes the laundry. Such a washing machine can be made in just a few hours.
How to do:
- Prepare an empty box, such as a porridge box. Cover it on all sides with white paper. If there are any gaps at the joints of the box, you can seal them with a strip of white paper.
- Place the sour cream lid on the wide side of the box and outline it with a pencil. Set the lid aside. Trace the resulting circle with a blue marker. Draw soapy water with bubbles inside the circle. Now use tape to secure the door cover so that it opens (see photo).
- Make a panel with buttons. Cut out a rectangle from colored paper. Using a hole punch, cut out button circles. Cut out some square buttons. Glue buttons to the washing machine. Glue the plastic cover on the left side using a glue gun or plasticine.
The washing machine is ready! Call all your favorite dolls, let the big wash begin!
Preparing for work
The first step is to select parts for your future homemade washing machine. You will need:
- laundry tank;
- electric motor;
- sheet of plastic or textolite;
- shaft for transmitting rotation;
- connecting and threaded bushings;
- shaft casing;
- activator.
In addition, you need a sheet of rubber for making gaskets (an old tube will do), rubber plugs or bushings of small diameter, they will serve as limiters and will hold the lid on the tank during washing.
Assembling a homemade washing machine
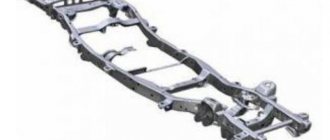
The most important part of the homemade product is the tank; as such, you can use a large enamel or aluminum pan; no changes will be made to its design, so at any time it can be used for its intended purpose. If you don’t have a large saucepan, you can make a homemade machine from a barrel of a suitable size.
The tank is ready, time to work on the erasing part (the cover with the motor, drive and activator installed on it). It will require a base. As such, a disk made from any sheet material available on the farm is suitable. It is better to take plastic or textolite, but you can get by with multi-layer plywood. When using wood, it is important to provide it with reliable protection from moisture. The diameter of the disk should be 10-15 cm larger than the diameter of the tank.
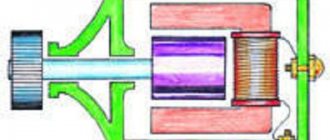
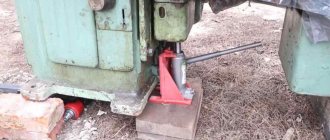
A hole for the shaft is drilled in the center of the disk; when using soft material, a sleeve should be pressed into it. It is recommended to use the unit from the “Skillful Hands” machine as an engine; the advantage of such a solution is that the engine does not need to be remade. If you use another unit, you will have to solve the issues of connecting the activator shaft; adapter bushings of different sizes will be required.
The motor is secured using the supplied bolts, washers and bushings; it is advisable to put a rubber gasket between it and the base; it will protect against splashes, reduce vibration, and reduce noise.
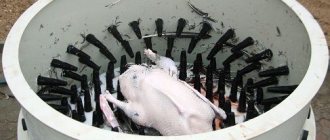
For a homemade washing machine you need an activator. It is unlikely that you will be able to make it yourself; it is easier and more rational to use a ready-made one with a bushing, for example, from a used “Malyutka”. The task of the activator is to mix the laundry, therefore, it must be lowered into the tank below the water level. To do this, the rotor shaft will have to be lengthened. If you use a motor from a machine, this problem is solved simply. The shaft already has an M10 thread cut; it is enough to select a rod of the same diameter and a connecting sleeve.
The rotating shaft must be closed, otherwise laundry will wrap around it, which is fraught with consequences. A small aluminum pan will work as a casing. A hole is drilled in its bottom. The activator sleeve is installed into it and secured from the inside with a nut. Since water will still get inside the “casing”, there is no need to use sealing collars.
The pan is attached to the disk from its lower side using self-tapping screws or bolts with nuts. The role of fastening corners will be performed by handles. As a result of all these manipulations, the following structure will be obtained: a disk, a motor is installed on top of it, its shaft passes through the base and the “casing” and is connected to the activator.
The washing machine you made with your own hands is almost ready, you just need to connect the motor to the power supply and take care of safety. For power, use a regular cable with a plug for household appliances; be sure to insulate the terminals using electrical tape or heat-shrink tubing. In addition, the engine must be closed. A cap from an old vacuum cleaner will do. To prevent the lid from “moving” during washing, shock absorbers are attached around the circumference of its lower part; plugs or rubber bushings will do.
You can start washing. Throw laundry into the tank, add water, add powder or liquid laundry soap. Close the lid and plug in the device.
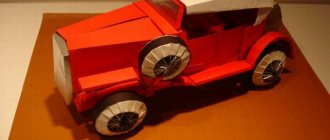
Paper fire truck
The sale of this vehicle will teach the child knowledge about company cars.
A fake fire truck requires the following materials:
- Glue,
- Two miniature boxes
- Colored paper
- And cardboard.
Use scissors as a tool. The cabin is created from a narrow box.
- It must first be divided into two parts.
- After this stage, you need to cover the parts with red cardboard. It is necessary to connect the body to the cabin.
- What's a car without wheels? Make them and add them to the fire truck.
- The staircase can be made of silver-colored paper. Foil will also work.
- A simple pen cap will serve as a flasher.
- The result is a toy that is educational in nature and suitable for many games.
Elementary design of an aquarium compressor
For small washing volumes, you can make a simple homemade washing machine from a bucket and a regular compressor. The role of the activator in it is performed by a stream of small bubbles that rise from the sprayer. The air pressure helps to mix the water, “knocks out” dirt, cleaning clothes. Of course, you shouldn’t expect high performance from such a design, however, it will quickly refresh your laundry and remove simple stains.
In principle, the manufacturing process of this mechanism is limited only to selecting a suitable container for the tank and installing a sprayer inside it.
Stages of creating a paper model
Let's give an example of the step-by-step construction of a paper machine. The origami will be unwrapped on a square sheet. In this case, we don't need a drawing.
- We bend the paper square diagonally.
- Next, fold the unfolded square with pronounced diagonals in half in two directions.
- Unfold and bend two opposite sides towards the center.
- Unfold the bottom part and bend it in half again.
- Unfold and connect the free side with the bend at the top.
- We do the same from the inside out. The result is a layout divided by squares of the same size.
- Place the reamer with the grooves facing down. We fold the shapes at all corners (in four small squares).
- Turn over and bend down to the width of one square.
- We divide the end of the bent strip on the left into three equal parts. Use scissors to draw the fold.
- We bend a small square from the outermost strip.
- Press the bottom strip over the maximum area.
- We slightly turn the level of the strip to the right and form a square.
- Left turn. Bend the tape, similar to the previous one. We do it this way everywhere.
- We bring the development to its original square state. We make a bend in the second stage.
- We twist the workpiece from right to left, bending the strips in parallel.
- At the corners we change the direction of the resource and form a square.
- We turn the product inside out and smooth it. The result is a rhombic figure that hides the rest of the structure.
- Smooth the small rectangle firmly along the diagonals. An edge is formed.
- Apply parts of the squares and iron them firmly.
- We make folds from the central part of the figure to the sides.
- In order for the outer square to intersect with the plane, we draw a triangle on the right side.
- From the same edge we turn up a small line along the line we defined. Raise the outer diamonds.
- Also, we follow from the opposite part.
- Both stripes are strongly smoothed from the center figures along the strip, downwards.
- Let's take a step back. Connecting the triangles.
- We carefully bring together the entire inside of the product with a strip coming from the core of the product by adding quadrangles.
- We repeat from the vertical line and up. We also attach the outer square sidewall to it. We do it on both sides. We iron it and pack the excess residual parts under the edges.
- Turn it over. We draw a line to the height of the bent part.
- Fold the sides of the mini square.
- We pull the line diagonally to the top of the product. A segment goes down from the top along the diagonal line, add it to it. We also do it on the reverse side.
- The result is rhombuses. Bend upwards to the right.
- We fold the remaining part with the bottom line of the fold strip. We act similarly everywhere. We unfold the squares, inward from the bottom. We hide some inside.
- We bend the strips on the sides.
- Important! One corner will open and fold in half, while the other will “go” under the part.
- We make a lapel of each square, flatten it and fold it in half.
- On the front area of the machine we bend the strip from the bottom.
- We bend the stripes down on the sides of the product.
- Molding wheels (inside out).
- Iron all the folds again.
Now you know how to make a car out of paper or cardboard.
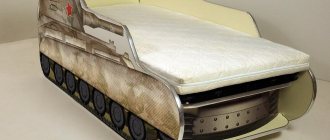
Homemade manual washing machine from a bucket and plunger
The designs described above require a connection to the network, but the next one allows you to do without electricity at all. This homemade washing machine will definitely come in handy for lovers of hiking and outdoor recreation. To make it you will need a plastic bucket with a lid and a regular plunger. A hole is cut in the lid of the bucket along the diameter of the plunger handle; it is advisable to reinforce it with a plastic sleeve.
The rubber part of the plunger needs some modification. Windows are cut out in it (from 3 to 6). The handle is inserted into the hole in the lid, water is poured into the bucket, laundry is placed and detergent is added. The device is easy to use - you just need to raise and lower the plunger handle, mixing the contents of the tank.
It’s good to have an automatic washing machine at hand, but sometimes you don’t have one, which means you need to use your ingenuity. With a little effort, a few hours of work, washing will become a simple and enjoyable task again.
Cardboard roll machine
Let's consider the most popular example - a diagram of a craft machine. It is quite simple to implement it. Even your baby can handle this.
You will need:
- cardboard toilet paper roll;
- gouache;
- cardboard sheet;
- colored paper;
- polymer glue;
- several push pins.
For tools, prepare scissors, a brush, a compass, and a ruler.
Sequencing:
- Paint the roll in the chosen color. This will be the body of the machine.
- Take cardboard and cut out four circles from it, paint them black. These will be tires.
- Cut out disks from a white sheet - four circles of smaller diameter, and glue them to each wheel.
- Make a steering wheel and additional decor. You can use flames, stripes, arrows, etc. as decoration.
- Cut through the cabin, not forgetting the seat. Attach the steering wheel.
- Attach the prepared wheels to the vehicle body using buttons. All is ready!