An original and interesting solution to decorate a room in an apartment is to create a bird with your own hands. In our article we will teach you how to properly make a bird yourself.
The rich imagination and skill of a craftsman will help you make a craft from any material. So, let's start the creative process.
Many people throw away more than thousands of plastic bottles every day. At the same time, few people know that many amazing things can be made from them (for example, model boxes, vases, feeders for cats and dogs, and more).
Let's look at how you can create a beautiful peacock from bottles. For work we will need the following materials:
- A log of wood is the future stand for our bird.
- Metal rod.
- Styrofoam.
- Plastic bottles (green, blue, transparent).
- Unnecessary plastic of different colors, paints, PVC glue, scissors and foil.
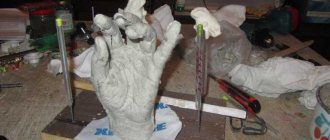
We cut out a peacock (body and head) from foam plastic and make indentations for the eyes. We fix the metal rod in the log and place the peacock on it. Carefully cut out “feathers” of different sizes from multi-colored bottles.
We round the feathers, and then use scissors to cut out the waves at the end. Then we make circles of foil of different sizes, paint multi-colored eyes on them and give a realistic look to the feathers using paints. Now we attach them with a stapler or glue to the tips of the “feathers”. We glue several short “feathers” to the head and neck.
We make a crest from dark plastic, which we glue to the head and draw eyes in the holes. From the “feathers” we form a fluffy tail, starting from the end, which is secured to the building mesh using wire. All that remains is to attach the tail to the body.
Paper plate craft
How to make such a bird craft? Disposable plates are taken. They are painted with the necessary paints and eyes are drawn on their surface, and a paper beak is also placed. The bird's wings and tail are best cut out of paper or made from real bird feathers.
You can also stretch a thread near the bird’s eyes, by which you can hang it, for example, on a chandelier, to then take wonderful photos of the bird’s crafts.
Work at the European Carving Championship
The art of carving has become so popular in the world that in 2011, for the first time in the German city of Leipzig, a competition was organized where the works of the world's leading specialists were exhibited. At the gastronomic fair Gaeste, one could see crafts made from vegetables and fruits.
The participants presented their masterpieces to the judges for 4 hours of work. The fabulous bird, which you can see in the photo below, was made by vegetable sculptor Vadim Nefediev.
The organizers provided the participants with full baskets of vegetables and fruits; they were allowed to bring pumpkins with them, as this is the main material for crafts. Sculptures made from the dense pulp of this vegetable delight with their beauty and brightness. If you become interested in creating sculptures, doing simple work at first, then over time you will be able to achieve the skill of the world's leading vegetable sculptors.
The work process is incredibly exciting. First, you can practice copying simple samples, photographs of which can be easily found on the pages of the World Wide Web. Over time, experience and the necessary skills for cutting the pulp or peel of vegetables and fruits are acquired. Then you can create your own unique masterpiece. Try your hand at a new art form! Good luck!
Application "Firebird"
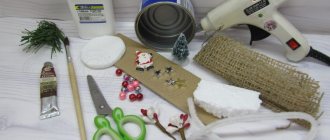
To create such a craft, you will need pre-dried leaves of trees (linden, rose hips, birch, oak, etc.) of various colors, as well as large seeds, for example, pumpkins. Linden and birch leaves are glued onto a sheet of cardboard, which will serve as the body and head, respectively.
A fluffy tail is made from rosehip leaves; you can also add a small tree branch for a strong base. The seeds form the eyes and small details of the craft.
A tuft from some branch will help to completely decorate the “Firebird”. You can safely send this bird craft to an exhibition in a kindergarten.
Beautiful composition for a wedding
Firebirds made from vegetables and fruits are often used by restaurateurs to decorate festive feasts. Such compositions decorate halls for anniversaries and weddings and are installed on a separate table in a prominent place.
The fairy bird may be alone on a pedestal or adjacent to several smaller individuals located around the main carving object. To make such a composition look impressive, it is placed on a raised platform, veiled with greenery and decorated with flowers cut from bright vegetables, such as beets, tomatoes or red onions.
Origami birds
It is very easy to make this craft using the well-known origami technique. The essence is this: strips are cut out of colored paper, which need to be folded into a knot so that their ends are different in length.
Using scissors, the head of the bird is cut out on one side, and the tail part on the other. These origami will perfectly decorate your home at any time of the year, and in winter they will remind you of warm days.
Stork
You can start with a simple DIY bird craft. Take a postcard with a picture of a stork, glue on feathers and get a three-dimensional image of the bird.
The second option is also possible: lay out the shape of a bird with white feathers, glue them to a sheet of paper (preferably a dark background). Use matches and wood chips to form the beak and legs of a stork. By gluing several dry blades of grass to the bird's legs, you can get a stork in the nest.
Birdhouses made from milk bottles
Don’t rush to throw away milk bottles and Kinder surprise containers, because you can make an attractive craft out of them. Round holes are cut in milk bottles, clothespins are glued to the bottom of the bottles, and the birds themselves are on them in the form of kinder boxes. Just decorate the birds' bodies with down or feathers, colored paper, and also draw eyes on them with a felt-tip pen, then the craft will be completely ready.
Peacock from bottles
You will need multi-colored plastic bottles, foil, thin plastic, a log, a metal rod, foam, a stapler and glue. The body of the peacock along with the head is formed from polystyrene foam. Small indentations are made in the intended places for the eyes.
The log will be used as a base; you need to attach the peacock's body to it using a metal rod.
Feathers are sold from cut plastic bottles of different sizes: the longest for the tail, the shortest for the neck and normal size for the rest of the body.
One part of the future feather is rounded, and notches are made on the other to give a more realistic look to the feather. The tail feathers can be decorated with cutouts made of thin plastic and foil.
Decorations can be attached with a stapler or superglue. A beak is cut out of a piece of red plastic. The “feathers” are glued with a slight overlap onto each other to the body with superglue. You can make the crest the way your heart desires, but it is better to use colored plastic to create it.
The recesses for the eyes are painted over with felt-tip pens of any color. It is convenient to use some kind of mesh to form the tail. Its collection begins from the bottom edge. The made tail is attached to the body.
Flamingo from bottles
To make this product you need large plastic bottles (5 and 10 liters), a polymer pipe about two meters long, a corrugated pipe about sixty centimeters long, acrylic, wire, foam.
The base body is made from the largest bottle. In its bottom you need to cut 2 holes according to the diameter of the polymer tubes (future legs). Feathers are cut from smaller five-liter bottles and attached to slits in the body.
A neck is made from a corrugated pipe, which is inserted into the neck of a ten-liter bottle. The head is cut out of foam plastic. Eyes are drawn with a felt-tip pen and a black plastic beak is attached. It is better to start attaching the feathers from the very bottom to the mesh.
Masterpieces of creativity
Experienced craftsmen can be offered instructions on how to make a rooster out of plastic bottles. For the craft you will need:
- Plastic canister on the body.
- 5 liter bottle for neck.
- Plastic pipe 40 cm for bird feet.
- 1.5 liter bottles for decorating thighs.
- Lots of plastic containers for feathers.
Comment! It is recommended to collect bottles of the same color so that after dyeing they do not differ in shade. 26
Frame
The formation of any bird, including a rooster from a plastic bottle, begins with creating a frame.
Key stages:
- The side of the canister is cut off and moved to the side.
- The pipe is bent to the shape of the legs and screwed to the canister with self-tapping screws.
- A 5 liter container is rolled up into a ball, this will be the rooster's neck.
- Plastic bottles of 1.5 liters, cut off at the top, will help to thicken the legs.
If you plan to make a small bird, take a smaller container.
Head
You can bring the rooster's figure as close as possible to a natural bird by making the head out of foam plastic. This kind of work is distinguished by jewelry and requires certain skills. It is quite difficult to cut out a solid element; it is easier to prepare the head, comb and beard separately, and then connect the parts. Then the workpiece is prepared for painting, for this:
- The foam bird's head is sanded with sandpaper.
- the surface is treated with acrylic putty;
- when the mixture dries, it is sanded again;
- a layer of PVA will give the workpiece the desired smoothness and prevent excessive absorption of acrylic paints.
You can decorate the bird's head in various ways. The eyes draw or attach small details of a suitable shape. Handicraft stores will provide a wide selection of decorative items. It is easier to cut the scallop and beak from plastic containers than from polystyrene foam.
Plumage
The plumage of birds varies depending on the part of the body. The tail usually consists of long feathers. Large parts are also required for the wings. The body and especially the neck are decorated with small elements. Maintaining proportions will bring the decorative figure as close as possible to the selected prototype. Small feathers are fixed with wire into holes previously prepared with an awl; large elements can be secured with self-tapping screws. When forming wings, reinforcing mesh is often used.
The legs of the rooster also deserve attention. The plastic tube at the top is complemented by bottles fixed with the neck down; the lower part is crowned with legs twisted from wire and wrapped with twine.
When to dye depends on the color of the bird. A monochromatic figure can be covered with a decorative layer at the final stage. It is better to paint the elements of colorful birds in advance, before starting assembly.
When you have the skills to work with plastic bottles, you can create a real masterpiece to decorate your area. Whether it will be an important rooster, an eagle owl at night, or a royal pigeon is up to the master to decide.
Recommended Posts
How to make a house for a cat from a T-shirt with your own hands
How to choose a combination lock for the entrance doors
Weaving baskets from plastic bottles
Do-it-yourself automatic watering for indoor plants
Law on playgrounds in the yard
Feeders made from plastic bottles