- December 1, 2020
- Crafts
- Yaroslavna Guseinova
There are many peacekeeping symbols. Perhaps the dove of peace with an olive branch has become one of the most popular symbolic images, known to everyone, young and old. The dove can be seen on large holiday posters and in drawings by schoolchildren in all corners of our planet.
How the dove became a symbol of peace
The dove has become a universally recognized symbol of peace. In order to become familiar with its amazing historical significance, let's look at different examples of how to make doves out of paper. But first, let's look deeper into the story itself.
The symbol of peace in Ancient Rome was a dove, or, more precisely, a dove that carries an olive branch in its beak. Also in other countries, this bird gradually became a symbol of kindness, love, purity and fidelity.
Pigeons can return home from almost anywhere on earth. The Egyptians were the first to breed them to send messages to each other.
In 1949, the famous Spanish artist Pablo Picasso painted a white dove with an olive branch in its beak. This image became famous throughout the world and was called the “dove of peace.” The first World International Peace Congress in Paris and Prague was held under this beautiful emblem of the reconciling bird.
The dove with an olive branch has become widespread in all areas of art. To this day, his image is part of peacekeeping holidays and movements. Pigeon monuments have been erected in 33 cities. In particular, in Russia they try to make a dove of peace on May 9, Great Victory Day, June 22 and other holidays.
Drawing of a dove with an olive branch
Draw or print a classic image of a dove with an olive branch. The drawing can be framed or attached with magnets to the refrigerator.
How to make a white paper dove more interesting? There are several options: you can decorate it with sparkles or glue rhinestones. This way it will not lose its classic look. What if the child still wants to color it? You can make one main dove of peace, and color the others as you wish or let the children color them. Or you can imagine that multi-colored pigeons are assistants to the main white dove. This way you will continue the creative process and complement it with a gaming beginning. If you want the process to be educational, tell about the pigeon yourself, read in a book or watch a video about these birds. You will not only make your child’s leisure time interesting, but you will also learn something new. For example, pigeons are among the ten most intelligent creatures of all animals and birds on the planet! This fact will not leave anyone indifferent!
Other interesting craft ideas
Below we will present photos of the most interesting and original crafts for May 1, which can easily be made in a few hours.
You can involve children in the process to develop their fine motor skills and develop their imagination.
If you didn’t know how to draw the Spring and Labor Day, now you have enough detailed instructions and photos. Now you just need a little time and a little imagination.
Making small voluminous pigeons
In order to get small voluminous birds, let's look at how to make paper doves using these templates.
To do this, we cut out doves from templates. Then we glue identical parts of the pigeons along the breast and head. And the tail and wings need to be fluffed. Next, you can draw the birds’ eyes, beak and outline the lines of the feathers.
Next, we offer options on how to make a paper dove with your own hands for May 9, Russia Day and other All-Russian holidays. We will paint one dove in the colors of the St. George's ribbon. And we will paint the other one in the colors of the Russian flag.
Make more of these pigeons and hang them on a string with clothespins. It will turn out to be a very beautiful and festive craft! In addition to the garland, you can make these doves on sticks. To do this, you need to take popsicle sticks or simply cut a wide strip of thick cardboard. Glue the pigeons to them with glue. With these sticks you can decorate a bouquet of flowers, a window, or just play.
other methods
Method No. 1
For work, prepare a paper square, approximately 20x20 cm. This is a paper dove, which is folded according to the classic method.
Follow the step-by-step instructions:
- Fold the square in half diagonally to form a triangle.
- Fold the triangle in half too, and then return it to its previous state. This is necessary to mark its center.
- Wrap the ends of the triangle inward, towards the center line. It should look like a rhombus.
- Fold the top and bottom of the diamond together to form a triangle. Make a bend and return the figure to its original position.
- On both sides of the diamond (right and left sides), fold the corners in half inward toward the center. Return to original position.
- The end of the triangle, from the corner of the diamond to the inflection line, needs to be folded inward. Do this on both sides of the figure.
- Fold the resulting figure in half, away from you, so that it looks like a boat.
- Form the wings by turning the ends of the boat up - on one side and the other.
- Make the pigeon's tail by bending the back of the figure inward.
- Make the bird's head in a similar way, bending the small tip of the front part inward.
- The last step is to make the bird’s wings more voluminous. To do this, you need to make a small bend near the very base of the wings.
Method number 2
This is a very easy way to make a paper dove. Ideal for activities with young children or beginners learning origami. You need a square with sides measuring from 10 to 20 cm. The smaller the sheet of paper, the more miniature the figure will be.
Step-by-step instructions are attached:
- Take a square and fold it in half diagonally. Make a fold line, then return the paper to its original position.
- Place the paper in front of you so that it looks like a diamond. Fold the top right and left sides inward so that the edges are even on the center fold line.
- Similarly, bend the bottom half of the diamond towards the center.
- Turn the workpiece over to the other side so that you have a solid part of the figure in front of you.
- Fold in half, tucking the bottom half of the shape up.
- To make the breast and neck, fold most of it up, making an inward fold. At the tip, make another bend inward to create a head for the bird.
- Spread your wings.
Method number 3. Modular pigeon
If you have enough time and patience, you can also assemble a dove using the 3D origami technique. The result should be an original 3D craft. Modular origami differs from classical origami in that many small pieces are first made, and only then are they fastened together. No glue is used.
First, learn how exactly small modules are made:
- Take thick A4 paper and mark rectangles of the same size on it with a pencil. This is easier to do if you first divide the sheet into 4 equal parts, and then divide each of them again into 4 parts. Cut the sheet along the lines, you should have 16 rectangles.
- Fold one rectangle in half so that the fold line runs parallel to its length.
- Connect both ends of the shape to create a bend in its center. Return everything to its original position. Turn the paper over so that the center fold line is at the top.
- Press the top edges to the center fold line. Turn it upside down again.
- Fold the edges that go beyond the limits upward, and then fold the small triangles along the edges again. The figure should be in the form of a triangle, so that nothing sticks out at the edges.
- Bend everything back, and then first fold the small triangles up, and then the bottom part.
- Fold the triangle in half. The model is ready.
Several hundred such modules need to be made, depending on the size of the figure. To fasten the parts together, the edges of one module are inserted into the pockets of another - and then in a circle. In the first three rows, 10 modules are fastened together with sharp edges facing outward, and then, by adding elements, the body and wings of the bird are formed.
The first time in the fourth row at an equal distance, 5 more elements are added to the 10. The next two rows do not change the number of modules, but you need to slightly compress the figure so that it looks a little flattened. The seventh row should already have 22 modules and then three rows continue to work according to the same pattern.
The eleventh and twelfth rows need to be made of 20 modules, and they need to be fastened not along the entire circumference, but only where the breast should be. The next row is 13 pieces, and then one more piece should be reduced. The pigeon’s neck is formed from 7 triangles, they are attached with the shorter side outward.
Then continue according to the scheme:
- 2nd row – 6 pcs.;
- 3rd – 5 pcs.;
- 4th – 4 pcs.;
- 5th – 5 pcs.;
- 6th – 4 pcs.;
- 7th – 5 pcs.;
- 8th – 4 pcs.;
- 9th – 3 pcs.;
- 10th – 4 pcs.;
- 11th – 3 pcs.;
- 12th – 4 pcs.;
- 13th – 3 pcs.
For the pigeon's head you need to take 3 modules first, then 4 pieces. In the next row, increase by one more, and then fasten two rows of 4 pieces each. The tail is made like this: first, 7 triangles are fastened, then increased first to 8, then to 9 pieces. The next three rows take 1 piece more, and then 1 piece less. The wings are made according to the scheme:
- 1-9 rows – 8 pcs.;
- 10th – 7 pcs.;
- 11th, 12th – 6 pcs.;
- 13th – 5 pcs.;
- 14th, 15th, 16th – 4 pcs.;
- 17th, 18th – 3 pcs.;
- 19th, 20th – 2 pcs.;
- 21st, 22nd – 1 pc.
The beak is made from one module and glued together with the wings to the body of the bird. The legs are made from 5 modules, inserting them into each other. The dove is ready, all that remains is to glue on its eyes, cutting them out of black cardboard.
Try making some paper doves right now! They can become an unusual part of your interior that attracts attention.
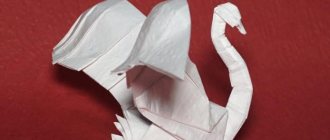
Making a large voluminous dove from two parts
The second version of a large voluminous pigeon is more complex. The wings in this version are glued separately.
Step-by-step steps with photographs of how to make a three-dimensional dove from two parts are presented below:
1. Carefully cut out the template. Cut the feathers on the tail and chest and curl them up a little.
2. We bend the dotted lines on the pigeon’s chest.
3. Glue the body of the pigeon onto the back dotted triangle on the tail.
4. Glue the breast and head of the pigeon together as shown in the photo.
5. Fold the wings in half and iron the middle line.
6. Apply glue to the dotted triangle on the wings.
7. Apply the line of the middle of the wings to the back of the pigeon and glue it.
9. Let's paint the dove or decorate its wings and tail with sparkles.
The dove is ready! You can decorate window handles or a chandelier with it.
To hang a dove on a rope, make a larger cut in the wings in the middle, thread the rope there and tie it in one knot.
Necessary materials
- a bottle of any plastic detergent,
- milk bottles in the amount of 24 pieces,
- pipe 12 mm in diameter and about 54 cm long,
- transparent one and a half liter bottles in the amount of 2 pieces,
- small foam plastic,
- wire,
- self-tapping screws with a small head,
- screwdriver,
- stationery knife,
- awl,
- fine sandpaper,
- glue type “Moment”,
- glue gun,
- leg-split.
Dove made of cardboard and colored paper
Let's make this pigeon step by step:
1. On a sheet of thick paper, draw with a simple pencil the outline of a bird without wings of the desired size.
2. Cut out the dove along the contour with scissors. If desired, draw eyes and beak with colored pencils.
3. Take a sheet of thin colored paper and cut out a strip equal to the length of the two wings. The width of the strip depends on how many folds you want to make on the wings. The more folds, the more magnificent and beautiful they will look.
4. Using a ruler and pencil, draw lines on the cut-out strip along the entire length of the future wings in increments of 1.5-2 cm. Fold the paper into an accordion.
5. Cut a hole in the middle of the cut out outline of the dove and insert the wings there.
Make several of these doves with wings of different colors.
The easiest option
This dove of peace, made using the origami technique, is intended for children of preschool and primary school age. It folds up in just nine steps. To prevent inexperienced origamists from getting confused, it is recommended to use paper with sides of different colors.
Step-by-step instruction:
- Let's start from the inside out. Fold the square sheet diagonally from top to bottom.
- Then we open it and repeat the same action, but now from left to right.
- We bend the resulting triangle into a “valley” along the dotted line.
- Open the layer closest to us to the left, shifting it by about 1 cm.
- Fold the figure in half.
- Bend the lower part along the dotted line. Rotate the product 90° clockwise.
- We bend the corner on the left, first forward and then back.
- Then we make a reverse fold, indicating the beak.
Two origami birds can be combined, for example, into an elegant Asian-style pendant. In the east - in India and China, doves symbolize a happy married life, so a pair composition would be very appropriate for congratulating a wedding or family anniversary. Especially if one figure is folded from gold paper and the other from silver, in accordance with the principles of Yin and Yang:
Conventions on origami diagrams
- Valley - fold towards itself, a line inside a sheet of paper.
- Mountain - fold away from you, line outside the sheet of paper.
- Inflection line - does not reach the edge of the contour, inflection in any direction.
- The cut line is a thicker line from the beginning to the end of the contour.
- The invisible line is a line that you should focus on and imagine mentally.
Pigeon airplane
Children will especially enjoy making this dove. Follow the step-by-step manufacturing scheme:
1. Fold a sheet of white paper in half horizontally. Draw a side view of the dove with its wing raised in the air. Make sure that the dove is drawn exactly in the center of the body.
2. Cut off the excess paper around the outline of the dove and its wing.
3. Fold each wing to make an airplane shape.
Preparatory stage
To achieve a striking resemblance to the original, a plastic pigeon needs high-quality plumage. For this you will need white dairy bottles. Approximate quantity - 24 pieces. All other materials will be easier to collect:
- A plastic container intended for detergent of sufficient width.
- PVC pipe Ø 12 mm about half a meter.
- 1 liter transparent bottles - 2 pcs.
- A small piece of foam for the pigeon's head.
- Self-tapping screws, wire.
- Awl, stationery knife, screwdriver.
- Fine abrasive sandpaper.
- Plastic glue and glue gun.
- Small decorative elements - twine for eyelids, beady eyes.