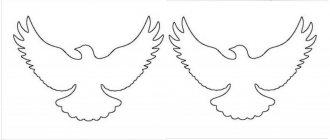
I will try to tell you how to make a home gaming complex from scrap materials in this post. So, we had two tents, which can now be connected into one, using a homemade tunnel between them..
We will need two tents with round holes, an old toy basket, or rather a metal frame from it.
And also fabric (I have old curtains), bias tape 5-10 m and, of course, threads, needles and other sewing accessories. Adhesive plaster 2-3 cm wide.
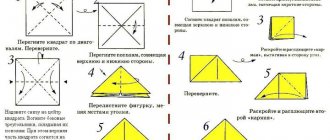
We measure the diameter of the holes in the tents, multiply by 3.14, and get the width of the tunnel. I got 164 cm on one side, 148 cm on the other. Fold the fabric in half, and set aside half the dimensions from the fold + reserves (allowances) for seams of 1-2 cm. The length of the tunnel is about 50 cm, in principle, no more is needed.
We sew the seam and fasten it with bias tape.
Next we make loops for the buttons, I made them from bias tape, 8 pieces on each side, 7-8 cm long. Fold it in half and sew it symmetrically to the very edge. Next we finish the edge with bias tape. For strength, it is better to sew the loops again, stepping back 1 cm from the edge.
Now the fun part, we attach the bias tape in a circle with a spiral. Please note that the ends of the bias tape extend onto the spiral with a decent margin, forming rings. It is better to make these rings at a distance of 4-6 cm from the edge, then you will understand why.
Where the rings and spiral meet, it is better not to stitch it, otherwise you will have to rip it out later.
We carefully insert the frame into the workpiece; this is a rather painstaking process. Spread evenly throughout the tunnel. It’s okay if the tunnel turns out to be a little wrinkled in the middle, the main thing is that the circles at the edges coincide with the holes in the tents or are slightly smaller.
The bias tape turned out to be on the inside, but it can be done on the outside as well, as the frame will screw in. We will protect our product. We wrap the adhesive tape around the end of the frame so that it forms a small bump.
Next, we glue the end of the frame to the formed ring with an adhesive plaster, it’s like closing a circle. We do the same from the other end. Now our frame will not spin inside the tunnel and will not come out anywhere.
We sew up all the holes.
Now we take 16 different buttons of medium or large size, the main thing is that they fit through the loops, and sew them to the edges of the tent, but not at the very edge, but at a distance of 3-5 cm. We fasten the tunnel. Ready!
Once again, a general plan for clarity.
From another entrance. As you can see, the diameters of the entrances are different and are at different heights, but this does not interfere with climbing back and forth. The tunnel is quite movable and flexible, and is firmly attached to the tents.
I sewed homemade curtains as a decorative element, there are ties to keep the window open.
And, just as importantly, this entire structure can be easily folded into a pancake and put away against the wall or under the bed (sofa).
Initially, my idea was to make an additional entrance to the tent, but then I remembered that there was an old tent, patched it up and off we went.. I hope my MK was useful, although I perfectly understand that not everyone needs it. It was important for me to convey not only the idea, but also to show those interested how to execute it. My children, by the way, are absolutely delighted!
Thank you for your attention!
Oh, I'm first, right? Very cool tents and tunnel. And most importantly, it's easy to do. Thanks for MK)
Thank you
Yeah! Super job! You can come up with something else! ABOUT! I came up with an idea! You can take a hoop, cover it with curtains in a circle and sew it to the exit of one of the tents, and hang the hoop from the ceiling. it will turn out to be a kind of mini-town
How to make a playground next to your house with your own hands
Previously, the space under the terrace was not used and was a spontaneous warehouse for all sorts of “useful things”. Because There are two exits from the terrace, and the terrace is quite high. It was decided to make a children's playground. In addition to the slide and sandbox, under the terrace there is a cozy place with a children's playhouse, and on the wall of the house there is an additional drawing board and a shower with a tap for washing hands and feet.
The space under the terrace will later be partitioned into two parts - in one there is a children's playground, in the other there is a place for storing garden tools. First, taking into account waterproofing, a wooden frame was made for the platform.
Then the soil for the sandbox and the area near the slide was removed. This is the hardest part of the job.
In the area under the sandbox and next to the slide, ebbs were made and sand and crumb rubber were poured for children's playgrounds.
Paper tunnel “Happy New Year!”
You will need:
- White paper for drawing
- Thick decorative paper (thin cardboard or pastel paper)
- Breadboard knife
- Cutting mat
- Iron ruler
- Embossing tool (awl or knitting needle)
- Stationery stapler
- Glue
Step-by-step master class on making a paper tunnel from paper with your own hands:
- Draw the net of the cube. The size of the cube (edge 80 mm) was not chosen by chance. The finished development of a cube with these dimensions, divided into parts, can fit into an A4 sheet format. To do this, two faces are separated in the development and valves are added to them for gluing. This cube has a separated bottom and two side faces.
- We redraw the cutting templates onto the draft. Templates for the colored part of the cube are highlighted in blue on the diagram, and for the white part – red.
- We staple the template with the details of the cube development and with the inner layers of the tunnel. Attention! We place staples outside the boundaries of the part or in places that will later be cut out.
- Using an embossing tool and a ruler, we draw creasing lines.
- Cut out the design according to the template. Attention! It is more convenient to cut straight lines using a metal ruler.
- We bend the parts along the creasing lines according to the template.
- On the bottom of the cube and on the top edge we draw or lightly crease auxiliary lines with an interval of 20 mm.
- Glue the layers of the tunnel. First, glue the parts of the layers to the bottom of the cube. Then we connect the bottom with glued layers to a part consisting of three faces of the cube. We glue it to the top edge, while simultaneously gluing the side edges and the bottom behind the flap. Attention! If the cube's development is solid, then it is more convenient to glue the layers first to the top face, and then to the bottom, while simultaneously gluing the side faces and the bottom behind the flap.
- Glue the remaining parts of the cube (with the cut out pattern) onto the valves.
Paper tunnel “Happy New Year!” ready. If you tie it with a bow and fasten a loop, you will get a Christmas tree decoration.
Paper tunnel "Merry Christmas!"
You will need:
- White paper for drawing
- Thick decorative paper (thin cardboard or pastel paper)
- Breadboard knife
- Iron ruler
- Cutting mat
- Embossing tool (awl or knitting needle)
- Stationery stapler
- Glue
How to make a tunnel out of paper or cardboard with your own hands:
- Draw the development of the cube (edge 80 mm). If the format of the available paper does not allow you to draw the entire pattern, then you can draw it in detail. In the presented tunnel, the cube consists of three parts.
- Using an embossing tool and a ruler, we draw creasing lines.
- We redraw the cutting templates onto the draft. Templates for the colored part of the cube are highlighted in blue on the diagram, for the white part - in red, and a separately cut out element is highlighted in green.
- We staple the template to the details of the cube development. Attention! The template of the last layer must be redrawn in a mirror (in this case, the templates of the first and last layers are attached to the front side of the cube development part). If the template is not mirrored, then it is attached to the inside of the cube development part. We place staples outside the boundaries of the part or in places that will later be cut out.
- Cut out the design according to the template. Attention! It is more convenient to cut straight lines using a metal ruler.
- We staple the template of the inner layers of the tunnel with a sheet of white paper.
- Using an embossing tool and a ruler, draw creasing lines according to the template.
- Cut out the pattern of the inner layers of the tunnel.
- We bend the parts along the creasing lines according to the template.
- Glue the side faces of the cube development to the top face, if the development consisted of several parts.
- On the bottom of the cube and on the top edge we draw auxiliary lines with an interval of 20 mm. The tunnel layers will be glued to these lines.
- We glue the tunnel. First we glue the parts to the top of the cube. Then we glue one of the side faces onto the flaps to all adjacent faces of the cube. Next, glue the layers to the bottom. And lastly we glue the remaining side edge, as if closing the cube.
- We glue a separately cut element onto the back edge.
Tunnel "Merry Christmas!" ready!
Paper tunnel "Happy Valentine's Day!"
You will need:
- White paper for drawing
- Thick decorative paper (thin cardboard or pastel paper)
- Breadboard knife
- Cutting mat
- Iron ruler
- Embossing tool (awl or knitting needle)
- Stationery stapler
- Glue
How to make a paper tunnel:
- Draw the development of the cube (edge 80 mm). If the format of the available paper does not allow you to draw the entire pattern, then you can draw it in detail. In the presented tunnel, the cube consists of three parts (the bottom and one side are separated).
- Using an embossing tool and a ruler, we draw creasing lines according to the diagram. Templates for the colored part of the cube are highlighted in blue on the diagram, and for the white part – pink.
- We redraw the cutting templates onto the draft.
- We staple the template to the details of the cube development.
- Cut out the design according to the template.
- On the bottom of the cube and on the top edge we draw auxiliary lines with an interval of 20 mm.
- We glue the development if it consisted of several parts.
- Using an embossing tool and a ruler, draw creasing lines according to the template.
- We staple the template of the inner layers of the tunnel with a sheet of white paper.
- Cut out the pattern of the tunnel layers.
- We bend the parts along the creasing lines.
- We glue the tunnel. First we glue the parts to the top of the cube. Then we glue one of the side faces onto the flaps to all adjacent faces of the cube. Next, glue the layers to the bottom. And lastly we glue the remaining side edge, closing the cube.
Tunnel "Happy Valentine's Day!" ready!
Paper tunnel "Halloween"
You will need:
- White paper for drawing
- Thick decorative paper (thin cardboard or pastel paper)
- Breadboard knife
- Cutting mat
- Iron ruler
- Embossing tool (awl or knitting needle)
- Stationery stapler
- Glue
Sequence of work:
- Draw the development of the cube (edge 80 mm). If the format of the available paper does not allow you to draw the entire pattern, then you can draw it in detail. In the presented tunnel, the cube consists of three parts.
- Cut out the development of the cube (or parts of the development).
- Using an embossing tool and a ruler, draw creasing lines according to
- We redraw the cutting templates onto the draft. Templates for the colored part of the cube are highlighted in blue on the diagram, and for the white part - orange.
- We staple the template to the details of the cube development.
- We staple the template of the inner layers of the tunnel with a sheet of white paper.
- We cut out the pattern on the parts with layers and on the cube pattern. Attention! We place staples outside the boundaries of the part or in places that will later be cut out.
- According to the diagram, on white paper we draw a development of the side parts to which the layers of the tunnel will be glued.
- Using an embossing tool and a ruler, draw creasing lines as shown in the diagram.
- We bend along the marked lines, forming valves.
- Glue the valves inside.
- Glue the layers onto the valves. The result is an internal insert.
- We glue the development along the valves, forming a cube. Be sure to leave one side edge unglued.
- We insert the inner layers into the cube, having previously smeared the side edges of the insert with glue.
- Glue the side edge of the cube, closing it.
The Halloween craft using the Tunnel Book technique is ready!
Postcard “Happy March 8!”
You will need:
- Thick decorative paper (thin cardboard or pastel paper)
- Breadboard knife
- Cutting mat
- Iron ruler
- Embossing tool (awl or knitting needle)
- Stationery stapler
- Glue
Master class on making postcards using the Tunnel Beech technique:
- Draw out the layout of the postcard. This is a rectangle with dimensions 340x125 mm. We divide it into 4 equal parts along the wide side, making marks at the top and bottom every 85 mm. Next, using an embossing tool and a ruler, draw creasing lines along the marks. If the format of the available paper does not allow you to draw the entire pattern, then you can divide it into two parts, fitting it into an A4 sheet format. In one of the parts you need to add a valve for gluing.
- We redraw the cutting templates onto the draft.
- We staple the template to the card.
- Cut out the template design. Attention! Congratulations should be written below the level of the cut out picture.
- Fold the card parts along the scoring lines. If the postcard consists of a whole unroll, then we fold it like an accordion.
- We bend the card like an accordion.
- Glue the background onto the last layer of the card.
- We tie the finished card with ribbon.
Postcard “Happy March 8!” using the Tunnel Book technique is ready.
Postcard “Happy Newborn!”
You will need:
- Thick decorative paper (thin cardboard or pastel paper)
- White paper for drawing
- Breadboard knife
- Cutting mat
- Iron ruler
- Embossing tool (awl or knitting needle)
- Stationery stapler
- Double-sided foam tape
- Glue
How to make a tunnel postcard with your own hands:
- We redraw the cutting templates onto the draft.
- We staple the templates to a sheet of white paper.
- Cut out the drawing.
- We glue foam tape at the corners to each layer of the tunnel.
- Glue 3 layers together. We get the inside of the postcard.
- On the front side of the resulting inner part of the card we glue foam tape at the corners. We repeat the operation on the reverse side.
- We draw the layout of the postcard according to the diagram. The “x” size is determined by the width of the inside of the card with the tape.
- Using an embossing tool and a ruler, we draw creasing lines according to the diagram.
- We staple template 1 to the development.
- Cut out the circle according to the template.
- Bend the reamer along the creasing lines.
- Glue the inside of the postcard on one side to the development.
- Glue the reamer onto the valve, while simultaneously securing the inner part with tape.
Postcard “Happy Newborn!” using the Tunnel Book technique is ready. Congratulations can be glued to the back of the card.
Birthday card!"
You will need:
- Thick decorative paper (thin cardboard or pastel paper)
- White paper for drawing
- Breadboard knife
- Cutting mat
- Iron ruler
- Embossing tool (awl or knitting needle)
- Stationery stapler
- Glue
Sequence of work:
- We redraw the cutting templates onto the draft.
- We staple the templates to a sheet of white paper.
- Cut out the details.
- Using an embossing tool and a ruler, draw creasing lines according to the template.
- We bend the parts along the creasing lines.
- At this stage, you can optionally sign the postcard. Attention! The inscription is applied to the part of the first layer.
- Draw out the layout of the postcard (rectangle measuring 240×120 mm). Divide it in half with a scoring line.
- Cut out the development.
- On the left and right sides of the postcard, 20 mm from the edge, draw two auxiliary lines.
- Before gluing the last part (the first layer), we glue the tie ribbon on the left and right sides of the card on the inside.
- We glue the first layer of the tunnel, closing the tape with a flap.
- The front part of the postcard can be designed as you wish. Attention! The edge of the adhesive tape should not be larger than the width of the flap.
To design a postcard you will need:
- Color printout of the picture and printout of the congratulatory inscription
- Thick decorative paper (thin cardboard or pastel paper)
- Threads
- Awl
- Metal ruler
- Buttons
- Double sided tape
Sequence of work:
- Cut out a rectangle measuring 85x105 mm from red paper, and a rectangle measuring 70x95 mm from blue paper.
- Set aside 3 mm from the edges of the rectangles.
- Using a metal ruler and an awl, we make perforations along the marked lines in increments of 3 mm.
- We create an imitation of machine stitching using a “back needle” seam. The “back needle” seam imitates a machine stitch on the front side; on the back, the threads overlap each other. When performing it, the needle is stuck into the place where it came out in the previous stitch.
- First glue the red part to the card with double-sided tape, then the blue one. We glue the color printout with a slight rotation.
- Place a congratulatory inscription on top.
- We complete the composition by gluing buttons.
Tunnel card “Happy Birthday!” ready!
How to make a tree house with your own hands
Usually, fairly large trees are taken for a tree house; if there are no such trees in your garden, you can make a platform for the site, which will be mounted both on the tree and on wooden posts in the corners.
Instead of driving several small bolts into the wood, it is better to use one larger one.
The order of work is as follows: first, two beams are attached to the tree, then a frame under the platform is installed on them, which in our case is reinforced with posts at the corners of the platform.
Hammocks for ferrets
Probably the most favorite accessory for ferrets, where they happily spend most of their time enjoying their dreams. They prefer to sleep in hammocks, being in a suspended state, than on shelf bedding. You can sew a hammock yourself, or buy it at a pet store. The hammock should be spacious, without a strong chemical smell. If you have several ferrets, then provide each with an individual sleeping place.
The hammock can be made of mesh or thick fabric that hangs freely from hangers
Hammocks are nothing more than hanging loungers and they come in different shapes and sizes. The most popular are classic wickerwork, which is made for people, but animals will need miniature beds. Fabric-based beds come in square or rectangular shapes that have ties or carabiners at the corners.
Another type is in the form of a pillow with foam rubber and rustling balls inside. There are also hammocks-tunnels, which are made from felt boots. In summer, ferrets need lightweight models, and in winter - insulated ones.
Types of hammocks
There are several types of hanging cradles for ferrets:
- classic wicker hammock for ferret;
- fabric hammock (square or rectangular with pendants);
- hammock-pillow, sealed with foam rubber or padding polyester;
- tube hammock;
- hammock made of felt boots.
Hammocks are also divided into lightweight and insulated. Insulated beds are used outdoors or in cool rooms. Cradles also vary in size - from 30 cm to 60 cm in length.
How to make your own playground
Such a playground has everything a child wants - a house, a swing, a slide, a ladder, a sandbox.
Such designs are the constant favorites of kids.
And no matter how complicated the site plan may look for a young dad, in reality it is a small square platform on which a children’s house is being built.
Such a platform is a simple and attractive design that looks good in any corner of the garden.
Purchase
A wide range of labyrinths for ferrets are presented on the shelves of pet stores. They can be made of fabric or plastic, large and have several strokes, or small with a pair of pipes.
Each owner will choose a suitable option, depending on the area designed for the labyrinth, the character and disposition of the pet. Their only negative feature is their fragility. Ferrets often gnaw and try to tear with their sharp claws everything that gets in their way.
In this regard, many breeders prefer not to spend money on labyrinths from pet stores, but to make them themselves, from scrap materials.
DIY children's playground in a rustic style
This children's playground is made according to the same principle, but instead of a children's house, a beautifully decorated gazebo is made on supporting posts, which also serves as a canopy for the sandbox on a hot day.
Children love summer most of all because they can spend almost the whole day outside. Children's playground projects can be completely different - from the simplest to the fantastically beautiful. But in any case, a do-it-yourself playground will allow you to truly fulfill one important dream of your baby.
Did you like our site? Join or subscribe (you will receive notifications about new topics by email) to our channel in MirTesen!
I’m not good at mathematics at all, I’m a philologist by training. I am sewing a tunnel for a child, I need to lay the frame in a spiral, the formula is such that the brain can be broken. I fought with her anyway, and it still doesn’t work out for me! Help, calculate for me, please!
The diameter of the tunnel is 50 cm, the length of one turn is 38 cm. A total of 4 turns.
“The length of one turn is calculated simply by the Pythagorean theorem: L^2=(Pi*d)^2 +t^2, where L is the length of 1 turn, d is the diameter of the turn, t is the pitch of the turn. Number of turns n=l/t, where n is the number of turns, l is the length of the wound section. The total length of the spiral is L(total) = (l/t)*sqrt((Pi*d)^2 +t^2).”
Technology and materials
To dig a pit measuring 6 x 2.5 and 2 meters deep, rent a small-cube excavator. The sequence of placement of layers and the thickness of the fills is as follows, the total thickness of the sand-crushed stone cushion is 80 cm, the height of the tunnel is 50 cm, the soil is 70 cm. After installing the tunnel blocks on the crushed stone base, install end caps and connect the supply sewer pipe. The holes located on top will be used to install ventilation pipes.
The durability of the system is significantly affected by the type and density of the geotextile shell. In this embodiment, polymer needle-punched geotextiles with a density of 200 g/m2 are recommended. This material has more than effective selectivity and filtration properties, which make it possible to reduce the intensity of siltation in tunnels several times.
As a mineral fill, experts advise using crushed stone of the 20/40 fraction. After installing the air vents and eliminating the noticed deficiencies, fill the structure with soil in several stages, with preliminary compaction of each previous layer.
The thickness of the fill is 70 cm, sufficient for the passage of passenger vehicles or arranging a parking lot. You can increase the bearing capacity of the soil by laying a modular geogrid.
Mountain tunnel. Master Class.
Svetlana Kundryukova
Mountain tunnel. Master Class.
Dear colleagues, I bring to your attention a master class on making a model of the “ Mountain Tunnel ”
For the layout we will need:
1. Two plastic bottles for the tunnel . ,
2. Light bulbs. ,
8. Tile adhesive, “Dragon”
, PVA glue. ,
9. Toggle switch, wire for connecting the backlight. ,
10. Colored sand. ,
11. Metal profile for rails. ,
12 Artificial plants. ,
13. Gouache, acrylic paints. ,
Single-story or multi-story: what to choose?
The classic option is a one-story metal cage. It is easy to disassemble, convenient and quick to clean. This design can be additionally equipped with a tunnel or pen: the dwarf will have more room to run.
The second option is a cage of several floors. For such a house there are a number of additional requirements.
Cparks/Pixabay
The distance between floors is from 17 to 25 cm. If the height is more than 30 cm, the level of injury risk increases.
The floor must be solid plastic, since food, bedding and the rodent’s paws will fall through the grate when running
Please note that the cages have height-adjustable tiers.
So which option is better? It is recommended that Djungarian hamsters choose single-story cages with a large area. Individuals love jogging and free space. This is much more interesting for them than climbing or climbing up bars.
Delicious "walnut" staircase
From the empty shells of several walnuts you can make an excellent toy for your pet. In addition to the empty shell halves, you need to prepare in advance:
- a thin nail with a sharp end;
- hammer;
- a strong thread as long as the height of the cell;
- medium size washer.
In all prepared half-shells, you need to carefully make a hole in the center. This is done by driving a nail (there is no need to leave it in the resulting hole). You need to thread a thread through the holes to make the shells into a kind of beads. An important nuance - all halves must be turned in one direction, with the exception of the last one. In a vertical position, the beads look like a stack of bowls standing on a tubercle.
A washer is tied to the end of the thread coming out of the last (lower) shell so that the thread is securely fastened and the structure does not fall apart. The upper end of the thread is tied to the “ceiling” of the cage so that the lower shell lies on the bottom, but the “beads” do not sag. You need to put treats for the hamster in all the resulting bowls. Climbing the structure, the pet will take away a tasty prize at each stage of “conquering the peak”.
The height of the structure must be respected. Hamsters climb beautifully, but they descend simply by jumping. Therefore, you should not use shells from more than several nuts for one construction.
In addition, it is important to provide your pet with a soft landing - the bedding in the area of the toy should be thicker
Requirements
The main criteria when choosing a cage are its comfort and safety for your pet. In addition, the future home of a furry friend should be comfortable for its owner. The owner needs to select in advance the place where the new home will be located, and also select a product for a certain size, no less than the minimum recommended for a dzhungarik.
The materials from which the cage is made must not only be durable and strong, but also safe. Rodents taste everything they see, so the grill bars they try should not be harmful to the health of the animal.
Choose a cage that is easier to clean. It is more convenient to buy a product with a pallet. Be sure to check that the door closes well.
Djungarians are very curious creatures, prone to escape, and a weak locking device may not withstand its sharp teeth. Try to buy a home with built-in attributes in advance. This will be a more economical option, and in the future you won’t have to think about where and how best to install all the additional devices.
Materials
Pet stores offer several options for hamster cages.
Made of metal rods. A good ventilated home in which the rodent feels quite comfortable. The inconvenience is that the noise the hamster makes can be clearly heard through the bars, and dirt always forms around. Filler and debris easily penetrate through the bars. The grill itself should be made of high-quality solid metal.
Do not take products made of copper or aluminum - the animal gnaws everything, so it will quickly render such rods unusable.
Plastic or glass aquarium. In such a closed home, the noise level is significantly reduced, and there is almost no garbage. In addition, this is the safest option for a home where there are cats - it is unlikely that a predator will get to the rodent, which is kept in an aquarium under a breathable mesh. However, the hamster himself will be uncomfortable in such a home, since it does not allow air to pass through well.
The inconvenience for the owner is that the aquarium is difficult to clean.
Lattice cage with plastic tray. This is the most preferred option. This cage is easy to clean. If the home is two-level, and the “floor” of the second floor is made in the form of a lattice, then check whether the pet is injured by getting its paws or abdomen stuck between the bars. If the risk of injury is high, cover the second level with cardboard.
It is recommended to buy cages in which the second floor is made of plastic and reinforced with high quality. Try to avoid wooden elements in the cage, as wood absorbs unpleasant odors and also becomes a favorite material for grinding down the rodent's incisors.
Designs and sizes
The length of the cage for one dwarf hamster should be at least 50 cm. This is even longer than for a Syrian hamster. And although the Syrian is larger in size than the Djungarian, the miniature pet still has to run a greater distance per day, so it needs a more spacious cage. If the cage is purchased without additional equipment, then do not forget that the area will be reduced due to the established mandatory attributes.
Another important point when choosing a cage is the gap between the rods. It should be no more than 10 mm.
Give preference to a cage with horizontal bars - rodents like this shape more, and it is much easier to attach additional devices to a horizontal grid for a comfortable life for a rodent.
If the distance between the rods is greater, the hamster will definitely try to escape. And even if the cage contains a fairly well-fed individual, this factor does not deprive it of its plasticity.
If you purchase a very spacious cage, then do not forget that cleaning the hamster is done quite often, and the large dimensions of the cage will significantly complicate this process.
However, if the owner keeps several hamsters at once and plans to breed them, then it is better to opt for a large cage. It is worth mentioning separately about the day of the dwelling. It can be with a retractable mechanism or high. A retractable bottom is much more convenient in terms of cleaning, but a cage with a high bottom is suitable for breeders, since the high sides will prevent curious little hamsters from falling out of the cage.