Photo: pinterest.ru The swan is the bird of love and fidelity, creativity and wisdom, nobility and purity. You can find a similar image literally everywhere: among toys, souvenirs, postcards or packaging. You can also make a paper swan with your own hands, putting a piece of your own soul into it! And at the same time - take your mind off everyday problems, keep your child busy, or just pass the time. Let's talk!
Swan made of modules. Scheme.
Let's start making a swan from modules:
1. Make the first two rows. Place the three modules as shown in the picture.
Insert the corners of two triangular modules into the pockets of the third. You will get this design.
2. Prepare two more modules and insert them into the structure made earlier.
3. In the same style we connect two new modules. But this design is quite unstable and can very easily fall apart. In order for everything to work out as it should, you should collect three rows at once.
4. Add a third row and make the structure even stronger.
The design should look like this. One row of it is made of 30 modules.
5. Just like you did the third row, do the fourth and fifth.
6. Now you need to carefully take the entire structure with two fingers and press on its middle with your thumbs so that it turns out
7. Now bend the edges of the structure upward to get the shape shown in the picture.
This is what it looks like from the side.
And here's what it looks like from below.
8. We put on the 6th row of modules in the same way as before.
9. When Row 7 begins, get ready to give your paper swan wings. First you need to attach 12 modules of the eighth row to the structure. Next, skip two modules and attach 12 more modules. Where you missed 2 modules will be the neck, and in the other empty area you will build the tail.
10. Start building the 9th row, reducing each swan wing by one triangle.
This is what it looks like from the side
11. Continue building the wings, decreasing the row by one module until there is only one module left.
12. Making the swan's tail. Also reduce the row by one module.
13. Making the neck and head. Prepare 19 white and 1 red modules, in which you need to glue the corners to make a beak. To make a neck, you first need to arrange two modules as shown in the picture, and then insert the corners of one module into the pockets of the other.
Next, we assemble the swan’s neck in the same style. When assembling, try bending the structure with a crochet hook.
14. The final touch is to place the neck on the remaining two corners between the swan’s wings.
That's all!
Rainbow swan made of modules
This incredibly beautiful rainbow swan is very easy to put together and requires 459 modules, which is actually not that many compared to other triangular module designs.
You can choose the color yourself, for example, you can make the beak from red modules, the body from white, and the wings, for example, from black.
You can make this rainbow swan with your children; they will really enjoy the whole process and will be happy with the final result.
Materials and tools
To create a swan you only need:
- plain A4 paper (it not only folds easily, but also holds its shape perfectly; color - optional);
- scissors (preferably medium-sized, because small ones will be inconvenient to cut paper);
- a little patience and precision.
You should also prepare a comfortable workplace for yourself. If all this is done, then you can safely begin the work process.
Rainbow swan made of triangular modules. Scheme.
1. Prepare red paper modules using rectangles measuring 4 by 6 cm.
2. Assembling the modules. Connect the three modules by inserting the corners of the first two into the pockets of the third. You should end up with a basic element like this.
3. Two more modules need to be attached to the sides of our element.
Using the same scheme, you need to make a ring of 2 rows, each consisting of 30 modules. Close the ring (see picture).
4. The third, fourth and fifth row should be added in a checkerboard pattern using orange triangles.
5. Carefully turn the workpiece inside out. Your design should now look like this
If you turn the design upside down, it will look like this
6. Making wings. To do this, you need to start adding the 6th row, which also consists of 30 modules, but now yellow. Choose the side where you are going to make the swan's head. Find two corners from two modules from the sixth row - there will be a neck there.
Start to the left and right of these two modules to build the 7th row, also yellow. Both on the left and on the right you should have 12 modules, with 2 spaces between them.
Continue adding modules to the sides, reducing each row by 2 triangles.
8. Make the tail of the module in the same way.
9. Making the neck of a paper swan. Insert one module into the other and continue to build up the swan's neck, giving it the desired bend.
10. Making a stand. You need to make two rings connecting the modules, just like the neck.
The simplest techniques
Look at numerous photos of swan crafts on the Internet and you will see how many different techniques and ideas exist. But many of them are too complex, and many, on the contrary, are simple, but do not look as good as we would like.
We have prepared for you a wonderful selection of crafts using techniques that are just right for you. These are proven master classes that will help you make beautiful crafts with your own hands without extra cost and effort. Try it and everything will work out!
Double swan made of modules
You can give this swan made of triangular modules to a loved one or friend, and there can be any reason.
Making it more difficult than previous swans
, but it will be larger and more magnificent.
Prepare a stack of A4 sheets and patience
, since it is a very important element in the manufacture of many modules - but if you have already seen the picture, you understand this.
You don’t have to do everything at once in one day, you can stretch the process
.
To create a double swan you will need exactly 1502 modules. You can make it from white paper, but of course if you add a few details, for example, pink or red (you can choose any color), then it will take on a beautiful color, but then prepare 1322 white and 180 colored modules
.
The whole process is divided into 3 separate stages.
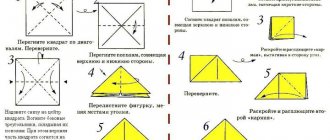
Method 1
The simplest option is also called “crane” or “dragon”. A photo of an origami swan made in this way can be found in any origami book or on the Internet.
At first glance, folding such a figure is difficult, but if you figure it out, it can be done in literally five minutes. To create such a swan, we will need scissors and plain white printer paper.
So, consider the sequence of folding a swan:
- Cut out a square from rectangular paper. To do this, we pull the top side to the side by the corner so that they coincide. Cut off the remaining strip at the bottom. You can use special origami paper; it has a square shape.
- Fold the square diagonally. Fold the resulting triangle in half again, connecting the sharp corners together
- Unfold and fold the square into a rectangle. It is important that all fold lines are in the same direction.
- We fold along the resulting fold lines so that we get rhombuses on both sides, with a cleft in the middle.
- We add the corners of the rhombus to this crevice. Turn it over and do the same on the other side.
- We pull the corners from the crevice on both sides. This is the head and tail of our swan. You need to pull them and the wings will spread out on the other sides.
- Bend the head down and the swan is ready. If you gently pull his head and tail, he will move his wings.
Swan made of triangular modules. Scheme. Stage I.
1. As usual, start connecting the 2 modules as shown in the picture.
2. Now connect another 60 (i.e. 2 rows of 30) modules that go in a circle. You should end up with a design like this.
3. Make a few more rows so that their number reaches 15. During the assembly process, you need to bend the structure inward once and continue adding modules, gradually bending and stretching the entire structure.
4. Assemble the tail and wings. A total of 6 modules are needed for the neck (in the figure, 6 modules are divided into 2 pink and 4 white) and 4 for the tail. The tail is located opposite the neck.
To assemble the neck, simply remove 1 module at a time, i.e. the next row of the neck will have 5 modules, then 4, 3 and stop at 2 modules.
To assemble the tail in the same style, we assemble modules, starting with 4 and reaching one at the top.
5. Assembling the wings. For the first row of wings you will need 10 modules.
When you start making the second row of wings, you need to insert the module from the tail side as shown in the picture.
6. Continue attaching the modules, using 10 pieces for each row. You need to get to the 10th row.
7. After 10 rows, you need to continue making wings, but this time reduce them one module at a time, i.e. each subsequent row will have 1 less module. Make sure that the rows of the wing on the right are equal in height to the rows of the left wing.
8. You should have a design like this from 770 parts.
9. To make your structure more stable, add modules to the base as shown in the picture to create a stand. You can attach these modules with glue. At this stage, you also need to attach all the modules evenly so that the swan stands well. Make another row like this (there are two in total).
Double swan made of triangular modules. We collect all the details.
The time has come to put everything together, i.e. insert the smaller piece inside the larger one.
If the inner wings are difficult to insert, they need to be inserted slowly, gradually moving the parts of the larger part apart.
With the third part, the same problems may arise. You will have to push it in little by little. As a last resort, place the part on glue.
And to make the neck you should start assembling with 3 or 4 modules. How the swan's neck bends is up to you. You can put the first few rows of the neck on glue to make the structure more durable.
You can decorate your swan to your liking, using ribbons, for example, but don't overdo it.
Assembling a swan from modules
1. We build the torso. To do this you need to assemble a chain of triangles (see picture). When you close the chain, you will have 2 rows of modules, each with 43 triangles.
2. Starting from the 3rd row, you need to attach the modules in a checkerboard pattern. For the body you need 12 rows.
3. Make the breast and wing. The breast base has 9 modules. In one of the pictures they are marked with a black marker. As you lay out the rows, each next one should have 1 less module until you have 3 modules left.
In order to start making the wing, you need to turn the modules the other way and attach them to the breast (see picture).
4. Take a careful look at the pictures - the row of wing modules that comes from the breast is reduced by one module, and at the end of each row you need to add one module (one pocket of this last module will be empty)
This is what it looks like from the inside.
5. You need to lay out 12 rows of 12 modules each, and from the 13th row, start removing 2 modules in each row (on the left and right sides of the row). The wing ends when 1 module remains.
This is what it looks like from the inside
6. Make the second wing in the same style.
7. Making a tail for the Black Prince. At the base of the tail there are 6 modules, which are turned upside down. Continue adding rows, decreasing each by 1 module. There should be one triangle left at the end. The picture on the right shows the inside of the tail.
8. Let's return to the swan's breast. We settled on three modules, and start making the neck of the paper swan from them. Alternate rows of 2-3 modules. There should be 19 rows in total.
9. Making the swan's head. Turn the modules over and start attaching them in a checkerboard pattern - one row is 3 modules, another is 2 modules, then again 3 and 2, and the head is ready.
10. Making the back of a swan. There are 15 modules attached to the base of the backrest. Build rows, decreasing by 1 module each time. Finish when there is one module left.
11. Making a stand. It consists of 3 rows of 61 modules, built in the form of a closed circle.
12. Paint the white swan black.
Before you start painting, you need to give the swan's wings and neck a certain curve. It is also worth mentioning once again that painting with black aerosol enamel is best done outdoors, since the fumes of such paint are poisonous.
Leave the stand white.
This is how the swan looks after painting.
13. Making white plumage. Use the white module to connect one module from the breast and one from the wing. In the same style, attach white modules along the edge of the wing, gradually moving upward, combining white and black triangles.
14. The same plumage should be done for the chest and tail.
15. To make the beak, use one white and one red module.
16. Using glue, attach the back to the swan. Attach the wide part to the breast, and the narrow part to the tail; add plastic eyes (if desired); glue the Black Prince onto the stand.
A little about swan fidelity
A couple of years ago, in France, an incredible story happened with a pair of beautiful swans who lived on a pond near the Bois de Boulogne. As we know, swans are birds with a huge soul and a kind, sensitive heart; they choose a mate for themselves once and for life. And then one fine day a misfortune befell the couple. One of the swans (a female) almost died, and all because of female curiosity. She swallowed some shiny fishing gear and it got stuck in her stomach. The swan husband was not at a loss, he began to call for help. The fearless bird began to scream, attracting people's attention, he threw himself at the feet of passers-by, asking for help.
Fortunately, a policeman was passing by that day and did not ignore the bird’s plea. I followed the swan and when I saw the already exhausted female, I quickly realized what the problem was. The policeman took both birds to the veterinarian, on the way the swan no longer screamed, he understood that people would help his wife. This story ended well; the bird was rescued and the ill-fated fishing tackle was pulled out of its stomach. And the story of these faithful love birds will live forever.
Interesting things about swans
These beautiful snow-white birds live on the water. They are located away from people, in quiet, inconspicuous bodies of water. If the birds feel treated well and cared for, they can settle in a crowded place or near houses.
Swans are by nature calm and leisurely birds, but if they feel threatened, you should be very careful. The Mute swans with a red beak and raised snow-white plumage are especially active. He can even attack a person when in danger.
Black swans, despite their more aggressive coloration, are, on the contrary, more peaceful.
Unusual facts
- As children, swans do not have a beautiful snow-white or black color. They are born with gray down, only depending on the climate a certain color appears.
- It is not without reason that more than one generation of people has been telling about the loyalty of swans. If one partner dies, the other swan may live alone for several years, and many live alone until death.
- The color of swans depends on the climate of the region where they live.
In warm areas, swans take on a dark hue, while in cold countries, swans become a perfect white color.
The history of origami
Origami appeared in Ancient China after the advent of paper in the one hundred and fifth year of our era. Origami was used exclusively for decorating monasteries and offering boxes made in the origami style to monasteries. Then origami began to be entertaining. Men began making symbolic figures or letters for their women in origami style. It was considered a very complex art that was not accessible to everyone.
Akira Yoshizawa in the mid-20th century came up with the “ABC of Origami” with lessons that could be used by all people, not just high-ranking officials and monks.
Nowadays, origami is very famous all over the world, especially in Japan, and can be practiced by both children and adults.
Initially, the use of scissors and glue was prohibited for making origami, but these tools are now acceptable for folding figures.