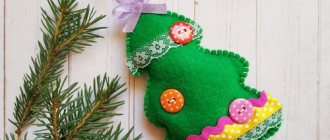
From felt
Felt is a very popular material now, from which you can sew almost anything. In addition to all its advantages, for example, brightness, high density, it also holds its shape, which is especially important in some cases. For example, when sewing toys for puppet theaters, it is simply irreplaceable. In addition, cut edges made of this material do not fray or crumble, and therefore do not require additional processing.
Large soft products are unlikely to be made from it, since the rather dense hard felt will not be very convenient to stuff. It is more suitable for small animals or finger theater puppets, where the ability to keep its shape is important.
Master class on how to make a felt cow without a sewing machine:
How to sew a felt kitten with your own hands:
How to take measurements from a child
Most children are standard sizes for their age. This is especially pronounced in children under one and a half years old. In this situation, it is convenient to use standard tables. If necessary, they can be adjusted, but it is better to do this as a last resort. Typically, patterns are published for standard sizes, and if you do not need to adjust them, you can use them without making your own edits.
You might be interested in Interesting and simple patterns of overalls for dogs
For older children, measurements are taken as follows:
- Neck circumference is measured at the bottom.
- To obtain the girth of the chest, measure where the most voluminous part is. In this case, the protruding parts of the blades should be covered.
- Young children do not have a clearly defined waist. It is recommended to determine it approximately, tie it with a centimeter and let the child move. When the centimeter sags, take this measure as the girth. If the baby's belly protrudes, then the measurement is taken at the widest point.
- To girth the hips, take the most protruding points: the buttocks and the edges of the thigh bones.
- Chest width is the distance between the armpits. The width of the back is measured in the same way.
- To determine the circumference of the head, the centimeter is wrapped at the widest point.
For your information! Based on the measurements taken, a pattern is created, with which you can sew comfortable and beautiful clothes for children.
Sports jacket pattern
DIY soft toys made from fleece
Fleece has long been used for the factory production of toys, so it is not surprising that it has gained popularity among needlewomen. In itself, it has a number of advantages compared to other materials: it is unpretentious, soft, stretches well, due to which you can easily hide minor flaws in the pattern or uneven seams. In addition, it is easy to care for and its cost is very low. Of course, there are also small drawbacks that will not make you refuse to use it: fleece tends to roll up and become electrified. If you choose fleece that is more expensive, then its quality will be significantly better.
When working with this popular material, you need to consider the following nuances:
- the fleece stretches along the transverse, so when cutting we take into account the direction of the pile;
- choose sharp needles and polyester threads;
- We make small seams, about 2 mm.
Most of the freely available patterns are suitable for sewing from fleece.
Cat or cat
The cat family is loved by both adults and children, so there are a lot of options for making it. These can be not only cute animals, but also heroes of popular cartoons, for example, Simon the cat.
Master class on sewing Simon the cat from fleece:
Hare
Hares are made in various types and techniques, but tilde bunnies with long ears have gained particular popularity. If you use another material for lining the ears, for example, bright chintz, then the toy will turn out to be even more interesting.
Video on how to make a fleece hare with your own hands:
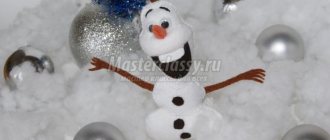
Bear
The bear, the main character of Russian fairy tales, needs no introduction, but almost everyone can sew one on their own. The patterns are not at all complicated, while the muzzle can be decorated in any available way: embroidered, sewn on, beads, buttons, etc.
Giraffe
A very interesting character who doesn't come across too often. Therefore, if it was not possible to find a suitable pattern, then you can take an ordinary horse as a basis, which only needs to lengthen its neck.
Giraffe patterns:
Owl
The owl is sewn very simply and easily, and for decoration you can use bright and rich colors, and several in one toy at once! Perhaps this is why children love the owl so much - here you can realize almost any color preference.
Cow
A cow or bull is usually made on the basis of very simple patterns, where the base of the hooves and horns can be cut out along with the body, or sewn on separately from another material. For sewing, fleece or natural thin fabrics, such as cotton, are usually used.
Fox
Toy patterns:
The red fox sister is very easy to do. It doesn’t even necessarily require a complex pattern, a very simple one is enough - everyone will recognize it by its bright red color. Most often it is sewn for finger theater from fleece or felt.
All the patterns discussed are suitable for any fabric, except, probably, felt due to its high density and rigidity.
Sliders
Baby clothes. Sliders
The pattern is for an approximate height of 74 cm. We transfer it to knitwear (interlock, kulirka).
Baby clothes. Pattern of rompers
We sew one of the two parts of the future sock to the front of the sliders.
Baby clothes. We sew sliders
Then we sew together the front and back parts of the legs.
Baby clothes. We sew sliders
Now we sew on the second part of the sock (the insole).
Baby clothes. We sew sliders
Turn it right side out. All that remains is to sew on the knitted belt. To do this, we cut a rectangle measuring 37x17 cm from thin knitted fabric (cashkorse, ribana, sandpiper fabric), bend it in half and sew it to our rompers.
Baby clothes. We sew sliders
I got such cute and comfortable rompers.
Baby clothes. Romper for babies
Don't come up with excuses, try it, you will definitely succeed
Very often, modern mothers are scared off by even the very thought of sewing from old things with their own hands for children, they say, I don’t have a machine, I don’t know how to make patterns, and anyway, I can’t buy a new one for my child...
To create clothes for a child, a new exclusive and favorite toy, any piece of furniture, a very fashionable accessory or decoration, you just need to be able to hold a needle in your hands and insert a thread into it, and everything else is just excuses. After all, this is precisely the case when it is not skill, but desire that is important for obtaining.
Regardless of what you want to create, sewing from old things allows you to fully express your imagination with a very small investment of money and time.
Hats and caps
One of the mandatory parts of a baby's wardrobe is a cap. It's easy to sew. It is enough to choose a soft natural fabric and cut out the details correctly. You can use ready-made clothing patterns for children, as well as create your own with an original design. An elegant hat will be useful for discharge from the maternity hospital or for baptism.
To create a cap pattern, it is enough to take just one measurement. This is the half-circumference of the head. To remove it, you need to measure the circumference of the baby's head, placing the tape in the places where the back of the head and forehead protrude most.
For a head circumference of 48 cm, the half-circumference will be 24 cm. To construct the back of the head of the pattern, use the following calculations:
- AB = ½ OG: 4 + 1.5 = 24: 4 + 1.5 = 7.5 cm;
- AD = ½ OG: 2 + 3 = 24: 2 + 3 = 15 cm.
To construct a rectangle, you need to calculate using other formulas. To do this you will need to make the following calculations:
- AB = ½ OG: 2 = 24: 2 = 12 cm;
- AD = sewing line length = 20 cm.
As you can see from the pattern picture, seam allowances are already included in the pattern. The edges on the front part should be processed. The best option would be a tape that will hide all the seams.
If the fabric is not soft enough, it is advisable to sew the parts with the seam facing out. For a girl, you can decorate the cap with lace.
A must-have item for a child's wardrobe
In second place after socks, relative to the frequency of purchase for young children, are hats. Regardless of the time of year, this headdress is a must-have in your child's wardrobe. And, as practice shows, there are never many of them. Panama hats, scarves, bandanas, knitted and woolen ones - they can all be made independently, and you can use old things for this. Sewing from old things and remaking old things can reveal talent and become one of the most important hobbies in the life of a young mother.
Overalls (pants with straps)
Baby clothes. Sliders with straps
Draw a pattern and transfer it to fabric (wader fabric, interlock). This pattern is suitable for a height of 74-80 cm. If you need a pattern for a height of 80 cm or a little more, then you can simply lengthen the legs and make the place of the step cut lower (for a diaper), that is, not 34 cm, but 37-38 cm.
Sliders with straps. Pattern
Sliders with straps. Pattern
We sew both parts together. You can sew such a leaf-like detail into the step cut for better comfort for the baby.
We sew sliders
We sew knitted tape along the edge of the entire upper part, including the straps. You can make it yourself by cutting a strip 3-4 cm wide and folding the edges twice. I bought ready-made knitted tape at the store. We attach or sew buttons onto the straps (you can do it with buttons).
Sew on the binding and attach the buttons
Now we make cuffs (cashkorse fabric, ribana). I cut out 2 rectangles 10x14 cm. We sew the rectangle on the side, bend it so that the seams are on the inside. Sew them to the bottom of the legs.
Sew on the cuffs
I got this kind of home dungarees (pants with straps) for my youngest daughter.
Baby clothes. Sliders with straps
Children's dress made from a T-shirt and flounce from an adult dress
One day it seemed to me that my dress was too long, and I tore off the lower flounce. Then we took our daughter’s “boring” T-shirt and sewed this flounce onto it, greatly shirring the fabric.
It turned out very lush and not boring at all! The main thing is that the colors match.
The dress gets a lot of compliments!
Transforming a sundress into a children's dress
I really loved this sundress - it was light and was simply irreplaceable in the subtropics. But I caught the hem somewhere, and a hole formed in it.
Therefore, the transformation began with cutting off the hem and top.
Then from the whole part of the hem I cut a “top”, i.e. top of the sundress. It was flipped over (the finished hem seam was on top, so no finishing was needed on the top of the top). Then I reduced the straps.
When sewing it to the top, the skirt had to be slightly pleated. Make sure that these folds are the same distance from each other.
I sewed this product on a machine. There were three seams: the bottom one, at the waist and the side seam on the top.
In total the work took about 2 hours.
Rug? Why not
Sewing from old things is not only about creating a children's wardrobe. Our grandmothers also turned clothes into rugs. Today there are two most popular methods for creating these products, which will find their place in any home, especially in the hallway and bathroom.
In the first case, clothing of any quality is cut in a spiral into strips of approximately the same width. Just sit down to watch your favorite movie in the evening, take an old skirt or T-shirt, scissors, and by the end of the series you will have at least one ball ready. Then take a thicker hook and single crochet, moving in a circle, start creating. A special advantage is the ability to knit in parts. Day after day you will see what shape the rug takes on and adjust the required sizes and colors. The finished product does not unravel and holds its shape well. It is also very easy to care for. After all, washing it in a machine or even by hand in a basin is much easier than dry cleaning a carpet bought for a lot of money.
If you don’t know what a hook is, and don’t even know the most basic knitting technique, there is a second option. This is exactly how the product is cut into strips. Once you have three balls of approximately equal size, begin to weave a braid from the ribbons. Whether the ribbons will be the same color or different is up to the needlewoman to decide. We wind the resulting braid so that it looks like a snail shell, and sew it with a regular needle at the joints. Such a rug, if lightly steamed after finishing work, will look simply amazing.
Repurposing an old sweater
In this collection you will find 5 popular ideas and master classes on making children's clothes from an old sweater with your own hands. All of them are very simple and will not require much time and effort from you. Measure, cut and sew - these are three simple steps that will allow you to turn an unnecessary item into a new thing for your child.
We suggest you make a headband, a hat, leg warmers, mittens and a skirt. If you want to sew all these things at once, one jumper and one cardigan will be enough. Additionally, you will only need good threads, scissors and a few elements of original decor (however, sometimes you can do without decorations).
Headband made from a sweater cuff
We suggest you sew a headband - teenage girls really like such accessories. It can be used as additional ear protection when it is no longer cold outside, but not yet warm. In addition, the headband can be worn in everyday life as a hair accessory.
Decide on the width of the craft by first measuring it on your head. Let's say it is 5 cm. Multiply this number by two and take into account the seam allowance (in our case it turned out to be 11 cm). Measure this distance from the bottom edge of the sweater and trim it. Fold the resulting tape in half and apply it to your head to determine the length of the bandage.
Trim off the excess and sew the edges of the ribbon together. Make a slight fold in the center to make the headband look nicer. This can also be done using an original brooch or a large wooden button. Decorate the accessory to your taste.
Openwork leg warmers from sleeves
If you've worn out an interesting knit sweater but don't want to part with it, give it a second life. The sleeves of your favorite item will make great children's legwarmers.
Options range from upcycling a warm and fluffy wool sweater to a regular knit jumper. However, you should not choose knitwear that is too soft - it tends to stretch, and it will not be easy for you to process the seams.
Check out our selection of sewing tips and tricks and hem the edges of cut sleeves. Complete the craft from an old sweater with beautiful buttons or pom-poms.
Children's cardigan hat
You can also make a hat from a sweater, but in the version with a cardigan you will also get ready-made decor in the form of cute buttons.
To avoid fiddling with patterns, take a ready-made baby hat that your child usually wears and attach it to the folded cardigan. Trace the outline of the cap with soap. There is no need to make a seam allowance - the outline line will be the allowance.
Cut out the product along the contour and sew the parts from the inside out. The finished accessory can be complemented with a pompom or a cute bow.
See also: a simple hat in 10 minutes
Sleeve mitts
You can make mittens from the sleeves of the cardigan from which you made the hat (previous master class) to make a set. You can also use another product. The main thing is that these things are the right size for the person who will wear the mitts, because their size must match the size of the sleeves.
Cut off half the sleeve and finish the edge. Make a small hole on one of the future mitts and try it on your thumb. Measure the exact distance and make a hole on the second mitt already along the ruler. Seal these holes with thread. Here you will also find useful the tips that we already mentioned in the previous master class.
The finished product can be decorated with applique or beads.
Skirt made from an old sweater
If your child has already worn out his favorite sweater, or you have another suitable item, turn it into a skirt. It's okay if you make it from a jumper that is much larger than the child - the skirt can be flared.
Using a tape measure, measure the desired length of the skirt. Add rib and seam allowance. Measure and cut the required amount of fabric from the sweater. Fold the raw part of the material twice and carefully hem it. Insert an elastic band inside (its length corresponds to the child’s waist).
The elastic band can be replaced with a belt - that is, make a skirt with ties. You can beautifully complement such ties with pom-poms.
As you can see, an old sweater or cardigan can make wonderful children's clothes that your child can wear for a very long time. And what’s especially great is that no one will even guess that you remade them from something: it’s unlikely that anyone will remember and match the color of your sweater with the new children’s leg warmers. Get inspired, create and decorate!