Material
Any Bigfoot doll begins with a project. At this stage, you need to decide on the materials for making the toy. Special knitwear is now on sale for sewing dolls. It is pre-painted in flesh color, all you have to do is choose the shade you like. There are 2 types of this kind of fabric. The thinner one is intended for sewing the head. It has a small margin of elasticity, sufficient to avoid unnecessary folds. Type 2 – a little denser, more suitable for the body and limbs.
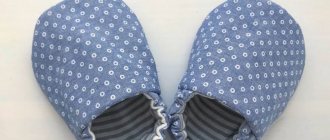
For the doll's body, you can use fleece fabric - this is a very soft, fleecy artificial knitwear. The toy is soft and pleasant to the touch.
For an eco-friendly doll, you can use linen. This is an excellent material, it absorbs moisture well and allows air to pass through. Be sure to keep in mind that after the first wash, linen shrinks. It is better to wash the canvas in advance, and only then cut out the doll on it.
Padding
The Tilda Big Leg doll is stuffed in several stages, each part separately, there are very thin, hard-to-reach places. It is very important to choose the right material so that the padding lies evenly. All materials can be divided into natural and artificial. Now is the period of craze for environmental friendliness, so many people stuff dolls with wool. The product turns out to be very soft; if you tear the fiber into small pieces, you can achieve uniformity.
Wool is wonderful, but it has its downsides. Monitor your child closely for several days; an allergy may occur to the wool. In this case, you will have to replace the filler with holofiber. Although this is a synthetic material, it is hypoallergenic. It is very convenient to stuff with it, because it already consists of small particles.
To make the doll more stable, many people prefer to fill the stacks with something heavy. This could be silica gel, cereal or small sea pebbles.
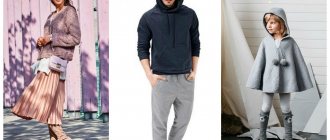
DIY clothing pattern for a centipede doll
We invite you to sew a nautical-style outfit for your doll, which consists of a skirt, blouse and pantaloons.
Trousers:
Blouse:
Skirt:
To add volume to the skirt, you can make a fluffy tulle petticoat underneath. It will look very elegant.
Patterns
There are several cutting options. In the first version, each part is cut out separately. Then the doll is gradually assembled into a single whole. It takes more work to sew the head to the body. If you do this job incorrectly, your head will wobble. You'll have to practice a lot before you get a good one.
The pattern of the Big Legs doll with a one-piece head is much easier to make. You don't have to worry about sewing it to your neck. This option will be especially useful for beginning needlewomen; it will help them gain self-confidence and not quit their job halfway through.
Progress:
- Initially, you need to transfer all the patterns (except for the head and feet) onto the fabric of the future torso of the doll and sew all the elements except one side.
- Fill the inside of the body with your chosen material and sew up its last side.
- Transfer the patterns of the head and feet onto the fabric with a margin of 5 mm.
- Using the foot pattern, make cardboard feet.
- We lay the cardboard feet on top of the fabric ones, fold the 5 mm allowances of the fabric feet onto the cardboard ones and attach them to each other with a heat gun or sew them on.
- We sew the feet to the legs, preferably with a hidden seam.
- We sew together the details of the head, leaving the side of the neck. We fill it with filler, and attaching it to the neck, we sew the body to the head with a hidden seam.
- We dress our doll in any clothes using patterns. These can be knitted items from hats to shoes, or even sewn ones. There are no general principles here.
- The last detail is the hair and headdress or hairstyle. For the first time, you can use a notebook on which you can stretch the yarn so that your hair straightens. Then, by cutting the wound yarn in half, you will get two identical strands.
- We sew the hair along each of the semicircles of the head and collect it either in ponytails (ponytail), or in a braid, or tie it with a ribbon.
- We draw the eyes (should be close together) with black acrylic paint and blush on the cheeks with regular blush.
- Clothes for the Snowball doll can be sewn directly on it. Of course, you can sew it on the doll, but most likely you or the person to whom you give it will someday want to change it for the season or for variety.
- It is not advisable to draw a mouth, nose, or far-set eyes, since the image of the Snowball doll will be disrupted in this way.
- A possible option for creating a nose is to attach a small stick with cotton wool or something like that wrapped inside the head to make the nose appear natural.
→ The presented material contains an interesting option for creating a body for a Snowflake or Snowy Girl doll. The author of this master class and the idea itself is Elena Makeeva. A special feature of creating a doll using the proposed method is that the shape of the head of the toy is given by a creative blank made of foam plastic. This doll will also have a neat nose. In general, let's watch and learn!
So, to create such a Snow Girl you will need patterns. The size of the patterns is commensurate with the A4 paper size. The author uses the following patterns for the body, arms and legs (two options, each for different shoes). The body pattern is sewn from below (leaving a small hole) and from above:
We use this pattern for sewing outerwear: vests, jackets and coats. This pattern allows you to sew outerwear for toys either from a single cut (then we apply the pattern to the bend of the fabric) or from two parts - this is a more economical cutting option.
Boot pattern, which includes parts: heel and toe
Let's return to sewing the legs, as already mentioned there are two options. One with a wedge, and the second without it. So, when sewing a version with a wedge, the leg immediately comes with a flat sole. First we sew the wedges on each part, and then we sew the leg parts along the contour. When using the second version of the pattern, you will also need to sew on the oval-shaped sole separately. Cut out the details of the doll’s body:
For sewing we use special knitwear for the body. It is better to cut along the grain thread. We wrap the ball with padding polyester and insert it all the way into the neck from above. The length of the fabric into which the head is inserted should be no more than 1.5-2 cm higher than the ball with padding polyester, otherwise you will not achieve a beautiful and even fit to the head. You need to wrap the ball with padding polyester 2-3 times, depending on the thickness of the padding polyester. We fix the synthetic winterizer using overstitching.
Now let's make the nose. You need to take a pin with a round tip, drop some glue on it, the author uses the moment, and wrap it with padding polyester several times.
We insert the blank ball into the head.
We mark an approximate location for the nose, pull back the head fabric and insert a pin into the ball.
We assemble from above:
Now we stuff the neck, to do this we roll the padding polyester into a tight tube and from the lower part of the body insert it into the neck until it stops.
This is what you should get. To prevent the padding polyester from moving out of place, you can and should secure it with pins in a circle.
We think you have more than once come across dolls on the Internet made based on Tatyana Konne’s master classes.
Stitching
We transfer the selected pattern first to paper, then to the fabric itself. When cutting, do not forget to add space for seams, about 1 cm. When all the parts are cut, you can start stitching. If you have a pattern for a Big Legs doll with a one-piece head, sew it together starting from the bottom edge. When the narrow part is sewn, you can stuff the head in advance, it will be easier and more convenient.
Handles are stuffed over the shoulder. We sew the leg, starting from the bottom, so that at the end all that remains is to sew on the foot. To stabilize the doll, you can put a piece of plastic or thick cardboard in the foot. Only then finish the work. To push the filler into narrow places - such as legs, arms, especially fingers, use Chinese sticks or thick wooden knitting needles.
To assemble all the parts into a single whole, special doll mounts are used. The arms and legs are movable. You can use simple buttons. We attach both legs at once, buttons on top and sew through the doll.
There is another way to sew a Bigfoot doll. We transfer the patterns onto fabric folded in half and immediately sew them on a sewing machine. Just be sure to leave room for stuffing. After stitching, all that remains is to cut out the finished parts.
How to sew a beautiful textile doll with a big head: patterns with descriptions and photos
A textile doll with a large head is most often used for interior purposes. It is not intended to be played with.
So, to sew an interior doll with a big head, prepare the following materials:
- synthetic filler
- textile
- stencil paper
- thread, needle
- foam or plastic head ball
The process of making a doll.
- Redraw the stencils on paper, or print them on a printer and cut them out.
Pattern diagram for a doll with a big head
- Transfer all parts to the fabric, add an additional 2 cm around the entire perimeter of each workpiece.
Fabric blanks
- Sew the parts together, leaving the areas marked with dotted lines on the diagram unsewn. Through these holes you will fill the doll with padding polyester.
- Fill each part of the doll with filler.
- The ball that we have listed in the materials is necessary for the head. Insert the ball through the hole in the top of the head and sew it up.
Doll parts filled with padding polyester
- Fasten all the parts together. The result is a finished doll body.
Finished doll body
- Now you can come up with a dress for the doll, put a wig on it, and draw a face.
The finished doll may look like this.
interior doll with a big head
How to stuff your head
To keep your head in good shape, you can use a foam ball as a base. If this is not the case, roll up a tight ball of old newspaper and cover it with papier-mâché. We wrap the workpiece tightly with filler. At this stage, padding polyester is best suited. Now we push this entire structure point-blank up to the throat.
To give the Bigfoot doll a nose, we take a stationery pin. We drip glue onto the tip and screw a small piece of padding polyester onto it. For strength, we wrap the base with thread. We insert the resulting blank into a foam ball inside the doll. Only a small tubercle of the nose will be visible from above.
The last step remains. Use a sewing stitch along the top edge and tighten. To secure, we make a few more stitches. The head is ready. Now we roll up another thick roll of padding polyester; it needs to be inserted into the doll’s neck. It should fit as tightly as possible to the head ball. Now you can stuff the rest of the body.
How to make Snowball yourself: step-by-step master class
Sewing a textile doll Snowball is not difficult. The main thing is to follow the entire sequence of actions.
Transferring pattern elements to fabric
The pattern of the doll's parts needs to be transferred to paper and printed. After this, the parts are cut out with sharp scissors directly along the contour; there is no need to leave allowances.
The parts need to be laid out on the fabric. If you need two parts, you can immediately fold the fabric in half. The paper pattern needs to be pinned to the canvas using pins and carefully traced with a pencil.
Uncover
Cutting out the parts is quite simple. You need to carefully cut out all the circled parts, leaving at least half a centimeter for allowances so that you can then carefully sew them together.
Sweeping body parts
After all the parts are cut out and prepared, they need to be carefully swept away with a needle and thread. The process is carried out strictly along the contour of the part.
Basting garment parts
Depending on what kind of doll you want to make, you need to immediately select the fabric and decor for the clothes. There are patterns on the Internet, you can choose any one.
The most important thing is that it fits the doll in size. Therefore, it is recommended to first find out the length and width of the doll itself (this is usually indicated in master classes), and then select the necessary clothing options.
The details are also transferred first to paper, then to fabric and carefully cut out. Then they are swept away in the same way.
Beginners should start with simple dolls
Sewing
After all the parts are sour cream, you can start sewing them together. For this purpose, use a sewing machine or do it carefully by hand.
Initially, the body, arms and legs are sewn together, leaving small holes through which the stuffing will be carried out. After this, you need to carefully turn them right side out. The legs are sewn together as follows:
- First you need to sew two pieces of fabric.
- You need to cut out feet from thick cardboard, the size of which exactly matches the size of the shoes.
- The cardboard blank is placed in the center of the fabric base, and then glued with a glue gun or simply carefully sewn.
- The finished sole must be connected to the legs using a thread and a needle.
The head is sewn together in stages - first the back parts are connected to the front, and then to each other. This leaves a small hole through which you will need to stuff the part. The workpiece must be turned right side out.
Stuffing parts
After all the parts are sewn and turned right side out, you can start stuffing them with filler.
Particular attention should be paid to the legs; the doll should stand well on them, so they need to be stuffed tightly. After this, all holes need to be sewn up with neat hidden stitches.
Choosing hair
The Big Legs doll loves beautiful hairstyles. There are several options for making hair. The simplest one is regular yarn. The presence of a large number of colors and textures gives room to the imagination. The doll can be curly, shaggy, or with a classic ponytail.
Professionals often use artificial hair. Specialized stores have a huge selection of hair specifically for dolls. If you can't find them, use tresses or wigs for people. You can also find ready-made doll hairstyles on sale; all you have to do is glue them to your head.
For a small doll, you can use natural wool for felting. You get a very cute fluff on your head. Dolls' hair can be made from satin ribbons, loosening them.
How to grow hair
How to attach hair to a Bigfoot doll? The master class will introduce you in detail. First, let's look at hair made from threads. First of all, you need to decide what hairstyle the doll will have. If you plan to part in the middle, then we start with the parting. If the hair is pulled back or falls freely on the shoulders, start stitching from the forehead. We cut the strand into equal sections with a fold in the middle - this is the length of the hair. Sew along the thread in rows.
Synthetic hair is usually glued on. To do this you need a hot glue gun or regular clear super glue. Gluing the hair is done in converging circles towards the crown. Apply glue to your head in an even stripe, and apply hair in small strands. Don't forget to protect your hands with gloves. The glue is very difficult to wipe off.
Wool hair can also be glued, or it can be felted using a special needle. The wool will mix with the filler inside the head and the hair will hold firmly.
How to sew legs for a doll: patterns with descriptions and photos
The legs will be somewhat more difficult to sew than the head or torso. And all because the leg consists of three components:
- two leg parts
- foot
The algorithm for sewing a leg is not very different from sewing a torso:
- First, a stencil is cut out.
- Then all the details are cut out using a stencil.
- They sewed them together in the following sequence: First, the two parts of the leg were sewn together.
- Then the foot is sewn to them.
Leg diagram for a doll
Advice! To prevent the doll’s foot from looking “flippered”, make 4 small stitches that will represent the toes.
How to properly make fingers for a textile doll
Face
Eyes are the mirror of the soul, what kind of soul will your doll have? The Big Leg doll, created with your own hands, most often has 2 simple black beads instead of eyes. It doesn't seem like anything special, but it looks very cute, especially if you lightly brown your cheeks.
Some craftswomen pay much more attention to the faces of their creations. Carefully drawn eyes look as if they are alive. Such a doll always has a special character. We draw eyes for the Big Legs doll, master class in the photo below. This shows you step by step how to draw eyes. The paints used are mostly acrylic; they can be bought at any craft store. Designer dolls have not only painted eyes, but also lips, cheeks, and sometimes freckles or moles. Before you start drawing, practice on paper.
Fabric for clothing
Clothes for the Big Legs doll are made from a wide variety of fabrics. The choice largely depends on what kind of item you are sewing. But there are still a number of certain principles:
- Do not use a pattern that is too large. Any drawing should look natural and fit into the proportions of the doll.
- Avoid fabrics that are too thick. The jacket can be made from thin leatherette without lining. Felt or velor is suitable for a coat.
- You can dress the doll in knitted clothes, but the yarn should not be too thick.
Follow these principles, use the right color combinations, and your dolls will be second to none.
Bigfoot doll sewing kit
What do you need to buy to make a big-legged doll? Actually not much, it all depends on your imagination. There are basic materials that are required for the job. First of all, this is fabric, preferably natural cotton. The fabric should not fray. To make the body, flesh-colored knitwear is used.
Hair is also necessary; it can be either artificial or natural. Wool for felting. For the head - a foam ball. For the eyes, either beads or acrylic fabric paint.
To sew shoes, you can use felt or artificial leather; such shoes will look just like real ones. You can't do without filler. You can use padding polyester or holofiber. To make it easier to stuff the doll and turn out the parts, use a special stick and tongs. There must be patterns. Flesh-colored needle and thread for body stitching, as well as colored threads to match clothing fabrics.
You can complement this set with accessories to suit your taste. Beads, handbags, flowers, soft toys, etc.
Cloth
It is not difficult to sew clothes for the Big Legs doll; patterns are often included with the main doll pattern. These cute toys are true fashionistas. Their clothes are in many ways similar to human ones, only the cut is changed to suit their figure. If you know how to sew, proceed as usual. Take measurements from the small model and get to work.
Dresses, sundresses, trousers, trousers, coats, a doll can be dressed in anything. Don't forget to pay attention to the little details. Cute lace for the trim of a sundress is perfect. Scarves, stockings and other little things are also important. There is a huge variety of hats.
Delightful dolls are obtained in historical outfits, or beauties from the outback. Vintage style really suits big legs. They look amazing in lace dresses in pastel shades.
Finishing
The Big Legs doll loves to dress smartly. You can't do without additional accessories here. A distinctive feature of the doll is that she never walks barefoot. You can sew the simplest shoes yourself. She often wears baby shoes or boot-style booties. Beautiful shoes are sold in specialized stores for doll makers.
Depending on the project, the doll may need a hat or crown, or cute little headphones. A handbag slung over your shoulder will add additional charm. Ruffles and lace will help create a cute girly look. If the doll is intended for a small girl, try to avoid too small parts. Do not use beads or sequins, and beads are only suitable for the eyes.
Despite the same patterns, no two dolls are ever alike. Each craftswoman brings something of her own, and the doll acquires individuality.
The question of how to sew a Bigfoot doll has been resolved. This wonderful handmade toy will delight anyone who receives it as a gift. Many people, having made their first doll, can no longer stop, and doll making becomes the work of their whole life. The toy is soft, so little ladies can carry it with them even in their sleep. She will forever be your daughter's best friend.
How to sew a beautiful New Year's interior doll: patterns with descriptions and photos
A New Year's doll can be a wonderful holiday gift. Including New Year's. But not everyone can appreciate this gift, so before giving someone such a thing, try to make sure in advance that the new owner will like it.
How does a New Year's interior doll differ from other dolls? Unless it's just an outfit. Therefore, you can take as a basis any of the previously described step-by-step instructions for sewing textile dolls. Dress her up in a beautiful New Year's dress, and the toy is ready!
Beautiful standard New Year's doll New Year's doll with a big head No. 1 New Year's doll with a big head No. 2 New Year's doll with a big head No. 3