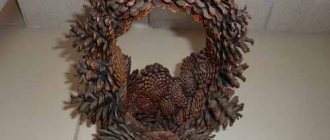
Felt little fox
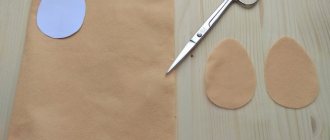
To make such a small fox from felt, you will need orange, white and black threads, a large needle, nails for the eyes, stuffing for toys and the material itself. First, let's print out the templates for the future toy. The size of the fox will depend on the paper size used for printing. We cut out the parts and start tracing them on the fabric. After the blanks are cut out, we sew the parts of the fox together. We put the eyes in place. We sew the white and black parts with threads of the corresponding color. It is important not to sew the tail and body all the way. We insert the filling through a small hole in the tail and sew it together. We attach the tail to the body and fill the main part of the toy through a small hole in the head. At the end we insert a loop there and sew up the toy. Ready!
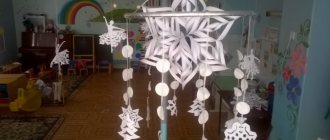
What should a children's mobile look like?
The main parameter by which parents should choose a device is safety. What to pay attention to:
- the pendant should be well attached to the bed. We must not allow it to fall on the baby. You should also check the reliability of the fastening in the store;
- there should be no sharp corners on the device, this will harm the child if he touches it;
- toys should be colored, but not very bright, so as not to irritate the baby;
- If there is a rotation function or built-in music, then it is worth checking that everything works smoothly. Excessive sounds, stuttering and stopping will negatively affect the mood of the newborn;
- the material from which the pendant is made must be hypoallergenic and completely safe.
Important! You should choose a toy that is lightweight in case it does not attach well to the side and falls.
Mobile for girls with unicorns
felt fox
This red fox turns out to be voluminous and quite large. Let's prepare blanks from light felt, as shown in the photo. We connect the elements of the head and proceed to the front legs. We attach the remaining parts of the body with pins and sew them together. We fill the body and tail with padding polyester and sew them to each other. We embroider the nose, eyes and mouth with black or brown threads.
Now let's make a felt cape for the little fox. Chop pink, yellow and orange leaves. We sew them onto a piece of orange fabric so that they overlap each other. Attach the threads and dress the fox. For decoration, you can make a couple of small acorns and leaves.
What is the best way to make a children's mobile with your own hands?
Store-bought cradles are mostly made of safe plastic. You can create figures yourself from wood or knitwear, also from felt. Products made from the latest material will look more interesting.
You might be interested in this Interesting patterns for women's and children's culottes with elastic bands
The disadvantage of homemade toys is that the fabric accumulates odors and dust, is difficult to handle, and has to be washed. But plastic can be wiped and disinfected at any time. However, in this case we can only talk about the safety of good plastic. If it is cheap, the figurine may be toxic, then it is better to make a carousel from felt.
Material for figures
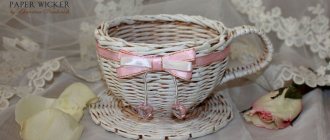
Felt fox bag
For the bag you need to take material of orange, milky, pink color, as well as a ribbon. Prepare the orange piece of fabric using a ruler and scissors. Cut the milk felt to size. Add cheeks and ears. The large button will serve as the nose and clasp, and the two small ones will serve as the eyes. Sew them on with light threads. We fasten the braid and carefully sew everything together. The result is such a comfortable and bright bag.
Felt toy Fox
This voluminous fox will please any child, and it is not at all difficult to make. We take templates and cut them out to make toys. For convenience, the white part of the fox’s muzzle, ears and spot can be glued with glue and then sewn. We outline the eyes and mouth with a felt-tip pen and embroider with dark threads. When the seam is ready, use a cotton swab and a felt-tip pen or paint to give the fox some blush. We fill the head with filler. We do the same with the tail and body. All that remains is to sew the head and body together, attach a bow and the red fox is ready!
Instructions
To begin, take the stencils you like and apply them to the felt. Draw a drawing on the material using a marker in duplicate.
- To do this, fold sheets of felt together and trace a stencil.
- Then they fasten the material with pins and cut out the design.
- After this, take threads that match the color and sew the product.
- But in such a way as to leave room for the filler.
- Don’t forget to sew a ring at the top of the future toy, which will serve as a holder between the thread and the crib mount.
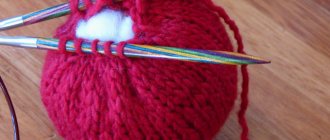
For stitching, it is better to use a loop stitch, but it looks most advantageous on the product. Fill the toy with padding polyester and sew it together completely.
Advice! The ring is sewn 1 cm from the edge of the toy. If necessary, use up to 3 rings. It depends on the size of the mobile toy. To connect the ring to the toy, use regular sewing, threading a needle and thread through the ring and securing the pair with stitches.
As for filling the product, this is done as carefully as possible, without leaving voids in the toy. Otherwise, during washing a number of problems will arise associated with deformation of the product.
For stuffing, use a regular pencil or pen, some even use a cotton swab. Again, as a filling material, it is better to use synthetic winterizer than other material. Since the first option dries quickly and does not deform when washed.
- Next they move on to hanging the toy. To do this, take a fishing line, approximately 40-50 cm in five copies.
- This will make it possible to hang up to 5 toys, which is standard for a mobile.
- A bracelet lock is tied to each cut line.
- As a rule, a piece of fishing line remains sticking out, so a bead is attached to it using a glue gun. This will give aesthetics to the homemade product.
- Then tie a free piece of fishing line to the base of the mobile, doing the same with all the prepared fishing line. In this case, the fishing line can be fixed at different heights.
And the last step of this needlework will be attaching a felt toy to a fishing line with a lock. Here you need to use all your imagination. As a rule, the largest products are attached in the middle, and the small ones at the edges. All! So quickly and simply, every parent can please their beloved baby.
Pincushion Fox
If you have nowhere to store needles and pins, then you can make a felt pincushion like this. We make a round muzzle from soft pink and white material. We embroider the eyelashes and nose with a stitch. Sew on the ears and fill the pincushion. Next, we make a box from felt circles and attach the fox to it. It can be decorated with a bow or flowers. Now the beautiful fox will serve for a long time.
turnip
Everyone's favorite children's fairy tale "Turnip" is represented by the following characters: grandmother, grandfather, granddaughter, cat, dog, mouse. The action takes place in the garden near the hut. Accordingly, the ideal stage would be a flat composition in the form of a fold-out book with a hut, trees and a large turnip (you can see how to make such a scene at the beginning of the article).
Example scene above.
Step-by-step description of sewing characters from the fairy tale “Turnip”
An important aspect before starting work will be the step-by-step production of characters in order to maintain their sizes (animals should be correspondingly slightly smaller in size than people).
Grandparents, Granddaughter
The sewing algorithm for Grandmother and Grandfather is described in detail in the fairy tale “Ryaba Hen”. To sew a granddaughter, you should use the description of the creation of Masha from the cartoon “Masha and the Bear”.
Cat
To sew a cat for the fairy tale “Turnip”, you will need:
- 2 pieces of gray felt;
- eyes or 2 black and 1 pink beads;
- prepare a paper pattern using the template and transfer it to felt;
- cut out 2 parts.
Cat assembly:
- Glue eyes to the face, sew on a nose, embroider a mustache and a smile.
- Connect and sew the 2 main parts, leaving a bottom hole for the finger.
- You can decorate it with a bow around your neck.
Dog
To create a dog you need:
- Have brown felt in 2 shades and a white piece for the eyes.
- Black buttons or beads.
- Create a paper pattern and transfer it to felt.
- Cut out pieces from fabric.
Dog Bonding:
- Sew on eyes and ears.
- Sew the tail.
- Embroider a smile and mustache, sew on a nose from a button.
- Connect the 2 parts of the body and sew, not forgetting the tail and the hole at the bottom.
Mouse
The method of sewing a mouse is described in the fairy tale “Teremok”.
turnip
The turnip is sewn very simply from 2 yellow pattern pieces and green felt tops.
In this case, you must fill it with padding polyester. Do not leave holes.
Green-eyed felt fox
To make it you will need a pattern. We trace the elements on the fabric with a felt-tip pen and cut them out. You can use plain soap to outline the template on black felt. In order to quickly sew the parts together, you can glue them together. We sew the ears, front and hind legs, body and tail. Next, we begin to attach them to each other. We cut out the eyes from green fabric, embroider the mouth and eyebrows with black threads - the muzzle is ready. You can add colors to the cheeks. The toy turned out to be fun and beautiful.
Required tools and materials
A felt chanterelle, the pattern of which is presented in various versions below, can be made with the following materials and tools.
| Material/tool | Purpose |
| Sheet/piece of felt | If the product requires stuffing with filler, it is better to use soft felt. When padding is not required, stiff felt works well. |
| Sample | Necessary for cutting parts. If a picture is taken instead of a template, then it must be printed in 2-3 copies to ensure the integrity of each detail. Because in the picture the details are superimposed on each other. |
| Filler | Required for bulky toys. The following types of materials can be used as filler:
|
| Sewing threads | For stitching and edging parts, you can choose not only sewing threads, but also knitting and embroidery threads. It is important to remember that the thickness of the needle eye depends on the thickness of the thread. The threads should be the same colors as the felt parts. |
| Needle | It should not be short or thin, but strong enough to pass freely through 2-3 layers of felt. |
| Hot glue gun | It is hot melt adhesive that can provide a high level of strength to products. However, if it is not available, any super glue with an immediate effect will do. |
| Soft pencil or marker | Necessary for transferring the outlines of product details onto felt. It is better to choose a marker for soft felt, a soft pencil for hard felt. Pencil and marker marks will not be visible on black felt, so when using it, it is best to use tailor's chalk. |
| Scissors | They should be of two types: large (for large parts, as well as for trimming a product that has about 2 layers of felt) and small (for small parts). It is best to take strong and sharp tailor's scissors. |
| Safety pins | Necessary for fixing a pair of parts when sewing them together. The fixed parts will not be able to move - which means they will be sewn smoothly. |
| Decorative elements | Used for product design. It can be:
|
Felt little fox
To make a little fox you only need felt and thread. We make a muzzle from the material of the desired color. Glue on the eyes, nose and white part. We sew on the ears. We embroider the mustache, mouth and eyebrows with black threads, and the highlights on the eyes with light threads. We sew the body, paws and tail together and stuff it with stuffing. We do the same with the head. Now we sew the head to the body and everything is ready.
Brooch
A fox brooch is a small decorative item, the creation of which is a quick and simple process.
Flat fox
To create a brooch in the shape of a flat fox you will need the following materials and tools:
- a small piece of hard orange felt;
- small pieces of white felt;
- a small piece of black felt for the nose;
- soft simple pencil;
- scissors;
- white, black and orange threads;
- needle;
- brooch fastening element.
Master class on making a fox brooch from felt:
- First you need to cut out the parts (transfer their images onto felt using a pencil or marker and cut them out):
- main part (the whole figure of a fox, orange color) – 1 pc.;
- body (orange) – 1 pc.;
- muzzle (orange) – 1 pc.;
- cheeks (white) – 2 pcs.;
- tail brush (white) – 1 pc.;
- nose (black) – 1 pc.
- Then you need to sew the body to the base with orange threads.
- Now you should sew the cheeks and nose to the head, and also embroider the eyes of the animal.
- Next, the head is attached to the body and sewn.
- At the end, the brooch fastening element is glued to the base.
Volumetric fox
A felt fox, the pattern for which is presented below for a brooch, can turn out to be voluminous if a small amount of filler is placed inside the head and tail.
To create a brooch in the shape of a voluminous fox, you will need the following materials and tools:
- a small piece of hard orange felt;
- a small piece of soft orange felt;
- small pieces of white felt;
- button (bead) for the nose;
- bow or flower;
- white sequins;
- soft simple pencil;
- scissors;
- black and orange threads;
- needle;
- safety pins;
- brooch fastening element;
- hot melt adhesive.
Master class on making a voluminous felt brooch:
- The first stage is cutting out the parts. It is necessary to transfer their images onto felt using a pencil or marker and cut them out. You should get the following set of parts:
- body (orange) – 2 pcs.;
- muzzle (white) – 2 pcs.;
- center of the muzzle (orange) – 1 pc.;
- ear (orange) – 2 pcs.;
- inner part of the ear (white) – 2 pcs.;
- tail (orange) – 2 pcs.;
- tail tassel (white) – 1 pc.
- The second stage is assembling the base. Both round orange parts must be folded together, secured with safety pins, and sewn with orange threads with a looped seam over the edge.
- The third stage is the design of the tail:
- you should glue a white tassel to one of the parts of the tail;
- Next you need to embroider the tail with sequins;
- then you need to sew both parts of the tail together with orange threads using a looped seam over the edge;
- Closer to the tip, it is necessary to leave a hole for stuffing, after which it is sutured.
- The fourth stage is the design of the head:
- the inner parts of the ears should be glued to the outer ones;
- then you need to embroider the inner parts with sequins;
- now you need to sew the center of the muzzle to one of the white parts of the head;
- then the nose is sewn on and the eyes of the animal are embroidered;
- Now you can sew the decorated head part with another white part using a looped seam over the edge, after inserting the ears between them;
- leaving a small hole, you need to place a little filler inside the head, and then continue the seam.
- The fifth stage is assembling the product. The head and tail are glued to the body, and a flower (bow) is attached near one of the ears.
- The sixth stage is the final one: you need to glue the brooch mount on the back of the product.
Felt fox
Even a small child can easily handle such a toy. Cut out all the details. Sew two ears, white spots and eyes to the head. We make random stitches with light orange threads - the result is wool. We attach a spot and two black paws to the body. We sew a light tip onto the tail and also show the fur. All that remains is to sew the tail and head to the body, and the fox-shaped craft is ready. This way you can easily make a fox mask.
The engine from Romashkovo - new opportunities
I have already shown you my Little Engine for studying color and counting, as well as the Little Engine from Romashkovo. However, in addition to learning numbers and primary colors, this toy has many other possibilities. Which ones?
Please under the cut... A lot of photos... and letters)
I've been meaning to implement this idea for a long time, but I haven't had enough time.
Finally I did it!
Let's start from the beginning...
1. develop motor skills, learn to fasten and unfasten buttons. 2 types of fasteners - on cars and on wheels.
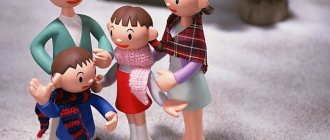
2. We study primary colors. The passengers on the train are such gnomes.
We put everyone in the appropriate train car.
For older children, or children who know colors, you can complicate the task, first put the gnomes in carriages, and then make a sequence in accordance with the colors of the rainbow... Here we remember - Every Hunter Wants to Know Where the Pheasant Sits
3. Learn numbers. Each carriage has Velcro windows from 1 to 10 sewn on it. The carriages are sewn in the form of pockets. “Put” into the car the number corresponding to the number of cars.
I used to sew voluminous figures
This time I sewed flat ones and Velcro on the back.
You don’t have to put it in the carriages, but attach it to the windows
or just play on the carpet machine
Well, now about new opportunities. To do this, I made this set of cards:
4. Studying sequences.
I had this book. It examines the development process of a butterfly, an apple tree, a sunflower, a frog, a duck, a human and a funny little man)
After the adult’s story, the child must independently arrange the cards in the correct sequence.
Again, you can do this on an assembled train by inserting it into pockets, or first lay out the cards among the cars and then “form the train” on a carpet machine, on the floor, on a table... more or less
5 We study the seasons.
6. We study the time of day.
The same principle is used to create a sequence. Let's learn a poem.
You can mark what time of day it is using a bear
7. We study the days of the week.
The principle is the same. You can again attach numbers to the boxes from 1 to 7. Cards with rhymes to make it easier to remember. Saturday and Sunday are days off in a different color
6.
This version of the train with cards can be used
like a weekly calendar
.
We attach 7 carriages with cards to a carpet machine and move the bear every day in accordance with the day of the week.
7.
Well, from here comes the idea of another calendar...
Weekly schedule...
For this I made slightly different cards for the days of the week
The color of the card corresponds to the train carriage: Monday - red, Tuesday - orange, etc. Saturday and Sunday are written in white font, again to highlight weekend days.
Well, cards with the schedule of business circles
We often go to the theater, I made this card, and the ball is a birthday card. The card is laminated and you can stick a photo of the birthday person on double-sided tape, attach his age to the car with numbers, or stick it on the card again. I have a smiley face for clarity)
I made blank ones so the child can draw or stick stickers, make plans for tomorrow, etc.
8. We teach vegetables, fruits, berries
(yes, anything)))) I have for example
You can also attach a number above to calculate how many are in the car
What vegetables are needed to make a salad...
Well, etc., etc., you can’t describe everything... You can print out cards with your daily routine, the sequence of putting on clothes
put only animals on the train, animals of the forest, of Africa…. find the odd passenger (for example, all the animals in Africa and the odd penguin)
We bought a whole box of cards for pennies on Myshop,
Someone on BB read an interesting game logic train... choose any picture, for example a mushroom, then you need to choose a picture that is logically connected - a squirrel (a squirrel eats mushrooms) - a hedgehog (an animal like a bek) - a needle (for sewing) - a teapot (like a needle made of metal) well, the meaning is clear I think
You can comfortably play with the train on the floor, on the bed, and not just on the carpet.
My son plays like this
And I regretted that I didn’t make a loop for the train... Now I’ve fixed it. You can deliver passengers and cargo to any point in the apartment
Do you think that's it? NOOOOO!
I recently saw Svetlana’s post Lesson plan for the week
As you can see, it begs to be used... I made cards.
I plan to do this. Every day in the evening I invite my son to choose a card with the type of activity and put it in the car corresponding to the day of the week. Well, Sveta wrote everything about this in more detail. Great idea Sveta thank you!!!
Well, this is our multifunctional carpet polygraph, for more than a year now it has been acquiring new and new ideas... If you’re interested, I’ll tell you how I’ll finish it)
Ugh! Well, that seems to be all! Thank you for reading. Let your kids learn while playing!
Children's handbag "Fox"
The child will really like this handbag, as it is bright and comfortable. It is also very easy to make because all parts are attached with glue. We will need a glue gun, felt and plastic eyes. We cut out all the necessary parts according to the template. In addition, you need to leave a wide strip that will serve as the bottom and side walls of the bag. For decoration we will use felt flowers, which we will prepare in advance. Using white material we designate the tail and face of the fox. Glue on the nose, ears and eyes. We collect flowers and place them on the tail and head. Now glue the strip to the front of the bag. After the glue has dried, glue the remaining wall. We make a handle from a thin strip of felt, and the bag is ready for use.
What are the benefits of a children's mobile?
Previously, it was believed that amulets should be hung over the crib, so they had their benefits, according to parents. Today, pendants perform several functions at once. Firstly, it is a way to calm the baby. The child is distracted by the movements of the figures above the crib and stops being capricious, and also falls asleep faster. Another equally important reason for use is that the baby begins to pay attention to different colors, and a kind of vision training occurs. When animals or balls move, the child reaches up towards them, developing his arms.
Sheep on the crib
Mobiles have also become an integral part of the interior of a children's room. Therefore, by making the pendant herself, mom can make the design special. This is an opportunity to choose a color scheme that fits perfectly into the room.
You might be interested in this: How much fabric is needed for a long sun skirt Plastic mobile
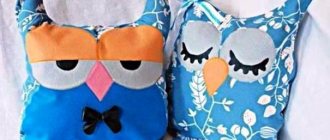
Felt toy
A fox in a dress will become any child's favorite soft toy. In order to make such a chanterelle, you will need not only felt, but also any other fabric, for example, cotton. Using the pattern, we cut out all the parts of the fox’s body, sew them together and fill them with padding polyester. We sew a dress in the form of a trapezoid and decorate it with braid. Be sure to remember to leave indentations for the hands. Sew the body, head, paws and tail. Small black beads will serve as the eyes and nose. We dress the fox in a dress and everything is ready.
How to make patterns
Before you start making patterns, it is useful to get acquainted with the types of finger theaters, which will help determine the direction of work.
Classification of finger theaters:
- A collection of toys that fit onto children's fingers, hiding them inside the doll.
- A set of characters with 2 round holes in the lower part of the body, into which the child’s index and middle fingers are inserted, creating movable legs for a fairy tale or cartoon character.
The first option is more practical and durable; these are the pattern patterns that will be offered in this article. However, if desired, any template can be slightly adjusted by adding holes and sewing the toys using the second method. You can make a finger theater from felt yourself, or find ready-made templates in books on handicrafts or on the Internet.
To make your own pattern, you need:
- determine which characters are to be “brought to life” and find what they look like;
- draw on paper the characters of the required size and all the details separately (arms, legs, cheeks, ears) or print a ready-made template from the computer screen. As a rule, toy patterns consist of the main part and the front parts;
- cut out parts;
A felt finger theater is made in several stages
- attach with pins to felt fabric and cut out according to the design without deviations;
- if the characters are planned to be double-sided, then the number of pattern pieces will double (the main thing here is consistency and not to get confused, first cut out one character and put the pieces together, then proceed to the next one). For beginning craftsmen, it is easier to start with single-sided dolls.
Felt toy Red fox
Let's prepare all the parts of the fox from orange, white, green and black material. We glue the eyes, nose and ears, and sew the rest. We fill the face, paws and body, and then sew them together. The pupils can be drawn with a black felt-tip pen. This fox's legs can move, so the toy turned out to be interesting.
Brooch Chanterelle
Take felt and threads of various colors. We will need a pin so that the brooch can be attached to something. Make an orange circle and a silhouette of a fox's head and glue them together. Now we will show the wool using orange and white threads in small stitches. We embroider the nose and eye in black. In order to make the back of the brooch neat, we will glue another circle with ears. Attach a pin and the brooch is ready.
In our master classes we explained and showed all the variations of chanterelles. Any child will enjoy this kind of handicraft; it is important to show patience and desire.
Case
To create a case in the shape of a fox, you need to prepare the following materials and tools:
- orange (brown) soft felt – 2 sheets of A5 format;
- a small piece of white felt;
- a small piece of black felt;
- a small piece of gray felt;
- soft simple pencil;
- scissors;
- orange threads;
- needle;
- safety pins;
- hot melt adhesive.
Master class on making a felt phone case in the shape of a fox:
- First you need to cut out the parts: transfer their images onto felt using a pencil or marker and cut them out. For the pattern, you can use the image of the finished product presented above. You should get the following set of parts:
- base of the case (according to the size of the phone, but taking into account the seam) – 2 pcs.;
- head – one piece (white) – 1 pc.;
- muzzle – middle part without ears and nose (orange) – 1 pc.;
- upper part of the muzzle with nose (orange) – 1 pc.;
- inner part of the ear (white) – 2 pcs.;
- eye (gray) – 2 pcs.;
- pupil (black) – 2 pcs.;
- nose (black) – 2 pcs.;
- tail – one piece (white) – 1 pc.;
- tail without tip (orange) – 1 pc.
- Next, you should take one of the base parts and sew a white tail part to its lower part, having previously secured it with safety pins. The orange part of the tail is sewn on top.
- Then the second part of the base is formed. First, you need to attach a white solid piece of the head to it, securing it with safety pins.
- On top you need to attach and fix the middle part - the muzzle, and then sew it to the base only in the cheek area.
- Now you should outline the location of the eyes and glue them to the muzzle.
- The inner parts of the ears and nose are sewn into place to the upper part of the muzzle with the nose.
- Next, you need to attach the fox to the head and secure the upper part of the muzzle with the nose with safety pins and sew all the parts with a decorative seam, fastening them to the base.
- At the end, both parts of the base of the cover are sewn together with a looped seam over the edge.
The felt fox figurine can be used in various ways: from a soft toy to a simple applique for the development of children in their free time. From the large number of pattern options presented, you can choose the appropriate one and create a beautiful product.