Slow and monotonous walks in the forest rarely captivate children. To make this pastime more exciting for your child, you can invite him to collect pine cones. The activity is not so useless, since from them you can build not only a beautiful, but also a functional thing. For example, a basket made from pine cones can become the basis for ikebana, or decorate the interior of a country house as a separate composition. How to make a basket of cones step by step can be found in the detailed description of the work on it.
How to prepare buds
The number of cones depends on the size of the product. It is necessary to collect only whole, clean, not damaged by pests. It is advisable to use not “fresh”, just collected cones, but those that have been lying in a dry place for a couple of months, have dried well, and have opened. Fresh pine fruits are sorted by size, dried in the shade under a canopy, laid out on newspaper so that they do not touch each other.
The structure assembled from such parts does not deform during operation. It is advisable to use elements of the same shape and type that are not damaged by pests - combining spruce with pine is problematic, and alder cones are suitable only for the external decor of the finished item.
Baskets look very interesting, where the side (top row) is made of the largest parts, and the remaining rows and handle are made of smaller ones.
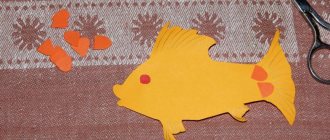
Cheerful bunny
You can make a lot of interesting animals from pine cones. , other materials will be additionally .
- Cone.
- Plasticine.
- Thin white wire.
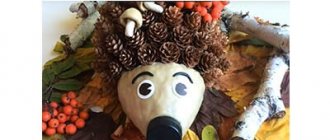
Here the algorithm for doing the work is very simple. The cone will serve as the body. On top of it we attach a round head from white plasticine. We attach another small circle of white plasticine to it, it will serve as a muzzle. We already attach a pink nose and a red mouth elongated with a sausage to it. We place blue beady eyes a little higher.
We draw out the ears from white plasticine and apply them to the head. At the tips of the ears we make two drops of pink, so the ears will look more impressive. We insert two plasticine handles on the sides and attach them properly to the pine cone, and at the bottom we also make two legs. Don't forget to insert a wire mustache into the bunny's face. Complete the composition with a small ponytail at the back.
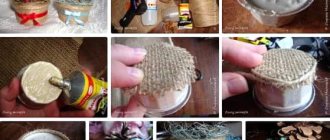
Materials, tools for assembling the basket using glue
A small basket is easily created from about four dozen pine cones and “moment” glue or any other similar one. You will also need a strong fishing line to create a handle for the product, wire cutters or strong scissors, beads, ribbons, glitter to decorate the finished structure, some free time for making, and drying the basket. It is better to start making an object from the base, and make the handle at the very end.
If you want to make a basket from pine fruits that are as light as possible, but not colored, they are soaked in water with bleach for 8-10 hours, after which they are dried in the oven.
Assembling the Basket Base
The base of the basket is assembled from nine cones of the same size. It is advisable to take large, homogeneous ones, laying them “bottom” outward - this way the design will be more interesting. When the circle is closed, another row is glued to it, but the bottom is already turned inward, and eight parts are already taken. In the next similar row, only seven parts will be required, the very bottom is made of one, the largest cone, with the bottom turned towards the “floor”. Now start making the handle.
To create a beautiful basket in the shape of a half ball, use a large foam ball, “wrapped” in foil up to the middle. The glue is applied directly to the latter, the cones are attached as close to each other as possible. When the product dries, the ball is taken out, and the basket-vase is filled with flowers, moss, and other decor.
Handle assembly
To make a handle, take a little wire or fishing line of medium thickness. For this part you will need nine cones glued together, with all but the top, central one turned upside down. For strength, the handle made of cones must not only be glued, but also wrapped with fishing line, but so that it is not overly noticeable. The part is wound and glued to the main part of the basket. The sides and outer part are decorated with beads, ribbons, rhinestones, dried flowers, and coated with glitter varnish.
Snowman made of natural material
From such scrap materials you can create not only animals, but also other crafts. For this craft lesson you will need to prepare:
- Skewers.
- Vatu.
- Cones.
- Scissors.
- A piece of felt.
- Small sock.
- A thread.
- Glue.
- Eyes for dolls.
Work order
- Using a skewer, we thread pieces of cotton wool between the scales of the main parts. You need to do this in three lumps for the body.
- Fasten them together using plasticine.
- Put a sock on your head and cut it off to make a hat. At the tip you can make a pompom from threads.
- On a piece of felt we mark the mittens and the nose of the snowman.
- Using a glue gun, glue them into place and attach the eyes in the same way.
Following the recommendations of this needlework lesson, you can easily make a beautiful winter snowman.
Master class on assembling a basket on a wire base
Larger structures are made from almost two hundred cones, fastened together with wire for strength. Here, all the elements are laid with the bottom outwards - this way the design looks more aesthetically pleasing, neater, and due to the fact that there is no glue here, it turns out to be completely environmentally friendly. To attach one cone to another, a wire loop is wrapped around it, and a “chain” of several objects is closed into a ring.
What to do step by step:
- a circle is assembled from about 30 elements, the parts of which are fastened together with wire; glue is usually not used;
- then three or four more similar rings are made, with the lowest one being made the smallest, since the basket should expand upward;
- the bottom here comes out relatively large, therefore, to create it, the parts are attached to a central large cone, all of them facing the bottom “towards the ground”;
- the bottom is made up of 7-11 cones, screwed with wire to the rest. Sometimes it is made of cardboard, but it is not so beautiful;
- now the handle is being made. It is “twisted” and contains two or three rows of small cones or is made of wicker and firmly attached to the base;
- Afterwards the product is decorated in any way you like.
Vase of pine cones step by step - read the blog hauvemysla on RealMusic
ஜ۩۞۩ஜ—————–—–ஜ۩۞۩ஜ———————–ஜ۩۞۩ஜ
Download (download link): https://bit.ly/2Ns178w
ஜ۩۞۩ஜ—————–—–ஜ۩۞۩ஜ———————–ஜ۩۞۩ஜ
Make ears and muzzle out of pompoms. It is best to connect the handle to the base using two means at the same time - wire and glue. To do this, you need to collect more cones, so that when working you can easily find cones of the same size, the cones should be open. Flowers from cones You will need: cones, brushwood, acrylic paint of different colors, a brush, green colored paper, scissors, a glue gun, a vase. Sections and scales are also used to create paintings or panels. Using an awl, you need to create a through hole in each cone, and string all the cones onto a transparent fishing line. Therefore, I had the idea to paint the buds in rich summer colors and then the bouquet would be completely different. Instead of the nose and eyes, you can use black peppercorns. In crafts, not only whole cones are used, but also individual sections and scales. The mixture is applied in a thin layer to the trunk. Arch of pine cones at the entrance Welcome to a winter fairy tale! You can choose a suitable container, insert it inside the vase and use it for fresh flowers or as a flowerpot.
The work process can be followed through consistent and expressive photographs. In the same way, twist the cones alternately with each other in a circle. The cones are sorted by size - the largest and “fluffiest” are attached to the lower tiers, the smallest - towards the top.
Unfortunately, it looks like the search requests sent from your IP address are automated. Therefore, we've had to temporarily block your access to Yandex Search. To continue searching, please enter the characters from the picture below and click “Continue”. Cookies are disabled in your browser. This means that Yandex will not be able to remember you in the future. If you're not sure about how to enable cookies, please refer to our. Why did this happen? Itʼs possible that these automated requests were sent from another user on your network. Then you shouldn't be bothered by this page for a long time. You could be submitting a large number of automated requests to our search engine. We've developed a service called that has been specially designed to handle such requests. Your browser may also contain add-ons that send automated requests to our search engine. If this is the case, we recommend disabling these add-ons. Itʼs also possible that your computer has been infected with a Spambot virus thatʼs using your computer to gather information. It might be worth checking your computer for viruses with an antivirus utility such as from “Dr. If you come across any problems or wish to ask a question, please do not hesitate to contact our Support service using the.
Master class on a vase of pine cones for those who love original decorative items made from natural materials - In the third row, we place the pine cones parallel to the previous row, at the same angle. The shapes of trees made from cones with your own hands can be presented in all their diversity - as far as the imagination of the master and the intention of nature allow.
Making basket-pots
A flowerpot is a decorative structure, inside of which a flowerpot with live, mainly climbing and hanging plants is placed. To begin with, select a plastic or ceramic pot, which will later be placed in a basket. The cones are fastened together or glued directly to the flowerpot itself. The handle of the basket is made higher than in a simple decorative one, so that nothing prevents the flower from growing in height. It is not at all necessary to make the bottom from natural materials - the side walls are enough. The edges of the structure are made one or two cm higher than the pot itself.
When it comes to a hanging product, it is done a little differently: the bottom is mandatory here, all elements are firmly fastened with wire matched to the color of the object. An inconspicuous wire frame of two loops clings to the flowerpot itself, a hanging hook, and neatly hides under the handle structure. If you decide to use pine cones to decorate a tub or barrel standing in the open air, then you cannot do without a special impregnation that prevents rotting, eating by beetles, and destruction under the influence of precipitation. Usually all kinds of compositions suitable for wood and various lumber are used.
Fairy tale characters
To make a three-headed dragon or Serpent Gorynych, you need to take three large cones for the fused body and three smaller ones for the heads. The body can be wrapped several times with fluffy wire to prevent it from falling apart. The wings are made from leaves or colored paper. From below, two chestnuts - paws - are attached to the cones with plasticine.
A funny brownie or a cool goblin, the inhabitants of a fairy-tale land are made according to the same principle as human figures. You need to take one large cone for the body, leaves, twigs, acorns and chestnut peels, glue and plasticine.
A forest dweller can stand in a clearing. For it, you can take a cardboard box or plastic lid cut in half and glue dry leaves, grass, moss to it using PVA or an adhesive pencil.
How to make an original craft, a brownie, from pine cones and other natural materials, step by step, is shown in the diagram below.
A gnome will differ from a little man, like a goblin and a brownie, only in attributes - a cap, perhaps a bag, which he holds in his hands.
This funny homemade Cheburashka is very easy to make. You will need:
- Two large round cones for the body and head, almost the same size.
- Two smaller round ones are for the ears.
- Two unopened pine trees (or two acorns) for the feet.
- Plasticine.
The parts are fastened together using plasticine and wire. The mouth, eyes and nose are made of plasticine or cut out of paper.
Square basket-box
To create such a functional item, you will need a small box made of thin plywood, hot glue, a construction stapler, and a wooden handle. The box is placed on a flat surface, pasting is done from the bottom up, the parts are placed as desired, you can combine elements of any shape, color and size. The top “cone” row should slightly obscure the edges of the box, and its inside should be tinted to match the color of the cones. A thin handle, woven from wicker or carved from wood, is secured with a stapler, pasted over with seeds of vegetables and cereals, and sprinkled with sparkles. This product is suitable for storing small handicrafts, various kitchen items, and haberdashery.
P O P U L A R N O E:
- Modernization of the KROT motor cultivator
- Christmas gifts
- Crafts from CDs, DVDs
In Russia, motor cultivators of the “Mole” type have been produced for a long time. The first model of the MK-1 "Mole" motor cultivator was manufactured as a single-purpose machine for tillage. To date, the technical capabilities of motor cultivators have been significantly expanded and even mini-forage preparation equipment has been developed to complement them. Externally, motor cultivators resemble walk-behind tractors and the main structural components of both are the same.
Read more…
DIY refrigerator magnets
Every year we give our family and friends souvenirs with the symbols of the upcoming New Year, as a sign that this year will be especially successful for all of us. And we rush to the stores in search of those very gifts. It is no secret that the symbol of the upcoming New Year 2014 according to the Eastern calendar is the Blue wooden horse. Why don’t we try to make New Year’s souvenirs ourselves , even if it’s not wooden, it’s also a wonderful and welcome gift.
Read more…
The speed of development of nanotechnology leads to the fact that the technology and technology for transmitting and storing information are changing very quickly. If recently disks were a new thing for us after floppy disks, now the latter have been replaced by flash drives. But, despite the fact that the discs will soon disappear into summer, do not rush to throw them away. At your leisure, you can make very original, and no less simple, crafts from disks with your own hands. Read more…
Popularity: 49,451 views.
Decorative design
You can decorate the finished basket with anything - it all depends on the imagination of the master and the size of the structure itself. Some options are so original that they do not require additional decoration. These are complex, in terms of self-production, baskets in the shape of chickens and turkeys, princess carriages and boats, amphora on a leg and some kind of casket with a lid.
Best suited:
- live, dry plants, moss;
- textile, paper flowers, including those made of corrugated paper;
- plastic, wooden, glass beads;
- ribbons of various widths, colors;
- varnish in a can with glitter;
- spray paint or can;
- twigs with rowan and hawthorn berries;
- grains of lupine, pumpkin, sunflower, coriander;
- patchwork crafts;
- toy mushrooms made of fabric or plastic;
- textile inserts;
- animals made from pine and fir cones;
- multi-colored sisal;
- buttons.
Some hobbyists decorate large floor baskets with LED lighting. It is hooked onto a handle, run along the sides or placed in the very center. The handle of the product itself is not always made round; heart-shaped, cone-shaped, and also U-shaped configurations are acceptable. From cones turned upside down, original flowers are created to fill the basket - the lower part is painted with bright acrylic paint, and the core is painted in a contrasting color. “Flowers” are placed on a bed of sisal and moss.
Differently decorated baskets are suitable for very different interiors and spaces. For high-tech, the product is completely painted with silver-gray paint; for ethnic, it is decorated with decorative grains; for boho, it is decorated with several strings of multi-colored beads.
Unusual basket
You can go further and create a complete composition of pine cones in the form of a basket of flowers.
To make the work look brighter, you will have to add a little artificial dye to it. This type of work is attractive because it does not require constant changing of the basket filler.
A thematic master class will show you how to create such a product.
Before you get started, you should stock up on:
- pine cones;
- a foam ball;
- acrylic paints and brush;
- hot glue;
- foil;
- green sisal;
- varnish (you can use hairspray or clear nail polish).
The ball should be half wrapped in foil.
The resulting foil container will become the basis of the future basket.
The foil should not be removed from the ball, as it should be decorated with cones. And it’s easier to do this on a solid surface.
The work is carried out using a glue gun. In this case, the cones are fixed tightly to each other with the “ruffy” side facing out.
Since the shape of the cones suggests the presence of voids on the surface of the foil between them, the empty spaces are covered with sisal.
This is how the work acquires completeness and a presentable appearance.
The basket is ready. It's time to start filling it up.
To do this, take several cones, which are painted on the underside with acrylic paints in the desired colors.
The blanks are left to dry, after which a contrasting flower core is added to the center of each colored cone.