How to sew an apple from fabric
I haven’t shown fabric crafts for a long time, today I’ll tell you and in the master class I’ll show you the correct pattern on how to sew an apple from fabric with your own hands. The homemade product is quite complex and requires some sewing skills. You can decorate any room with it or give it to your child as a toy.
For the fabric apple we need:
— Velvet (velor), base for crafts; — Artificial velvet; — Gabardine fabric for sheet; - Scissors; — Twisted cord, approximately 7 centimeters; — Sintepon, padding polyester, holofiber, any filler; — Extended needle; - Sewing machine; — Glue gun; — Pins;
- Threads.
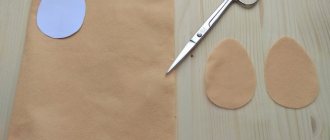
First you need to make the right pattern. Let's draw two such details on paper. On the edge where it says “fold”, we make a fold so that when the part is cut out, it will be mirrored.
These are the cut fabric pieces we will need.
On velvet, which is artificial, we create many deep cuts.
We make lines along the edges, on the apple itself, and also on the leaf. We don’t sew up 1 centimeter on the sheet; we put the filler through this hole.
We cut off the tip of the sheet, turn it inside out, and fill it just a little with synthetic padding.
We turn the apple blank inside out, fill it, then use a regular seam to make bastings. At the same time, retreating 1 centimeter.
Carefully pull the apple and hide the edges inside.
From the side of the stamen we thread a needle and thread, pull it out at the other end of the apple, and so on several times. Thus, this will give shape to the craft and stretch the end of the apple with a thread of resentment.
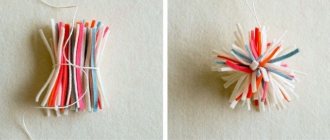
We roll the initial piece of artificial velvet into a tube and use a glue gun to attach the stamen to the apple.
We trim off the excess length.
We also glue the tail to the apple.
We also glue the leaf. For reliability, all these things can be additionally sewn.
This is the original fabric apple we managed to make.
do-crafts.ru
Pincushion “Apple”: knitting
A pincushion is a must-have attribute for a needlewoman. There are many options: knitted, sewn, embroidered, in a wide variety of shapes and sizes.
Today I invite knitting lovers to knit themselves an apple pincushion on knitting needles.
You will need:
- red, green and brown yarn
- circular knitting needles
- stuffing material (holofiber)
- needle and scissors
- pin
The needle bed is knitted in the round (Magic Loop Technique). The master class can be viewed here.
So, let's start knitting. The entire fabric is knitted with knit stitches only.
We cast on 10 loops and close them in a circle. We knit the first row. To avoid confusion, mark the beginning of the row with a pin.
In the next row you need to double the number of loops: we knit each loop of the previous row twice - behind the front and behind the back wall. We get 20 loops.
Third row: knit 20 loops.
Fourth row: double the loops, knit each loop behind the front and behind the back wall. We get 40 loops.
From rows 5 to 15 we knit with knit stitches without increasing or decreasing.
Row 16: We continue knitting, gradually adding 4 loops in the process, we get 44 loops.
Row 17-19: Knit with knit stitches without increasing or decreasing.
Let's start decreasing.
Row 20: We knit one loop, then we knit two loops together through one, at the end there are 2 loops left, we knit them alternately. We get 30 loops.
Row 21: We knit one loop, then we knit two loops together through one. We get 20 loops.
Row 22: We knit two loops together through one. We get 10 loops.
Row 23: Knit with knit stitches without increasing or decreasing.
Now we fill our future pincushion with filler.
Cut the thread, leaving a long end. We thread this end of the thread into the needle and thread the needle through the loops on the knitting needles one by one. Take out the knitting needles and tighten the thread. Then secure the seam with a few neat stitches and tie a knot.
Now you need to make indentations on the top and bottom of the apple. Poke the needle through the apple from top to bottom and bring the needle out from the bottom. Pull the thread a little so that a recess appears on top and pierce it with a needle next to where the needle exits - now from bottom to top. Pull the thread. You have a recess at the bottom and top. Now we fasten the thread. And you need to cut the thread and hide the tip. To do this, pierce the apple again, pull it a little and trim the edge of the thread. After this, the tip of the thread will hide inside the needle bar.
Now let's tie the stem. To do this, use a knitting needle to pick up a couple of loop walls at the top of the apple and tie a brown thread. Take the second knitting needle and knit stitches on the first knitting needle. We knit a lace 2.5-3 cm long, close the loops and cut the thread. We carefully hide the ends.
All that remains is to knit the leaf. Take green yarn and cast on three loops.
Row 1: Knit stitches 1 and 3 on both sides, purl the middle loop. We get 5 loops.
Row 2: Knit 5 stitches. Next, all even rows are knitted without increasing or decreasing according to the number of stitches on the needles at the moment.
Row 3: Knit 1 stitch, next stitch on both sides, purl, stitch on both walls, knit. We got 7 loops.
Row 5: Loop on both sides, knit 2, purl, knit 2, loop on both sides (9 loops).
Row 7: Do not increase. Knit 4, purl, knit 4 (9 stitches).
Rows 9-14: Same as rows 8 and 9, without increasing or decreasing.
Row 15: knit 1, knit 2, knit 1, purl 1, knit 1, knit 2, knit 1 (7 stitches).
Row 17: knit 1, knit 2, purl 1, knit 2, knit 1 (5 stitches).
Row 19: 2tog, purl 1, 2tog (3 stitches).
Row 21: Knit three stitches together and complete knitting. Cut the thread, leaving the tip for sewing.
We thread the tip of the thread through the needle and sew a leaf at the base of the stem. We fasten the thread, cut it and hide the tip.
The pincushion is ready!
source: https://www.naturalsuburbia.com/
Fruits and berries made of fabric
Added: 02/01/2013 Author of the article: Ekaterina Vinnichek
Despite the fact that our kitchen is in restrained brown and beige tones, I wanted to generously splash brightness and freshness there. And also, I thought, it’s winter now, and in winter you always want fruit. Therefore, without thinking twice, I took out my scraps and sewed fruits and berries from them. Help yourself too:
I sewed according to the famous Tilda patterns for apples, pears and strawberries. And although there is a lot of information and master classes on this topic on the Internet, I will still talk a little about my sewing here.
I circled all the patterns on 1 A4 sheet so that I could see the size ratio:
For sewing fruit, scraps of cotton or other fabric you have are perfect. Or you can make all the fruits multi-patch by sewing several small patches and cutting out halves of them. This, alas, remains my unrealized idea.
The easiest way to cut leaves is from green felt or any other non-flowing fabric. We will also need several wooden skewers.
We sew together 2 halves of fruits and berries, with a hole on one side for turning inside out.
When cutting, we make allowances only along the seams, since according to the original patterns in the places of gathering there are already allowances:
The principle of sewing berries
Next, the principle is this: turn it inside out, stuff it, and tighten the edge:
On top of the strawberry we simply sew triple felt leaves in a few stitches:
The principle of stitching apples
For fruits, the principle is a little more complicated. After stitching the parts:
After stuffing and cinching the edges (this essentially ends the work on the strawberries, but not on the fruit):
We pierce the apple right through, bringing the needle and thread down (to the center of the seam):
And then back. At the same time, we pull the thread, thereby forming the bottom of the apple:
This is the apple I got:
I cut out leaves for apples and pears from felt, one pattern at a time:
I put a leaf in each apple and secured it with transparent glue.
And then she stuck the “petioles” inside. I cut them from wooden skewers. But “stalks” made from real twigs would look best and most natural (alas, I couldn’t get to the forest, and there’s nothing suitable in the yard):
The principle of sewing pears
With pears it’s almost the same. Only they are pulled together at the bottom, and not at the top:
For pears, I made small blanks from a petiole and a leaf:
And inserting them from above inside each, secured them with glue:
I covered the place where it was tightened with a “pippy” - a small brown felt circle:
I painted the petioles of all the fruits with brown acrylic paint:
It is assumed that all these fruits and berries will be in a large wicker basket, which I have not yet found... In the near future, there will most likely be a new addition to this colorful and inedible family!
The original of this master class can be found on the author’s website.
www.vsehobby.ru
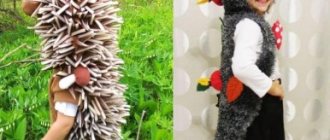
Family of felt dogs - master class and diagrams
We will need: colored felt, filler, two beads, thread, needle and scissors.
Step one: we make patterns for the details of the dog according to the proposed pattern, transfer them to pieces of fabric and cut out all the resulting parts. Next, we sew the legs to both halves of the body.
Step two: sew the spots to the head and the heart to the back of the dog.
Step three: sew both halves of the dog together, leaving a hole at the bottom for stuffing. We fill the toy with padding polyester and sew up the left hole. We sew on the beady eyes, and then embroider the nose and mouth.
Step four: sew ears and a bow to the head.
Step five: in the same way we sew the remaining dogs, the diagrams of which are in front of you. Such a family of small puppies can be hung on a mobile for newborn children, as well as on a crib. And if you use beads or cereals as a filler, the toys will further develop the baby’s fine motor skills.
Do-it-yourself pincushion “Mannequin”
For work we will need the following tools and materials:
- a piece of thick fabric;
- synthetic winterizer or holofiber for stuffing;
- Chinese stick 22-23 cm (you can use a regular pencil as a replacement);
- a large spool of thread or something else, the main thing is that the stand is stable;
- fabric glue.
Sewing a mannequin: master class
First, we make a life-size mannequin pattern and transfer it to the fabric.
Next, prepare the Chinese chopstick. To avoid the mannequin turning and sliding off the stick, in the places where the chest and hips will be located, we wrap a strip of fabric smeared with glue, as shown in the photo below.
We sew or sew by hand only the sides and darts, and make zigzag notches on the bends.
We turn the workpiece inside out, insert a Chinese stick into it and tightly stuff the part with holofiber. We turn and trim the neck so that it fits more tightly to the wooden base.
We make a small hole in the bottom clearly in the center, string a stick onto it, and sew the bottom to the main fabric part of the mannequin. We insert the stick into the pre-coated coil with glue. The mannequin is ready!
If desired, it can be decorated: wrap the stick with a bright satin ribbon, tie a small bow in the neck area. Decorate the body of the pincushion with fabric or lace.
Do-it-yourself needle bar “Sewing machine”
For work we will need the following tools and materials:
- two small pieces of fabric - plain and variegated colors;
- one large button;
- two regular toothpicks;
- half a spool of simple sewing thread;
- a small piece of thick cardboard for the base of the machine;
- filler for stuffing (holofiber, padding polyester or cotton wool);
- sewing threads;
- pins;
- scissors.
How to sew a needle case with your own hands: master class
First, we are waiting for a pattern of an unusual needle case in the form of a sewing machine:
Then we need to sew both parts of the base, and to the upper part, to one half, pin a piece of fabric - the middle of the sewing machine. This is an optional step, but if you ignore it, the pincushion will be “skinny”.
Now let's start sewing: we stitch or topstitch first one side of the workpiece, then the other, and turn the part right side out.
At this stage we insert the cardboard into the base of the sewing machine. It is cut precisely according to the size of the pattern.
Next, we fill the lower and upper parts of the needle bed with holofiber.
Carefully sew the upper part of the needle bed to the stand. Insert the first toothpick in place of the needle, and the second one where the spool will be attached. We wind threads of any color you like onto half of the spool and sew a button in the place where the wheel is located.