Cardboard furniture is a great alternative if you can’t afford regular furniture! Tables, chairs and sofas can be made from cardboard with your own hands!
Such an ordinary thing as cardboard, which we often throw away without thinking with the rest of the garbage, can turn out to be an excellent material for building good furniture. Of course, you can assume that such interior items will be fragile and will easily bend under the weight of objects placed on it, but this can and should be avoided by properly processing the cardboard.
Advantages of cardboard furniture
Such furniture has a lot of positive advantages:
- Stylish design. You can design any thing for your home, based only on your taste or the preferences of your family;
- Economy. Spend very little money to buy the necessary tools, and you won’t have to spend money on delivery/installation;
- Mobility. With lightweight, immediately foldable furniture, moving will not be your nightmare - you will only have the joy of packing things for your new life;
- Ergonomics. There is no need to walk around an endless store in search of “that very thing” that will simultaneously appeal to you, fit into the interior and be comfortable - from now on you can combine these three qualities;
- Safety. There are absolutely no harmful or dangerous elements in cardboard furniture - after all, you make furniture from boxes with your own hands, which means you check and see all the components;
- Environmental friendliness. The furniture has lost its former appearance and attractiveness, or you decide to change the design - just take it apart and put it in a bag. You can throw it away without worrying, or you can use it to light a fire for barbecue - cardboard will not harm the environment in any way!
- Strength. If cardboard is processed correctly, furniture made from it will last a very long time.
Despite the large number of advantages, cardboard furniture has one extremely unpleasant feature - when it is in a humid environment, the furniture deteriorates and becomes unsuitable for use.
Take this fact into account and always remove cardboard furniture from the street, otherwise sudden rain may render it unusable.
What can be done
At first glance, you might think that cardboard is a fragile material that requires special handling. On the one hand, this is correct, on the other hand, having chosen the desired type of cardboard, you don’t have to worry about its further use. Cardboard furniture will be durable and practical if you follow the sequence of work and recommendations for using tools.
To choose an option for making a furniture product yourself, you need to consider several proposals:
- Toy furniture made of cardboard - it is profitable and creative to make your own furniture for dolls. If children require the purchase of a new house for Barbie with all the accompanying accessories, the solution would be to produce this option with your own hands;
- Book shelves are considered one of the simplest cardboard products. They don’t take much time to make, and the books don’t put much stress on the cardboard;
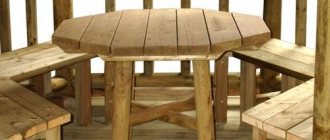
- The original table will not be a dining table on which dishes are constantly located, but a small coffee or coffee table. A child can perform developmental tasks on such a piece of furniture, because it is designed for a light load;
- Chest of drawers - this kind of furniture is convenient for storing documents or papers; children’s accessories will also fit here. It is easier to make a chest of drawers from cardboard boxes from large appliances, such as a refrigerator;
- Shoe rack - an original shoe stand in the form of triangular cells will fit comfortably into any hallway. Entering the room, all guests will be surprised at how convenient and practical the rack turned out to be;
- A small chair for children - since cardboard is not intended for heavy loads, furniture for children is what you need. A small chair for your baby will become his favorite object, where he can draw or play.
As you can see, furniture made of cardboard is easy to make. To make it you need the simplest material and a minimum of tools.
Table
Shoe rack
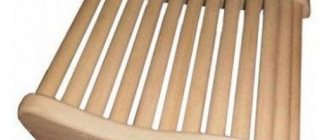
Chair
Dresser
Shelves
Toy
Tools and materials for manufacturing
What is needed to make cardboard furniture with your own hands? The constant materials will be:
- Packaging cardboard/cardboard boxes – you can ask for boxes in the store or look for purchased equipment at home;
- Regular and colored tape, paper tape, double-sided tape;
- A stationery knife for cutting cardboard (watch the sharpness of the blades and change them as they become dull);
- Sharp scissors;
- Dull knife;
- Roulette/iron ruler;
- Pencil and eraser;
- Glue (PVA, hot melt glue, wallpaper glue, liquid “moment” - depending on the situation, but sometimes you can only get by with tape);
- Sandpaper (you will use it to sand the cardboard sections);
- Kraft paper (white and dark) and tracing paper.
Types of cardboard
To make cardboard furniture with your own hands, you will need different cardboard, depending on the situation.
Cardboard can be one-, two-, or three-layer, depending on the number of layers, which, in turn, consist of small waves that can be seen on the cut of the cardboard. The more layers of cardboard with waves, the thicker the cardboard. Also, do not forget to determine the sides of the cardboard before starting work:
- smooth (sometimes with drawings) side - front,
- rough - purl.
To strengthen the edges of cardboard furniture, use dark-colored kraft paper, gluing all the seams with it, using wallpaper glue. Stick white paper (or tracing paper) on all furniture - it makes decorating the furniture easier.
Remember: craft paper and tracing paper must be torn by hand before gluing, not cut!
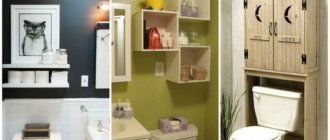
How to beautifully design and decorate storage boxes
How to make cardboard furniture more durable
Depending on the purpose of the item (whether it be a chest for children's toys or a TV stand), cardboard is strengthened in different ways. For a more reliable and durable fastening, you must remember the following:
- To strengthen the cardboard and protect it from moisture, use parquet varnish, applying it to finished and decorated parts of the furniture;
- Try to make furniture symmetrical - it is more stable than irregularly shaped furniture;
- If you make asymmetrical furniture, then add more supports to it for strength;
- The more cross sections your furniture has, the more stable it is;
- To give more strength to your structure, use a trick - make two layers of cardboard on all furniture elements. But, pay attention, the layers must be different: one layer must have horizontal waves, the other must have vertical ones;
- Light cardboard is less durable than dark cardboard;
- The thicker the cardboard, the stronger it is.
Cabinet for kitchen or living room
The finished product will be stylish and beautiful and will fit perfectly into the classic and retro style of the interior. A model of the future cabinet is drawn on paper, and places for shelves are outlined. Then the parts are cut out to the required size.
The sides of the cabinet and its bottom are made thicker in one of the following ways:
- Take 2-4 identical pieces of cardboard. Carefully coat the first cut with glue, apply the second, and let the glue dry. In this way, all the parts are connected to each other, resulting in a piece of thick material.
- Cut out two identical cardboard pieces. Prepare long strips of thin or corrugated cardboard 1-2 cm wide, bend them like a snake and stick the ends onto one part. After drying, cover the snakes with a second cardboard element, pre-lubricated with glue, and allow the entire structure to dry.
The process of cutting out and thickening all the elements of the cabinet is quite important, so you need to be careful and patient. To avoid confusion, all parts are numbered or signed in another way. The glued cardboards are placed on the floor for a day and pressed down with a weight so that they do not warp.
Then proceed like this:
- Grooves for shelves are cut into the side walls of the future cabinet from the inside.
- Place the shelves inside, securely glue them with “Moment” or hot glue, and leave to dry for 24 hours.
- They connect the structure into one whole - glue the top and bottom, glue in the internal partitions, if any.
- After the structure has completely dried, all side sections are carefully sanded with sandpaper or carefully sealed with thin strips of paper.
Making a cabinet from corrugated cardboard
The next step is to decorate the cabinet. All surfaces are covered with craft paper or regular white paper, and then painted with acrylic paint.
There is another option for finishing the structure. It is coated with a wood primer, allowed to dry, and putty with an even, smooth texture (for example, finishing gypsum) is applied.
The dried layer of putty is sanded with fine sandpaper and painted over in any color. For example, the combination of beige and gold paint looks beautiful - they are alternated with chaotic strokes.
You can also paint all surfaces in one shade, and then go over some areas with a damp sponge dipped in a different paint, or treat only the corners and contours. Any decor and fittings are glued onto the finished cabinet.
How to use cardboard furniture
How to properly use hand-made cardboard furniture
In order for your cardboard new thing to serve faithfully for a long time, do not forget that:
- Cardboard furniture is afraid of moisture (varnish will not save you from rain);
- Use it for its intended purpose: if you have made a table for letters/keys/changes, do not place a bulky flower pot on it;
- Make sure that there is no open fire near cardboard furniture (be it a fireplace, a fire, or even a cigarette) - you may lose not only a piece of furniture if you allow a fire hazard.
How to make furniture from cardboard with your own hands if only a box comes to mind? What can you make from a shoe box? We are in a hurry to surprise you - you can make a lot of amazing things from cardboard that harmoniously fit into the interior, from the nursery to the hallway, and if you are completely overwhelmed by inspiration, then there are many ideas for the office and country house.
Below you will see how to make cardboard furniture with your own hands using patterns and diagrams. For the first time, choose something that is not too complicated to get comfortable with the manufacturing technique.
Important! When designing furniture, remember that 0.6 cm will take up furniture decoration, and always add these centimeters when measuring dimensions.
Pros of DIY cardboard shelves
- Elegant design - you design the item with your own hands, relying on personal preferences.
- Practicality - you will only need to spend money on purchasing the necessary tools.
- Cardboard furniture can be disassembled and reassembled at any time, which is very convenient when moving or during renovations.
- You don’t have to waste time searching for a practical, something you like that will fit perfectly into your interior.
- Cardboard furniture does not contain harmful, toxic or other hazardous substances.
- Durability – the service life of cardboard furniture will be long if it has not been exposed to moisture and has been properly processed during creation.
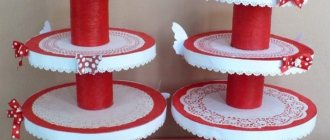
Master class No. 1: Cardboard shoe stand
We decided to simplify your task - we put the first master class that anyone can assemble. So, armed with all the necessary items, let's get started.
Step 1
- Take sheets of cardboard - approximately 21x24cm - and divide them into three equal strips; Using a dull knife, press the strips thoroughly so that they bend.
- Cover the long sides of the sheet with any colored tape.
- Then fold the sheets into triangular oblong shapes and secure with the same tape.
Step 2
You can make any number of triangles. To secure the shelves, take whole sheets of cardboard and glue the triangles to them with double-sided tape or PVA. You can put a sheet of cardboard on the very top and put high boots on it.
Adviсe
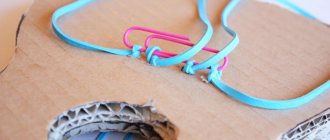
You can complement the bench with forged twisted decorations. To do this, you will need thick wire with a diameter of 2-3 mm and acrylic paint to give it the desired effect. Using pliers, the wire is given the desired shape. The parts can be connected using tape, and then the “forged” parts can be covered with papier-mâché. This will also strengthen the frame of the product.
The paste with which pieces of newspaper are smeared can be prepared from boiled water and flour in the proportion of 3 tablespoons of flour per 500 ml of water, adding a little glue there. The resulting mass needs to be cooled and only then used to glue the wire. Please note that you will need not one or even two layers, but about 3-4, so that the papier-mâché turns out dense and does not fall apart in the future.
The next step will be to eliminate all the resulting irregularities. To do this, use sandpaper, first medium, and then fine grain. After this, the element is covered with self-hardening plastic, which is sold in small packs and hardens quite quickly, then the procedure for removing irregularities is repeated. However, you don’t have to try too hard here, because roughness may be appropriate to reproduce the “antique” effect and simply a more natural look of the bench.
The frame must have monograms, which are also made using plastic. Using a knife you can make them more expressive and deep, and also give the entire frame greater precision and “detail.” The last step will be painting. Everything is clear with black paint, but how to give the bench a metallic effect? Here you will need silver paint. It should be applied with a dishwashing sponge. Then we let the part dry, cover it with acrylic varnish and attach it to other elements.
Master class No. 2: Cardboard bookshelf
Step 1
Take long, not wide sheets of cardboard - some of the sheets will be used for vertical bases, so they should be a little longer; in general, the size of the sheets can be any size at your discretion. You can look for such sheets in hardware stores - sometimes they throw them away with just such cuts.
If you can’t find it, take solid (without bends!) sheets and measure for the cutting line so that on all sheets they coincide when threaded into each other.
Step 2
If you take thick cardboard sheets, then when you connect them together they will hold tightly and without additional means. Thin sheets can be secured together with hot glue; it will dry quickly, so you will have to act quickly when joining the sheets. After joining the sheets, you can already use the shelf.
Simple origami diagrams of a paper chair
A miniature chair is very easy to make using the origami technique. To do this, you will need a sheet of paper measuring 20x20 cm. Schemes for manufacturing can be found on thematic websites and downloaded from the Internet.
There are also many books on this technique. However, it is quite possible to experiment and create your own scheme. There is a very simple scheme for making a high chair, understandable to both adults and children.
Follow the strict sequence of actions:
- You need to take an ordinary sheet of paper in the shape of a square and fold it horizontally. The larger it is, the larger the chair will be. Accordingly, from a small piece you can make a very tiny product.
- Next, return the sheet to its original state and fold half the paper horizontally.
- Fold the other half of the sheet horizontally in the same way.
- We unfold the sheet and begin to fold it in the opposite direction.
- Carefully cut off one of the sides and bend the remaining part in half.
- We turn one corner so that we get a corner. We do the same with the other side.
- We direct the lower part upward.
- We wrap the side parts on each side. In configuration, they resemble the walls of a chair. The resulting product is already visible.
- We unfold the craft, straighten it and give it the outline of the desired product.
REFERENCE! An ordinary chair can be easily made from a simple origami pattern in 5 minutes.
IMPORTANT! In the origami technique, strictly follow the recommended steps and try to make all folds as accurately as possible with the smallest error.
Master class No. 3: Hanging shoe rack
- Take a couple of large sheets of cardboard and mark them into equal rectangles based on the size of your shoes. Then cut them out.
- Fold each rectangle as shown in the photo, and secure the resulting pockets with tape.
- Insert the pockets into each other so that it is easy to secure them with double-sided tape, but still leaves room for shoes.
- You can fix the shelf on the door - it will not interfere with you at all and take up a lot of space.
Shelf for children's room
To make shelves for books or toys in a children's room, come up with an interesting cut for sheets of corrugated cardboard. Our next sample uses the outline of an apple. The back wall is a whole apple, and the inner partition is a thin strip, 10 cm wide and contours that follow the outer part of the cutting.
The front panel already conveys all the details of the shelves and external parts of the rack. The bottom bar is made wider so that the shelf acquires structural rigidity. It can be strengthened with several layers of cardboard, gluing them together. The same goal is pursued by short stiffening ribs that are attached between the three main parts of the apple structure. They are all glued parallel to each other and have the same size.
Further work is done on the actual shelves of the apple-shaped rack. Make sure that all corners are straight and cut exactly to size. You can cover the rack with colored paper or wallpaper to match the color of the room walls.
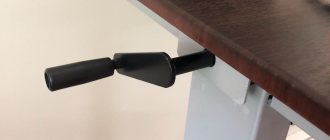
Master class No. 4: DIY laptop stand
Almost each of us has an indispensable tool for work and communication - a laptop. And we have to buy all sorts of peripheral devices for it (mouse, flash drives, removable hard drives, etc.). And so, when there is a desire to put it on a stand for ease of use, we are forced to go to the store and spend extra money. For those who want to avoid unnecessary expenses, but do not want to give up the stand, there is an excellent solution - to make it yourself. And how to do this - you will read in this article.
Materials and tools:
- Laptop to measure stand size;
- yardstick;
- several sheets of paper or newspaper for a stencil;
- thick cardboard for the stand itself (you can use an unnecessary box);
- long ruler;
- marker or pencil;
- large scissors or a utility knife.
You already understand that we don’t need any special materials - everything listed is probably available in any home. Let's start production.
Step 1.
Take paper or newspaper and spread it on a flat surface. It is better to carry out all actions related to measuring the size of the stand and making a stencil according to the “measure seven times, cut once” principle, because at best the stand will be crooked, and at worst it will not hold the laptop.
- First we will make a leg (this is a crossbar between the legs to give the stand more rigidity). We take a tape measure and measure the length of the laptop along the keyboard, from corner to corner.
- Mark exactly half of this length with a marker on paper.
- We draw a line - this will be half of the base of the pole. It's better not to draw this detail entirely. Make a slight inaccuracy and the laptop will stand crooked.
- We measure up from the edges of the segment 4 cm and 7 cm. Draw a rectangle.
- Mentally divide the rectangle into 3 parts: the first third is an almost straight line at a height of 4 cm, the second third is with a pattern or hand making a bend at an angle of 45 degrees to the 7 cm line, the last third is from the right end of the segment we draw a line to the 7 cm line at an angle 45 degrees.
- All this is simply and clearly shown in the photo (detail 1). At the point where the two curved lines meet, a narrow sleeve is made - at this place there will be a cutout for aligning the parts.
Step 2.
The same photo shows a template for the legs of the stand (detail 2).
You select the angle of the stand based on your personal preferences. This will add up to the height of the right and left sides of the leg. When drawing the template for the leg, pay attention to the tooth that will subsequently keep the laptop from falling.
In height, it should be at least a third of the thickness of the laptop. The slot in the leg for coupling with the leg should not be in the middle, but at a distance of approximately 1/3 from the far edge. This also affects the stability of the structure. Curves are at your discretion.
The slots in the legs and leg can be no more than 3-4 cm in height. They can be 3-5 mm in width depending on the thickness of the cardboard, but in both parts they can be the same.
Step 3.
Cut out paper templates. We attach the template of 1 part with the bottom cut to the even edge of the box chosen as the future stand. It is desirable that the stable parts of the stand are perfectly level (the stand will not wobble on the table).
- Carefully trace the template on one side, then flip it over to the other side and continue tracing. We get one continuous symmetrical part (leg). Apply parts only to smooth parts of the box (pieces of cardboard) where there are no folds.
- On another cardboard (for example, the bottom of a box) we place the paper template of part 2, i.e. leg. We circle and repeat the same a second time. The legs must be absolutely identical.
Step 4.
We cut out all the details with scissors or a stationery knife. We move them along the slots, as shown in the photo.
If everything is combined correctly, then you can be glad that a simple (like all ingenious), functional, strong stand for your digital friend is ready! Install a laptop on it and attach additional keyboards to it, watch movies at a comfortable height, sweep cookie crumbs under the stand - you are now the happy owner of a homemade laptop stand!
Origami bench
Before making a bench out of paper, prepare scissors and a sheet of thick A-4 paper. First, fold the sheet in half horizontally and cut it into two long rectangles along the fold. Each half needs to be folded in half again lengthwise to determine the center line. Then straighten the workpiece to its original state.
The top and bottom corners must be folded so that they reach the center fold line. You will get a long strip with triangles at the ends. Only after this bend the figure in half. The same folds need to be made on the second half of sheet A-4. You should end up with two stripes with beveled corners.
To make a bench model, you need to connect both parts by inserting one into the other with a short part. The photo shows how the triangular edges of the strips should be positioned. These are the legs of the bench. Bend the edges of the corners slightly inward so that the craft stands firmly on the table surface. You will also need to make two identical folds of paper on both sides at an angle of 90°. That's it, the paper bench is ready!
Drawings and dimensions
First of all, it is worth mentioning the collapsible frame options. Such models are very mobile. Their parts are connected with bolts. The storage can be easily moved to the desired location. But there are also non-demountable frame racks.
To join their parts use:
- welded joints;
- self-tapping screws;
- nails (this is determined by dimensions and material).
When large in size, such assemblies are virtually stationary. It is not only impossible to take them out through a door or window, but even to disassemble them. It will only be possible to break it, so dismantling is fraught with many difficulties.
As for the console versions, such racks do not have sidewalls. But it provides for attaching the shelves to the solid rear wall.
As for folding models, they are closer to a stepladder. The dimensions are relatively small, and you can’t count on decent capacity. However, the mobility is even higher than that of the collapsible versions, and this largely compensates for the low capacity.
As for the shape, rectangular and triangular types of shelving are optimal for both the pantry and other rooms. A rectangle is generally a classic shape. You just need to choose whether to install square legs or extend the supports to support the entire structure at once
When drawing up a diagram, you should pay attention not only to the geometry, but also to the dimensions of the storage unit itself.
The height is mainly limited to 2 m. In this case, even most people of average height, without stepladders or stools, can reach the top shelf. As for the depth, it is entirely determined by the size of the objects laid out.
Hanging or protruding things are not very good, but a huge half-empty space is unlikely to be a rational choice. To store books, magazines, and flowers, you need shelves 0.3 m wide and 1 m long.
For garages and sheds, for garden tools, for wallpaper and for illuminated seedlings, it is recommended to use shelves 0.4-0.5 m wide. They can also be used to stack:
- tires;
- canisters;
- spare parts for cars and garden equipment;
- metalworking, carpentry and entrenching tools;
- fasteners;
- various clothes.
Particular attention should be paid to the shelving in the bathhouse. All of them must be mounted not only on the floor, but also on the wall, because otherwise it is impossible to ensure reliability
It is unlikely that anyone will like falling from a shelf to the floor. All such products must be made of wood and carefully polished.
This is what a rack cabinet looks like with a height of 1716 mm, a rear wall width of 1038 mm and a single section width of 324 mm. But this is a homemade budget class shelving unit. The depth of the shelves reaches 500 mm. Their length is 1550 mm. For work, plywood with a thickness of 1.5 cm and pipes measuring 2.5x2.5x0.2 cm are used.
What can you make a doll table from?
First you need to decide on the material.
Suitable for creativity:
- cardboard;
- matchboxes;
- pieces of plywood;
- unnecessary CDs;
- ice cream sticks;
- plastic bottles;
- paper rolls for toilet paper.
On the Internet you can find a lot of different master classes that tell and show how to make a table for dolls with your own hands. Let's look at some of them.
Rack with side walls
In almost every apartment there are places that are not used in any way. Such places include a small space on opposite sides of the door, where there is usually nothing standing. If desired, it can be used rationally by placing a small rack in which you can store books, shoes or other items. The peculiarity of this design is that it should be covered with walls on the sides. You can make a rack yourself if you follow all the rules and recommendations.
Rack with side walls
Tools and materials
The list of tools and materials for making a compact shelving unit is practically no different from the list mentioned above. Prepare the following for work:
- chipboard (chipboard);
- thick sheet of plywood;
Plywood sheets of different thicknesses
- boards for the frame of the structure;
- set of self-tapping screws;
- glue for working with wood;
- impregnation (stain);
- router or electric jigsaw;
- roulette;
- paint brush and work gloves.
What you need for work
Description of the problem and methods for identifying intruders.
As it turns out, this is how scammers act. First, remember the moment when you “Log out” your account. If this was not the case, but the requirement to confirm it exists, then check your host file. It is located in the system32 folder. But it’s easier to get to it by clicking: Start->Run->Type “%windir%\system32\drivers\etc\hosts”->Press “Enter”. You should see a window like this:
To open the host file, select the Notepad application. Now let's look carefully at the contents of this file. The normal and standard content of host should look like this:
If so, then pay attention to the scroll bar on the right and bottom. They should be missing
If there are any, then scroll them to the maximum and observe the hitherto hidden redirection lines of the host file. It is here that you can determine which site will open in the browser when you select a particular resource. Thus, typing vk.com can redirect you to yandex.ru. You can do this yourself. Fraudsters redirect you to their websites, where the design is completely copied. And so you entered your phone number and received an SMS. Pay attention to the recipient's name. It must be vk.com! Other senders who ask to send a return SMS are definitely extortionists. In SMS from VKontakte you only receive a confirmation password, which you need to enter in the browser window in a special field.
Creative shelves for children's books
When thinking about making a bookshelf with your own hands for children, consider cardboard as the main material. In addition to the fact that it is environmentally friendly, products made from it are lightweight, which minimizes the risk of injury to a child when a shelf falls.
In order for the shelves to carry a developmental load, we will make them in the form of funny animals. The child's delight begins from the moment the structure is assembled, where he takes an active part. With such a creative book shelf, your baby will quickly learn order. Now the books will have their own funny children's shelves, which will be a pleasure to put in order. It will be difficult to draw up a diagram of a puzzle shelf in the shape of an animal yourself if you are not familiar with drawing programs, and even with drawing itself. You will have to look for the diagram, which is not very difficult.
Then everything is simple. We decide on the size, enlarge the patterns, which we then cut out, transfer to cardboard and then cut out the blanks. When cutting out the legs - the elements that hold the entire structure, we place the corrugations vertically. This will provide additional reliability and stability of the shelf. If there is no thick cardboard available, and there are doubts about the reliability of the unusual shelf, we cut out 2-3 times more cardboard parts, glue together identical elements, and dry them under a press. Remember, the thicker the cardboard, the wider the grooves for attaching parts should be. In this case, the joint must be reliable, strong, the movement of elements is unacceptable. All that remains is to assemble the structure and, if desired, paint or decorate it. Having made various blanks of several types, the designs can be changed periodically, which will not let your baby get bored.