In this lesson, we have published several step-by-step master classes that clearly show how to make birds from plasticine with your own hands. Let's look at the step-by-step steps of sculpting a crow and a woodpecker. First, tell your children interesting information about these birds, and then proceed to carry out your plans.
Birds are amazing creatures of nature that literally fill our lives with new meaning. They can be colorful, such as parrots, hummingbirds, flamingos or other exotic birds, or seemingly inconspicuous, such as crows, sparrows and others. But they are all amazingly beautiful, graceful and lead a special way of life.
In both the first and second cases, the main color of the plasticine will be black. Only the first craft will be completely dark, and the second will be diluted with white and red.
How to make a crow step by step
To sculpt a bird you need to prepare:
- plasticine set;
- stack.
Step 1 . Prepare a black block of plasticine. You need 1 or more pieces, depending on the size of the craft you plan to make.
Step 2 . Sculpt the body of the bird. Make an elongated part - a pear. If there is not enough plasticine, then inside mask any other shade, damaged plasticine, or a rolled up piece of foil.
Step 3 . Glue a small black ball at the wide part of the pear and smear the plasticine at the joint. Connect the head and torso. The skeleton of the crow will be ready.
Step 4 . Move on to the flat parts: the tail and two wings. Make models of triangles and drops, also leave a little black plasticine for the crow's beak, because it is also black.
Step 5 . Glue 2 wing drops on the sides of the body, and begin to bring out small hangnails in a stack, thereby imitating feathers. If the plasticine is dense, then at this stage you can use small scissors; they can simply cut out such small corners, completely filling the surface of the wings.
Step 6 . Perform identical operations on both wings. After you do this, do not touch the top with your fingers so as not to press down the selected corners (feathers). Attach a tail that flares to the bottom at the back.
Step 7 . All that remains is to design the head. Turn the last small piece of plasticine into a beak. This will be a small cone, glue it in front and carefully bend it down. Glue 2 gray circles as eyes with pupils. Only these lighter spots will stand out against the otherwise dark background.
Step 8 . The bird should also have legs; make these parts from black and gray pieces. Glue small cones in wide parts to the body, and on the bottom - legs.
The crow figurine is ready.
If desired, you can carefully mix blue into black plasticine to make the plumage believable, with a beautiful tint. Everything is simple and clear.
Stork step by step - modeling a bird in the senior group
We sculpt a body from a white ball and attach the neck and head. We make white and black wings and show feathers on them. Attach the bird's tail and wings. Legs can be made from ordinary matches. To do this, we attach matches to the body using balls. We add membranes at the bottom. All that remains is to make a nose in the shape of a carrot and eyes from beads.
Sculpting a woodpecker in stages
The next master class will be on sculpting a woodpecker from plasticine. Remember that the color of these birds is black and white with variegated splashes of red or yellow. Therefore, prepare the appropriate colors of regular plasticine or air plasticine.
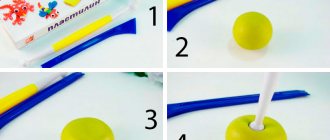
Step 1 . As in the previous case, the main block of plasticine will be black. But in this case you need to add white fragments to the plumage. You will also need a small piece of red and brown or orange for the beak and crest.
Step 2 . Divide the black block to form the body, wings, head and tail.
Step 3 . Roll the largest piece in your hands, smooth it out, and turn it into a body.
Step 4 . Attach a small black ball to one side of it. For security, secure a toothpick inside. Glue 2 white cakes on the sides of the small head ball. Glue the chest on the front of the body.
Step 5 . Using additional pieces of black plasticine, fashion wings. Their shape has already been examined using the example of sculpting a crow. Glue the same long tail.
Step 6 . Glue thin white stripes across the wings. Do this on the first and second wing. Also attach a small red plasticine sausage to your head in the form of a tuft. On the reverse side, lift up a kind of comb; the woodpecker should have it.
Step 7 . Attach a long beak in front - a powerful weapon of a woodpecker, with which he heals trees, breaks through wood, and gets worms. Glue 2 small black balls, like eyes, onto white cakes on the head.
Step 8 . Glue the legs in the same shape as in the case of sculpting the crow. Only the paws themselves can be made from orange plasticine.
Step 9 . The bright woodpecker craft is ready.
We looked at a creative lesson in sculpting birds using the example of two individuals familiar to the smallest children of kindergarten age (preschoolers) and older children who have already started school.
A simple bird - modeling in the preparatory group
First, let's sculpt a simple bird out of plasticine. Roll a blue ball. We form the body in the shape of a droplet and bend the tail up. Connecting the head and body. We sculpt wings from two balls and use scissors to make 2 cuts on each. We also cut the tail. Add wings, beady eyes and yellow legs and beak. Creating such a bird is perfect for middle school children.
Firebird – plasticine applique
The Firebird is a fictional bird, such a miracle is mentioned only in Russian folk tales. We can only guess what she looks like, and together with the children we can imagine a feathered creature of extraordinary beauty. The prefix “heat” tells us that this bird is so beautiful that it dazzles with its beauty, its feathers seem to breathe heat, shimmer and sparkle. By re-reading interesting fairy tales, you can continuously fantasize, and realize the fruits of your creative thoughts in crafts. The firebird can be drawn, molded from plasticine, or made into an applique from paper. All this is proposed in this master class, but plasticine will be used. We will draw a figurine of a beautiful bird on paper, but we will make an applique from three-dimensional plasticine parts.
To sculpt crafts you need to take:
- - cardboard - the basis of the drawing;
- - plasticine of red, orange, yellow colors;
- - a thin toothpick or skewer.
How to make a firebird step by step
1. Choose bright cardboard - the basis of a fairy-tale drawing. Since the firebird should be fiery, it is better to use orange, red and yellow colors to sculpt it. These shades will look very beautiful on a blue background. Take some yellow plasticine and knead it in your hands. Make a small oval flat body, glue it to the cardboard, move it up a little to leave room for the bird’s gorgeous tail. Attach a thin neck and a small head from the same plasticine.
2. Prepare bright blanks for sculpting the wings. Pinch off a few pieces of orange and fiery plasticine, gradually reducing the size. Pull each piece into a sausage.
3. Attach the first row of large feathers to form the bird's wings. Start with the largest piece, then attach the shorter ones in order. Clearly join one end of each piece to the body. Press the tip of the toothpick around the entire perimeter of each feather individually to highlight the design.
4. Glue on the second layer of feathers of the second color, also making them fluffy using a toothpick. Make two wings.
5. Proceed to sculpting the gorgeous bird of paradise tail. In this case, plasticine of the same shades is also suitable for modeling elegant feathers. Pull out the sausage. Make one end long, thin and pointed, press the other with your finger, forming a spatula. Glue on top details in the form of diamonds or droplets of other shades, attach a central dot-ball. Pierce the pieces and press down on top with a toothpick to add relief.
6. Make some long feathers and attach them to the tail.
7. Add other similar details to make a beautiful ponytail.
8. Several small feathers can be glued to the head; follow the same method.
9. And finally, show the feathers on the bird’s body and neck. To do this, also use a sharp tool and rinse the entire surface of the plasticine.
This is how you can bring a fairy tale to life. A beautiful plasticine craft is ready. The Firebird turned out to be bright, and the main secret of successful sculpting is the use of the most beautiful blocks from the set and a good mood.
How to do:
- Bullfinch.
If you choose other colors, then using the same pattern you can make a titmouse or sparrow. - Owl. Mix plasticine of several shades to obtain an interesting color. The body and wings are decorated with small flattened flagella. Attach them from the bottom of the body, rising higher and higher to the head. The wings also stick to the sharp edge. If you do not cover the body with feathers, you can make a penguin using the same scheme.
- Parrot. Apply the plasticine well, then you will get smooth transitions from one color to another. Don't forget to make legs (like an owl's) to sit the bird on the branch. You can make a swallow in a similar way. The swallow's body is an oval, slightly pointed on both sides. The tail has two flagella. The wings are droplets that need to be folded and then flattened. Don't forget to make a white belly.
- Cockerel. The body is similar to a parrot, but the neck is longer, so you can simply attach another oval for the head. The legs can be placed on toothpicks just like a bullfinch. For example, an eagle is sculpted in the same way.
- Swan. The wings can be decorated using small flattened flagella. Attach them from the sharp part of the wing. If you make the swan pink, add long legs and crochet the beak, you will get a flamingo.