Good afternoon, dear needlewomen!
felt material more than once in our master classes, and decided that it is a very comfortable fabric for creating wonderful crafts and educational toys, since it is pleasant to work with: the material does not crumble, its edges do not need to be processed.
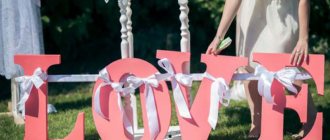
You can also decorate a child’s room with felt letters by making a banner out of them.
You can also make letters from felt - learning the alphabet will be a pleasant activity for your child. Your baby will learn letters as well as colors.
You can put the letters on a magnet and attach them to the refrigerator, or make a panel with Velcro, or maybe even an alphabet game with your own hands.
A felt alphabet is a very useful thing and is indispensable in learning letters.
In our article you will find letter patterns, a master class on sewing letters and the alphabet from felt with your own hands.
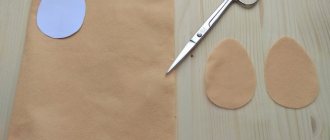
How to cut letters from felt
Adviсe:
- When cutting out letter patterns, use scissors to round off sharp corners to make cutting and sewing easier.
- You can transfer the pattern to felt using a pencil, soap, or a disappearing marker.
- You can lay out patterns on felt in any direction; it has no longitudinal or transverse threads
- Felt does not have a back side - trace the pattern on either side of the felt
- The edge of the felt does not require special processing; there is no need to turn the letters inside out
- Leave a few millimeters for the seam
When cutting out felt, the main thing is to maintain smooth movements, not to fuss, and not to make snags.
If the movements of the scissors are smooth, there will be no gaps left.
To cut out the inside of the letter, make a cut with scissors and then cut along the outline.
Materials and tools
To create a soft alphabet, you need to purchase the following items from art and craft stores:
- Filling - you can use padding polyester, holofiber or padding polyester. The latter option is preferable, as it is lightweight and does not lose its shape. To develop tactile perception, many advise taking cereal, but first it will need to be calcined in the oven to prevent the appearance of beetles.
- Textile glue or glue gun. These 2 types of glue are non-toxic and odorless. If the letters are not created for a child, you can also use glue moment crystal.
Glue gun
- Scissors, Velcro, magnets, needle.
- Disappearing fabric marker for transferring patterns onto fabric and making notes. As a last resort, you can use a gel pen.
- Thin but non-transparent fabric.
- Threads - to sew toys, you can use regular sewing threads or floss. The second option has a plus - a rich range of colors, which allows you to choose a color to match the fabric, then the seams will not be noticeable.
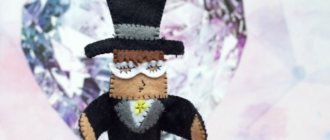
Note! As an additional decoration for the toy, you can use beads for the eyes, beads, bows, and bells.
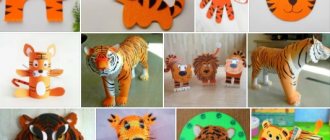
Felt alphabet with animals
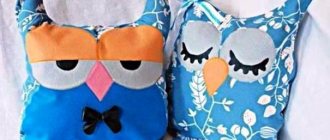
You can diversify the usual felt alphabet by sewing charming animals to the letters, it will be more interesting to study the letters. For example, in the letter “A” - sew a Stork, to the letter “N” - a Rhinoceros.
You can also make an alphabet wall hanging for organization.
For this you will need additional materials:
— Velcro;
— Main fabric for panels;
— Filler, for example, padding polyester, holofiber, foam rubber, cardboard, it will keep the shape of the panel.
— Fabric of a different color for “pockets”
We cut out large rectangles (2 pieces) from the fabric, sew pockets onto the front part, cut them out of multi-colored fabric and sew them onto the base. Next, both sides of the panel need to be sewn, not forgetting to put the filler in the middle.
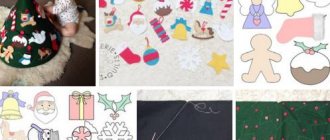
Then you need to come up with an animal for each letter, prepare patterns, some of them you will find below, also in our previous article.
Or print out regular children's coloring books and use them as patterns.
For each pocket cell there is one letter and an animal. You can play with the animals and learn letters at the same time.
It’s not difficult to do, but the work is small and therefore quite painstaking. But the result is worth it!
For sewing, use thin 1 mm felt.
Felt toys for beginners: 15 simple patterns
Many needlewomen love to sew felt toys. They turn out to be unusually cute and cute, so children love to play with them. If you want to please a child with such a toy or sew a souvenir for someone, then even a novice needlewoman can easily do this with felt.
Why felt is a universal material
In its properties, felt is similar to paper. It cuts perfectly, sticks and does not crumble. It can be used in a variety of types of needlework: from toys to scrapbooking. But at the same time, felt products are soft, with a beautiful texture, durable and do not tear. Felt is perfect for sewing educational aids, both simple ones in the form of a rattle and complex ones: books, puzzles, rugs.
Many mothers look at such toys and want to try to sew them with their own hands. For beginners, felt is one of the most suitable materials. You can sew toys by hand or on a sewing machine, glue or sew on parts, add your own details to the pattern and easily come up with your own.
Which felt to choose: soft or hard felt for toys
First, you will need to decide on the choice of felt. It comes in two types: soft and hard.
Soft felt is suitable for bulky toys, as it stretches a little and the parts are easy to sew together. This felt holds its shape perfectly and the child can safely play with the toy without fear that something will happen to it.
Hard felt is less flexible. It is more used for flat toys and aids, letters and applications.
Tip : sometimes it is difficult to decide on the choice of felt without feeling it and assessing the quality of the material. In our store you can order samples of felt, which we have in stock.
To sew toys from felt, you may need the following materials:
- Floss threads
- Glue gun
- Hollow fiber for stuffing toys
Felt toys: Patterns
We offer you a selection of simple patterns that you can use to sew felt toys. To do this, print out the pattern, attach it to felt and trace it with a washable marker. Seam allowances are not needed, since the edges of the felt do not need to be processed.
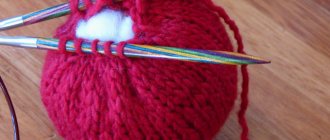
Cut out the pattern pieces and sew them together. Leave a small hole to fill the toy with holofiber, and then sew it up with a hidden seam.
We hope you enjoy working with felt. Take a look at our online store, where you will find a large selection of felt for different types of needlework and other materials for creativity.
- Photo source: Pinterest
- We have a lot more interesting things:
- 5 most popular types of seams when working with felt
- Types of felt: which one to choose and what can be sewn
- 3 life hacks that will be useful when working with felt + 2 bonuses
- Eco-leather: 5 useful master classes
- 10 soft toys that can be sewn from felt
Source: https://touchthebeauty.com.ua/pomoshch/stati-i-master-klassy/86-igrushki-iz-fetra-dlya-nachinayushchikh-15-prostykh-vykroek
Pattern of the letter E and a raccoon from felt
Letter E made of felt. DIY alphabet video.
Letter Z and giraffe made of felt. DIY alphabet video.
Letter Z made of felt. DIY alphabet video.
Letter I made of felt. DIY alphabet video.
Letter Y made of felt. DIY alphabet video.
Letter L made of felt. DIY alphabet video.
Letter M made of felt. DIY alphabet video.
Letter N made of felt. DIY alphabet video.
Letter O made of felt. DIY alphabet video.
Letter O made of felt. DIY alphabet video.
Letter R made of felt. DIY alphabet video.
Letter C made of felt. DIY alphabet video.
Letter T made of felt. DIY alphabet video.
Letter U made of felt. DIY alphabet video.
Letter F made of felt. DIY alphabet video.
Letter X made of felt. DIY alphabet video.
Letter C made of felt. DIY alphabet video.
Letter s made of felt. DIY alphabet video.
Letter H made of felt. DIY alphabet video.
Letter Ш made of felt. DIY alphabet video.
Letter Ш made of felt. DIY alphabet video.
Letter b, b, e, yu made of felt. DIY alphabet video.
Letter I made of felt. DIY alphabet video.
Felt letters on magnets video
Fabric selection
Many woven and non-woven materials are suitable for creating soft parts:
All the needlewomen who have tried to make soft letter pillows say that the best fabric in this matter is felt. This is a dense non-woven material consisting of compressed wool. Felt is valued for its advantages:
- Strong, non-fraying edge.
- Wide variety of colors.
- Plasticity, the ability to maintain shape.
- Ease of use - bends in different directions, easily tears and cuts.
- Possibility of double-sided use.
- Wide variety of colors.
Using the felt alphabet
An alphabet made from felt with animals is just what you need for educational activities with your child.
Felt alphabet for a child
Bright letters will attract attention and will be remembered quickly and for a long time. And fun games with felt alphabet, which can be played at home in the classroom, will help you consolidate your knowledge:
- “Soft landing” - lay out the alphabet on the floor, circle a toy plane over it: “The plane was flying, flying - what letter did it land on?” The child must answer as quickly as possible.
- “Who lives in the house?” — invite the girl or boy to put a suitable toy animal in the signed pocket.
The work of creating a felt alphabet is painstaking and long work. But every minute invested in the development of a child will become the basis for the formation of a happy and successful person.
Source
Optimal alphabet size
You need to decide in advance what size the alphabet and animals will be. This determines how much felt you need to purchase. Teachers working with children believe that the optimal size for a child’s hand is letters of 6.5-10 cm.
But it is worth remembering that the side seams will take about 2 mm; after printing, the letter will gain volume and will look smaller. Therefore, in order to sew a voluminous Russian alphabet, the pattern must be large - 12-13 cm.
If the alphabet is created as a decorative component, any size can be taken.
How to build a pattern for a three-dimensional pillow letter
The first question you need to decide is what size your pillow letter will be. If there is only one letter, then of course it should be quite voluminous and large, and if you make your name in full, then the size of the letters may be smaller. It is especially important not to make a mistake with the “thickness” of the letter, especially since after filling it with padding polyester or other material, the letter will “lose weight” a little. Therefore, we recommend that before creating a pattern, first cut out several letters of different sizes from paper and choose the most suitable option. These dimensions can then be used to construct the pattern.
It is best to “construct” the pillow letter pattern on graph paper. It is inexpensive, but the pattern of the letter will be perfectly even and symmetrical. Please note the two arrows at the top and bottom of the pattern. They point to the central dots that bisect the letter. It is advisable to make such markings for any letter, especially since most of them have a mirror image, for example V, S, L, M, T, etc. The pattern is needed only for the front part of the letter; the reverse side will be similar to the front. But don't forget to turn it over when cutting the fabric. For the letters A, M, T, this does not matter, but for the letters S, Z, Yu, etc., the front part of the fabric of the back half will be inside the pillow.
The pattern of the side parts connecting both parts of the letter into one whole is not built. Determine its width and cut strips marked with chalk directly onto the fabric. Naturally, not forgetting about the seam allowances for all the details of the pillow letter pattern. The height and width of the pillow are not as important as its thickness. Moreover, after filling it with insulation, the volume of the pillow will “take away” an additional 1-2 cm. Take this into account when creating a pattern in advance.
What will you need for the job?
The main material needed in the work is felt. It comes in different thicknesses: from 1 to 5 mm. For a flat alphabet, it is advisable to use the thickest available option; for a voluminous alphabet, it is advisable to use soft, thin felt. Pay attention to the quality of the fabric: acrylic material creaks. There are also options with the addition of wool. If your baby has prerequisites for allergic reactions, then it is better not to use felt to make the alphabet.
The pattern is the easiest step in sewing fun colorful letters. To work, you will need threads that will closely match the tone of the felt, unless you want to make a contrasting stroke. This original idea also looks original and attractive.
Needles, pins, scissors and a textile marker will be good assistants for the craftswoman in working on patterns of letters of the Russian alphabet. You can use any filler; synthetic padding is ideal. To make it easier to type three-dimensional letters, you can use a sushi stick.
Independent work on letter patterns
If you couldn’t find a pattern for the letters you would like on the Internet, you can make it yourself. There is nothing complicated about this; you need to set the desired font style and size in a text document, and then print it. All! You can sew the alphabet from felt. The pattern for future products is ready!
For a voluminous alphabet, it is recommended to choose characters with rounded edges so that they do not have thin elements, otherwise it will be almost impossible to sew and stuff them.
For a flat alphabet, it is undesirable to choose fonts with jagged edges, as they will constantly wrinkle and therefore be inconvenient to work with.
Consumption and layout of fabric for letter pillows
You see that in our example, for the letter A, only half a meter of fabric, 150 cm wide, was needed. And strips 10 cm wide (plus allowances) are assembled from several pieces cut across. But in another case, the fabric consumption may be greater. And if the fabric is inexpensive, then it is better not to skimp on it, but to buy it with a reserve. In addition, you can use companion fabrics, much like in the photo of this pillow.
Before buying fabric, lay out the pattern on the floor, marking the expected width of the fabric, and then you can easily calculate its consumption. It is not necessary to cut the fabric of the halves of the letter-pillow along the longitudinal line. After all, for the letter C, for example, the fabric will be cut almost in a circle, not to mention the letter O. But the strips must be cut in one direction, preferably along the grain thread. Don’t forget about seam allowances, including those inside the letter, they should be at least 1.5 cm.
What, besides desire and skillful hands, might be needed to sew pillow letters with your own hands?
If you have the skills of a seamstress and experience in making garments yourself, as well as such a scarce resource in the presence of an infant in the family as free time, for the process itself you need to prepare:
- writing paper, stationery, a ruler for drawing a pattern diagram;
- special chalk to transfer the outline of the template onto the fabric;
- materials for production – optimally cotton and holofiber;
- a well-functioning sewing machine;
- sharp scissors for cutting fabric;
- safety pins replacing basting;
- strong threads in the color of the fabric;
- iron with steam function.
If you have all the necessary materials and tools, you won’t have to be distracted and after cutting out the parts you can completely immerse yourself in the exciting process of sewing.
What you need to know before sewing a letter pillow for the first time
Absolutely everything that a newborn comes into direct contact with must be safe. This also applies to the materials from which the pillow letters are made or which are supposed to be used when sewing them yourself.
The fabric for the letter-shaped pillow cover should be dense enough to prevent access to the internal contents due to accidental damage. The material should not accumulate static electricity, shed or cause irritation. Also a desirable quality is the ability to absorb moisture and allow air to pass through. Taking into account all these requirements, the letters of the pillow are sewn from the following natural fabrics:
- thick cotton;
- satin with a silky surface pleasant to the touch;
- calico or linen are used less often.
A fairly large amount of filler is placed in the finished case to add volume. Natural down and feathers are unlikely to be suitable. Modern synthetic analogues of traditional down and feather stuffing are more acceptable for a number of reasons:
- do not cause allergic reactions;
- cannot be a medium for the spread of mites and mold;
- dry quickly after wet cleaning;
- after repeated washings they do not lose volume.
The latest generation of fillers - holofiber and artificial down - have quality certificates and are recommended by the Ministry of Health for use in children's bedding and accessories for newborn cribs. Therefore, before you start sewing, you must try to find such safe materials on sale and spare no expense in purchasing them.
We will teach you how to sew letter pillows with your own hands
With the arrival of a new, smallest and most beloved person in the family, his parents are not for a moment concerned about the health and safety of the newborn. If we take into account the arrangement of the baby’s first sleeping place, then the issue of equipping the crib with sides is decided unambiguously: protection is needed. The nominal letters are the same sides. Buy or sew pillow letters with your own hands - everyone can make this choice.
Like any type of bumper, letter-shaped pillows can create a soft barrier between the delicate body of a newborn and the hard elements of the bed. Vertical rods especially cause a lot of trouble for parents. The baby either hurts himself on them, making a sudden movement, or squeezes an arm or leg into the gap and cannot get out of the uncomfortable position on his own. Often, having left for a minute, mothers come running to the inconsolable crying of the baby, for which there seems to be no reason. However, any discomfort is critical for the baby, because after the comfort of the mother’s tummy, the newborn still has to get used to new conditions for a long time.
For this reason, using bumpers, they also try to create a special microclimate inside the crib. Limiting the perimeter with soft protection excludes the baby from the calm development of:
- sudden changes in temperature and drafts;
- annoying loud noises;
- bright light and disturbing movements of adults for the baby;
- display of curiosity by pets.
However, ordinary, not too voluminous bumpers and even original-looking bumpers in a crib look a little boring if they are present in only one embodiment. The role of a highlight for a baby's crib is successfully played by the soft letters of the pillow. Whether the newborn's name will be made up from purchased ready-made letters ordered from the manufacturer, or whether to gather strength and sew an original accessory yourself - each family decides individually.