The Disney cartoon character with bright ears has long been a favorite of many children of all ages. At many holiday events or theme parties and photo shoots, the funny Mickey Mouse costume is always the most beloved and popular. Of course, you can purchase a ready-made outfit for a Disney cartoon character in a specialized store. However, you can save your money and make ears for cute Mickey Mouse at home from scrap materials with your own hands.
We bring to your attention several detailed and accessible master classes on creating original Mickey Mouse ears for yourself or your child.
Mickey Mouse ears
There are several options for how to make ears for a Mickey Mouse costume. It is better to use a hoop, since the ears will hold on better and not become deformed. You will also need glue, black fabric or felt, thick foam rubber or corrugated cardboard, and pattern paper.
Draw 2 circles of the required diameter on paper, transfer the pattern to black fabric and cut out four circles from the fabric. From foam rubber or cardboard we cut out two circles with a diameter 1.5-2 cm smaller. We insert the filler between two circles of fabric and carefully stitch it, leaving a small hole at the bottom.
Mark on the hoop where the ears will be placed and glue two small erasers to these places. After the glue has completely dried, we put the ears on the erasers with an unsewn piece and sew them from the bottom under the hoop. We cut off the excess fabric and cover the entire hoop with black material.
Ears can be decorated with sequins and sparkles. For a girl, you can make an elegant red bow, and for a boy, a small cylinder made of cardboard or felt.
If you are making a Mickey Mouse costume for a baby, it is better to replace the headband with a cute hat. This attribute will not fly off and squeeze the child’s head. To sew a light hat, just measure the circumference of your head and the length of the product. We draw a semicircle pattern with the appropriate dimensions on paper, transfer it to the fabric and cut out two parts. Don't forget to leave a seam allowance of 1-2 cm.
For simplicity, you can take a ready-made black hat and sew ears on it. You should also insert foam rubber or cardboard inside the ears for the form. To make the hat hold better, you can sew on ribbons that will be tied at the bottom. The hat can be decorated with beautiful embroidery, beads or rhinestones.
Photozone
In the age of active life on social networks and the universal love for numerous beautiful photos, creating a themed photo zone will be a must in organizing a children's birthday.
An excellent solution would be to cover the photo area with a plain fabric, for example, burgundy. Place several chairs and seat cartoon characters on them - Mickey Mouse, Minnie Mouse, Pluto and others. These can be ordinary soft toys. In the background you can hang inflatable balloons, corrugated paper pompoms, and decorative balls. Of course, everything should be in three colors (red, white, black). You can also print out large images of cartoons and hang them up too.
What do we do next?
Making a DIY Mini Mouse costume for a child is much easier than for an adult. All you need here are black tights, red shoes or Czech shoes, and a red dress with white polka dots. If this is not the case, a white or red T-shirt (blouse with short sleeves), a black vest with large buttons (optional) and a red skirt will do. In the case of an adult, it is better to sew the whole dress and decorate it with a white lining. It will be both more elegant and beautiful. Nude stockings or tights, red or black sandals or shoes will look good.
We welcome guests and dress them up in Minnie style
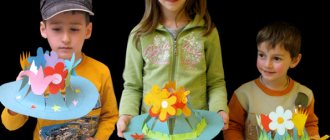
At the door, guests may be greeted by a sign with the main character of the cartoon or a garland of signs indicating that fun awaits them. If you plan to celebrate the holiday at the dacha or in a private house, you can decorate the path to the house with Minnie figures, which can be easily made from disposable paper plates.
And so that our guests are also in holiday style, we give them cute caps with ears and bows at the entrance. A more interesting option is hoops with ears, and girls will certainly like bright bows on hairpins or elastic bands that they can wear all evening and then take with them as a souvenir of the holiday.
Games and competitions
It would be a great idea to invite animators to the holiday, who will happily play the role of your favorite characters. Professionals also have a special, pre-prepared script. A birthday in the style of Mickey Mouse will be even more fun if you prepare more different games and competitions.
Let's make Mickey
Give your guests pieces of pastry fondant, puff pastry or plasticine and give them a master class on sculpting a Disney cartoon. Each child will be able to make a souvenir for themselves and keep it as a keepsake, and if it’s mastic, then decorate a birthday cake with it.
Best Pluto
The kids will be happy to compete with each other to see which of them barks better. A fun and noisy competition will be fun entertainment for everyone. And the winner, of course, will receive a prize!
Sleeping giant
One of the most favorite active games for children. One of the adults lies down on the floor and pretends to be a sleeping giant, with many soft toys scattered around him. Children must carefully collect all the toys without waking the giant. And naturally, the giant will wake up at the most unexpected moments and grab the laughing guys by the arms and legs.
Bowling
To organize the game you will need a regular set for children's bowling. To keep the Mickey Mouse themed birthday party, stick pictures of the cartoon characters on the pins and balloons. Divide the kids into teams and have a real bowling competition. Dynamic and catchy music will make the game even more fun and active.
Who is faster?
Quite an old game that absolutely everyone knows. But that doesn’t stop kids from liking her. Print out a large image of a mouse on regular A4 sheets. There should be one less sheet than the number of participants in the competition. We lay out the leaves in a circle, the children stand around, turn on a quick, cheerful melody and run! The second the music stops, the children must take their place on the piece of paper. A child who does not have time is eliminated. The game continues further, before the next stage the presenter picks up from the floor one piece of paper with the image of a cartoon character.
You can spend your children's birthday surrounded by your favorite cartoon characters. If your child loves watching the adventures of Mickey Mouse, he will definitely love this themed party idea for kids. A cake with the main character, funny costumes, active games based on Disney - all this will turn an ordinary holiday into an original children's event.
Options for “ear” hairstyles for girls
How to make a stroller from diapers with your own hands. DIY stroller made from diapers If we are talking about a child, you can be bolder in your fantasies and come up with other variations of ears - not just mouse or cat ones.
Try making horn-shaped ears like a bee's.
- Select two small strands at the crown of your head and tie two ponytails.
- Make loops from the ponytails, threading the hair on the last turn of the elastic not all the way through.
- Lay the bulk of your hair in waves - this is exactly the effect you get if you undo your braid in the morning.
Another interesting option is ears and eyes, like a snail.
- As in the previous case, we will need two symmetrical strands on the crown.
- Tie the ponytail on one side with an elastic band, and on the last turn, pull the hair out halfway, forming a loop.
- Wrap the remaining strand around the base of the tail, rising higher and higher until only the “eye” remains of the loop.
A similar hairstyle would be suitable for an alien outfit - the ears will act as antennas.
Various versions of hair ears appeal to children and attract older fashionistas. Try different variations of this hairstyle - perhaps you will like one of them.
Suits
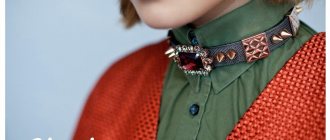
Decorating for a party is, of course, very important, but don’t forget about costumes. It is worth choosing the appropriate outfit not only for the hero of the occasion, but for his/her parents.
You can buy a themed outfit in the shape of your favorite hero, but they very often look too intrusive. Moreover, around the child there will already be plenty of three-dimensional and flat images of the mouse and his friends. It is best to choose clothes in appropriate colors and complement the look with bright accessories.
Stylish Christmas balls for the Christmas tree made of rope
No matter what topic we talk about and what kind of things we create, we always touch on such material as twine - it has become very fashionable and popular, because truly stylish products come out of it.
Let’s try to use two different techniques to create these New Year’s Christmas balls.
According to the first method, we will wind the rope directly onto the workpiece.
But first you need to make a hole in the foam ball, drop a little glue there and insert the tip of the cord. This way we will secure it.
Or, as suggested in the master class, drop glue on a pin, pierce the foam with it and let the glue set.
We also coat part of the ball with glue and begin to wind the rope in even circles, pressing them tightly against each other. Apply glue periodically.
We also thread the second end of the thread into the hole from the back side onto the glue.
And we will definitely add beads, lace, braid, and rhinestones to the decor.
The second, also already known, method is in a balloon.
We inflate the ball to the desired size, tie it and wrap it with jute in a chaotic manner.
We dilute PVA glue with water in a ratio of 3:1.
We lower the ball with the rope into the bowl of glue, turn it so that all the threads are saturated with it, take it out and set it somewhere to dry.
Then we pierce the balloon and carefully take it out.
Master class on creating toys for the New Year from fabric
Let's try to make at least a simple ball decorated with fabric. I also found a master class for you. Here there is no need to glue or pin the material, it is inserted into the slots on the ball, and then these seams are beautifully masked. Easter eggs can also be made this way, keep in mind for the next holiday.
For information, this technique is called "kimekomi" from "kimi" meaning wood edge and "komi" meaning to tuck. And the Japanese came up with it. Many years ago, this is how they dressed wooden dolls in silk dresses.
You can use all kinds of scraps and pieces of fabric, both colored and plain.
First, you need to divide the foam ball into several equal parts and draw the edges with a pencil. It is convenient to use thread to ensure an even line.
Then grooves 3-4 mm deep are made along the marked lines with a sharp stationery knife.
Pieces of fabric suitable for the size of each lobe are pressed into the slots, excess fabric is trimmed and finally driven into the recesses; curved nail scissors are well suited for this purpose.
If desired, you can paint the parts with paint or even do decoupage, and then glue a decorative cord, braid or ribbons, slightly pressing them into the grooves.
The upper and lower parts (poles) of the ball must also be disguised: with stars, pompoms, bows, tassels, etc.
How to make Christmas balls with paper flowers
Flower balls are quite suitable for decorating a New Year tree. Let's make such beauty out of paper!
We will need:
- corrugated paper
- foam ball
- hanging tape
- good glue, it’s better to take “Moment”
- beads for additional decoration.
Manufacturing sequence:
- Make a hole on the ball with scissors and squeeze out a drop of glue.
- We fix a piece of narrow satin ribbon in the hole on the ball in the form of a loop.
- Cut small pieces of equal size from a roll of paper.
- We twist roses from each strip: first we bend the corner and then roll it up as shown in the photo.
- We tie the resulting flowers with threads at the base, cut off the excess paper so that it does not interfere with fastening to the ball.
- Glue the roses onto the ball one by one, placing them tightly together.
- We decorate the toy with beads, they will help close the gaps that have formed.
Step-by-step instructions for sewing a children's skirt
For work you will need the following materials:
Step 1
Measure your child's hips using a measuring tape, divide that by 6.28 to determine the radius, and write that down on a piece of paper.
Step 2
Fold the fabric 4 times.
Step 3
Using a measuring tape, measure the distance of the radius from the closed corner and mark it with chalk on the fabric. Do this several times at different angles until you have several marks that will describe a curve around the inside corner, then connect these points with chalk.