If a lot of empty plastic bottles have accumulated at your summer cottage, do not rush to throw them away.
They can find useful applications on the site and on the farm. Using bottles you can not only decorate your garden, but also build structures that will be very useful in everyday life.
It is worth noting that for this you do not need special education as a builder or designer. In addition, you will not need to buy expensive equipment and building materials.
Using, at first glance, such an accessible and simple material, you can significantly transform the area near your house or make items from it that are useful in the household and everyday life.
Advantages of fake plastic bottles
- The opportunity to realize your creative potential;
- Original design;
- Not big financial expenses;
You can make very attractive flower beds for plants with your own hands from plastic bottles. Or create a flowerbed in which “plastic” flowers will bloom.
Using cut bottles you can fence off a pond or flower bed. It is enough to dig the bottles into the ground so that the bottom is at the top. Multi-colored tones will add a “zest” to such a border.
Fabric balls
If, in order to make beaded beads with your own hands, you only need to go to a craft store, then fabric jewelry will require more effort, patience and time.
First you have to sew soft beads yourself:
- Cut square pieces from multi-colored fabric (their area corresponds to the size of the future ball).
- Use a needle to make ties around the entire perimeter.
- Tighten the thread, leaving space at the top.
- Fill the ball with cotton wool, scraps or foam rubber.
- Pull the product.
Next, we follow the principle of beaded beads: we pierce fabric beads with a needle and alternate colors, making a pattern. At the finish we tie both ends and securely fix them.
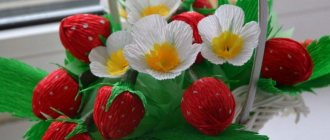
Making plastic flowers
Before you begin the process, you need to prepare the necessary materials. Namely: the required number of plastic containers and acrylic paint.
To make the plastic “ikebana” look more beautiful, you can use bottles of different sizes. This will allow you to make flowers of different shapes. After all, the size of the flowers depends on the size of the bottle.
You will need paint to paint the plastic in different colors. When choosing a paint, it is important to pay attention to its composition and make sure that it is suitable for application to a plastic surface.
To decorate your summer cottage beautifully, you cannot do without an alpine slide!
Kane making technique
The technology for making so-called canes or canes is in great demand when making jewelry from polymer clay.
To work you need to prepare:
- plastic of two colors,
- glass for rolling and modeling,
- knife,
- ruler,
- food foil,
- mold.
Operating procedure.
- Wrap a rolled out clay sausage of one color in a mass of a different color and put it in the refrigerator for a while.
- Cut into small pieces and give them different shapes.
- Place mixture of a contrasting color on the rolled out layer.
From the resulting blank it is convenient to cut elements of any shape for decorations.
Step-by-step operating instructions
First of all, cut off the neck of the bottle. You don't have to cut off a lot of plastic. It is enough to cut off only the screw part, the rest will “go” to the petals.
Now we need to cut out petals of the appropriate shape and size from plastic. It is important not to cut them off from the bottom, because the “stem” will be attached to it.
We round the petals with a heated knife. To make the flower more attractive, you can make it multi-layered. To do this, we connect the bottom of two similar crafts using wire.
Finally, we attach a “stem” to the bottom in the form of a strong stick or thick wire.
In this simple way, you can make a whole flower bed that will delight the eyes of all residents of the site.
Jewelry ideas
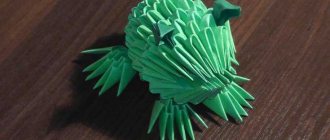
Any elements can be sculpted from multi-colored plastic mass. For this reason, there are a huge number of options for clay jewelry.
The material allows you to sculpt flowers, berries and other decorative elements of complex shapes.
To create jewelry you will need a minimum of tools, and the result will be unique designer brooches, earrings, necklaces and bracelets.
You can come up with ideas yourself or take photos of polymer clay jewelry created by experienced craftsmen as a basis.
A creative hobby will not only allow you to create stylish items for yourself and your loved ones, but can also become a source of additional income.
Use of bottles in everyday life
Plastic bottles can be useful not only in the garden, but also in everyday life. For example, housewives in the kitchen can make excellent containers for storing cereals from them.
To do this, you need to cut off the neck of one bottle and the bottom of the other. The cut bottom will serve as a lid. Just a couple of minutes and the original container is ready!
If you are into knitting, you can cut off the bottom of the bottle and place a ball of thread in it. By pulling the thread into the neck, you don’t have to worry about the threads getting tangled.
Don’t rush to get rid of plastic containers, because they can serve as a good material for realizing all your creative fantasies.
Of course, you need to start with small projects, but as you gain experience you will certainly be able to move on to larger ones.
Rolled lawn: types, lawn laying and care- Design of the porch of a private house - ideas for beautiful design in 2022 (131 photos)
Metal tile Monterrey - A beautiful and inexpensive option for arrangement (60 photos)
Making beads from plastic
MAKING BEADS Once upon a time, all beads were made by hand. And even now, when magnificent mass-produced beads are sold everywhere, it can be interesting to make your own beads. From paper. fabric, wood, bamboo - all of these can make excellent beads
POLYMER CLAY (PLASTIC)
Probably the most popular handmade beads are made from polymer clay. This is a relatively new modeling material, inexpensive, versatile and very easy to use. Plastic is sold in almost any specialized store in briquettes and has many shades. You can roll it into small balls, bake them in a regular oven, and you will get strong and durable beads. First, knead the plastic with your hands so that it becomes soft and elastic, and then give it any shape. Make your beads round, square, oval, or disk-shaped, just like you used to make them out of plasticine in kindergarten. Roll a long sausage and then cut it into a special stack. After shaping the beads, pierce each one with a needle or straight pin to create a hole. String the beads onto wooden or metal rods, which you then place on a baking sheet. The firing time and temperature are indicated by the manufacturer. Typically, plastic is fired at 130-135 degrees for 10-30 minutes. Follow the label directions, otherwise the plastic may change color. If the color you need is not on sale, you can make it yourself by kneading plastic of two colors together.
Snail
Roll the plastic into a sausage about 5 cm long, thick in the center and flat at the ends. Roll the ends towards each other; When you reach the middle, gently press the curls together. Pierce the bead in the middle between the curls.
Roll
This fun pattern, named after the pie, is very easy to make. Mash plastic of two (or more) colors. Using a rolling pin or a special roller, roll out the plastic into thin plates and, stacking them one on top of the other, gently squeeze them so that they stick together. Trim the excess to create a rectangle approximately 7.5 x 10 cm. Starting at the short end, roll the plastic into a log shape (see Figure 1). Trim any rough edges. Cut the resulting sausage into equal pieces. Pierce the beads along the diameter and fire them.
Chess board
Beads with a checkerboard pattern will help make your jewelry more diverse. To make them, roll out four plates of plastic. Place them on top of each other, alternating colors. Trim the edges to create a rectangle, then cut it into four equal bars. Turn them over so the colors are staggered, and squeeze lightly with your hand to seal the layers together (see Figure 2). Cut the resulting block into pieces of equal thickness. Make holes in the beads from one side to the other (or from corner to corner) and fire them according to the instructions.
Safety precautions To avoid troubles, it is better not to use the same rolling pin for rolling out plastic and food. When firing beads, do not forget about ventilation.
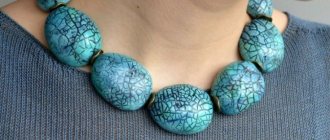
NECKLACE WITH JADE BEADS
Plastic is so versatile that it can imitate a variety of minerals and semi-precious stones. In this case, various shades of jade are presented.
You will need: plastic: transparent, green, terracotta, purple (or dark blue), black; black leather cord; coarse-grained; sandpaper.
1. Knead the plastic until it becomes soft and elastic. 2. Take transparent plastic and mix it with a small piece of green plastic, about 1 cm long. If the mixture is not green enough, you can add another piece. Roll the resulting mixture into balls with a diameter of about 2.5 cm. 3. Divide the remaining transparent plastic into three parts, set one of them aside. In the second part, add two or three small balls of terracotta plastic, 0.5 cm in diameter. To the third part, add one similar ball of purple or dark blue plastic. 4. Add small crumbs of green, terracotta and blue plastic to the resulting mixtures and gently press them, imitating stains, like on real jade. 5. To depict inclusions of mica, roll crumbs of black plastic into each bead, sprinkle the table with earth and roll the beads over it. If the spots are too large and noticeable, cover them with a thin layer of transparent plastic. 6. Roll the balls over a smooth surface to remove fingerprints. 7. Make beads of various shapes: a large square bead with a hole in the middle, several disk beads and several long cylinders. If necessary, change colors by adding thin sheets of terracotta or purple mixture. 8. Pierce each bead with a needle. Make the oven temperature 10 degrees higher than indicated on the package. Place the beads in the oven and immediately turn it to the desired temperature. Try not to overcook: if you overcook, the transparent plastic will turn brown. 9. When the beads are ready, cool them in the oven. If the plastic begins to bubble, sand it with coarse sandpaper (wear a mask while working). 10. String the beads onto the cord, tying a knot on both sides of the beads to secure it.
BEADS “MARBLE BARRELS”
Mix plastic in your favorite colors to create a rainbow necklace and earrings.
You will need: plastic of various colors; knife; tiger tail cord; silver beads for spaces; heart beads (optional); two clamps; clasp; two stud pins; silver blanks for earrings (earrings).
1. Take plastic of different colors and cut it into pieces about 3 mm in diameter. Gather the pieces into one lump and remember to leave no air between them. Don't knead too long; the colors can mix very easily. 2. Roll plastic into a sausage about 1.5 cm in diameter. 3. Twist the ends of the sausage in opposite directions, and then roll it in your hands to smooth out the plastic. Twist until the color stripes begin to alternate. And then roll out the sausage on the table to the desired thickness. 4. Cut the beads into barrel shapes of the same length. 5. Pierce each barrel lengthwise with a pin to make holes. 6. Fire the beads according to the instructions, and then cool them. 7. For the necklace, string barrel beads onto the cord, alternating them with silver beads. If you want, you can add a contrasting heart bead. Attach the clasp. 8. For earrings, string two silver beads onto a pin and a barrel bead between them, and then attach the pendant to the workpiece. Do the same for the second earring.
NECKLACE “BRAGGER”
Since you've made two different types of plastic beads, why not combine them? This colorful set combines roll and checkerboard beads perfectly.
You will need: plastic: pink, purple, black and white; silver bugles for spaces: silver beads and discs; blue glass beads; dark green beads; tiger tail cord; contrast heart bead (optional); curl beads, clasp, 2 pins, blanks for earrings (earrings).
1. Make beads: “rolls” from pink and purple plastic, and “checkerboard” type beads from black and white plastic. 2. Fire the beads according to the instructions and cool them. 3. For the necklace, string the beads onto the cord in the same order as in the photo, or make your own pattern, complete the decoration with clips and clasp. 4. For earrings, place beads on pins as shown in the photo and attach the pins to the blanks.
BLACK AND WHITE EARRINGS
Black and white are the most spectacular colors of plastic. This composition uses elements of the “roll” pattern. it was simply cut and then put back together.
You will need: black and white plastic, rolling pin, sharp knife, contrasting beads, 2 nail pins, 2 earring blanks, pliers.
1. Mash a piece of black and white plastic and roll them into thin plates. Place the black plate on the white one and trim the edges to make a rectangle approximately 7.5 x 10 cm. Starting from the short side, roll the plates into a tube. 2. Roll out the resulting tube into a sausage about 15 cm long. Cut a 5 cm piece and set it aside. Roll out the remaining sausage until it is twice as thin. Cut another 5 cm and roll out again so that the sausage is again twice as thin. Cut 6 pieces of 5 cm each. 3. Carefully cut each piece in half lengthwise. You have 18 halves with a half spiral pattern. 4. Place one of the large halves flat side down on the table. Add some white plastic on top and place another large half with the same flat side down (see Fig. 1). 5. Place 4 medium-sized halves on the sides (see Fig. 2). 6. Roll out a thin piece of white plastic and place your pattern around the edge. Place the remaining small halves, 6 pieces on each side of the composition. Fill the gaps with pieces of white plastic to create a semicircular shape. 7. Gently squeeze the workpiece with your hands to stretch it a little and smooth the edge. 8. Roll out 2 black and 1 white plates and wrap the blanks in turn: black, white and black again. 9. Let the workpiece harden a little, and then cut pieces about 7 mm thick. Pierce each resulting bead and fire it according to the instructions. 10. Make earring charms: place a silver bead on a pin, then a plastic one, a frosted glass bead, and then a silver one. Attach the hanger to the workpiece.
Carol Taylor "Beads"
Tools for making jewelry
Polymer clay is a material that requires different variations of working with it, which means the presence of certain tools. Of course, in order to make it easier to work, and if you plan to make more than one product, but do handicrafts constantly, you need to purchase special devices and tools.
Among the main necessary assistants in the work are:
- plastic spatula;
- sharp knife;
- roller or rolling pin;
- modeling board;
- clay varnish;
- extruder for producing geometric shapes.
You should only purchase tools when you are sure that the process is exciting and enjoyable. For your first experiment, you can try to make a product from improvised materials without spending extra money on professional tools. At the same time, in the process, you will understand why it is inconvenient to work and what you need to purchase for the future.
Making a brooch “Geometric Shapes”
How to make an original brooch from beads with your own hands? Geometric shapes are in fashion this year. We will use them to make a brooch. To work, you will also need already made beads with pins at the end.
Roll out a layer of clay 0.5-1 mm thick. Cut out a rhombus with sides 4 cm long. Separately roll out another layer of a contrasting color or tone as desired.
From this layer, cut out geometric shapes - triangles, circles, squares. Round the edges with your fingers and place them in random order on the diamond, after applying a little gel to the surface. This will be the base of the brooch.
Make holes in the bottom to insert rings for bead pendants. Lubricate the base that we have on the washcloth with gel and carefully place our diamond on top so as not to distort its shape. Bake in the oven.
Insert rings into the holes at the bottom. Insert a pin into the bead, trim the long end so that it is enough to make a ring at the other end.
Make a ring with pliers and insert it into the ring on the brooch. Thread other beads in this way. The brooch is ready.