It is no coincidence that the mesmerizing sakura is a national treasure of Japan. A tree with delicate flowers is a unique symbol of the east. She brings health, prosperity, peace and love to the family.
An inflorescence of 5 petals represents happiness and complete harmony. According to the traditions of this country, faint pink shades certainly predominate in the decoration of homes, indicating the cordiality and warm feelings of the owners towards their guests.
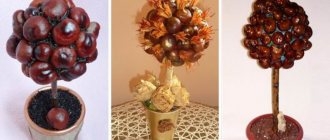
Many people are interested in how to make a sakura tree from beads on their own. It is always placed in plain sight in the house so that you can admire its beauty and charm. It will certainly delight those present with the talent of the master who created it. There are 2 methods of weaving a plant - from individual flowers or with thick, spreading branches.
Both compositions look charming and worthy of admiration. The second, more luxurious option, is made using loops. You can involve children in the process, who will be fascinated by working with sequins and beads.
Preparation
For creativity you need:
- pink and white beads;
- wire with a cross section of 0.3 mm and thick copper;
- floral tape;
- stand;
- wire cutters;
- scissors;
- acrylic paints;
- plasticine;
- varnish;
- PVA glue;
- sisal;
- gypsum;
- foil;
- figurines of birds.
Advice! Having all the tools, even a beginner can create a tree in a summer style with his own hands.
Useful tips for beginners
To ensure that beginners can get a sakura tree right the first time, experienced craftsmen share their tips from practice. If you take them into account when making crafts, there should be no difficulties.
Helpful Tips:
- If you don't have masking tape on hand, you can use adhesive tape.
- You can assemble the tree in the reverse order, that is, first attach the trunk to the stand, then attach the sakura branches from bottom to top.
- You should put a piece of polyethylene in the mold for the stand, then the stand, which has dried and petrified, can be easily pulled out of the mold.
- It is recommended to dilute alabaster as thick as possible; in this form it dries faster.
- While the alabaster is drying, the tree should be supported so that it stands level.
- For the trunk, alabaster must be diluted very thickly. With this consistency you can quickly achieve the desired thickness of the trunk, as well as make natural depressions in the bark.
- If the alabaster solution does not harden, you should add PVA glue to it.
- You can paint the trunk and branches several times. The first layer can be applied in brown. Then you can dilute the brown paint with white and blot the trunk with a light shade with a sponge. You can apply a third layer with a sponge, mixing brown and red shades of acrylic paint.
- Beginners are recommended to spend no more than 1 hour a day beading. The thing is that the activity is exciting, but it greatly affects your vision, so you should get used to it gradually.
- Craftsmen with poor eyesight should consult an ophthalmologist before starting weaving.
- It is best to store beads in small boxes, sorted by color.
Advice from experienced craftsmen on weaving sakura beads can greatly facilitate the work of an as yet inexperienced craftsman.
The Japanese flavor will decorate the interior throughout the year if you complement it with a tree or just a sakura branch woven from beads with your own hands. Such a tree can even become a talisman for a home and bring happiness and good luck to it.
Weaving flowers
For each flower you will need 43 centimeters of thin wire. String glass beads onto one part of this length, make a loop out of six pieces and another one above it. Twist the wire at the base.
Weave 4 petals like this. Connect so that each one fits slightly onto the next one.
For the core, cut a piece 40 cm long. Place one white bead on it. Twist the two ends eight turns. On the same segment you should get ten stamens the same as the first one. Roll them up tightly.
Insert the resulting bundle between the petals and secure at the base.
A combination of two tones of pink will look interesting. You can weave 70 inflorescences from dark and 50 from light. Form clusters of five flowers, while twisting the wire completely. There should be 24 branches.
Making a barrel
- Take 5 pieces of copper wire of different sizes and combine them in the form of an open palm.
- Wrap the shaft in several layers of tape, forming a palm in the center to place the birds.
- Dilute plaster with water according to instructions. Place three balls rolled out of foil into the pot so that it does not burst, fill it with gypsum mortar.
- Plant the sakura in a flower pot and wait until it dries completely.
- Glue the flowers to the branches with adhesive tape. Chaotically distribute both shades throughout the tree.
- Create the relief of the bark using wire, wrapping the shaft and gluing it in some places with electrical tape.
- How to make a mixture to create a relief: mix a tablespoon of plaster and one and a half tablespoons of glue, pour in a little water. Before covering the rod, hide the cherry blossoms under foil.
- Paint the tree with white paint, then dilute it with brown paint, thereby giving the bark a natural color.
- When the acrylic dries, cover everything with clear varnish.
Advice! It is more convenient to use a special spray varnish for creativity.
Story
Sakura symbolizes the frailty of life and the transience of existence. This is a family of roses, a subfamily of plums. Most trees serve a decorative function, but there are also fruit-bearing ones. The fruits are small and very sour, but due to their rarity they are extremely expensive. When the flower fully blooms, it remains that way for only a week. But it all depends on weather conditions; if there is strong wind and rain, then flowering will be significantly reduced.
Hanam holiday
Sakura blossoming in Japan is celebrated at the state level; it is a big day that leaves no one indifferent. Khanam is translated as “contemplation of flowers.” The main events take place in the main park of Shinjuku, and not only politicians, but also members of the imperial family take part. The park is especially beautiful in the evening, when the flowering plants are illuminated, creating a magical shimmering effect. People come to this holiday not only to relax, but also to find new business partners, strengthen contacts or conduct negotiations.
Decoration
Twist a nest out of wires, and mold eggs out of plasticine. Having placed them in the nest, glue the birds on top. Secure the structure in the center of the branch. Cover the rhizome with sisal and attach it with glue.
Second option
This simple method describes step by step weaving a decorative oriental symbol of love.
Preparatory stage
Before starting work, prepare the necessary materials:
- Decorations for the New Year: decor ideas and options for decorating a house and apartment for New Year's celebrations (135 photos)
- Window decoration - simple ideas and step-by-step descriptions of do-it-yourself window decoration (110 photos and videos)
Diaper cake - a step-by-step description of creating a diaper cake. 115 photos and videos of creating a gift
- purple beads;
- alabaster;
- masking tape;
- gouache mixed with PVA glue;
- 35 meters of thin wire;
- bowl;
- stones;
- hairpins
Weaving twigs
Beading begins with small blanks, which are then collected into tree branches.
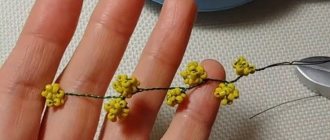
On a 45 cm wire, collect 6 beads and twist them into a loop at a distance of 9 centimeters from the edge.
On the long end, dial on six more and also make a loop 1 cm from the previous one.
Using this pattern, make eleven loops. Bend them so that one of them is in the middle and the rest are opposite each other. Twist the distance between them.
To make the crown fuller, use as many of these preparations as possible. On average - 80-100 pieces.
- Patchwork - technique and master class for sewing stylish and beautiful sewing with your own hands (80 photos)
- Tilda doll - a master class in sewing toys with your own hands. 125 photos of the best toy models
- How to make a car out of paper: step-by-step description of how to quickly and easily build a high-quality car (75 photos + video)
When they are all woven, connect them 3 at a time into the base of the branch.
For the crown, twist two bases. Then collect four branches from three branches. The remaining ones are collected in five for the lower rows.
Installation in a stand
You can put your tree in a pot, flowerpot, or make a flat stand with further decoration. Let's take a closer look at these methods.
Installation in a pot
- Prepare a pot or flowerpot.
- Secure the tree to the bottom of the pot with stones.
- Dilute the plaster with water in the ratio indicated on the package.
- Pour the solution into the container.
- Wait for the solution to dry.
- Decorate the surface.
Flat stand installation
- Find a suitable container with small sides or make one out of foil.
- Dilute the plaster in the ratio indicated on the package.
- Place the workpiece in foil.
- Fill with solution.
- To provide support, apply plaster to the trunk.
- Decorate the stand.
Assembling an oriental beauty
In this tree of happiness, a trunk is immediately formed. To do this, take a wire 40 cm long and screw the 2 upper branches to it. Wrap with masking tape.
The next row has four middle ones. Add another wire and also cover it with tape.
Place a thick wire a little lower and tie several lower branches. And wrap it with tape again.
- Paper toys - diagrams, ideas and options for making various toys with your own hands (110 photos)
Dymkovo toy - modern collections, their creation and features of making Dymkovo toys (115 photos and videos)
Knitting openwork patterns - diagrams and step-by-step master class on how to knit an openwork pattern quickly and easily (95 photos + video)
Take a pot, install the structure and fill it with solution. Bend the trunk and coat it with a mixture of alabaster, glue and water.
After the mixture has dried, paint it and varnish it. Arrange the branches to your liking.
Advice! The branches can be arranged in the shape of a heart, and each side can be decorated with a different color.
Design options
You can decorate the tree with various additional elements. Inspiration can be found in photos of such products from experienced craftswomen. For example, plant it in a pot or fix the roots on a flat pebble. Its base is decorated with a scattering of beads, moss, small pebbles, or a stone texture is created.
A small amount of greenery will add originality. You can choose different sizes and shades of pink, lilac or white bugles. Use matte or pearlescent beads.
Every needlewoman can create sakura from beads. This is a very interesting and creative process, but it requires patience from the master. This unusual craft can decorate a windowsill, a shelf with books, or any other place in the house. Even a beginner can easily master this type of needlework by watching at least one video tutorial.
Making a beaded bonsai with your own hands
It should be understood that bead weaving is a delicate and painstaking work that requires certain skills. For those who are turning to this art form for the first time, there are many easy master classes for beginners.
The whole process is divided into several main parts: weaving branches, assembling and installing the tree itself, decorating the composition.