Black cat
The black cat has been the object of superstitions and various prejudices since ancient times. But, as the well-known song says, “only a black cat is unlucky.” Therefore, we suggest not to listen to prejudices, but to spite all the failures of the black cat!
To make this craft you will need:
- plastic bottle for kefir (milk or drinking yogurt);
- cardboard;
- self-adhesive colored paper;
- plastic eyes;
- scissors;
- glue gun;
- a can of black paint (can be replaced with acrylic paint).
Execution instruction
- Take a kefir bottle, remove the top label and wash it with dishwashing detergent inside. Screw on the lid.
- Cut out 2 ears and 2 paws from cardboard.
- Using a glue gun, glue the parts to the base.
- Cover the top with spray paint. To avoid getting the table dirty, cover it with newspaper or cling film. Use gloves when working with paint. It is better to take children to another room while painting.
- When the paint is completely dry, glue on the eyes and nose with mustache. Glue several circles of different sizes on the surface of the bottle.
The result is a funny black cat. The craft can be used as a noisemaker (pour some peas or beans inside) or as a decorative figurine in the garden.
Progress
1. To make the body you will need a bottle with a high neck : neck. Unfortunately, I received a vessel with the end cut off - I had to “reanimate” it
. Scotch tape helped me connect the parts.
2. Cut off the bottoms of the other two bottles
3. Cut out the ears and make folds.
4. We insert the bottoms into each other and secure the ears. We fix everything with tape.
5. Now we connect the head to the body, again using tape.
6. From thin white packaging material, cut out circles of different diameters and make cuts.
7. Cut off a strip of plastic for the tail .
8. I used a corrector to paint the muzzle, ears, tip of the tail and draw the front paws.
9. I painted eyes, nose, and mustache with gouache
10. The final touch is tying a ribbon around the neck (I hid the ugly connection of parts with tape)
.
Now this couple will have more fun together!
Flower pots “Cute kittens”
Small plants planted in pots in the shape of charming kittens look original and stylish. Making such crafts is not at all difficult.
You need to prepare:
- several plastic bottles;
- a stationery knife or scissors with sharp ends;
- black marker.
- acrylic paints.
Step-by-step instructions for making flower pots
- Prepare the bottle for use (get rid of the label and wash the inside).
- Decide on the height of the future product and mark a horizontal line around the bottle.
- Above the line, schematically draw 2 triangles – the cat’s ears.
- On the opposite side, draw an elongated oval - the tail of the animal.
- Carefully cut with a utility knife (scissors) along the marked outline (including the ears and tail).
- Cover the top with acrylic or spray paint. Paint the tail part on both sides.
- After complete drying, draw a muzzle (eyes, nose, antennae) with a marker.
- Bend the tail and decorate it with a decorative bow.
In order for the plants to grow better and the root system not to rot, several holes must be made at the bottom of the bottle. Pierce the bottom of the homemade pot with a hot awl or nail. Now the plants will not only look original, but also grow well.
Such pots can be used not only for planting home flowers, but also for storing small items (spools of thread, decorative shells, etc.). An interesting solution would be a napkin holder or organizer made in a similar way (for colored pencils and pens). You can also pour candy or crackers inside.
In order to eliminate the possibility of injury from the sharp cut edge of the bottle, before painting the part, hold a lit match or lighter near the edges. The edges of the product will melt a little and will no longer be so sharp and traumatic.
If you take a large bottle (5 - 6 liters) for work, then a similar pot can be used for planting flowers in your garden.
DIY cat flower pots made from plastic bottles
With this simple step-by-step instruction, in just 10-15 minutes you can make a charming flower pot from a plastic bottle with your own hands. We will tell you how to turn an ordinary and used bottle into a cute little cat. The craft is so simple and understandable that even small children can handle it.
This flower pot will fit well into both country and home interiors. If you have children, let the flower in a “cat” stand in the child’s room, especially if he makes this pot with his own hands. True, in the process of creating crafts, you must strictly follow safety precautions: cut the bottles yourself, do not trust a child to do this, and you need to paint them with rubber gloves, preferably also with a gauze bandage to cover the respiratory tract (on adults, fresh acrylic paints are almost completely do not affect).
What do we need?
- clear plastic bottles
- acrylic paints (can be in a spray can)
- permanent marker
- decorative varnish (non-toxic)
- priming
- plant
Plastic bottles don't have to be big. If, for example, you decide to plant a cactus in a pot, you can even take a 0.5 liter bottle. For large flowers, bottles from 2 liters are more suitable.
How to make a pot?
We cut the bottles so that we form two cat ears in front and a tail in the back. If the edges are too sharp, you can carefully melt them using a candle or lighter. Keep the bottle at a distance of 2-3 cm from the fire, with its edge facing towards it. Take precautions!
We paint future flower pots both on the outside and on the inside. Acrylic lays flat on plastic, so there should be no problems. Since we paint on the inside too, the craft will not turn out pale - there is no need to apply an additional layer. If you have paints in spray cans, use them, the scheme will be the same.
Draw the eyes and ears on the bottle using a permanent marker. If you don't have one, use acrylic paint of a different color and a thin brush.
Leave the cats to dry for a day. If you wish, you can coat the flower pot with a non-toxic water-repellent varnish (if your acrylic is already water-repellent, you do not need to do this).
All that remains is to pour in the soil (this is an important point, since we need to make the plastic pots stable). Next, you can add soil or plant the flower directly in the ground - it depends on the plant itself and its needs.
Our flower pots in the shape of kittens are ready!
We suggest you make several of these pots and plant them next to each other, so that not only new plants, but also a family of cute cats will live in your home. Small children especially like these homemade pots.
Cat as a garden sculpture
In order to make a cat from plastic bottles, you don’t need any special skills, the main thing is that you have paints on hand with which you can color it. The rest of the steps will be very simple:
- Take a six-liter plastic bottle, clean it of dirt and degrease it.
- We make cuts in the places where we plan to make the ears and tail.
- From the second vessel we cut out the small parts missing for the figure.
- We paint the whole bottle and small parts as your imagination requires, and let it dry well.
- We insert the ears and tail into the prepared cuts.
Thus, we get a cute cat that can either sit or stand. Its location depends only on how the bottle will be placed.
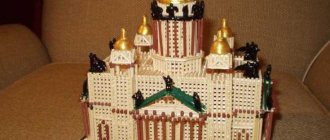
A figurine of the cat Matroskin can be considered a modernized analogue of the previous cat. Making it yourself is more difficult, but it also looks more interesting.
More material will be needed for its construction. In particular, you will need bottles with a volume of 6 and 10 liters, one piece each, and 4 pieces of plastic 1.5 liter bottles. In addition, you will need a hose with a diameter of 10 mm.
A cat made from plastic bottles is made using the following algorithm:
- In a large bottle we make holes into which we extend two pieces of medium-length hose - we get paws.
- One and a half liter containers are attached to the paws so that the feet come out. It is better to cut off the top part of them and attach only the bottom.
- A six-liter plastic bottle is cut so as to remove the middle of the bottle. We connect the bottom with the neck, thereby obtaining the head of a cat.
- We attach ears cut out in the shape of triangles to the corners of the bottom of a six-liter bottle.
- The entire figure is decorated with your own hands using paint in the style of Matroskin the cat.
Instructions for making a cat
You can make many options for cats from plastic bottles. Let's look at the most interesting ones.
Cat as a garden sculpture
The whole point of making such a cat is in the beautiful design of the craft.
The main essence of its production is the skill of painting with acrylic paints. The manufacturing process itself can be done even by a small child.
You need to take a plastic bottle of at least five liters and wash it thoroughly, as well as degrease it.
Next, cuts are made in which there will be ears and eyes.
After this, a second bottle is taken, from which the remaining small elements are produced. When you paint them, after the paint dries, you can glue everything into a single figure.
Such a cat will perfectly decorate an ordinary garden plot. There are many such figures that can be made, in various shapes and sizes.
Cat Matroskin
This cat model made from plastic bottles is difficult to make, but the result will please you
This is a modernized version of a cat for a garden plot. Accordingly, the process of its manufacture is much more complicated.
The material you will need is one 6- and 10-liter bottle, as well as four plastic bottles of one and a half liters each. You also need a hose with an average diameter of 10 millimeters.
Several holes are made in the largest bottle, into which two pieces of hose are threaded. These will be the paws.
One and a half liter bottles will serve as feet. They will need to be secured to the paws.
For a plastic bottle with a capacity of six liters, the middle is cut out and joined together with the bottom and neck. This is the head.
All that remains is to glue on the ears and design the face to look like Matroskin’s cat.
Cat - plant pot
A pot in the shape of a cat can be used to decorate both a house, a veranda or a garden plot.
Cat made of plastic bottles
Hello, dear friends! In the souvenir and gift departments, I often pay attention to cat figurines; I really like them. And recently I got the idea to make a similar cat out of plastic bottles with my own hands.
My youngest son Alexander helped me with this. Of course, I “handled” the knife and scissors myself, and he happily covered our cat with paint.
To make a cat we will need:
1. Plastic bottles - 2 pcs. (any size)
2. Knife and scissors.
3. Paints and brushes. You can use acrylic, spray paint, enamel and car paints, gouache (if the cat will stand in a dry place).
The sequence of making a cat from plastic bottles
♦ We take two plastic bottles, we used one and a half liter transparent ones.
♦ One bottle will be the body of a cat.
♦ From another bottle we cut out parts for the head, 2 ears and a tail.
♦ The head consists of two halves: we cut off the lower part of the bottles (the second half can be cut off from the bottle for the body, or you can take the third), then insert it into each other.
♦We make cuts with a knife for the ears in the upper part of the head, in the lower part there is a hole for the neck of the bottle-body, in the back there is a cut for the tail.
♦ We paint all the details with paint, we used gouache, but it is better to use the paints listed above. You can choose the color to your liking.
♦ When the paint dries, draw out the muzzle, chest, front legs, tip of the tail and ears.
♦ Putting all the details together.
So we got a cat made from plastic bottles.
You can use it at your discretion: to decorate the interior of a house, a garden plot, or you can make an additional cut and you will get a spacious piggy bank.
And for anyone interested in finding out what benefits real cats bring, I advise you to read here.
How to make a protective collar with your own hands from a plastic bottle
Based on the measurements, a paper model is made.
Before you start making a collar, you need to measure your neck circumference
pet, as well as
the distance from the neck to the tip of the nose
. Based on the measurements, a paper model is made. It is very important that the design is not tight or too long.
How to do:
- A cone is cut out
of a plastic bottle according to the paper pattern and fitting is carried out so that the collar matches the circumference of the pet’s neck. - To connect the edges together, you will need Velcro or four tapes
, which are sewn to each side of the cone. Holes in the plastic can be made with a nail or a thick needle. It is convenient to use a stapler for this purpose. - It is advisable to trim the inner edge of the collar around the entire perimeter with a strip of fabric
so that the hard plastic does not irritate the skin on the pet’s neck.
You will need Velcro to connect the edges together.
In the same way, you can make a collar from a plastic flower pot or plastic bucket. The only condition is that the material must be transparent so that the cat can see the world around it.
How to make a fabric collar
of fabric is best suited.
, for example, calico or cotton.
For capricious cats, a fabric collar is better suited.
This product is soft and comfortable for the cat, and she can even sleep comfortably in it. But such a collar has one drawback - the animal will eventually wrinkle the fabric and get to the wound or seam. Therefore, it is advisable to place a piece of thicker fabric or cardboard
.
- The circumference of the cat's neck is measured
and a paper model is made according to the dimensions. - Two parts
are cut out of the fabric according to the pattern . The same piece of cardboard or thick fabric is sewn inside. Connect all the pieces and sew them together to make a collar. - The edges of the collar can be sewn or connected
using Velcro. - Make lacing
on the inner edge of the collar to secure it around your pet's neck.
In order for the product to better hold its shape, it is advisable to make a fabric edging along the outer edge of the collar.
Making a collar from cardboard
A protective cone made of cardboard will help out if you need to quickly make a protective collar
, but there is no time to cut and sew all the parts.
To make it, cardboard from any box, for example, shoes or household appliances, is suitable.
- After measuring the circumference of your pet’s neck, cut out a cone
with a margin from cardboard. - Try the collar on the cat and, if necessary, cut off the excess.
- the edges of the sections together using tape
. This is best done by putting a collar on the animal.
Cardboard from any box is suitable for making a collar.
Cat from a plastic bottle
If your child has recently begun to actively stare at street cats and dogs running past, then it’s time to distract him a little. First, let a cat from a plastic bottle appear in the apartment. There are so many options for creating it that a child, actively making his tenth cat, may forget about his recent desires, then switching to a plastic bunny, hedgehog or donkey. What if this becomes an impetus for the development of his creative potential or design skills? Also, these step-by-step instructions and photo ideas will be useful to all cat lovers.
Master class on making a cat from a plastic bottle
Svetlana Davaeva
Master class on making a cat from a plastic bottle
After the publication of "Miracles from Waste Material"
Some colleagues wrote in reviews that they liked
the cat made from a plastic bottle .
My partner Tatyana Nikolaevna Glukhodedova was the first to see this craft on the Internet and suggested making it for the competition. We didn’t bother looking for a step-by-step explanation and immediately got to work. Only green bottles were found Subsequently, we hid it under the “white breast”
.
There were no paints at hand, except for gouache and watercolors that roll on plastic , but we found a way out of this situation: we used a corrector.
At the request of my colleagues, I decided to show a master class on making a cat (or maybe a cat)
.
— 3 brown plastic bottles;
— proofreader (a tool for correcting errors in the text)
;
- white packaging material (paper napkins can be used)
;
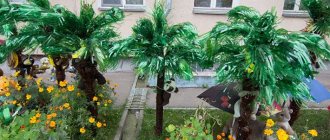
Cat flower bed made of plastic bottle and cement
This funny flowerbed cat is made from a plastic bottle and cement. It was made with your own hands from scrap materials, the main thing is to use your imagination.
For this masterpiece, you will need: - sand, - water, - cement, - plaster, - wire, - a large plastic bottle, - varnish, - paint and wooden slats.
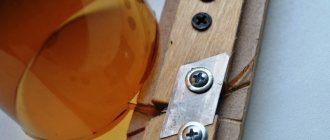
We need to take a plastic bottle and cut it so that this container becomes our flower garden. The bottle must be tightly wrapped with wire. This is necessary so that the cement with which we will later cover the bottle does not slip. After this, it is necessary to knock down a frame from the prepared slats and attach a container to it.
Mix the cement mortar. The consistency should be like thick sour cream. To do this, you need to take 1 part cement and 1 part sand. But gypsum should only be added to the ready-made mixture, which we will take in our hands, otherwise the solution with gypsum will harden instantly. Before you start covering the container with a solution of cement and plaster, you should wear rubber gloves.
Take the prepared cement solution in your hand and add a tablespoon (tablespoon) of gypsum to it. Knead the resulting mixture in your hands and roll it into a sausage. After that, attach it all to the frame. Gradually, apply such a solution to the frame, making the necessary proportions and convexities.
Decorative decoration for the garden “Cat family”
On personal plots you can often see various decorative figures (gnomes, mushrooms, etc.). Owners most often buy figurines for garden decoration in specialized garden stores, and, as a rule, almost all of them are identical. To be original and decorate your site in a special way, we suggest making similar figures with your own hands.
In order to decorate the garden with a funny cat family, you will need 2 plastic bottles, acrylic paints, scissors, a heat gun and a decorative bow.
Description of step-by-step work
- Cut off the bottom of the bottle, but not completely, but by cutting out 2 triangles (cat ears).
- From the remaining part, cut a ring a few centimeters wide and cut it (you will get a tail part).
- Use acrylic paints to paint the cut parts (muzzle with ears) and the whole bottle (body).
- To make the garden figurine stable and not fall from the wind, pour sand or small pebbles into the body bottle.
- Using a heat gun, glue the tail to the back. Fold the ears up and glue the muzzle to the body.
- Decorate the figurine with a bright bow.
Not only children, but also adults will admire such unusual cats and kittens. And the popularity of your garden plot will be ensured!
Required tools and materials
To make your own plastic cat, you will need:
- plastic bottles;
- acrylic paint;
- scotch;
- foam paper;
- scissors.
In this article you will learn how to plant and care for echinacea.
Find out about the peculiarities of growing heuchera, planting and caring for it here.
Flower girl made from a plastic container
Another interesting solution is to make a flower girl in the shape of a funny cat. True, for the work you will need not only a set of necessary materials and tools, but also a creative approach and the ability to work with cement (clay, gypsum).
The photo shows step by step the work of making a flower girl in the shape of a cat.
With a little time and creativity, you can make real masterpieces out of ordinary waste materials!
Related Posts
leave a comment
Master class on making a cat from a plastic bottle
Master class on making a cat from a plastic bottle
After the publication of "Miracles from Waste Material"
Some colleagues wrote in reviews that they liked the cat made from a plastic bottle . My partner Tatyana Nikolaevna Glukhodedova was the first to see this craft on the Internet and suggested making it for the competition. We didn’t bother looking for a step-by-step explanation and immediately got to work. Only green bottles were found Subsequently, we hid it under the “white breast”
Mosaic in the form of a cat
Often, when making figures from plastic bottles, the caps are thrown away. But it’s better not to do this, as they can still be used. There are a lot of ideas for traffic jams in the country. For example, making curtains or laying out a garden path.
Mosaics made from plastic bottle caps look very interesting on various surfaces, for example, on the wall of a house or a fence. You don’t need a lot of materials for this; it’s enough to have plugs and nails or self-tapping screws. You can choose the colors of the corks or simply paint them later. For example, this cat looks very cute, which could easily be depicted on the wall near the playground.
How to make a cat from a plastic bottle
It’s always nice to look at a beautiful and well-kept dacha plot. And if there are also objects of the owner’s creativity on it, then it is doubly pleasant. Nowadays there is a huge number of different garden figures that can easily be bought in the store.
But why not make your own? Various animals are a very common theme among craftsmen. Today we will tell you how you can place a cute cat made from a plastic bottle on your property and spend time usefully.