Skilled dressmakers, knitters, and hardworking needlewomen always need crocheted needle beds on hand. Diagrams and descriptions will help you choose the cutest style to suit your taste and knit the right thing to decorate your everyday life.
How to crochet a simple pincushion: master class for beginners
Let's start with the simplest square crochet needle bed.
As a motif, you can use any regular square, or a granny square pattern in my case.
I’m not presenting the diagram here, I think it won’t be difficult to follow the link to the publication dedicated to this tune, where there is also a video tutorial.
Absolutely any yarn will do; you don’t have to buy a new one; small leftover yarn will be enough.
Hook – corresponding to the thickness of the thread.
So, we crochet a needle bed.
- Depending on the thickness of the yarn, you will need to knit a square of 4–7 rows.
- It is better to knit the second square for the wrong side more densely; I simply knitted it with single crochets. I tried to make it with the same pattern as the face, but still the holofiber sticks out of the “holes” in a rather unattractive way; from the front side it’s somehow not very noticeable.
- We fold both squares together and sew along the edge with single crochets, crocheting both walls of the loops. Leave one side unstitched.
- We fill our pillow with cotton wool, holofiber or padding polyester.
- Sew up the fourth side.
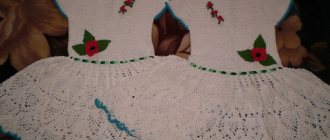
- If desired, you can decorate the needle bed with ribbons and flowers.
You can, of course, first sew a fabric cover, and sew a knitted openwork motif on top of it, as in the title photo, it will also be beautiful.
You can find diagrams of different square motifs here>>.
Mushroom pincushion with hiding place + MK
1. Mushrooms are not only interesting to collect and delicious to eat, but also to create, and even more so to use for pleasure. A lot of mushrooms were born in the Country, I saw them at exhibitions, and then the idea arose to create not just a mushroom, but a pincushion with a hiding place for threads, beads, scissors and more. I had the idea for a long time, but I did it so quickly and got great pleasure and a lot of positive emotions. If you liked my White, join and create for the joy of yourself and others.
https://dekormyhome.ru/rukodelie/igolnica-kruchkom-s-opisaniem-i-shemami-master-klass-s-video.html
https://jenskiymir.com/rukodelie/vyazanie/4173-igolnica-gribnaya-polyanka-kryuchkom.html
https://snegohodow.ru/kak-sdelat-sshit-svyazat-igolnicu-gribok-1020113/
Scheme and description of knitting a biscornu pincushion
Now let’s complicate the task and crochet an unusual pincushion.
Let's take this diagram as a basis:
Description
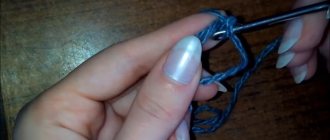
The beginning is, as usual, from VPs closed to a ring.
In the first row - 12 C1H.
In the second row we double the number of loops, knitting two double crochets from one loop.
In the third row, above each column of the previous row, we knit a single crochet, and between them a single crochet, inserting the hook lower into the first row.
In the fourth row - single crochets in each column of the 3rd row.
I skipped row 5 so that there were no big holes.
In the next one, over every three loops of the previous row, I knitted toes: 1 sc, 1 hdc (half double crochet), 3 dc, 1 hdc, 1 sc.
And in the last row, above the two “petals” I knitted single crochets, and above the third - 6 C1H to form the corner of the square.
I did not knit the row with the arches.
The second motif is exactly the same, but with yarn of the same color.
You can knit any other pattern, that’s not the point.
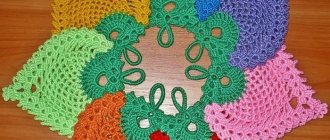
And now the most interesting part: when stitching, we fold the blanks as follows: we place the corner of one motif in the middle of the side of the other and connect it sequentially loop to loop with a crochet hook.
The result is a needle bed of an incomprehensible shape, which is called biscornu.
As a bad photographer, it seems that I could not convey the real picture in the photo, in fact, it seems to me that it turned out very nice.
A few more ideas that everyone loves.
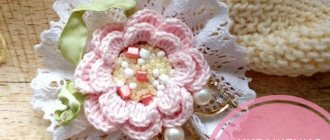
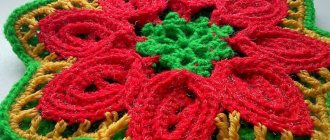
Beautiful crochet flower pincushion
You can knit not only a square, but also a round needle bed with any pattern, even with simple colored tracks, double crochet or single crochet.
We connect two circles, fill them with holofiber and get a pretty decent simple pincushion.
But we will make it more beautiful and original.
We take a needle with a large eye, insert a strong thread and use it to pull our round needle bed from the center to the edge in five places at an equal distance from each other.
We pull it tighter and get flower petals.
Sew a button in the middle part.
Additionally, decorate with a bow if desired.
I liked this pincushion the most, it’s beautiful and easy to knit, oh-so easy!
Knitted pincushion in the shape of a heart
I found this heart, knitted a long time ago, which can also be used as a pincushion.
Everything is just as simple here: we knit two hearts according to any pattern and connect them together.
The pattern and description of the knitting of my work is in the post “Pillows - Crochet Hearts”.
You can also sew a small pillow from fabric and decorate it with crocheted openwork. We have diagrams of such hearts.
Original designer pincushion
A young but already experienced craftswoman, Ksenia Zaikina, posted an original pincushion on her blog. She recommends meeting Grandma Kindness and adopting the idea. This sweet granny is knitted from several parts and filled with holofiber, the handles are movable and held on by a thread fastening. The hair is made from felting wool, and the face is painted with acrylic paints. The idea is brilliant in its simplicity and will definitely decorate the desktop of any skilled needlewoman.
Pattern for knitting a hat pincushion
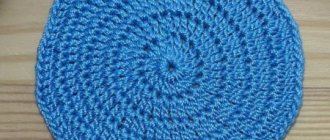
Crocheting a pincushion in the form of a hat starts from the bottom - this is a regular circle with increments of loops in each row (in each loop, through one, through two, etc.).
This is how a circle is knitted to the required diameter, say 3-4 centimeters.
Next you need to knit 2 cm without adding loops - with a crown.
For the brim of the hat, we knit a circle with a diameter of 9-10 cm and tie the edges with some simple border.
This diagram of a hat-pincushion with a beautiful openwork brim will come in handy.
Now let's connect the parts. To do this, you may also need to cut a circle out of cardboard to fit the bottom, but you can do without it. We fill the bottom with filler, cover it with cardboard, put a circle on top and sew it to the bottom with hidden stitches using a needle and thread.
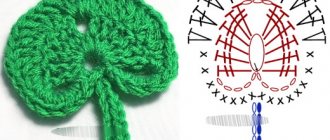
To decorate the hat we knit flowers. As an example, this diagram:
Hedgehog
Now let's knit a hedgehog-shaped pincushion. It is knitted very simply and quickly, so it does not take much time.
For the pincushion you will need:
- Yarn “Children's Novelty” is beige and brown, as well as red and green;
- Hook 1.75 mm;
- Filler for toys;
- Needle;
- Scissors;
- 2 beads.
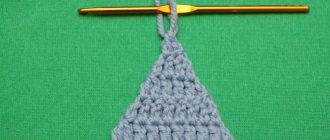
We will knit in the round, so first we make a sliding loop. Then we perform 6 sc in a row inside the loop. Pull the tail of the thread and tighten the loop.
Our little piece consists of 6 loops. Next we will knit, increasing their number.
In the 2nd row you need to perform 2 sc in all 6 loops. So let's double their number.
In the 3rd row, in order to knit 6 increases again, we knit 2 sc, skipping 1 loop. That is, in every 2 loops of this row we knit 2 sc.
The detail gets bigger. We knit 2 more rows with additions.
In the 4th row we will increase in the 3rd loop of the row. We knit 2 sc 1 each, and in the 3rd loop 2 sc in a row.
In the 5th row we knit 2 sc in every 4th loop.
The part consists of 30 loops. Now we will lift it up. To do this, we will knit 5 rows of 30 sc in each of them.
Photo 1
Now we need to knit a beige piece using the same pattern. Only the last 5 rows without increases are not knitted.
Photo 2
Let's put the details aside. Let's start knitting the muzzle. Use brown yarn to knit 6 sc into a slip stitch. Tighten it and knit 1 row without changes.
Change the thread to beige and add through the column.
Photo 3
Then 1 row needs to be knitted without adding.
Next there will be an alternation of rows with and without increases. After each additional row, you need to knit 1 row without any additions. We make increments according to the amigurumi principle. That is, we further add after 2, 3. Between them there is 1 row without increments. At the end there are 2 rows without increases instead of 1.
Photo 4
Then we take the beige part and sew it to the brown one. As you sew, you need to fill the part with filler.
Photo 5
Sew on the muzzle.
Photo 6
Let's knit an apple for decoration. We form a sliding loop from the red thread and perform 6 sc again. Next we increase the detail by increments through 1 loop. We knit the next 3 rows with 9 sc.
Decrease after 1 loop. Don't forget about the filler. We decrease in each.
Photo 7
We join with a green thread. We make 5 air loops and then knit 4 connecting stitches. This will be a leaf.
Photo 8
Sew the apple onto the hedgehog.
We knit ears from beige thread. This is just a sliding loop with 4 sc inside it.
Attach 2 beads in place of the eyes.
This is such a funny pincushion!
In order not to forget the address of the page and share with friends, add it to your social networks: Do you want to know news about competitions or master classes?
Tags: Crafts for home
Attention! It is better to write urgent questions in the comments on the website (form at the bottom of the page) or, better yet, directly by email. There are no notifications about comments from the VKontakte form! This form is more for feedback. 
Discussion: there is 1 comment
- Sonya:
October 2, 2022 at 5:44 pmNice pincushion! Miniature, stylish, you can knit it for yourself or give it as a gift. Thanks for the idea and MK!
Answer
Practical pincushion on a jar
If you crochet a lid on a jar, you will get not only a pincushion, but also a very practical thing in which you can put various little things.
The manufacturing technology is as follows:
- Crochet a circle slightly larger than the lid of the jar.
- We sew a wide stitch along the edge with a thread and a needle and tighten it a little.
- We fill this part with holofiber or cotton wool.
- Glue the resulting pincushion to the lid of the jar. Sometimes it may be more convenient to place a cardboard circle between the lid and the knitted part.
- We decorate the edges of the lid with braid.
On a forest motif
The mushroom pincushion, which we will now work on, is knitted from not very thick threads.
To create it we will need:
- hook one and a half millimeters;
- scissors;
- soft filler;
- needle and thread.
The first thing we will work on is the leg of the mushroom: we knit a ring of six loops, then we knit a pair of NBR posts into each loop. Now we knit an additional couple of lines with additives. In the first row, additions should occur on every second stitch, and in the second row, every two stitches. In total, we will get twenty-four buttonholes.
The new series has no additives yet. We knit the BNK column through the back walls of the buttonholes. Next we knit seven rows of twenty-four columns of BNK.
When the part is made, we put stuffing into it.
Next we have to work on the top of the mushroom. The first thing we will do is knit a circle of forty-eight stitches. We produce additives in each row. In total, we will have eight rows. First, we make a ring of six loops and knit additives throughout the loops. Out of six loops we got twelve. Now we put additives in every second buttonhole. From the next row every couple of buttonholes. Then we add after three buttonholes and after five buttonholes. Thus, we knit a circle of forty-two stitches, making six additions for each row.
New three rows of forty-two BNK columns.
We work in the same way on a circle of forty-two loops, but after the additional rows we do not knit anything else.
We sew the upper and lower parts of the hat with regular threads, leaving a small hole. We insert the stuffing into this hole and sew it up.
We also sew the upper and lower parts of the mushroom.
Related article: DIY sweater bag
From threads of a different color we knit several circles of six and twelve buttonholes and sew them to the hat with the same threads.
Our pincushion is ready. You can also tie a stand leg to it or leave it in the form in which it is now. A composition of several of these mushrooms sewn together will look great.
Cool crochet pincushions
Crafty craftsmen are coming up with more and more interesting options, such as, for example, cool crocheted needle beds.
Pincushion cup of tea
A detailed master class on knitting needle beds and cups can be seen in this video (it is in the language of needlework and more or less everything is clear).
Let me briefly explain what the essence of knitting is. Yarn for hook number 5.
Cup. First, we knit 7 rows of a circle with a light thread in single crochets (with increments of loops), then another 7 rows - without increments.
Tea. You need to knit 6 rows of the RLS circle with a thread of the appropriate tone.
Pen. The tube is knitted on 5 loops in a circle; at the same time, during the knitting process, it must be filled with filler.
Tea bag. Consists of two parts knitted with 5 sc stitches in three rows and a 4th row with decreases at the edges.
Assembly. Fill the cup tightly with some material, sew on the edges of the “tea”, a handle and a bag on a thread.
Fungus - box
Mushroom pincushions can be crocheted not only in the form of fly agarics, which is very simple. Pay attention to such cute boxes in the form of mushrooms for boys and girls.
I am attaching the diagrams.
girl's box diagram
girl's hat diagram
boy's box diagram
boy's hat diagram
Knitting begins from the bottom of the box. On the “face” they embroider eyes, a mouth, blush – knitted circles. Pompoms or a “tail” are attached to the caps.