Oven mitts are a useful and indispensable attribute in any kitchen. In addition to their immediate task (to protect hands from the hot surfaces of pots and pans), they also have another function - decorative. Of course, you can simply buy potholders, but many housewives prefer to make them with their own hands. The easiest option is to sew a simple square without worrying too much about its appearance. But if the requirements for potholders are not limited to simple functionality, and you want to make them an independent element of kitchen decor, the task becomes a little more complicated.
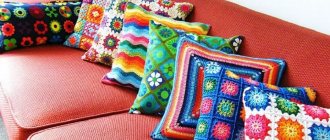
Knitted items are always more original and exclusive than sewn items. Crocheted potholders will become an interesting element of kitchen decor, add coziness to the room, and create a warm, homely atmosphere. We invite you to familiarize yourself with some models of crocheting potholders with diagrams and a description of the procedure for performing the work.
Materials and tools for knitting potholders
Since the purpose of a potholder is not only aesthetic beauty, but also to protect your hands from burns, the choice of materials for its manufacture should be approached in a special way.
Important! Under no circumstances choose yarn made from viscose and silk. They will not prevent burns.
Cotton, acrylic and wool are best suited for these purposes. But they cannot be combined so as not to lose the shape of the product during operation.
When choosing thick yarn, you should avoid any thickening in its structure, since making patterns with such a thread will make it impossible to use it when working with hot surfaces.
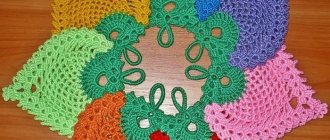
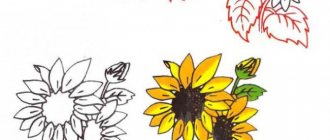
Sunflower
The sunflower flower has always been the warmest and sunniest pattern, bringing joy and light to the house. The flower potholder is usually used when performing work in a Mediterranean or country style. The colorful accessory has a prominent central part and an eye-pleasing edging.
This is a rather complex and time-consuming procedure for beginners, the reward for which will be a product of amazing beauty, with many details. In tool form, it is best to use a #2 or #3 hook. It is better to select the coloring of the yarn based on brightness and saturation: the colors should convey solar contrast.
The instructions will be a table for weaving a similar napkin.
Important: if you are going to knit a decorative item that is not used for its intended purpose, you should pay special attention to the openwork areas. Otherwise, it is preferable to choose a dense option.
Crocheting potholders: patterns and descriptions
Flower
By choosing floral elements and experimenting with color schemes in their design, you can always create a unique item that harmoniously matches the kitchen interior. Choose no more than two contrasting colors.
Additional Information! In order to maintain the shape and color of the product, only periodic washing in cool water is enough. Afterwards you should starch and iron it.
- The center should start with a dark color, closing 8 air loops in a ring.
- The second row consists of 18 st. S.N.
- In the third, 1 stitch of the second row is knitted and another loop of 23 chain stitches is connected. Having connected further 1 st.b.n. you get 9 additional loops with 1 same stitch between them.
- The next two rows are tied with the resulting loops. The top of each loop is added with three single crochets.
- The sixth and seventh ones change color, but maintain the previous order of operation.
- In the 10th I count 7 st. bn to wrap them into a petal and connect them to the eighth.
You can knit a potholder either with knitting needles or with crochet. It all depends on the type of ornament and the thickness of the yarn.
Spiral
The essence of making such a potholder is that several colors are used in a single circular row. The difficulty of such weaving is only that while one color is used, the remaining loops remain open.
Important! To prevent loose loops from tangling and unraveling, you should secure them with a marker that can block them. These “markers” can be pins or paper clips.
To make a potholder you will need 5 colors of cotton yarn, 100 g each, 4 markers and a No. 4 hook. The diameter of the finished product will be 21 cm.
Let's accept the designations for colors in advance:
A – red;
B – brick;
B – orange;
G – yellow;
D – beige.
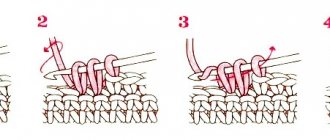
First, we make an inner ring from the darkest color - 1 chain stitch, 1 tbsp. b.n., 1 p.s.n., 2 tbsp. S.N. Having attached a new thread, we repeat the process again with each subsequent color.
In the first row we perform 2 tbsp for each color. S.N. from one loop and 1 tbsp. S.N. into the next loop.
In the second we use the same number of loops, but repeat three times. Then everything is simple - only the second art. changes. S.N. – another +1 is added to it. We do this for seven rows, the last of which will already have 2 tbsp. s n. from one loop and 6 tbsp. S.N. in the next stitch three times for each color.
In the eighth, in the sequence of colors D, D, C, B, A, we make 3 stitches for rounding. S.N. and 3 tbsp. b.n., combining which you can cut the thread.
The product is ready after we also knit the back part and fasten them to the front part using color D.
Do-it-yourself knitted items help create a special coziness.
Hexagon
This potholder is similar to homemade cookies. In its manufacture, only double crochets and air loops are used.
Knitted according to a very simple pattern.
Bees
“Bees” in the kitchen can delight children who like to watch or help their parents in the cooking process.
Mischievous bees will greatly delight small children.
To make it you will need black, yellow and white cotton yarn - 50 grams of each. For the eyes, nose and mouth, it is worth purchasing mercerized threads in black, white and red colors. Hooks No. 1.5 - for threads and 3.5 - for cotton.
This potholder should be knitted in accordance with the pattern.
The main pattern is carried out according to the scheme, taking into account that the decrease at the beginning of the row consists of skipping, and at the end by simply not knitting it.
Sunflower
The diagram of this product is very similar to the diagram of the Flower potholder.
A very beautiful and easy to make potholder.
The same steps are followed, starting with a flat circle. Then 12 petals are knitted, tied with three rows of single crochets and continue according to the pattern.
Potholder pattern “Flower”.
Lamb
This potholder will consist of several parts at once, which will have to be knitted in stages.
Each lamb is knitted separately.
The main part is knitted in the form of a circle, according to the pattern. The last row should be taken in a darker shade.
Sheep body diagram.
Next we knit a very simple forelock, also knitting the fabric with yarn of a darker shade
Diagram of a sheep's forelock.
To make the legs, we collect white threads into 9 chain stitches and make 3 lifting loops. In the fifth loop we first knit one, then 3 double crochets, 2 half-double crochets, 1 tbsp. b.n., 3 tbsp. S.N. in one loop, 1 tbsp. b.n., 2 half-columns, 4 tbsp. S.N. and 3 air loops - close in the initial loop.
For the ears, use dark-colored yarn to cast on 8 air loops and close them into a ring. In the second loop add 1 double crochet, 1 double crochet and dc. b.n., 1 half-column and 3 half-columns in one loop.
We make ears and legs in pairs.
Peacock
For the first row of the base, you need to cast on 2-3 air loops and close them in a circle.
First we take beige threads.
In the second we make 7 half-columns. In the 3rd, 4th and 5th rows we make 17, 37 and 50 double crochets, respectively.
We supplement the finished part with any contrasting thread, knitting a row with single crochets. But it is important to leave 8 loops intact. (16)
We tie it with black contrasting thread.
Using double crochets we knit the tail. 4-5 rows are knitted with “fans” - no more, increasing the number of “fans” in each of them. (17)
Next we introduce an orange thread. And after 3 rows - burgundy.
Using contrasting thread again, we also tie the tail. (18)
Using black thread we knit the feathers on the peacock's tail.
Don't forget to make a loop on the middle fan. (19)
The loop is needed to hang the potholder next to the stove.
We knit the body in single crochet columns. At the end, you need to pull the last thread so that the body rises towards the tail.
We knit the body in a dark color.
Next we sew on the eye, embroider the beak, tie up the legs and sew the head to the body. (20-21)
Here is such a handsome peacock made from leftover yarn.
heart
This pot holder will be a nice Valentine's Day gift for your mom, sister or friend.
An original potholder, knitted very quickly.
Square potholders
A regular square potholder is very easy to knit. You can make it original by experimenting with color combinations or adding small knitted flowers to the front part.
The potholder in white and lilac color looks very nice.
Bee
Crochet pot holders are new items for the kitchen that can update the condition of the room. It’s no secret that a bee is a symbol of hard work and caring for one’s own home.
These cheerful, sunny insects with variegated colors can fit perfectly into many interior solutions. The process of making potholders for the kitchen with a hook will also give you a lot of positive emotions.
For the work you will need to use hooks No. 3.5 and No. 1.5. The fabric used is gimp of three shades, with a density characteristic of 70m per 50g. It is also worth purchasing natural threads of the same tones.
You can create other insects and animals: a mouse, the pattern of which is on the Internet, a beetle, a tiger or an elephant. The external shape of the glove is limited only by your imagination!
Diagram and description
- The process of creating a bee begins with working with a tool of larger diameter. The main image is made with capped posts according to the configuration presented above.
- Please note: as soon as you change the shade, the outer buttonhole is knitted with the next color. The crossing of the gimp occurs on the inside.
- The increase is secured with cap stitches, and the final part of the line is knitted the other way around - not with cap stitches.
- The decrease at the base of the strip is skipped, and closer to the end it is not knitted.
We recommend knitting two bees at once so that they don’t get bored in your cozy kitchen. In the same style you can make a hot stand; the work is also done with crochet.
This article will help you learn how to create crocheted potholders, the patterns of which we also discussed in the guide. This is a very simple dilemma that even a novice craftswoman can cope with. Homemade household items can bring pleasure to you and your loved ones.
Pleasant emotions are obtained not only when using them, but also at the moment of knitting. Crochet New Year's potholders will be an excellent gift option for the main winter holiday. Good luck!
Knitting potholders
Knitting needles are chosen in the same way as a hook - in accordance with the width of the thread. The number of the knitting needle will be its size.
You can also knit patterns or ornaments using knitting needles, but it is better to start with the simplest knitting technique - multi-colored stripes.
Knitting for beginners
Additional information and tips:
- Alternating knit and purl stitches allows you to achieve a three-dimensional pattern.
- A secret technique for beginning craftsmen is embroidery. If you can’t knit a beautiful ornament with knitting needles, then you can resort to embroidery on top of an already knitted surface.
- A little secret for determining the size of the knitting needles: lightly twist the threads in half - the ideal thickness of the knitting needles is the thickness of the twisted threads.
Beginners should start with simple checkered or striped patterns.
To make a simple two-color potholder, you need to cast on 11 loops and knit 20 rows of each color, alternately with the front and back sides. (25, 26)
Potholders in the form of multi-colored squares.
Bamboo
In terms of characteristics, such raw materials largely replicate flax. In addition, bamboo fiber is environmentally friendly and does not exhibit allergenic properties.
Please note: it is fashionable to use floss with a small percentage of synthetic or wool content. These types of material have increased elasticity, which will facilitate the selection of thickness.
Note!
- Patterns for knitting overalls for a newborn: step-by-step master class
How to crochet a mouse and a rat: video master class on crocheting the 2020 symbol
How to knit a warm hat with ears for a newborn boy and girl - video tutorials with patterns, instructions for beginners
Knitted potholder in a circle
In the form of an orange
For such a potholder you need 50 grams of cotton yarn in white and yellow or orange colors and a 4.5 mm knitting needle.
After each row, the knitting needles must be turned over. All loops are facial:
1st row - knit 14 loops, leaving the 15th out of work;
Knit the 2nd and all subsequent rows from the wrong side with facial loops;
3, 5, 7, 9, 11 rows – decrease by 2 loops each time;
13th and 14th - knit all 15 loops.
The last 14 rows must be repeated 10 more times, and then duplicate rows 1-13. Use white thread to bind off all stitches in the purl row.
Potholders knitted in short rows.
Potholder with a leaf, knitted from the center
This potholder is very easy to knit.
The color of the yarn can be completely different.
Potholders with shadow patterns
This pattern is created by moving the front stitch to the back and back. (29-31)
This potholder is very easy to knit according to the pattern.
Enterlac technique
This method of knitting will allow you to create a product similar to patchwork.
Row 1 – knit 21 stitches with the wrong side.
2nd – turn the knitting every two loops, alternating purl and knit stitches.
3rd - in each inner row we add one loop until we get the first triangle.
The product will consist of such triangles.
Simply amazing oven mitts are made if you knit them using the enterlac technique.
Turning an idea into reality
There are many options for making potholders with your own hands. They can be sewn, woven, knitted. Numerous photos of knitted potholders, which are posted on websites on the Internet, amaze with the variety of shapes and appearance. You just have to choose the appropriate option and start implementing your idea.
Potholders with shadow patterns
Kitchen items with the so-called shadow pattern look very interesting.
By matching it to the color palette of your kitchen or home, you can get a very harmonious design. In addition, the same potholders can be made using a simple hosiery method by changing the color of the yarn to create a pattern.
Video: Shadow pattern “Sponges”
How to choose thread colors to make potholders beautiful
Not everyone has a developed sense of color, and sometimes coming up with harmonious combinations of shades is a real pain. It’s so good that everything has long been invented for us ! There are already ready-made color palettes, you just have to type in the search engine on the pictures tab “combination of orange and red”, “combination of cool shades” or “what colors go with turquoise” and voila:
Or choose any picture that you like and see what colors are there , where they are relative to each other. Buy this yarn. You can simply pull out all your supplies and languish over them a little, like a cat, moving them back and forth and choosing the most successful combinations . This method is also one of my favorites)