Published: 01/28/2021
- Homemade engine tilter
- Requirements for the tilting stand
- Stands for assembly - disassembly
- Working with the stand
- Engine tilter price
- Homemade engine tilter
- Features of the engine stand design
- Why does the engine break down?
- Outboard motor trolley
- How does a boat motor trolley work?
- Review and cost
- Drawings and photos of tilters for VAZ engines
- “Trade in” or changing the car “key to key”
- Working with the stand
- Do-it-yourself disassembly and assembly stand for engine repair
- Drawings and photos of tilters for VAZ engines
- Primary requirements
- Do-it-yourself disassembly and assembly stand for engine repair
Homemade engine tilter
Many car enthusiasts repair their car engines on the garage floor or on a workbench. This is always inconvenient, associated with constant lifting of weights, tilting a bulky cylinder block or cylinder head. All these factors lead to excessive fatigue of the car mechanic and a decrease in the quality of engine assembly. To make their work easier, craftsmen have developed many homemade tilter designs for the engine.
Options for homemade tilter designs
There really aren't many options. In the West, complex and bulky home-made structures are known, like a crane beam, almost with hydraulic drives.
In domestic conditions, car enthusiasts assemble the simplest structures from what is at hand. Of the homemade tilters for the engine, two-support and cantilever versions are known. The last design is the easiest to manufacture. Its characteristics are sufficient to carry out major repairs of almost any passenger car engine weighing from 150 to 250 kg.
Before starting to manufacture the unit, it is necessary to study in detail the existing samples of stands for engine repair. The sample is selected to suit the immediate needs of an amateur car mechanic. The availability of materials and dimensions for ease of work in a small garage are assessed. The permissible load weight is calculated in accordance with the type of engine that is to be repaired.
Based on the results of a study of existing structures, a sketch drawing of the most optimal version of a cantilever-type tilter was developed. Overall dimensions in the diagram are given in millimeters.
In the sketch, the designations D 60 and D 52 correspond to diameters of 60 and 52 mm.
Materials for production
Due to the fact that the engine tilter will have to work under severe conditions of physical stress associated with the weight of the engine, high demands are placed on materials.
The following materials are used for manufacturing:
- steel square profile 70 x 70 with a wall thickness of 3 mm, length 3 m;
- steel pipe with outer diameter 60 mm, inner diameter 53 mm, length 245 mm;
- steel pipe with outer diameter 47 mm, length 480 mm;
- steel channel with internal side width 70 mm, wall thickness 3-4 mm, length 280 mm;
- flange for bolted connection to the engine - 1 pc.
Tools and hardware for stand assembly
To connect the nodes of a metal structure made of a steel channel and a square profile, you will definitely need a welding machine that allows you to work with an electrode with a cross-section of at least 3-4 mm. In addition, for cutting you will need a grinding machine with a metal cutting disc with a diameter of 115-125 mm. To ensure bolted connections of prefabricated parts, you will need a drill with the ability to work with a drill with a diameter of up to 14-20 mm. M12 bolts are also required to assemble the structure.
You will also need a set of files to cut off burrs and uneven edges, and remove flaws in metal cutting. It wouldn't hurt to purchase some sandpaper to remove rust from the surface before painting.
Assembly of the engine tilter
The first step is to cut out the channel and square profile in accordance with the sketch. Next, a vertical post is made from the profile and welded to the square from the channel. Then the structure is reinforced with metal slopes, which can be made from scrap parts.
After this, a base is welded from a cut square profile - a tilter stand for engine repair. At the site of the bolted connection to the base of the vertical post, preparatory work is carried out, steel bushings are inserted and welded to strengthen the structure.
Then you should begin the final assembly of the engine tilter. The stand is connected to the stand by welding and M12 bolts.
A horizontal pipe with an outer diameter of 60 mm and an inner diameter of 52 mm is welded to the vertical stand. A horizontal axis is inserted into this part. It can be made of a steel pipe with a diameter of 47 mm with a welded flange for bolting the cylinder block or cylinder head.
In the horizontal axis, you can drill through holes every 45° along the radius, to be able to fix the position in space with pins after rotating the attached motor to the required angle.
Materials for making homemade products:
- The vertical post and horizontal beam are made of a rectangular pipe 40 x 80 x 3 mm.
- The traverse is made of a pipe 40 x 20 x 2 mm.
- Supports made of round pipe with a diameter of 50 mm.
- The pipe that rests on the car wheels has an approximate diameter of 50 mm (the pipe needs to fit freely into the support pipes), 3 meters long.
- The lever is 1 meter long.
Actually the lift itself.
The tipper device works as follows: two bolts without nuts are inserted into the holes on the vertical stand, one bolt is under the beam on which the machine rests, the second secures the lever.
To raise the car by 10 cm (this is the distance between the holes on the vertical stand), you need to remove the bolt securing the lever, move the lever to the next hole and fix it by inserting the bolt.
Raising the lever up until the beam on which the machine is lying will not pass the next highest hole. As soon as it passes this hole, without releasing the lever, we move the bolt into this hole. By rearranging these two bolts, we lift the car, the whole process takes no more than a couple of minutes.
Drawings of a car tipper are also included.
Requirements for the tilting stand
A tilter, or stand tilter, is a device that can support the weight of a car engine, while the engine does not lie on the stand, but is movably fixed. Thus, in order to gain access, for example, to the crankcase, you do not need to turn it over on a workbench or think about how to strengthen the cylinder block on the surface. The engine mounted on the equipment can rotate freely around its axis and have several fixed positions, depending on the design features. In this case, it is necessary to achieve several indicators:
the device should not take up much space in the garage:
the engine must be fixed firmly and rigidly;
the design must allow a certain force to be applied while maintaining stability;
the structure must be rigid;
The tilter should allow you to easily select the desired position of the engine, holding it securely.
Necessary materials
The tap is made from a profile 7 m long. It is best to use a material whose wall thickness is 7 mm. The mechanism must be durable, so you should choose a profile with a cross section of 80x80 mm.
To make a lifting device, you will also need several pipes. Suitable products are 700 mm, the cross-section of which ranges from 76 to 99 mm.
To build a crane you will need a jack, you can take it from a VAZ. It is best to use a device that is designed to lift loads weighing up to 5 tons. To construct the mechanism, 4 plates with a thickness of 8 mm are required.
Stands for assembly - disassembly
Engine stands.
This is a mobile or stationary device for engine repair in a car service center. Allows you to suspend the engine or gearbox for further disassembly of the unit. Using an engine disassembly stand allows you to tilt the internal combustion engine around its axis 360°.
The engine can be turned manually or by an electric motor with a worm gearbox.
Using clamps, the engine is fixed on the stand and then disassembled.
Based on the frame design, stands are classified into:
T-shaped. Not heavy, but not very stable either. These models are recommended for repairing minicar engines.
U-shaped frame. Such stands are more resistant to turning over. Such stands are needed for repairing engines of passenger cars, SUVs, etc.
Fully welded frame. These stands are mainly manufactured in Russia and have maximum load capacity and capabilities for repairing transfer cases, axles, etc.
To save space, stands are often made with a folding frame.
Engine weight classification:
Load up to 500kg. Such stands for internal combustion engines of passenger cars.
Load 500?1000kg. They are used in car service centers for repairing engines of passenger cars, minibuses and light trucks.
Motor weight over 1t. This type of stand is used for servicing engines and gearboxes of trucks and buses.
To repair V-shaped engines for domestic and imported trucks, gearboxes, axles, transfer cases, it is recommended to use a frame type tilter R-770 or R-776.
To buy a high-quality stand for engine assembly and disassembly, contact the Technosoyuz company.
Assembly
If the installation will need to serve various types of engines or simply be for all occasions, then it should be made universal. It should be taken into account that VAZ car engines differ significantly from BMW mechanisms in fastening methods. It may be necessary to create a stand for disassembling and assembling the KamAZ-740 engine or other large-sized engines.
A pair of channels with 10 mm holes is welded to the rotation plate. The pitch is 50 mm. Places for channels are marked in the area of the motor mounts. The center of gravity is precisely directed along the axis of rotation of the plate. This will make it possible to simply rotate the stand around its axis.
Using a manual hoist makes it possible to install the structure on wheels (they must be strong enough). This will make it easier to move the faulty part around the room. If necessary, it can be easily moved to the far corner. You should also attach a tray at the bottom, thanks to which the dirty waste from the engine will not spill on the floor. The existing pan below will make it possible to flush the engine.
Working with the stand
Before starting operation, be sure to carry out a visual inspection of the system. If any defects are discovered that could damage the equipment during maintenance, they must be corrected. If upon inspection there are no such defects, you can begin work.
For a good and long service life of the structure, it is necessary to monitor its condition. It is necessary to check the reliability of the fixing fasteners each time you use it, regularly lubricate all moving parts and store the unit in a dry place. The possibility of direct contact with precipitation and moisture should be excluded.
You should not load the stand above the actual calculated weight, so as not to drop the engine due to breakdown. During operation, the structure must be placed on a stable surface. It is also worth using a fixing pin for the rotating mechanism
Work should be done carefully and carefully
You need to make sure the load is centered. The unit must be firmly secured with brackets. You should definitely follow safety precautions so as not to damage the engine or get injured. With proper care and proper use, the stand will last for many years.
If there is a stand for disassembling and assembling the engine, repair work is carried out efficiently and conveniently. Self-assembled installations can significantly save money on the family budget for the purchase of several models. Every home craftsman, if desired and has the appropriate tools, will be able to assemble a stand suitable for many types of mechanisms.
Main types of equipment
The average garage has a reduced square footage and requires careful selection of equipment. Before installation, it is recommended to carefully study the need for individual mechanisms, their types, pros and cons. A hydraulic valve is determined by two criteria.
By type of drive
There are also two subtypes of hydraulic drive:
A significant drawback of the first is oil cylinders. They need frequent regular replacement, so this design is considered extremely unprofitable for constant use. The combined system will last longer. However, some of the work with winches will have to be taken on by mechanics.
According to the design of the support
Hydraulic cranes are divided into mobile and stationary, they can be folding and prefabricated cast (goose). For ordinary garages, it is more rational to choose a mobile structure with folding parts.
Engine tilter price
In principle, making a tilter for an engine with your own hands, the drawings and designs of which are posted on the page, is quite simple. Another thing is how useful it will be and how justified the use of garage space for its placement will be. Be that as it may, the equipment is very useful and functional, easy to manufacture and inexpensive in materials.
The price of a branded, factory-made tilting berth for passenger car engines will be at least 8 thousand rubles, and if you work hard and make a tilting crane with your own hands, you can save 20-25 thousand.
How to remove the engine from a car in the garage with your own hands?
Basic maintenance of the motor is possible without dismantling it. Replacement of spark plugs, maintenance of intake and exhaust manifolds, and even replacement of the timing belt (chain) is carried out directly in the engine compartment of the car. However, work with valves, crankshaft, piston group, etc. is carried out only with the engine removed. Not to mention the overhaul procedure.
From our article you will learn how to remove the engine from a car in the garage, how you can remove the engine yourself and how to do it correctly.
The material was prepared by the site Auto-science.ru - whose specialists will help you check the mileage of your car efficiently and without errors.
How to remove the engine from a car in the garage without resorting to the help of a car service?
In fact, this is not such a complicated procedure as it might seem at first glance. The main task is to select tools for removing the motor.
Important! The engine weighs several hundred kilograms. Falling it can not only cause property damage, but also cause serious injury.
Before lifting the engine from the engine compartment, it is necessary to carry out the following procedures:
- Drain all technical fluids: oil, power steering fluid, brake fluid.
- Free the cooling system from antifreeze.
- Drain the gearbox (except when you remove the engine without removing the gearbox).
- Disconnect all hoses and pipes of the fuel, brake, lubrication and cooling systems.
- If possible, remove attachments: air conditioning compressor, generator, etc.
- Disconnect electrical cables, engine control unit, injector control cables, high-voltage ignition coil wires.
- Remove the connectors from all motor sensors. It is recommended to make a list (“based on” the maintenance and repair instructions), this will help you not to miss a hidden connector.
- In most cases, you will need to remove the hood cover.
If you plan to remove the engine without the transmission, you need to unscrew all the tightening bolts and make sure that after removal the gearbox will not fall under the car. That is, you need to take care of temporarily securing the unit.
How to remove the engine from a car?
At home, there is usually no professional lifting equipment, so you will have to rent it or make it yourself.
Do-it-yourself goose for removing the engine
This is a simple mechanism that resembles a gooseneck. It makes it possible to move the engine away from the engine compartment. It may have a rotating design that allows you to remove the engine without moving the machine.
The heavy internal combustion engine is simply transferred to a workbench located next to the car. In fact, it is a universal garage crane. The rack rests on long “legs” located under the engine compartment to prevent it from tipping over. A cable and a winch are used for lifting.
The gander is used both in garage conditions and in small services.
DIY engine removal lift
As a rule, this is a rolling crane, the lower part of which is placed under the front bumper. A smooth platform is required; on uneven ground, removing the engine using such a device is problematic. The lift operates using hydraulics or a tensioning mechanism like a winch. The device is simple: a stand with rolling supports, and a movable boom on which the motor is suspended. You can make a lift with your own hands from a channel or a square professional. pipes.
If there are strong wheels on supporting legs, you can quickly roll out the lift with the motor and move it to the repair area.
Do-it-yourself winch for removing the engine
Applicable if the car is being repaired in a solid stone garage. The most inexpensive tool that can be used to remove an engine. A chain or cable is used to pull it out.
There are two design options:
- A transmission mechanism with a drum that is suspended from the ceiling.
- The winch is fixed to the floor, and a pulley is fixed under the ceiling.
Features of removing various motor designs
Longitudinal arrangement. As a rule, such internal combustion engines are removed without a gearbox, although exceptions are possible. The radiator needs to be removed.
Transverse arrangement. The motors are compact and easy to lift vertically. The gearbox remains on the engine.
Hybrid systems and electric vehicles. Internal combustion engines in such machines take up little space or are absent altogether. Electric motors can be built into the wheel drive or integrated into the transmission. Due to their small size, their dismantling is not difficult.
All types of internal combustion engines are installed on supports. In frame structures, the attachment points are located on the frame; in cars with a monocoque body, there is usually a subframe.
block-mitsubishi.ru
Homemade engine tilter
Many car enthusiasts repair their car engines on the garage floor or on a workbench. This is always inconvenient, associated with constant lifting of weights, tilting a bulky cylinder block or cylinder head. All these factors lead to excessive fatigue of the car mechanic and a decrease in the quality of engine assembly. To make their work easier, craftsmen have developed many homemade tilter designs for the engine.
Options for homemade tilter designs
There really aren't many options. In the West, complex and bulky home-made structures are known, like a crane beam, almost with hydraulic drives.
In domestic conditions, car enthusiasts assemble the simplest structures from what is at hand. Of the homemade tilters for the engine, two-support and cantilever versions are known. The last design is the easiest to manufacture. Its characteristics are sufficient to carry out major repairs of almost any passenger car engine weighing from 150 to 250 kg.
Before starting to manufacture the unit, it is necessary to study in detail the existing samples of stands for engine repair. The sample is selected to suit the immediate needs of an amateur car mechanic. The availability of materials and dimensions for ease of work in a small garage are assessed. The permissible load weight is calculated in accordance with the type of engine that is to be repaired.
Based on the results of a study of existing structures, a sketch drawing of the most optimal version of a cantilever-type tilter was developed. Overall dimensions in the diagram are given in millimeters.
In the sketch, the designations D 60 and D 52 correspond to diameters of 60 and 52 mm.
Materials for production
Due to the fact that the engine tilter will have to work under severe conditions of physical stress associated with the weight of the engine, high demands are placed on materials.
The following materials are used for manufacturing:
- steel square profile 70 x 70 with a wall thickness of 3 mm, length 3 m;
- steel pipe with outer diameter 60 mm, inner diameter 53 mm, length 245 mm;
- steel pipe with outer diameter 47 mm, length 480 mm;
- steel channel with internal side width 70 mm, wall thickness 3-4 mm, length 280 mm;
- flange for bolted connection to the engine - 1 pc.
Tools and hardware for stand assembly
To connect the nodes of a metal structure made of a steel channel and a square profile, you will definitely need a welding machine that allows you to work with an electrode with a cross-section of at least 3-4 mm. In addition, for cutting you will need a grinding machine with a metal cutting disc with a diameter of 115-125 mm. To ensure bolted connections of prefabricated parts, you will need a drill with the ability to work with a drill with a diameter of up to 14-20 mm. M12 bolts are also required to assemble the structure.
You will also need a set of files to cut off burrs and uneven edges, and remove flaws in metal cutting. It wouldn't hurt to purchase some sandpaper to remove rust from the surface before painting.
Assembly of the engine tilter
The first step is to cut out the channel and square profile in accordance with the sketch. Next, a vertical post is made from the profile and welded to the square from the channel. Then the structure is reinforced with metal slopes, which can be made from scrap parts.
After this, a base is welded from a cut square profile - a tilter stand for engine repair. At the site of the bolted connection to the base of the vertical post, preparatory work is carried out, steel bushings are inserted and welded to strengthen the structure.
Then you should begin the final assembly of the engine tilter. The stand is connected to the stand by welding and M12 bolts.
A horizontal pipe with an outer diameter of 60 mm and an inner diameter of 52 mm is welded to the vertical stand. A horizontal axis is inserted into this part. It can be made of a steel pipe with a diameter of 47 mm with a welded flange for bolting the cylinder block or cylinder head.
In the horizontal axis, you can drill through holes every 45° along the radius, to be able to fix the position in space with pins after rotating the attached motor to the required angle.
Assembly instructions and drawings
The design was called “goose” because of its L-shaped shape. The mechanism is easy to use, because thanks to it you can bring the boom to the engine compartment. This reduces labor costs for tying the engine, which reduces the time required to complete repair work.
The design of the “goose” is simple. The mechanism consists of a collapsible support equipped with wheels. With their help, it is easy to move it from place to place and roll it under a car.
The garage device has a vertical stand, on which a jack is installed. “Goose” has a retractable boom, which is equipped with a chain and hook. When the jack is activated, the boom goes up, lifting the load.
A hydraulic crane is most often used to lift an engine. The device can be made according to ready-made drawings, but most often a hand-created crane diagram is used; even beginners can draw it with their own hands.
First, the collapsible part of the pore is made; it is a butt part. After this, the vertical stand is welded. A spacer must be installed at the bottom. After this, they proceed to installing the jack; it must be securely fastened. The boom is made to reach full reach; it is needed to remove the engine. All parts of the structure are welded. The result is a reliable yet maneuverable device.
When the product is ready, tests must be carried out.
To do this, hang a load that should be 20% heavier than the one that needs to be lifted. If the mechanism can withstand the load, it can be used for work. The goose crane is collapsible, so it will not take up much space in the garage.
There are many ready-made diagrams and instructions on the Internet. But it’s better to make the drawings of the transmission rack yourself. The platform takes on a lot of weight, so the sheet metal must be square with sides of 800x800 mm, the metal thickness must be at least 5 mm. You can reinforce the platform with a profile along the perimeter or diagonals.
The height of the rod is 1.2 m, it will extend to a maximum lift of 1.6 m. Extension is limited by the stroke of the jack. The optimal dimensions of the technological platform are 335x335 mm.
Features of the engine stand design
Of course, you can do without any tilters and disassemble the Zhiguli engine on a box or on a workbench, if you have one. But there will always be a risk that the motor will slip out and fall on your feet or on the floor; you always need to call someone for help, it’s always inconvenient. Some of the drawings shown on the page are designed specifically for VAZ engines, and some are universal. But they all work for their owners and make engine repair easier.
Read more: Universal low and high beam headlights
The main thing that needs to be achieved is stability and rigidity. Not everyone graduated from a university with an “A” in strength of strength materials and technical mechanics, so we will give some main points as a basis for building with your own hands or changing the dimensions indicated in the drawings. There are also many options for tilters that attach the engine to only one console. This causes increased stress on one rack. This design also has the right to exist, but subject to certain conditions.
In any case, the stand will be made of profiles, it does not matter whether it will be a square pipe, a powerful angle or an I-beam. At the junction of two profiles, a certain amount of movement cannot be avoided.
In this case, an ordinary triangle will come to the rescue, which is the most rigid and indestructible figure. Consequently, it is necessary to unload the central post as much as possible, and this can only be done with the help of slopes, so that the maximum load falls on the support triangle.
It is very important to correctly position the center of gravity and relieve the lower frame from bending loads. Here, too, several braces will have to be included in the design.
The center of gravity must be located so that it is possible to rotate the engine without problems, but at the same time the entire structure remains stable. You need to take into account both the weight of one cylinder block and its weight together with the cylinder head, flywheel and crankshaft.
► How to make a stand for testing starters and generators with your own hands.
You can hang the engine with everything attached to it, turn it and lock it in any convenient position. The design is thought out so that nothing interferes with disassembling the engine to the bare block. The paws are attached to the engine instead of the mounting brackets for the pillows.
The axis of rotation of the engine is located approximately at its geometric center. Due to this, the design turned out to be as compact as possible. Plus, the stand is collapsible, making it easier to store.
I think everything will be clear from the photographs.
The base is a frame made of 60mm channel. Uprights with support hinges at the top are screwed to the frame. The hinges are made of pipe and open on hinges. After installing the assembled engine with legs on the stand, the hinges are closed and secured with nuts.
To secure the engine in the desired position, a removable clamp is placed on one of the axles. It is enough to loosen it, turn the engine and tighten it.
I made a stopper on two wheels diagonally - a curved plate is bolted to the frame, clamping the wheel.
A pallet is attached to the bottom of the frame. It was bent from a sheet of galvanized roofing.
I can only say approximately the dimensions - I measured everything in place, placing an empty block on the choppers. The frame is approximately 60x80 cm, the height of the posts is 35 cm.
The materials are the most affordable. Channel 60, channel 50, pipe with diameters 36 and 28, two 8mm plates, wheels from trolleys. Tools - grinder, welding, drill, file.
Comments 25
The stand looks promising. Two questions. First: wouldn't it be better for me to add height to the posts (my height is 180 cm)? Second: how long are the channels on the brackets? If there are any other useful tips learned from the experience of using the tilter, I will be glad to use them. The engine needs to be repaired.
My height is about the same, the height of the stand is enough for me. The length of the channel is about 20 cm. All sizes turned out to be optimal - both compact and convenient. Only the mechanism for fixing the engine position has been altered - the clamp does not hold well. I welded a bicycle sprocket and a spring-loaded clamp.
Dear Gleb, to say that you are a handy and big-headed person would be an understatement. I am always amazed by such skillful people and, in addition, sharing their ideas and inventions, because in the bustle during the process, or greed, not everyone puts their brainchild on public display. Respect. What if we make a more powerful vertical stand, but one, not two, and accordingly make one lateral mount to the engine? Will three bolts of one mount support the entire engine and attachment? I don’t want to attach it to the output side of the crankshaft so that there is easy access to the oil seal packing. And if so, then this stand could be made more universal. What do you say to Gleb and the rest of your comrades? I'm interested in any opinion.
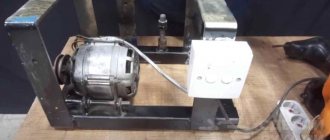
Why does the engine break down?
Of course, we all want our vehicle to serve us for a long time and at the same time be in excellent working condition all the time. However, this only happens in fairy tales, and in practice, even new cars taken from branded showrooms need repairs after just a few years. And what can we say when the owner does not spare his “iron horse”? In general, many factors contribute to the failure or incorrect operation of one of the main parts of a car - the engine.
So, let's look at the main mistakes that lead to such disastrous consequences. As already mentioned, the most negative impact is the incorrect operation of the vehicle, for example, the use of unsuitable fuel or low-quality technical fluids. Untimely replacement of the oil and timing belt and constant overload of the vehicle will also have a negative impact. Neglecting the engine’s need to warm up in the cold season will be even more destructive. And what can we say about malfunctions after mechanical impact due to an accident?
Design features and operating principle
The hydraulic valve is made of durable metal and has a stable design. The main principle of the mechanism structure: stable support with low dead weight. This helps you lift loads of up to three tons with ease, but a maximum of two meters above the ground.
Garage crane is used for:
The crane contains a hydraulic drive and operates through a system of communicating vessels. The method allows you to make the rise smooth.
Stationary
The stationary crane is installed in large car repair shops and is securely attached to a monolithic foundation. The mechanism has a boom with a rotating system and is equipped with a manual drive. Allows you to work on only one vehicle at a time.
It is important to calculate the installation location in advance, since it will not be possible to dismantle the structure without loss.
An integral advantage of a stationary crane is its large lifting capacity. It is provided by a monolithic support, which creates rigidity of the system.
Portable
The hydraulic rolling crane has wheels on its base. The support is provided by the lower metal beams, which results in loss of load capacity readings. It is better to choose a faucet with a massive triangular support. By design they are divided:
Important! Folding units need to strictly follow the instructions for lifting the permitted load. The arrow cannot withstand and, if the permitted standards are not observed, it breaks off.
Outboard motor trolley
Several models of trolleys for outboard motors are presented by Technomarine:
Free-standing trolley
Cart with motor mounted on the false transom using motor bracket clamps. The design of the trolley stand with a support and a handle for transportation forms a single non-separable structure. The stand is a rectangular frame made of a metal profile. Cost 4500 rubles. Trolley weight 15 kg, wheel diameter 254 mm. To install the motor on the transom, you will have to remove it and move it by hand.
- An improved cart of a similar design has two small wheels on the handle, allowing you to easily roll the motor in the trunk or trailer. It will be a little more expensive, 4650 rubles.
- A trolley with a free frame (false transom) allows you to install the motor on the transom of a boat without removing it from the trolley. The motor is attached to the cart using a pin through a hole for remote control of the boat. The cost of the cart is 4250 rubles. This is perhaps the most convenient version of the trolley from Technomarine, which excludes the complete raising of the motor.
Finalization of the design
If necessary, the stand for the outboard motor can be made more mobile. To do this, you can attach small wheels from a cart or small bicycle to one edge of the rack. A handle made of metal or wood is attached to the upper part of the structure to make it convenient to transport the motor when tilted. Refining the design with small wheels will make it possible to easily move and also bring the motor to the boat without any extra effort.
Having considered the technology for creating a motor stand, each owner of this equipment will be able to make a simple design with their own hands.
This year I purchased a buoy motor, a 4-stroke 5-horsepower HDX. The motor is in good condition, despite its age (5 years). Accordingly, a rack was needed for storage and maintenance. Having scoured the Internet, I realized that it was better to do it myself... Buy some kind of chair for 2-3 thousand rubles. there was no desire.
Yes, I wanted it with wheels. Therefore, this photo was taken as a basis
Since the remnants of the profile and a couple of scraps of laminated plywood were left over after the construction of the trailer, we only had to buy wheels and furniture bolts. Such wheels as in the photo are of course good, but their price turned out to be 800 rubles per piece. Therefore, I bought two regular wheels with a bracket for 300 rubles each.
How does a boat motor trolley work?
The principle of operation of the trolley, which is simple in design, is as follows. The lower part of the deadwood (keel, gearbox) rests the motor against the support frame. The motor is secured to the trolley rack on the false transom using standard threaded clamps. A slight shift of the center of gravity from the wheel axis towards the stops prevents the engine from tipping over.
To remove the motor from the transom of the boat, perform the steps in the reverse order. Loosen the threaded clamps on the outboard motor bracket. We roll the cart as close as possible. We remove the motor from the transom and hang it on the false transom of the cart. Tighten the threaded connections
how to lift the engine out of a car with your own hands
You really can't do it with your hands.
manual winch
head removed, hinge, 2 bolts, rags for wings, 2-3 meter thick pipe, 2 lift, 1 coordinate, do not put legs
You can take everything apart under the hood. I've already done this.
the cable, the crowbar, and two people can pull it out entirely. if there is one then for parts
There are special attachments sold in auto parts stores, where you can turn the handle by hand or something like that…. Well, personally, how long ago was the engine removed from a Muscovite - they drove it into the garage, the chain to the engine, then the chain was thrown over the crossbar, and then this chain was attached to the second car
depending on what car. on a six without a head, one was pulled out and installed. hard, but tolerable
at least three of us are required or a winch behind the beam
If a car has up to 2 liters, remove everything from the engine, the block will become much lighter. The engine jack is lifted, removed from the cushions and pulled out. If it’s a Jeep/SUV, then pull the waist, or take everything off again and take two or three people out. If it’s a BelAZ, then it’s easier to squeeze it out without special ones. equipment
I knew one guy - one of them pulled out pennies from the collection.
When the time comes to overhaul the engine, there is no way to do without overhauling its internal parts. To do this, you have to remove it and take it to a mechanic, who can replace all the old worn parts with new ones. But it is at this stage that most drivers make their mistakes when they try alone to quickly remove the engine, repair it and quickly drive their favorite car. First of all, you need to understand that it is impossible to remove the power unit alone, otherwise you can not only hopelessly damage the engine crankcase, but also damage your limbs. How many cases have there been when drivers, in great haste, tried to remove the engine themselves! Then we drive the car to the garage, where there is a pit and reinforced concrete floors, which allow us to more confidently carry out all these necessary repairs. You can only disconnect all the electrical cables, fuel wires and belts from the pulleys, while not forgetting to drain all the water from the radiator and the oil from the engine crankcase. These are all elementary but necessary operations that every self-respecting driver should know. Therefore, before removing the engine, you need to prepare all useful containers where all liquids from the engine will be drained, not forgetting to prepare soft rags along the way, with which you will have to collect all the spilled liquid (you can be sure that there will definitely be some). It is advisable, if the engine still has a liquid air filter (they are installed on GAS), to remove it and pour out the old oil. This will reduce the weight of the engine. Then we rent a special device - a jack-trolley and place it under the engine. With its help, we slightly lift the engine from below in order to be able to loosen the bolts on the rubber pads on which, in fact, the engine hangs. After the last nuts are unscrewed, the engine is then smoothly and gradually released to the bottom. This first option is suitable when an electric lift is available and the car can be raised completely. But in widespread cases, when you don’t have a hoist or floor lift at hand, but you really want to go, you can get by with primitive devices. You need to prepare a metal cable and pipe. Then we wrap the cable around the engine, lift the engine, loosen the nuts on the mounts and very carefully lower the engine to the bottom of the pit. It is better to do this dangerous work with three people, because two will hold the iron pipe, and the third will loosen the nuts on the engine shock-absorbing mounts. Needless to say, before removing the engine from the car, the wheels should be firmly fixed in wooden blocks in order to completely eliminate even the slightest movement of the car chassis? Install the engine in reverse order.
A winch or assistants to help.
Lower into the pit, then winch up
the simplest and cheapest option is a manual hoist. You can buy it for 3-4 rubles! https://www.mp-u.ru/shop/ruchnaya_tal
My husband also suffered and finally bought a hoist. Perhaps you should buy or maybe repair the old one. There are also spare parts for the hoist here.
touch.otvet.mail.ru
Review and cost
To transport motors, water-motor boats use carts, both individually produced to suit their needs, the design and weight of the motor, and industrially produced (for universal use), which can be purchased in stores selling water-motor equipment and boats.
Trolley for transporting outboard motor TM-2
The trolley is designed to carry a fuel tank with the engine; it has a collapsible design. The support for a stable position, the mount for a standard fuel tank, the handle with wheels are easily detachable. To install the motor on a boat, it must be removed from the cart and moved to the transom of the boat. The weight of the aluminum trolley is 8.7 kg, which is two times lighter than a trolley made of structural steel. Cost 6500 rubles.
Price - 6500 rubles.
Morlab trolley
This is a transformable trolley. The design is patented. The stand, support, and handle for transportation are folded, the assembled cart is very compact and allows you to take it with you to the boat. The weight of the trolley is 6 kg, which is ensured by the frame being made of a square aluminum profile. The special design and shape of the false transom allows you to transfer the motor from the cart to the transom of the boat without lifting the motor. Cost 7500 rubles.
Price - 7500 rubles.
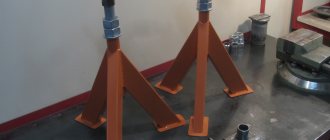
Drawings and photos of tilters for VAZ engines
The simplest solution to this issue is shown in the photo. The simplest tilter, albeit with one engine mounting point and only three additional braces, which remove the main load from most of the central pillar. And it is already reinforced with an additional stiffening rib in the form of the same profile.
The question remains about the stability of the entire structure, since the supporting area is relatively small. In this case, you can consider the option of two mounting points for the motor on the stand. There is a double-sided mounting of the engine, which also distributes the load evenly across the racks, and a large supporting area, which prevents the structure from tipping over.
All dimensions shown in the drawing correspond to the dimensions of VAZ studs and landing planes, and the motor is secured by a locking pin from turning. The locking mechanism allows you to select one of sixteen positions, which is quite enough to service any engine. Good luck to everyone!
Read more: Replacing the front driveshaft of a Suzuki Grand Vitara
After I made myself a crane www.drive2.ru/c/1481270/ there was still a little iron left, and I decided to also make a tilter for the engine, it’s still better to sort out the engine on a stand than on your knees, well, this is what came out of this idea
How to make a garage goose crane with your own hands
photo of the manufacturing process
mode according to pipe sizes and angle
I used a cardan cross and a shank as the upper hinge
During the tests, I noticed that the jack was tilting and thought about making a similar hinge at the bottom of the jack, but after several removals and installations of the engine in the engine compartment, the problem disappeared because the jack's stroke was not so large and the misalignment practically disappeared
and a short video of the work
the two-ton jack is a little heavy to pull; in the future it will be replaced with a more powerful one
Review of a homemade hydraulic crane! Removing and installing the engine in a car with two hands.
“Trade in” or changing the car “key to key”
The “Trade in” service involves the sale of a used car, the proceeds from which go towards paying for a new model. In this way, the owner only has to pay a fixed amount in order to transfer to a new vehicle.
Key-to-key car exchange differs from the previous service in that the owner exchanges his car for a suitable used model, subject to an appropriate surcharge.
These two relatively new ways of buying cars eliminate the risk of fraud that is common when a car is sold second-hand on the market. Transactions are formalized by leading auto companies in accordance with the current legislation of the Russian Federation.
Construction of a crane beam for a garage
Experienced car owners say that a crane beam is rarely needed in the garage, but if it is needed, there is nothing to replace it with. It is used for removing and installing the engine, and less often for moving other loads. Purchased mechanisms are expensive and take up a lot of space, so the best solution for a private craftsman is a do-it-yourself beam crane made from scrap materials.
How to make a crane beam in the garage with your own hands
In order to make a garage lift with your own hands, you will need:
- For racks - pipe with a cross-section of 100x100, length 2350 mm - 2 pcs.
- For the cross rod - a round pipe with a diameter of 100 mm and a length of 4150 mm.
- For supports – round pipe with a diameter of 110 mm and a length of 600 mm – 2 pcs.
- For bases and diagonal supports - corner 100x100 mm.
- M 16 bolts for attaching supports to rods.
- Wheels (for example, from a warehouse cart) – 4 pcs.
- Manual winch with a lifting capacity of up to 1 ton.
- Cable and rollers (for example, from an elevator door drive).
Dimensions are approximate and subject to adjustment to suit the size of your garage.
Crane beam device
The mechanism is a U-shaped structure (bridge) with a lifting mechanism. In large auto repair shops, both parts may be movable. The bridge moves on rails, the lift moves on a span beam. In garages, to save space, rails are not laid, and the bridge is equipped with wheels.
The crane beam device consists of supports, a span beam and a lifting mechanism. The supports are welded from metal pipes and channel bars. A manual or, less commonly, electric winch is used as a lifting mechanism.
Girder cranes are of the "floor operated" type, as opposed to those that are handled from a cab. To make the mechanic's work easier, the garage crane can be equipped with an electric winch . This will increase manufacturing and maintenance costs, but if it is necessary to frequently dismantle engines and other heavy units, it will pay for itself. In rural areas where there are power outages, insufficient power or voltage surges, you should give preference to a manual winch. Especially if we are talking about a personal garage and not a private workshop.
Recommendations for making the device
Above we looked at what a beam crane consists of: supports, a span beam and a hoist. Manufacturing takes place in several stages:
- Weld the vertical supports in the shape of an inverted T with two diagonal supports.
- Weld the span pipe to form a U-shaped structure.
- Install the wheels.
- Weld a winch to one of the side supports.
- Install the lifting mechanism: fix the rollers, stretch the cable and hang the hook.
Ready-made drawings can be found online, but it’s easier to make it yourself by adjusting the product to the size of the garage.
Working with the stand
Before starting operation, be sure to carry out a visual inspection of the system. If any defects are discovered that could damage the equipment during maintenance, they must be corrected. If upon inspection there are no such defects, you can begin work.
For a good and long service life of the structure, it is necessary to monitor its condition. It is necessary to check the reliability of the fixing fasteners each time you use it, regularly lubricate all moving parts and store the unit in a dry place. The possibility of direct contact with precipitation and moisture should be excluded.
You should not load the stand above the actual calculated weight, so as not to drop the engine due to breakdown. During operation, the structure must be placed on a stable surface. It is also worth using a fixing pin for the rotating mechanism
Work should be done carefully and carefully
You need to make sure the load is centered. The unit must be firmly secured with brackets. You should definitely follow safety precautions so as not to damage the engine or get injured. With proper care and proper use, the stand will last for many years.
If there is a stand for disassembling and assembling the engine, repair work is carried out efficiently and conveniently. Self-assembled installations can significantly save money on the family budget for the purchase of several models. Every home craftsman, if desired and has the appropriate tools, will be able to assemble a stand suitable for many types of mechanisms.
DIY crane assembly technology
If you have certain skills, assembling the mechanism yourself will not be difficult. To do this, it is important to draw up a preliminary design drawing, choose materials wisely and strictly follow the assembly instructions.
Schemes and drawings
Below are sample drawings of a hydraulic crane. You need to make accurate calculations yourself, based on the parameters of a particular garage.
Material selection
To build a garage lift yourself, it is recommended to first purchase all the required materials:
Do-it-yourself disassembly and assembly stand for engine repair
Let's start with the fact that finished products are an excellent option if the service for repairing power units and components is put on stream, so to speak. In other words, the high initial cost of such products of appropriate quality often does not allow many to purchase disassembly and assembly stands both for personal use and for work in garages and even small service stations.
For the reason stated above, craftsmen and owners of small auto repair shops opt for the option of making their own stands, which are used for engine repairs. Note that drawings that are presented in the technical literature and can also be found in large quantities on the Internet will help you make a stand for engine repair with your own hands.
A simple engine repair stand has several basic elements:
- plate for securing the internal combustion engine;
- stand base;
- special baking tray;
- rotary mechanism (usually worm type);
It should also be noted that the stand must be a mobile device and be a universal solution. To put it simply, some disassembly and assembly stands may be suitable for working only with a specific type of engine or allow you to work with a narrowly limited category, while others provide the ability to install and securely fix all kinds of internal combustion engines.
For this reason, even if the tilting stand is initially made to service your own car, it is better to make the device universal, since in the future there may be a subsequent need to repair other cars. As an example, we can mention the engines of the domestic manufacturer AvtoVAZ, which can be mounted on a stand using flange fasteners at the rear, while reliable fixation of an engine from a foreign car cannot be achieved in this way.
To solve the problem of achieving universality, two channels are welded to a rotating plate. The indicated channels must have 10 mm holes. The distance between the holes should be about 5 cm. The holes themselves are made in the area where the mountings of the power unit cushions are located on the engine. This approach allows you to mount different motors that differ in size on the stand using adapter brackets.
In parallel with this, it is necessary to place the engine or a separate unit so that the center of gravity of the fixed part is opposite the axis of rotation of the rotary plate. This will allow you to rotate a fixed power unit, a separate part or assembly without unnecessary effort. Equipping the stand with wheels that can withstand heavy loads will make it easier to install the unit on the stand, and will also provide the ability to move large parts directly on the stand. This eliminates the need for frequent use of various lifts during internal combustion engine repairs.
Finally, we add that engine repair usually involves the need for external washing and flushing of internal cavities, cleaning parts from engine oil, various contaminants and deposits. After removing covers, pans and dismantling various elements, as a rule, a certain amount of residual technical fluids also leaks from the engine. To maintain cleanliness in the workplace, as well as to prevent such liquids from getting on the floor, a special tray is located at the bottom of the disassembly and assembly stand for engine repair.
A mesh with small cells is additionally installed on top of the pallet. The specified mesh is necessary in order to place it on it and then wash the removed elements over the pallet. The mesh also allows you to retain small engine parts that may fall into the pan during washing or repair work.
Engine repair equipment
The engine can rightfully be called the “heart” of a modern car. It is this part that bears the greatest number of loads, and the performance of the entire vehicle directly depends on its performance. Owners fix some minor breakdowns on their own, but to fix more serious problems, you should contact specialized auto repair shops equipped with equipment for engine repair. A signal for the need to visit a car service center may be an increase in fuel consumption or difficulty starting the car.
The technology for repairing any engine is built in several stages. First, the attached equipment is removed from it, then the assembled engine is washed.
After this, the motor is placed on a stand to disassemble the engines. This equipment for engine repair allows you to securely fix the part in a position convenient for work. Paradoxical as it may seem, often the cause of damage to car engines is dirt getting into them. Therefore, after disassembly, all its components are thoroughly cleaned.
A slightly more advanced model of a disassembly stand is an engine repair stand. It can be equipped with additional accessories, such as trays for collecting technical fluids.
After disassembling and washing the engine, it is necessary to inspect it, repair or replace damaged parts. For these purposes, specialized equipment for engine repair is also used.
Installations for honing cylinders of automobile engines are designed for honing cylinder mirrors. The operation is carried out in order to achieve proper seating of the piston rings. After all, only in this way can the required tightness of the fuel combustion chambers be achieved. The bushings of the upper and lower connecting rod heads, valve mechanism drives, and engine cylinders are honed. There are two types of honing stands on the market with different types of hone: a “bottle brush” and a surface hone, made in the form of an attachment with sharpening stones.
After all structural elements have been restored, the engines are assembled, tested and run-in at a stand for assembling and adjusting engine clutches.
Engine break-in stands are one of the most important types of equipment for engine repair. Many models allow for both cold and hot running, while others are designed for only one operation.
Cold running can significantly reduce the breakthrough of gases into the crankcase from the combustion chamber and the penetration of oil into it. The engine is connected to the stand and begins to run in, first at low speeds, then their frequency constantly increases.
Hot running does not eliminate the influence of temperature on engine parts, and, as a result, uneven heating of the elements, leading to uneven thermal clearances.
The further operation of this important unit largely depends on the quality of the equipment used to repair the engine. After all, careless disassembly or honing with a low-quality machine can lead to engine damage that is not noticeable at first glance, but can greatly affect its performance after a certain period of time.
Dear site visitors and potential clients. The management of the website www.ural-ks.ru brings to your attention that all information posted on our website is of an advertising nature and does not contain an offer with all the essential terms of the agreement, from which the will of the person making the offer is seen to conclude an agreement on the terms specified in offer conditions (public offer), but is an invitation to make an offer provided for in paragraph 1 of Art. 437 of the Civil Code of the Russian Federation.
All essential conditions for the purchase of advertised products will be specified in the purchase and sale agreement.
You can get all the necessary information on the configuration, prices, purchase and delivery of products advertised on the website from our specialists by phone.
Prices for goods are calculated in rubles at the dollar and euro exchange rates; at the time of placing the products on the website, the final price of the products is calculated at the current foreign exchange rate. To clarify this information, you can call our managers or make a request by email.
In case of delay in issuing an invoice and commercial proposal, as well as if there are any complaints about the work of the sales department, contact a senior manager.
Attention! All prices on the website are excluding VAT
Source
Drawings and photos of tilters for VAZ engines
The simplest solution to this issue is shown in the photo. The simplest tilter, albeit with one engine mounting point and only three additional braces, which remove the main load from most of the central pillar. And it is already reinforced with an additional stiffening rib in the form of the same profile.
The question remains about the stability of the entire structure, since the supporting area is relatively small. In this case, you can consider the option of two mounting points for the motor on the stand. There is a double-sided mounting of the engine, which also distributes the load evenly across the racks, and a large supporting area, which prevents the structure from tipping over.
All dimensions shown in the drawing correspond to the dimensions of VAZ studs and landing planes, and the motor is secured by a locking pin from turning. The locking mechanism allows you to select one of sixteen positions, which is quite enough to service any engine. Good luck to everyone!
Read more: How to convert kilowatts to amperes
After I made myself a crane www.drive2.ru/c/1481270/ there was still a little iron left, and I decided to also make a tilter for the engine, it’s still better to sort out the engine on a stand than on your knees, well, this is what came out of this idea
Technological features
How to make a car tipper with your own hands? This question is quite interesting. There are many different ways to make such a lift. But almost all of them are based on a jack. This lifting mechanism is supplemented with extensions, resulting in a design that is no different from the factory one. Only it costs several orders of magnitude cheaper. The following indicators must be taken into account:
- Safety;
- Load capacity;
- Climbing angle.
Primary requirements
The main requirements for a stand for disassembling and assembling engines are versatility and ease of use.
It is also important how many levels of freedom are provided in the design, what tonnage the selected equipment should withstand
Currently, stores offer a wide range of options to choose from. You can assemble the structure yourself. This will save money and help you choose parameters in accordance with your wishes for personal ease of use.
A homemade installation must be durable and reliable. All metal elements are assembled by welding. In this case, it is better to seek help from a specialist. He will be able to qualitatively weld all the parts together. In this case, the safety of service personnel can be guaranteed while performing their activities.
Design elements
A typical stand for disassembling and assembling engines consists of a list of certain materials that are taken as a basis for assembly. The list includes several design components. This is a plate to secure the internal combustion engine, a stand base, a special tray for escaping waste material, and a rotating mechanism.
Also, for greater convenience and versatility, the equipment should be able to move around the room. To do this, install durable wheels at the bottom of the structure.