Knitted mitts are a bright and fashionable accessory that is popular today among both teenagers and adult women. Mitts are fingerless gloves or simply sleeves. They can be worn both for warmth and as an openwork decoration. Some clothing styles, such as Boho, include lace mitts to complete your look.
Crochet mitts can be crocheted from thick yarn with crochet size 4-5. Such mittens should be worn not only for beauty, but also for warmth. They are especially popular among female motorists and those who do not like to wear mittens/gloves in winter.
Crochet mitts are a good way to add variety to your wardrobe with minimal effort. After all, you don’t need a lot of thread or time to knit mitts. We have collected many patterns and master classes, viewing which you will learn that even a novice needlewoman can knit mitts. And interesting models are created not only due to complex patterns. Some simple patterns look quite impressive on mitts.
The originality of crocheted mitts can be achieved through interesting details:
- belt loop
- buttons
- borders
- applications.
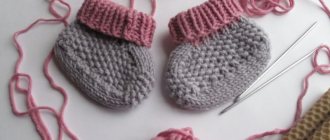
Mitts are often crocheted for children. It’s interesting for children to wear mittens with an applique in the shape of their favorite character or mittens in the shape of an owl or crocodile. If your child does not like mittens, then funny mittens will help solve this problem.
Crochet different mittens for yourself and your loved ones as gifts, send your works to our editorial office for publication on the website.
Features of crochet
If you decide to take up crocheting mitts for beginners, you should remember that crocheting is different from knitting. Crocheted fabric is less elastic, so the cuff stretches less well. The product is more rigid and thick.
All this must be taken into account when choosing yarn and pattern. Very voluminous patterns are not suitable for crocheted gloves; the yarn should be thin. For a pair of gloves, 100 g of yarn is enough. For regular models, a hook number 2.5 is suitable, for openwork ones - 4.5-5.5.
The knitting density should be medium so that the product comes out soft, but at the same time warm. Do not tighten the thread too much. The cuff will not be very elastic, so it makes sense to make it with buttons or laces.
Thread selection
For very young children, we recommend using baby wool or analogues.
For children aged 6 and older, baby wool and those with a high wool content are suitable.
For adults, 100% wool and a ratio of 30 acrylic, 70 wool and other ratios are also suitable.
how to choose the right hook and thread
Two simple options
The simplest option is mitts without a thumb, for which a hole is simply left. They usually start knitting from the bottom, and during the process they try the glove on the hand. You can knit in the round or make one flat piece. The process is as follows:
- The first stage is knitting the cuff. Its width is approximately 5 cm.
- Next, knit the part between the wrist and the lower edge of the finger hole - this is 3-5 cm.
- The hole for the thumb is made by knitting a chain of air loops 2-3 cm long into one of the columns of the finished row.
- Continue knitting the main part. Air loops are knitted in columns according to the chosen pattern.
- The mitt is knitted until it reaches the finger bones or lower phalanges.
- All open edges of the finished glove are tied.
Measurements
Measurements you will need throughout your knitting.
We make them using a centimeter and take measurements around the arm, i.e. We wrap the centimeter around our hand in the right place and see how many centimeters we measured and write them down on a piece of paper.
Pay attention to the photo, 1e is the measurement of the widest part of the arm, when you knit without an elastic band, then measurement 1 is necessary, we focus on it, because Knitting does not stretch compared to elastic.
Therefore, for mitts, when you knit with an elastic band, we use measurement 2, wrist.
Measurement 3 is the base of the fingers - this is the volume that will be needed when knitting a finger, subtract from volume 1 - measurement 3, we get the required number of cm needed for the thumb.
If you don’t have a centimeter or don’t want to take measurements, apply cast-on stitches or knitting until you reach the desired size.
Regardless of the knitting density, this fitting option will help you immediately understand whether you need to increase the number of loops or leave the cast-on loops.
To avoid mistakes, avoid repeating a loop in a loop if your size is different, especially if it is larger.
Patterned gloves
If you have just recently learned to knit and want to crochet mittens, this master class will help you with this. This pattern is knitted in the round:
- First they make an air loop. Cast on a chain of 30 chain stitches and connect its end and beginning.
- Knit 5 rows in a circle with regular single crochets.
- Start knitting the pattern. You can use yarn of a different shade for this. A simple and beautiful pattern is obtained from double crochets. First, make 3 air loops for the height of the row. Skip two stitches, and knit 4 double crochets into the next one. The entire row is performed in the same way.
- Start the next row - skip two loops of the previous one, then knit 4 double crochets in one loop. The result is triangles, each of which “grows” from the middle of the same triangle of the previous row. In the same way, finish the row and knit 4 more rows.
- After the sixth row, the fingers begin. Try on the glove.
- To make a hole for the thumb, make two connecting loops and end the row. Next, turn the work around to knit in the other direction. Make another row like this.
- We usually knit the next row in the round. You can continue with regular columns. The edge can be tied with a “crawfish step”.
- Having finished the main part, knit the finger. To do this, the hole is tied with single crochet stitches to the required length of the finger.
The finished product can be decorated with applique, beads, and embroidery.
Video for beginner needlewomen
It is difficult for beginners in any business to navigate work recommendations the first time, since they cannot know some details due to inexperience. This also applies to crocheting. In this case, practical video lessons with master classes for beginners help you work faster and better.
Video “how to crochet beautiful mittens”:
Share with your friends!
Read us in the Zen channel
Straight piece mitts
To knit this model, you need to make one straight fabric. It is then sewn together using a hook. The product is made in this way:
- Before you start knitting, you need to take measurements - arm circumference at the level of the bones. Determine the length of the mitt.
- Subtract 1 cm from your arm circumference so that the glove fits your hand well.
- The piece is knitted across the arm and has a rectangular shape. The width of the part is the length of the glove, and the height is the circumference of the hand minus 1 cm. To do this, cast on a loose chain of air loops of the required length plus one loop for the height of the row. Next, knit the fabric in single crochets.
- When the rectangle is ready, determine the place for the finger. Then the edges of the rectangle begin to be sewn together using a chain stitch. Having reached the hole for the finger, knit in half-columns only on one side. Next, the rest of the glove is sewn together.
- Knit a finger. To do this, three rows of single crochets are knitted along the edge of the hole.
What to do if the size doesn't fit? How to make mitts to your size?
Before starting knitting, determine the largest size, which is the width of the hand at the base of the thumb, and use this size as the basis for starting knitting a simple mitt, as in the video above and in the description.
It is necessary to collect so many air loops so that the hand fits into a closed ring. For example, if your arm volume is 23 cm, then after casting 10 air loops, measure how many loops are in 1 cm. Most often there are 2 loops. From here 23 cm * 2 = 46 loops must be cast on or try on the cast-on loops, adding their number until the hand fits into the ring.
Then we knit in the same way, the changes will only be in the number of loops, i.e. if 22 loops are written, then you will have your own number, pay attention to the differences in the size of the finger. We carry out measurements in the same way and determine how many loops need to be left on it.
Openwork models
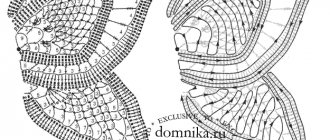
For openwork models, use hook No. 4.5 or 5.5. To make the product more elegant, you can take yarn with lurex. Feminine crocheted openwork gloves for beginners can be crocheted according to the following pattern:
- The glove is knitted in the round, starting from the bottom. First, a chain of air loops is collected.
- According to the pattern, knit to the desired length.
- Make a hole for the thumb.
- Having knitted one half of the glove (the upper one), fix it and cut off the thread. Unfold the work and knit further - down along the arm.
The second glove is performed in the same way. Please note that the finger will be on the other side.
make knitted mittens more interesting :
- belt loops;
- buttons;
- border;
- fringe;
- beads or rhinestones;
- applications.
All this can be added after the main part is knitted.
Mittens can be winter, autumn and even summer, everyday or festive. It’s quite easy to make such an accessory with your own hands, choosing the style and material to suit any look.
Originally posted 2018-08-29 10:54:25.
Source
What forms can there be?
Shapes of the upper part of the mittens - mittens:
- triangle
- trapezoid
- semicircle or elongated semi-oval.
When choosing elastic bands, beginners choose a regular elastic band; more advanced knitters can knit it with braid.
Whether to knit mitts with fingers or not is a decision you make yourself. For beginner knitters, we recommend knitting 1 finger in a circle with the big one, and by analogy knitting the rest, if desired.
A slight difficulty arises with hiding the thread, because... you tie it at the beginning of each finger, and if the thread is thick, then it will be very noticeable.
Main varieties
- Pipe. It is actually a simple sleeve, without additional slots for fingers. Beginners are recommended to start knitting similar things with this type.
- Pipe with thumb slot. A separate thumb slot is added to the previous design. This significantly increases the reliability of the product, it fits better on the hand, but also complicates the knitting process.
- Trumpet with shortened thumb. Actually the same as the previous version, only the thumb is half closed, while in the previous version it is completely open.
- Fingerless gloves. The most popular option among young people, very comfortable and warm, ideal for virtually any style.
The choice of thread for knitting depends on the tasks that the product will need to perform. For example, in winter it is recommended to give preference to wool. In summer it is better to use cotton, it makes the skin feel best.
Do not forget that different types of yarn can be combined with each other, creating amazing color combinations.
Do you need an elastic band and how to knit it?
The elastic band will allow the mitt to fit more tightly to the hand and, thanks to stretching, it will be easier to remove and put on.
Learn more about each type, choose which one you like best.
English gum:
There are various options for knitting elastic, let's look at the simplest one.
- We take measurements and cast on the 1st loop, as well as a number of chain loops equal to the desired width of the elastic band.
- Knitting all elastic loops with single crochets over the front half of the loop. So we knit in one direction until the end of the row and turn and knit in the second.
- We repeat until the elastic band reaches the desired length, equal to the circumference of the arm, and try to make sure that the entire arm fits into the resulting ring before sewing.
- If your hand does not fit through, tie it enough so that your entire hand, including your thumb, fits through. If you knit tightly, the elastic will not stretch well, but the mitts will be warmer; if you knit loosely, the elastic will be looser and will stretch easily.
- Upon reaching the end of the row of the required length, fold the beginning and end and knit with connecting stitches or single crochets in 2 loops through 2 parts.